GCP Full Access Deployment Guide
Overview
About Google Cloud Platform (GCP)
Google Cloud Platform is a cloud computing service that offers hosting on the same supporting infrastructure Google uses internally for end-user products such as Google Search and YouTube. Google Cloud Platform provides developer products to build a range of programs from simple websites to complex applications.
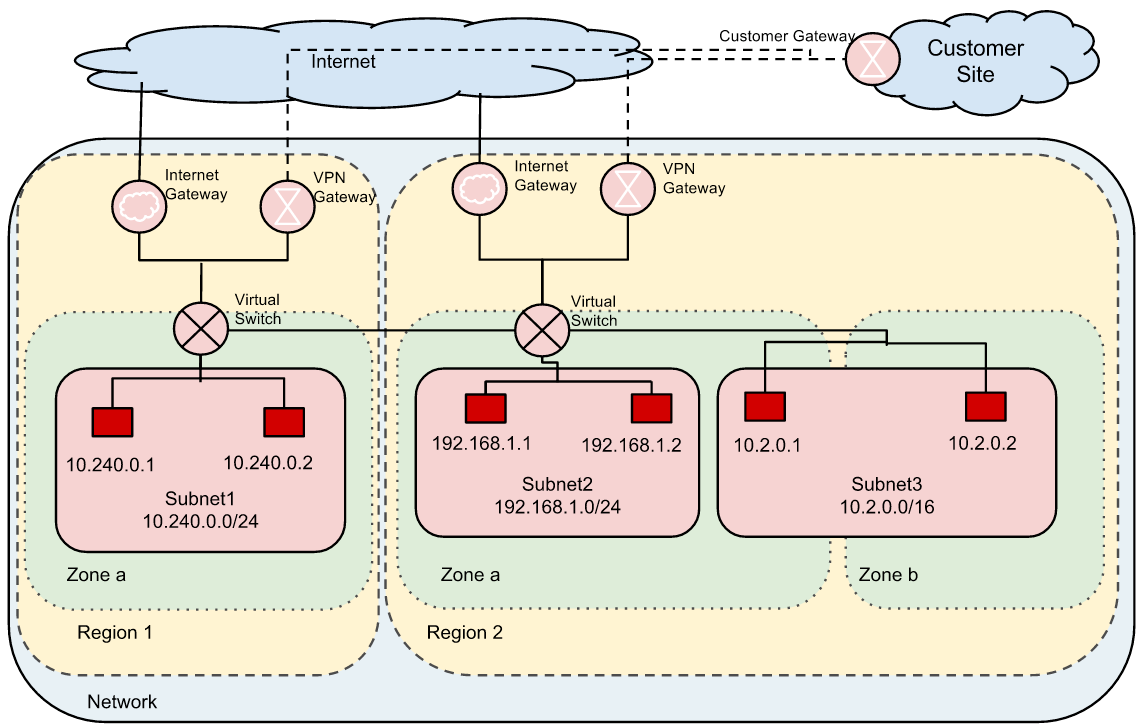
Google Cloud Platform is a part of a suite of enterprise services from Google Cloud and provides a set of modular cloud-based services with a host of development tools, including hosting and computing, cloud storage, data storage, translation APIs and prediction APIs. A sample deployment case would look as below:
Note: Starting with Avi Vantage version 20.1.3, GCP IPAM on GCP is not supported.
About Avi Vantage
The Avi Vantage platform provides enterprise-grade distributed ADC solutions for on-premises as well as public-cloud infrastructure. Avi Vantage also provides built-in analytics to diagnose and improve the end-user application experience, while making operationalizing easier for network administrators.
Avi Vantage is a complete software solution which runs on commodity x86 servers or as a virtual machine (VM) and is entirely accessible via REST API calls.
Note: Avi Vantage supports cloud operations with non-admin tenant.
GCP Full Access
Prior to Avi Vantage release 18.2.3, the inherent capability of the GCP cloud was to deploy a cloud on a cluster of Linux server hosts. Click here to know more.
Starting with Avi Vantage release 18.2.5, full automation on the GCP cloud is available. Just create a virtual service and the service engines get automatically spun up in GCP.
Deployment Topology
GCP Project Selection
The first step to provision Avi Vantage on Google Cloud is to decide on the GCP project(s) where the Controller and SEs will be created.
In this guide, the following projects will be referred to as the configuration of the Avi GCP cloud is illustrated.
- Controller Project
- The Controller project will be used to create the Avi Controller.
- This project is required only if the Avi Controller is in GCP.
- The Controller project will be used to create the Avi Controller.
- Service Engine Project
The service engines exist in this project. The following resources are created in this project:
- The service engine image
- The service engine VMs
- The network load balancer, if the public Virtual IP (VIP) is configured
- The service engine image
- Network Project
The network project is where the GCP Virtual Private Cloud (VPC) exists and is used to
- Allocate IP for management and data NICs of the service engine virtual machines(VM)
- Create routes for VIP
- Create firewall rules
- Allocate IP for management and data NICs of the service engine virtual machines(VM)
- Storage Project
- This project is required to create Google Cloud Storage (GCS) Buckets and Objects.
- The service engine image will be uploaded to the buckets in this project.
- Once the image is created in GCP, the buckets will be deleted.
Note: All the aforementioned projects can be in the same GCP project or they can be in different projects depending on the deployment topology.
Authentication
Avi Vantage needs a GCP service account to authenticate and authorize access to GCP APIs. The service account can be created in any GCP Project.
To create a service account,
- From the Google Cloud Console, select the required project.
- Navigate to IAM & admin > Service Accounts.
- From the Create Service Accounts screen, click on +Create Service Account and enter the details as shown below:
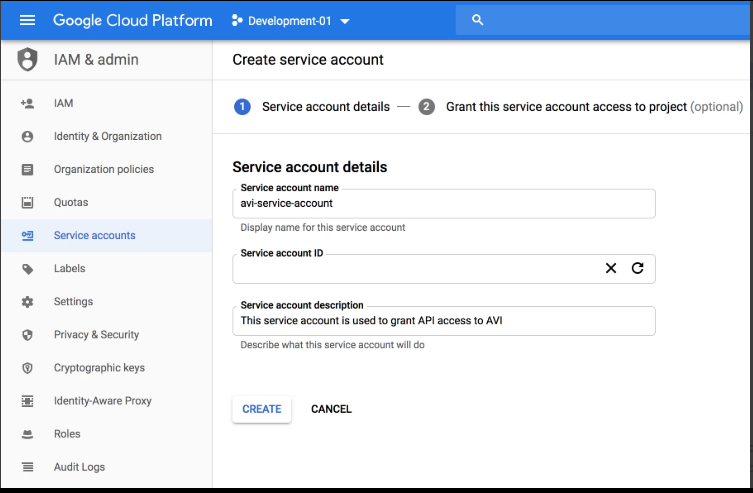
Creating Service Account in the GCP Console
- The service account details can be provided to the Avi Controller using either one of the following ways:
a) Providing just the service account email ID.
Notes:
- In this case, the service account has to be attached to the Avi Controller VM in GCP. This is done while creating the Avi Controller.
- This option works only when the Avi Controller VM is running inside GCP.
b) The service account JSON key is added to the Avi cloud.
Notes:- This option can be used irrespective of where the Avi Controller is running (inside GCP or outside).
- The service account JSON key has to be specified in Avi Vantage while creating GCP Cloud in the Avi Controller.
Click here to know how to create the JSON key.
To create the JSON key,- Navigate to IAM & admin > Service Accounts.
- Click on the service account that was created in Step a.
- Click on the edit icon.
- Click on the Create Key.
- Click on JSON as the Key type to download the private key.

Creating Private Key in the GCP Console
- Click on Create.
The private key is created and downloaded to your computer. -
The same service account has to be added in all the GCP projects as mentioned in GCP Project Selection.
Add this service account as a member with the required GCP Role in the required project. For instance, add this service account as a member in the network project and grant it the Avi Network Role. Refer to GCP Full Access Roles and Permissions to know how to create roles with the required permissions in projects as per the deployment topology.
Avi Controller Installation
This section lists all the steps required to setup the Avi Controller VM in GCP.
Creating the Avi Controller Image
To create the Avi Controller image,
- Download the Avi Controller image for GCP from the Avi Networks customer portal.
- Follow the steps below to create a new bucket in the GCP storage project for SE images to be uploaded.
To re-use an existing bucket, skip the steps below and proceed to step 3
Note: This bucket will be deleted when the Avi Controller image is successfully created in the Google Compute Engine.Click here to know more about creating a bucket in GCS.
- From the GCP Console, navigate to Storage > Browser.
- Click on Create Bucket.
- Specify the name of the bucket.
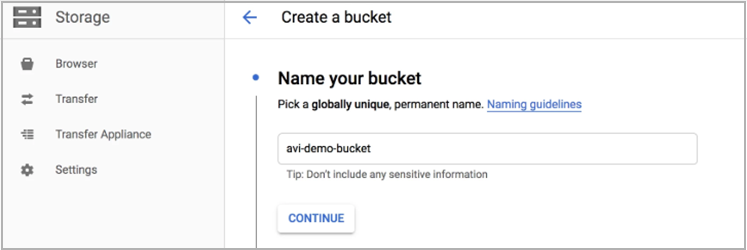
Creating a Bucket in GCS
- Click on Choose where to store your data.
- Under Location Type select Region.
- Select the Location where the Avi Controller VM has to be created.
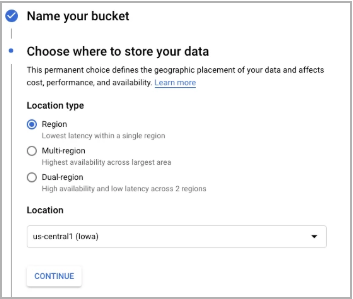
Creating a Bucket in GCS
- Click on Create.
- Upload the Controller image gcp_controller.tar.gz into the Google Cloud Storage (GCS) bucket created. This will become the source for the Avi Controller Google Compute Engine image.
This can be done via the GCP Console or via the CLI.
- Click here to know how to upload the image via the GCP Console.
- From the GCP console, navigate to Storage > Browser.
- Select the bucket created in GCS.
- Click on Upload files and select the gcp_controller.tar.gz file to upload it to this bucket.

Uploading gcp_controller.tar.gz to the GCS Bucket
The uploaded gcp_controller.tar.gz file is as shown below:
Uploading gcp_controller.tar.gz to the GCS Bucket
- Click here to know how to upload the image via the GCP CLI.
- Download and install the gsutil tool.
- Upload the gcp_controller.tar.gz to the bucket using the commands shown below:
$ gsutil cp gcp_controller.tar.gz gs://avi-demo-bucket Copying file://gcp_controller.tar.gz [Content-Type=application/x-tar]... - [1 files][ 2.7 GiB/ 2.7 GiB] 29.3 MiB/s Operation completed over 1 objects/2.7 GiB. - Verify the MD5 hash of the file uploaded in the bucket with the gcp_controller.tar.gz.md5 file available in the Avi Networks customer portal as shown below:
            $ cat gcp_controller.tar.gz.md5
            5c4a4f35eea1a0bd97409fbfe6d90188
            $ gsutil hash -mh gs://avi-demo-bucket/gcp_controller.tar.gz
            Hashes [hex] for gcp_controller.tar.gz:
                Hash (md5): <value>
- Create the image in the Google Compute Engine using the image uploaded in the bucket.
a. Create the image in any GCP project where the Avi controller will be installed or in any other project that can share images with the Controller Project..
This can be done via the GCP console or using the gcloud tool.- Click here for the steps to create the image via the GCP Console.
- From the GCP Console, navigate to Compute Engine > Images.
- Click on Create Image.
- Enter the Name.
- Select Cloud Storage File as the Source.
- Select the gcp_controller.tar.gz file in the Bucket which was uploaded.
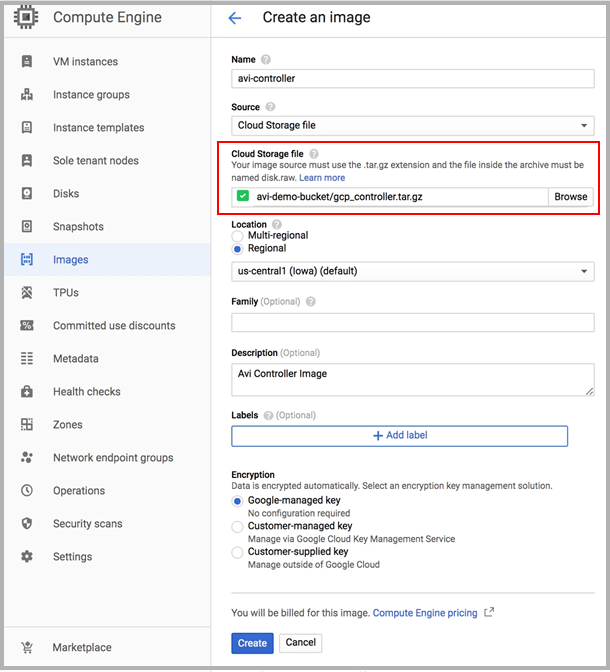
Creating the Image in the Controller Project via the GCP Console
- Click on Create
- Click here to see how to create the image using the gcloud tool.
  $ gcloud compute images create avi-controller --project=controller-project --description="Avi Controller Image" --source-uri=https://storage.googleapis.com/avi-demo-bucket/gcp_controller.tar.gz
  Created [https://www.googleapis.com/compute/v1/projects/controller-project/global/images/avi-controller].
  NAME            PROJECT                 FAMILY  DEPRECATED  STATUS
  avi-controller  controller-project                      READY
b. Delete the object and bucket that were created in GCS since they are no longer required.
Creating the Avi Controller Virtual Machine
The minimum configuration required for the Avi Controller VM is as below:
| Memory | 24 GB |
| vCPUs | 8 |
| Disk | 128 GB |
The recommended minimum GCP machine-type is n1-standard-8 (8 vCPUs, 30GB Memory).
Note: The machine-type depends on the Avi Controller scale requirement.
For more information, refer to Avi Controller Sizing.
For more information on creating a cluster, refer to Controller Cluster IP in GCP.
Creating Controller VM from GCP Console
- From the GCP Console, navigate to Compute Engine > VM instances.
- Click on Create Instance.
- Enter the Name.
- Select the Region and Zone where the VM has to be created.
- Select the Machine type. This depends on the scale required. A minimum of n1-standard-8 is recommended.

Creating a VM Instance in GCP
- Under Boot disk click on Change to configure the boot disk details.
- Click on the Custom Images tab and select the image that was created in the section Creating the Avi Controller Image.
- Select SSD persistent disk as the Boot disk type with a minimum of 128 GB disk space.
The Boot Disk screen is as shown below:
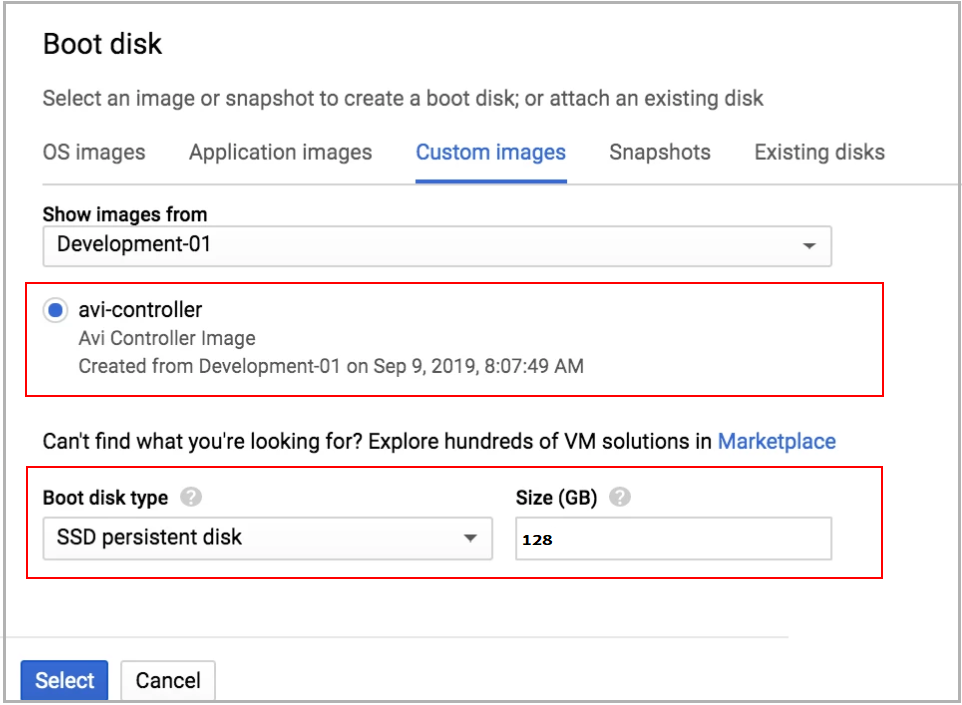
Configuring the Boot Disk in GCP
- Click on Select to save the configuration.
- Under Identity and API Access, select a service account to be attached to the VM, using which the Avi Controller authenticates GCP for API access.
Note: If you don’t want to add the service account to the VM then service account’s JSON key can be added to the Avi Cloud later. Refer to Authentication.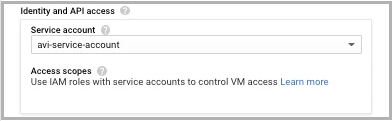
Attaching the Service Account Project
- Add the GCP Firewall target tags created to allow traffic from Avi service engine to the Avi Controller and the clients accessing the Avi Controller.
- Click on the Networking tab.
- Click on Network Interfaces and select the VPC network and subnet in which the Controller should be created.
Note: The VPC can be in another Project and is shared with this Controller project.
Configuring the VPC Network
- Click on Create.
The Controller VM will be up in a few minutes as shown below:

Creating a VM Instance in GCP
Configuring Avi Vantage
Once the Avi Controller is up and running, open Avi Vantage from the browser.
- Configure the admin details as shown below:
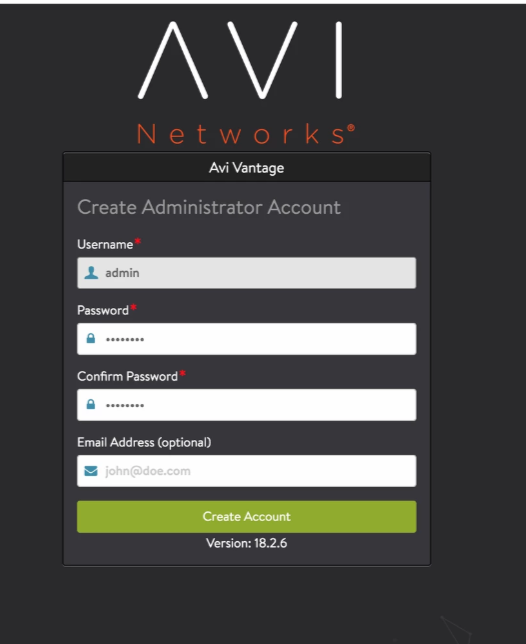
Creating Admin Account in Avi Vantage
- Configure DNS and NTP settings as shown below. This can be edited later, if required.
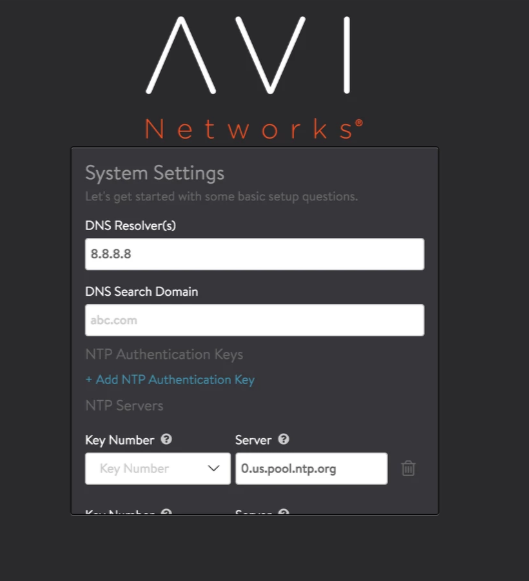
Configuring DNS and NTP Settings in Avi Vantage
- Enter the email address to be used for alerts from the controller. This can be set up later.
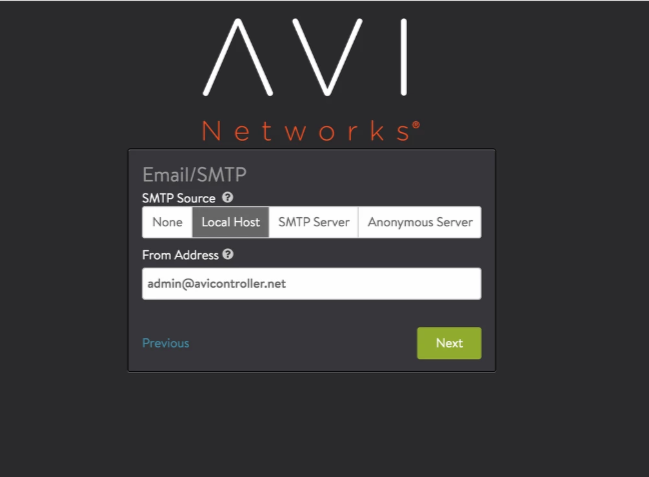
Configuring Email/SMTP in Avi Vantage
- Select No Orchestrator.

Selecting the Cloud Orchestrator in Avi Vantage
- Select No for Support multiple Tenants. Multi-tenancy can be enabled later, if required.
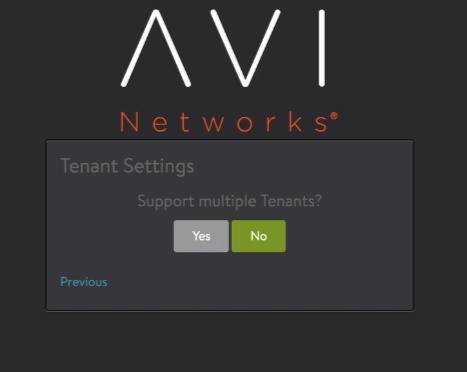
Configuring Multi-tenancy in Avi Vantage
With this, the setup is completed.

Completing the Setup
Configuring GCP Cloud in the Avi Controller
In this section, Avi cloud of type Google Cloud Platform will be created. It will spawn the service engines in the configured GCP Project, zone and VPC. Service engines will start load balancing the workloads in GCP.
To create the Avi Cloud of type GCP,
- Log in to the Avi Controller by entering your Username and Password.
- From the Avi UI, navigate to Infrastructure > Clouds.
- Click on Create to add new cloud.
-
Under Step 1: Select Cloud, complete the following steps:
i. Enter a Name for the cloud.
ii. Select Google Cloud Platform as the Type.
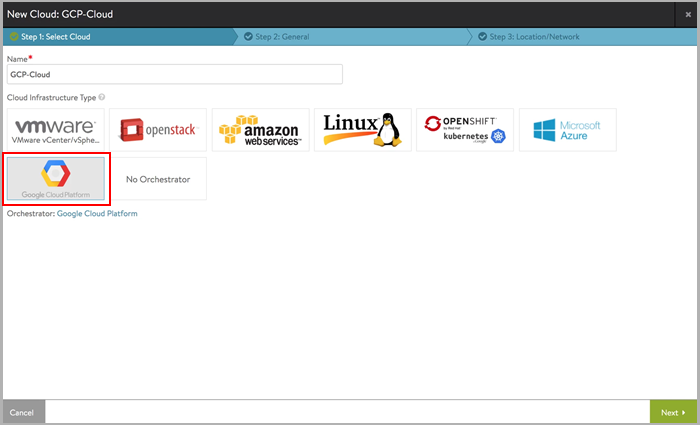
iii. Click on Next. - Under the tab Step 2: General in the New Cloud: screen, enter information related to the GCP service engine project, service account and IPAM configuration for allocation of VIPs.
Click here to know how to create an IPAM provider which will be required to allocate VIP from the Avi internal network.
i. Click on the IPAM Provider field and click on Create IPAM/DNS Profile.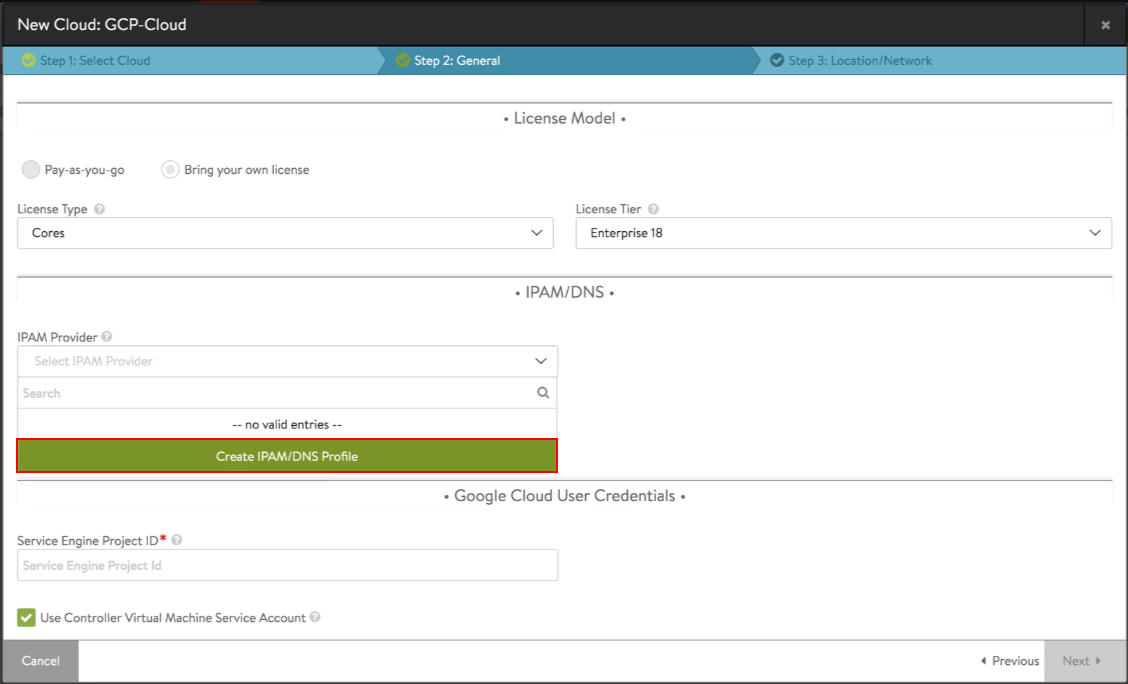
Creating GCP Cloud in Avi Vantage
ii. Enter the Name and select the Type as Avi Vantage IPAM as shown below: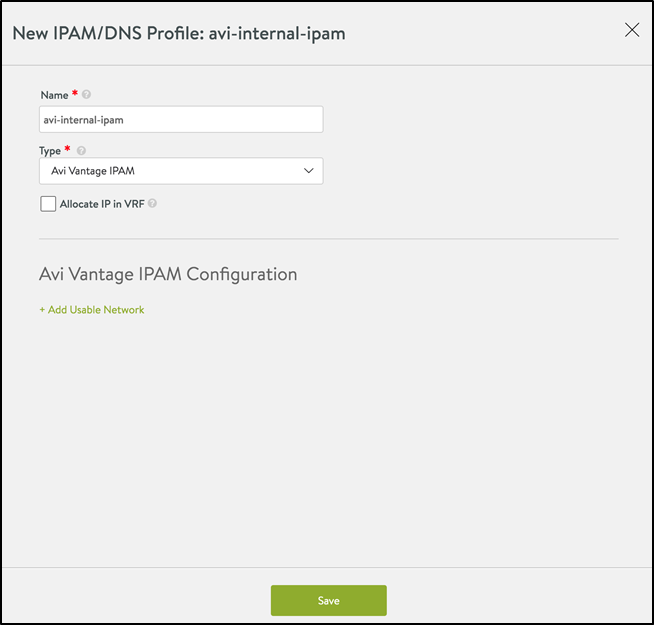
Creating IPAM in Avi Vantage
iii. Click on Save. - Enter the Service Engine Project ID. This is the GCP project ID where the service engines will be created.
- Configure GCP API Access.
Click here to know how to configure GCP API access.
Avi Vantage needs a GCP service account to authenticate access to GCP APIs.
To configure GCP API access,- If the Controller is running in GCP and a service account is attached to the Avi Controller VM, then select the option Use Controller Virtual Machine Service Account as shown below:
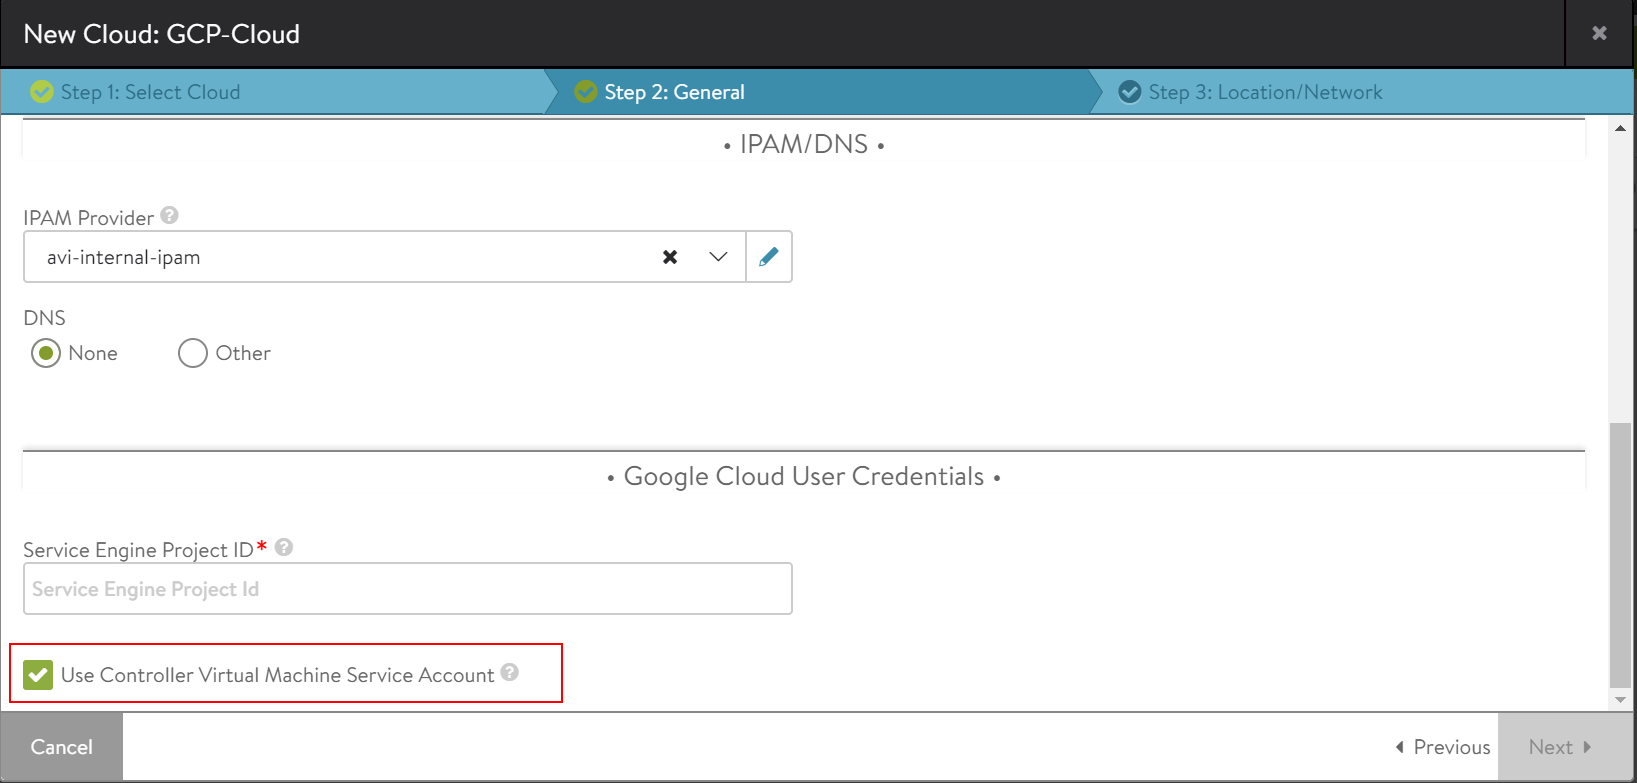
Configuring GCP API Access
- If the Controller is outside GCP (in some other public/private cloud) or there is no GCP service account attached to the Avi Controller VM, then add a user with GCP service account JSON key in Avi Vantage as shown below:
- Click on the Google Cloud Credentials field.
- If the credential object is already created, select it. Else click on Create Credentials.
- Enter the User name and the service account JSON Key which was downloaded (shown in the Authentication section).
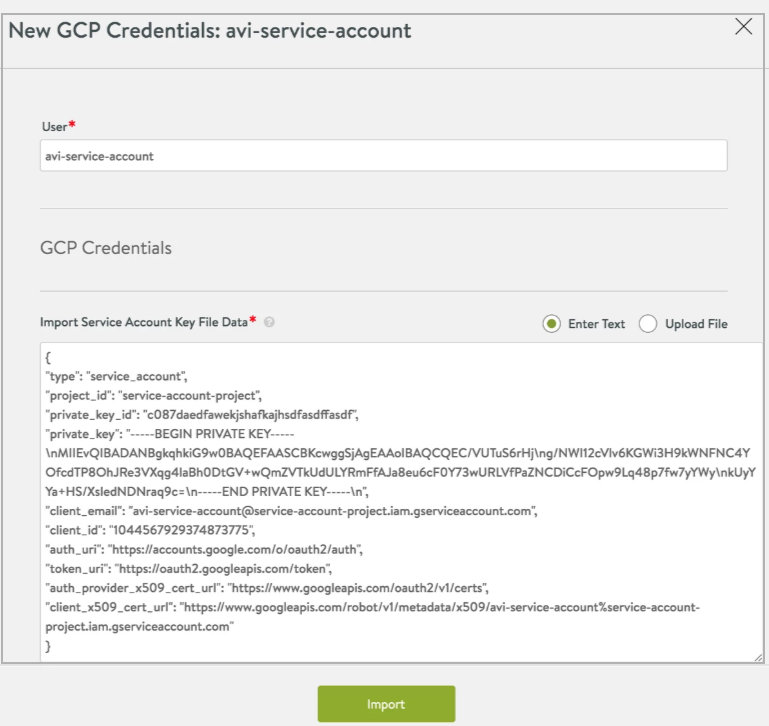
Configuring GCP API access
- Click on Import.
The New Cloud: screen is as shown below:

Completing Step 2: General
- If the Controller is running in GCP and a service account is attached to the Avi Controller VM, then select the option Use Controller Virtual Machine Service Account as shown below:
-
Click on Next.
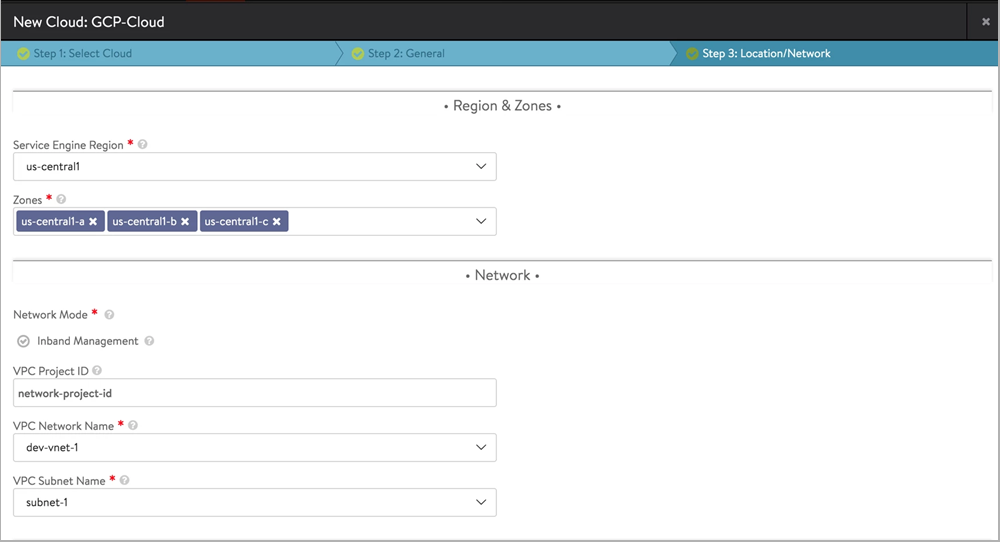
- Under the tab Step 3: Location/Network, configure the region and zones where service engines must be deployed. Configure the service engine image and the network settings as shown below:
- Select the GCP Service Engine Region where the service engines will be deployed.
- Select the Zones in the selected region. The service engines will be distributed among the selected zones. Note: It is recommended to have more than one zone for service engine high availability.
- Enter the GCP project ID where the VPC is present, in the field VPC Project ID. By default, the service engine Project ID is used.
- Select the VPC network in the network project.
- Select the subnet (from which management IP of service engines will be allocated) in the VPC network.
Configuring Location/Network
- Firewall Target Tags will be applied on the service engine VMs to allow the ingress and egress traffic to the Avi Controller, other service engines and virtual services.
The firewall tags need to be created in the VPC in the network project.
To know more, refer to GCP Firewall Rules.
- Enter the Cloud Storage Project ID in which Avi Vantage will create the bucket to upload the Avi service engine image in GCP. Note: By default, the service engine Project ID is used.
- Enter the Cloud Storage Bucket Name.
Notes:- Cloud Storage Bucket Name is required only in cases where the service account does not have the permissions to create a bucket in the Google Storage Project.
- If the service account has permissions to create the bucket in the Google storage project as described in the Authentication section, then Avi Vantage will create the bucket while creating the Avi service engine image in GCP and will delete the bucket once the image is created.
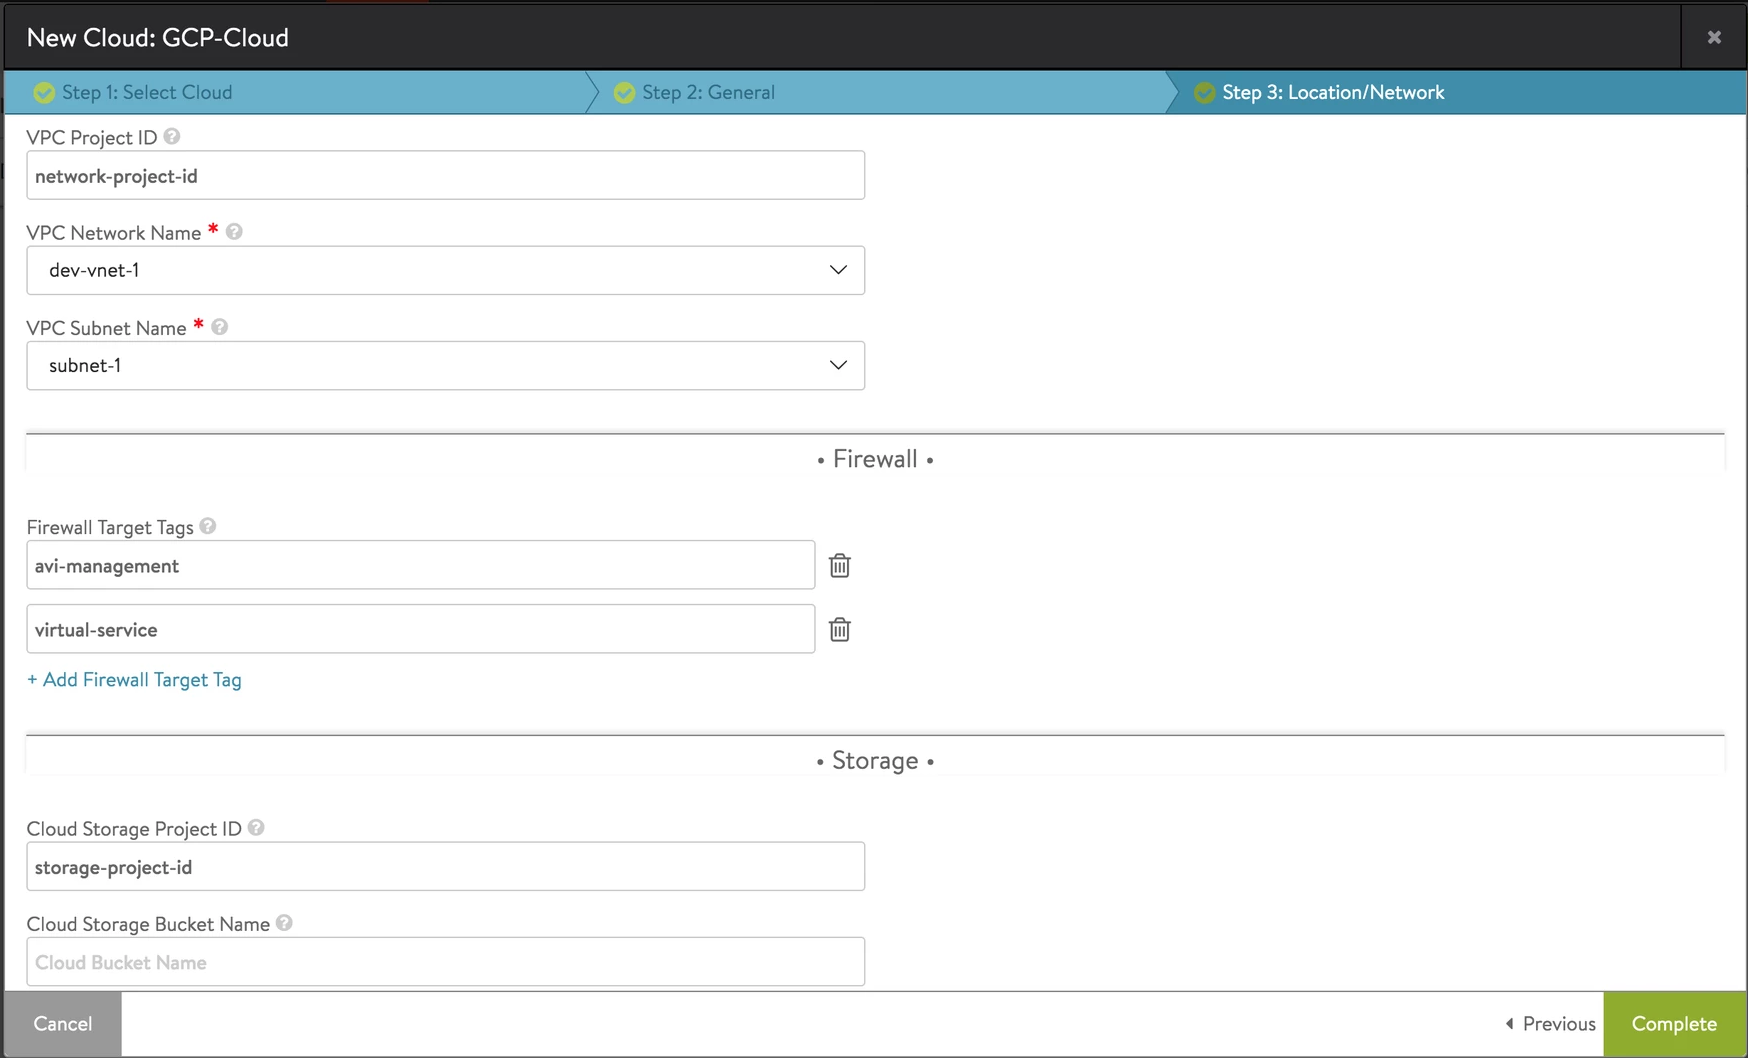
Completing Step 3: Location/Network
- Click on Complete.
The Avi Controller will then validate the configuration and will start creating the service engine image in the service engine project. After the image is successfully uploaded, the Avi cloud will be ready for virtual service creation.

Creating a GCP Cloud
Configuring Service Engine Group Properties
The GCP machine type can be configured via service engine group properties, from which the service engine virtual machines will be created in GCP. If the instance flavor in a service engine group is not defined then service engine virtual machines are created with the memory and vCPU’s defined in the service engine group.
To configure GCP machine type,
- From the Avi UI, navigate to Infrastructure > Service Engine Group.
- Select the GCP Cloud.
- By default a service engine group with name Default-Group is created for the cloud. Either edit this or create a new service engine group.

Creating Service Engine Group
- Select the GCP machine type in the Instance Flavor field as shown below:
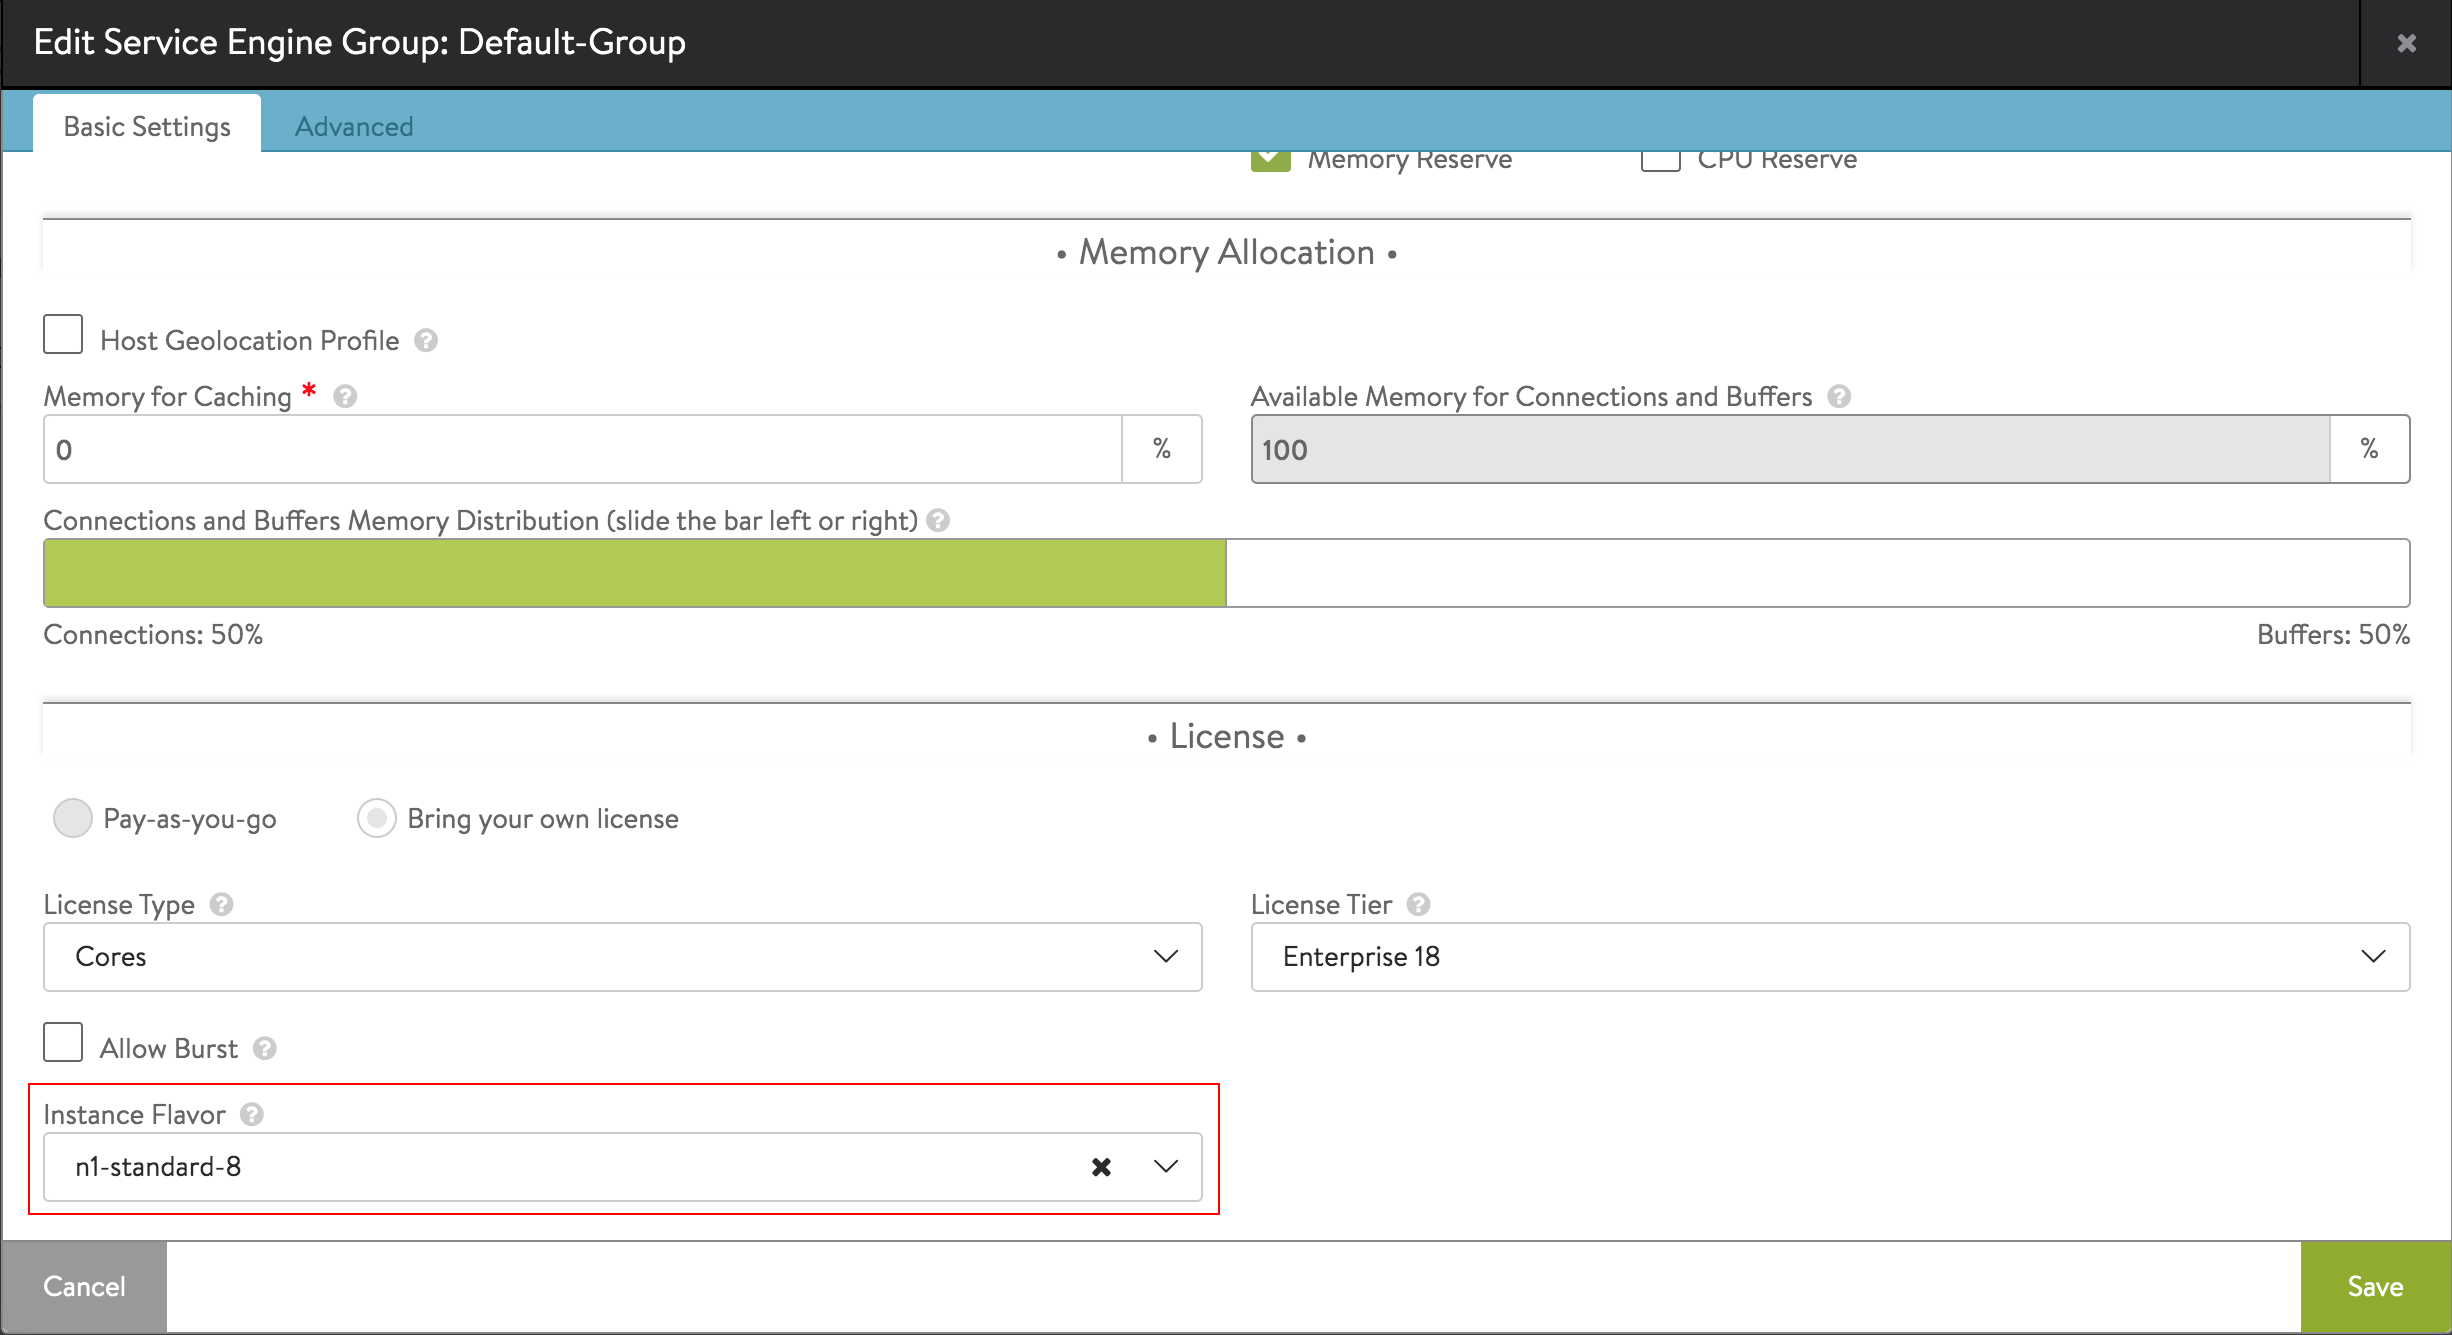
Selecting Instance Flavour
- Click on Save.
High Availability Options
The following high availability modes are available for the GCP cloud:
- Legacy HA Active/Standby mode
- Elastic HA N+M mode
- Elastic HA Active/Active mode
To know more about the modes, refer to the Service Engine Group article.
Avi Network and Internal IPAM Configuration
The VIP of a virtual service can either be a static IP which the user manages, or it can be allocated from the Avi internal IPAM.
Note: The subnet from which the VIP is allocated from, should not overlap with the existing subnets in GCP.
If the VIPs for a virtual service need to be managed by Avi Vantage, then the Avi virtual network needs to be created and then added to the Avi IPAM created.
Creating a Network
- From the Avi UI, navigate to Infrastructure > Networks.
- Select the cloud for which the network must be created as show below:

Selecting the GCP Cloud in Avi Vantage
- Click on Create.
- Enter the Name for the network.
- Click on the Add Subnet button.
- Enter the subnet range for the VIPs. Note: The subnets should not overlap with any of the existing subnets in the VPC.
- Select the Add Static IP Address Pool. VIPs will be allocated from this pool.

Configuring Network Settings
- Click on Save.
Updating Avi Internal IPAM with VIP Networks
Update the internal IPAM which was created while creating the cloud with the VIP Network created.
- From the Avi UI, navigate to Infrastructure > Clouds.
- Select the GCP cloud and click on the edit icon.
- Click on the edit icon for IPAM Provider as shown below:
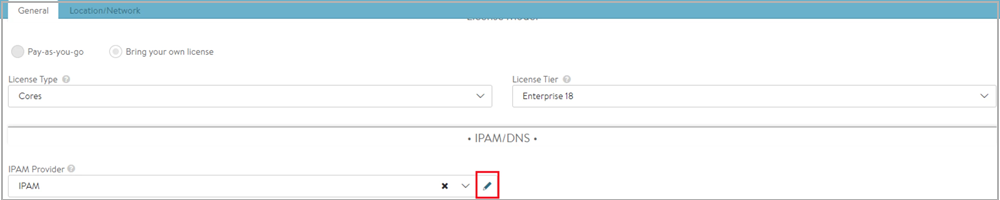
Editing the IPAM Provider in Avi Vantage
- Click on Add Usable Network.
- Add the network that was created.
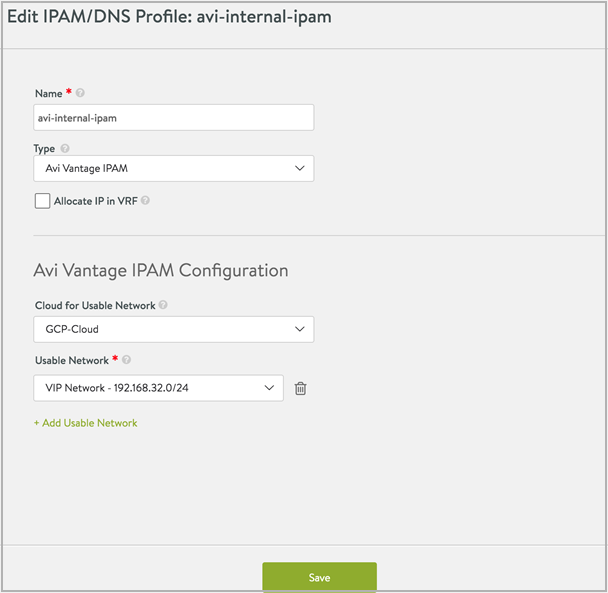
Configuring Usable Network
- Click on Save
- Click on Next in the Edit Cloud: screen and then click on Save to complete configuring usable networks.
Virtual Service Configuration
Prior to creating a virtual service, a pool with GCP Servers in it is required and the Avi service engines will load balance traffic among the servers in the pool.
Creating Server Pool
- From the Avi UI, navigate to Applications > Pools.
- Click on Create Pool.
- Select the GCP cloud.
- Enter the pool Name.
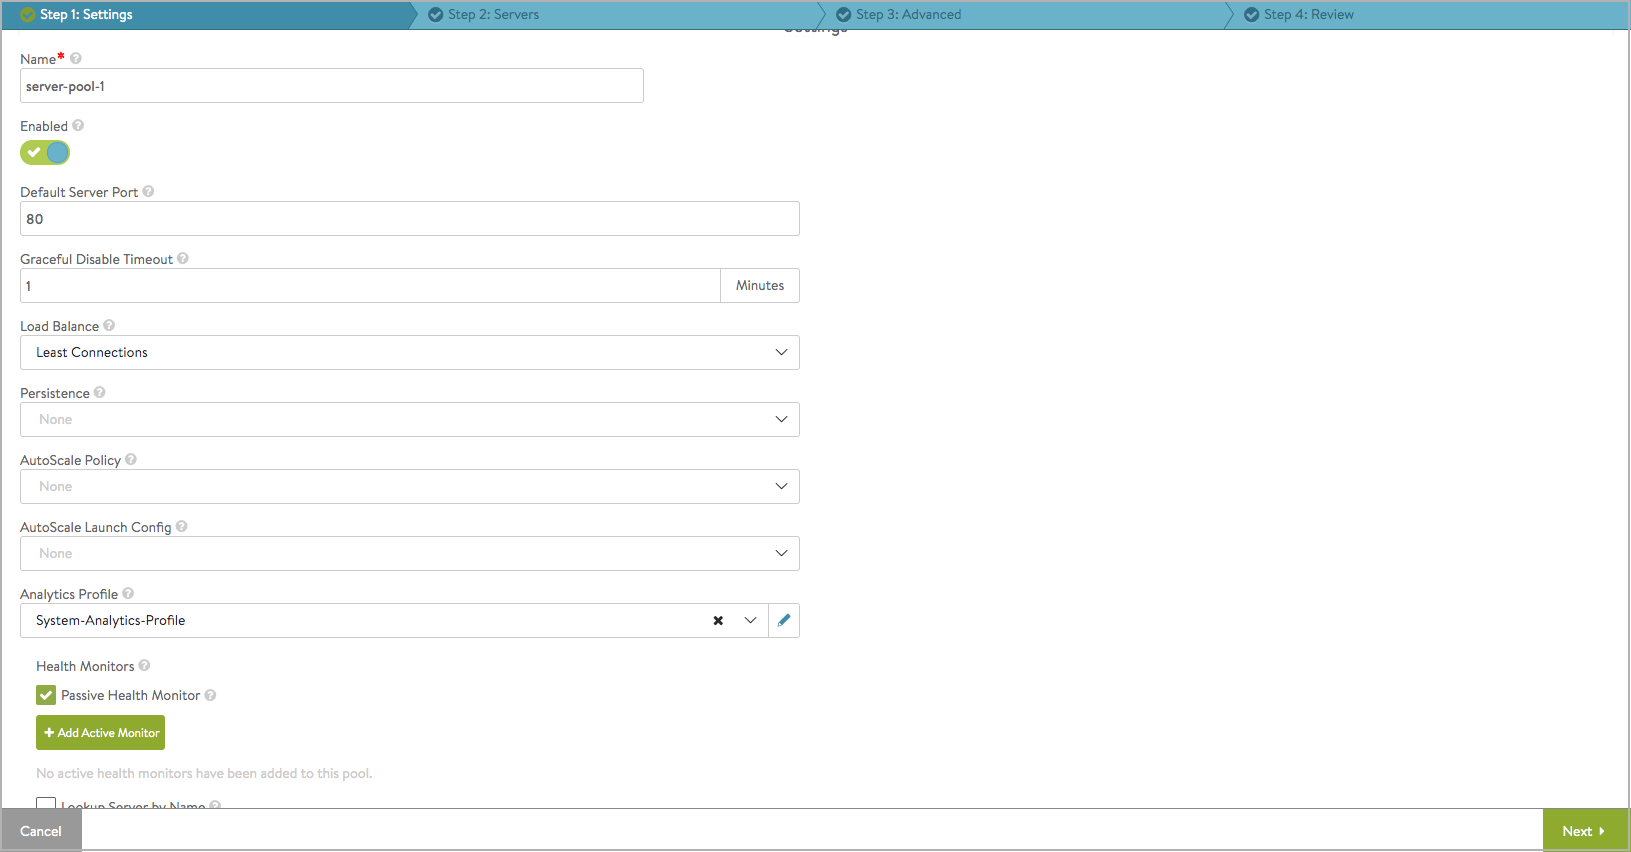
Creating a Server Pool in Avi Vantage
- Click on Next.
- Enter the Server IP Address (one or more application (back-end) servers in this pool). The servers can be in any GCP Project or VPC but should be reachable from the service engines.

Entering the Server IP Details
- Click on Next. Navigate to Step 4: Review.
- Click on Save.
Creating Virtual Service
To create the virtual service,
- Navigate to Applications > Virtual Services.
- Click on Create Virtual Services.
- Select Advanced Setup.
- Select the GCP cloud.
- Click on Next.
- Enter the Name.
- In the field Network for VIP Address Allocation, select the VIP that was created.
- If the virtual service needs to be accessible via the Internet, select the option Assign Floating IP for External Client Access. The Public IP will be allocated from GCP and the virtual service will be configured with that IP.
- Enter the service port under Services.
- Select the pool, which has the application servers, created here.
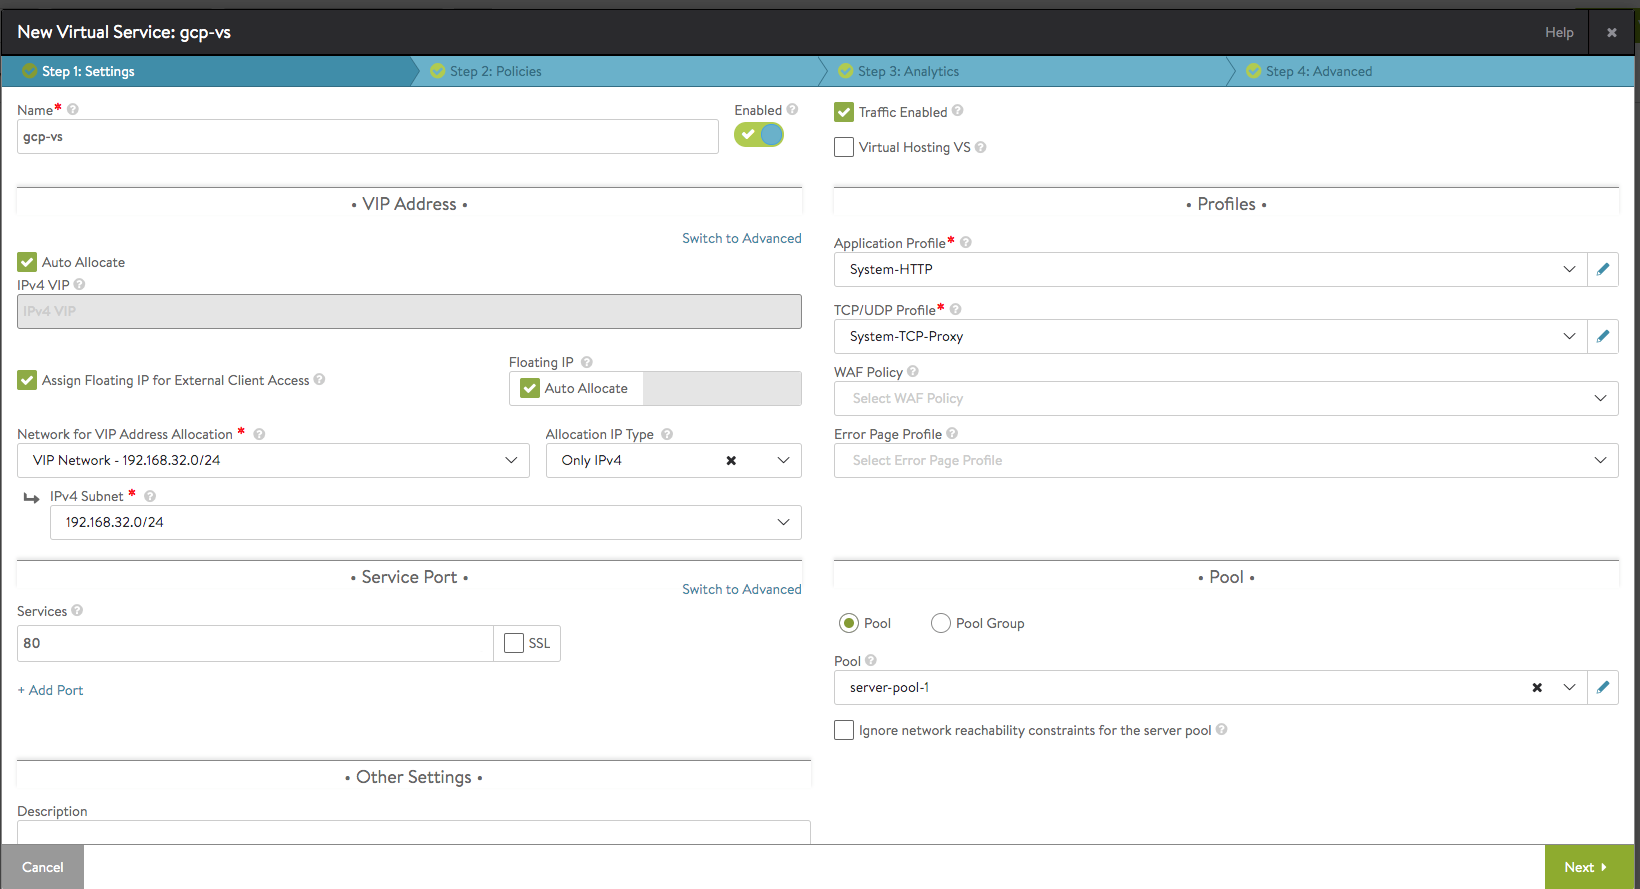
Creating a Virtual Service
- Click on Next in the New Virtual Service: screen and navigate to Step 4: Advanced.
- Clink on Save.
Wait for the virtual service status to turn green. On creation of the first virtual service for a cloud, the service engine VMs will be spawned and configured in GCP.
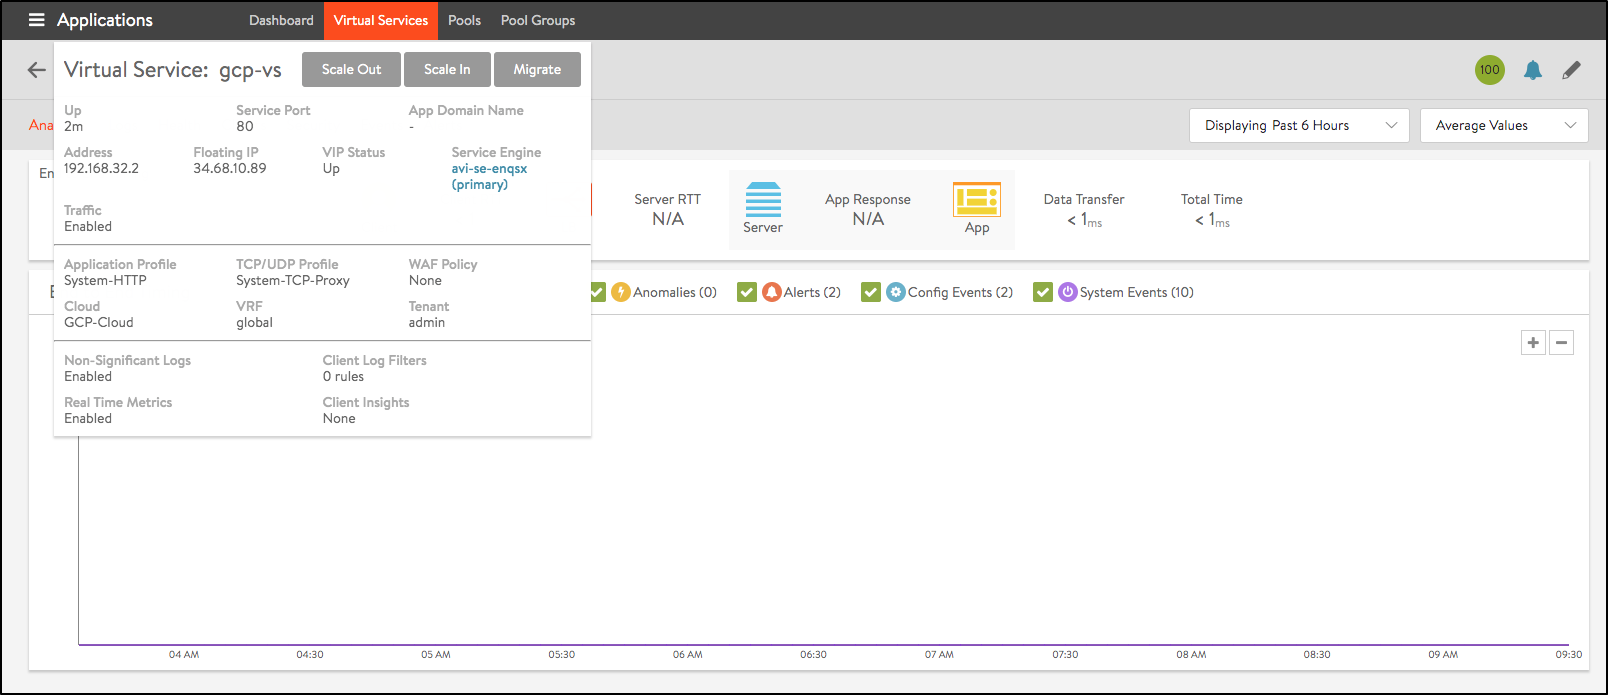
Creating a Virtual Service