Install Avi Kubernetes Operator
Overview
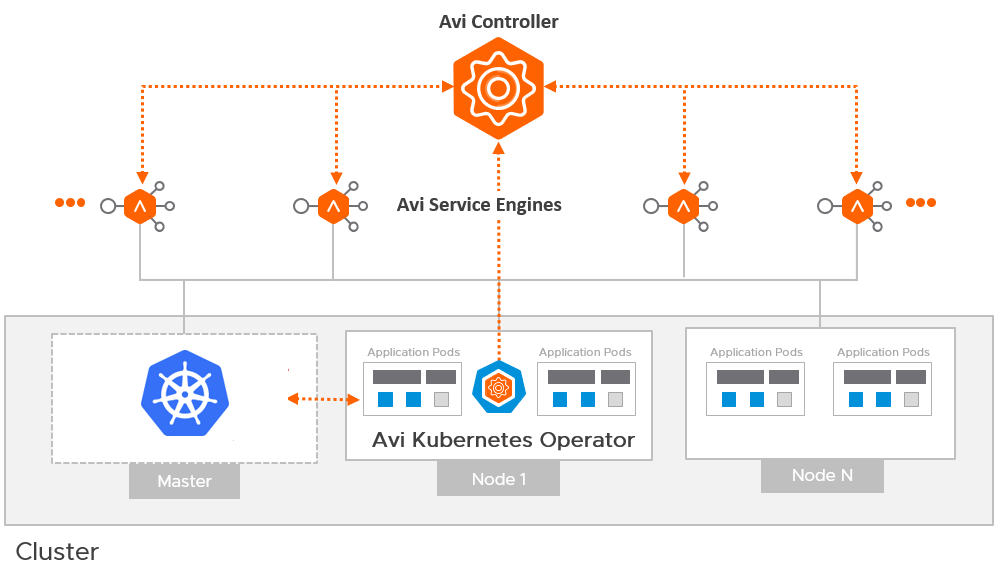
The Avi Kubernetes Operator (AKO) is an operator which works as an ingress Controller and performs Avi-specific functions in a Kubernetes/ OpenShift environment with the Avi Controller. It remains in sync with the necessary Kubernetes/ OpenShift objects and calls Avi Controller APIs to configure the virtual services.
The AKO deployment consists of the following components:
- The Avi Controller
- The Service Engines (SE)
- The Avi Kubernetes Operator (AKO)
An overview of the AKO deployment is as shown below:
Create a Cloud in Avi Vantage
The Avi infrastructure cloud will be used to place the virtual services that are created for the Kubernetes/ OpenShift application.
Note: Currently vCenter cloud (write access mode and no access mode) are supported, and the Avi Controller is deployed on the underlying infrastructure.
Refer to the Installing Avi Vantage for VMware vCenter to know more.
As a prerequisite to create the cloud, it is recommended to have IPAM and DNS profiles configured.
Configure IPAM and DNS Profile
Configure the IPAM profile and select the underlying network and the DNS profile which will be used for ingresses and external services.
To configure the IPAM Profile,
- Navigate to Templates > Profiles > IPAM/DNS.
-
Edit the IPAM profile as shown below:
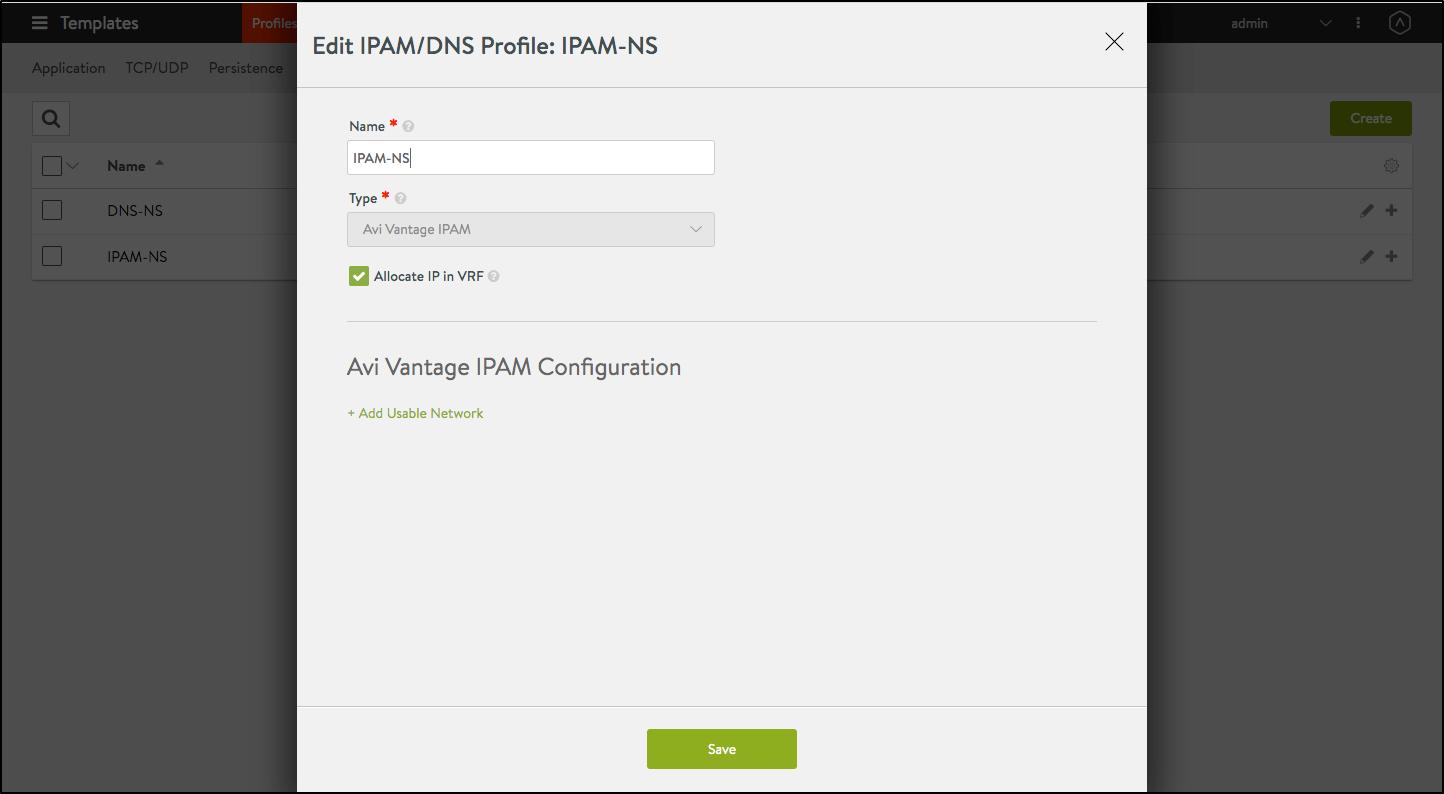
Note: Usable network for the virtual services created by the AKO instance must be provided using the fields
networkName|subnetIP|subnetPrefixfields during helm installation. - Click on Save.
To configure the DNS Profile,
- Navigate to Templates > Profiles > IPAM/DNS.
-
Configure the DNS profile with the Domain Name.

- Click on Save.
Configure the Cloud
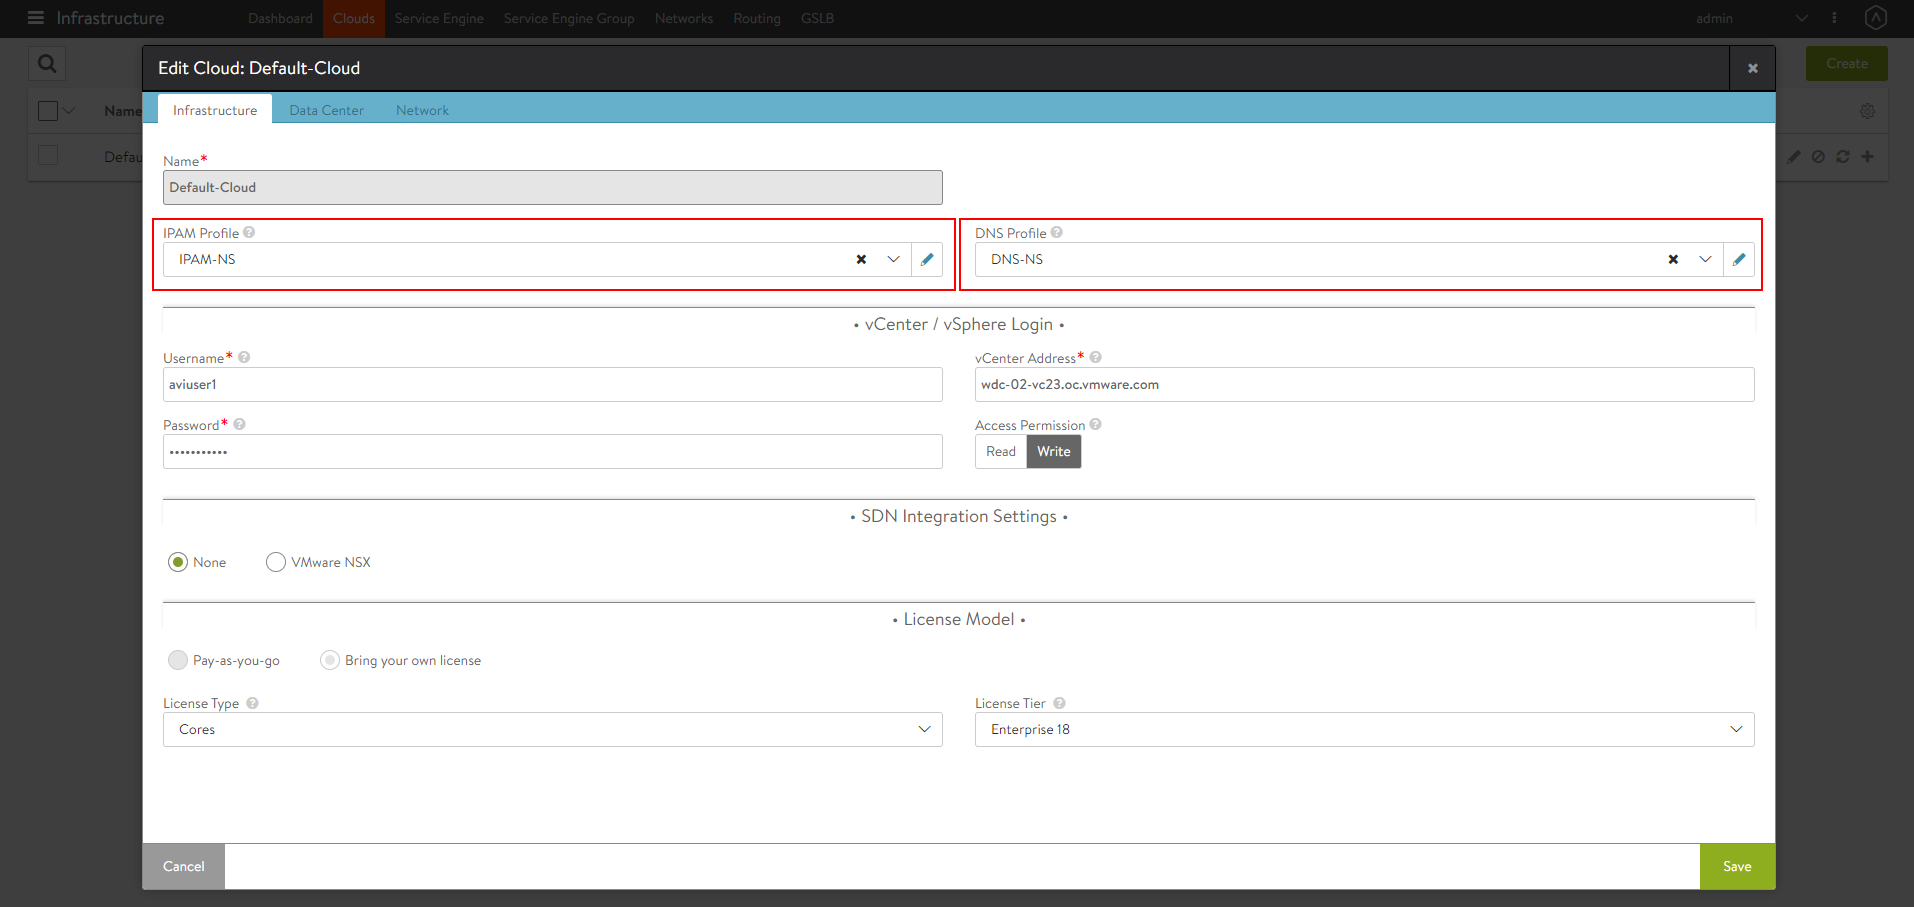
- Navigate to Infrastructure > Clouds.
- Select the vCenter cloud and click on the edit icon.
-
Under the Infrastructure tab, select the IPAM and DNS profiles created for the north-south apps as shown below:
-
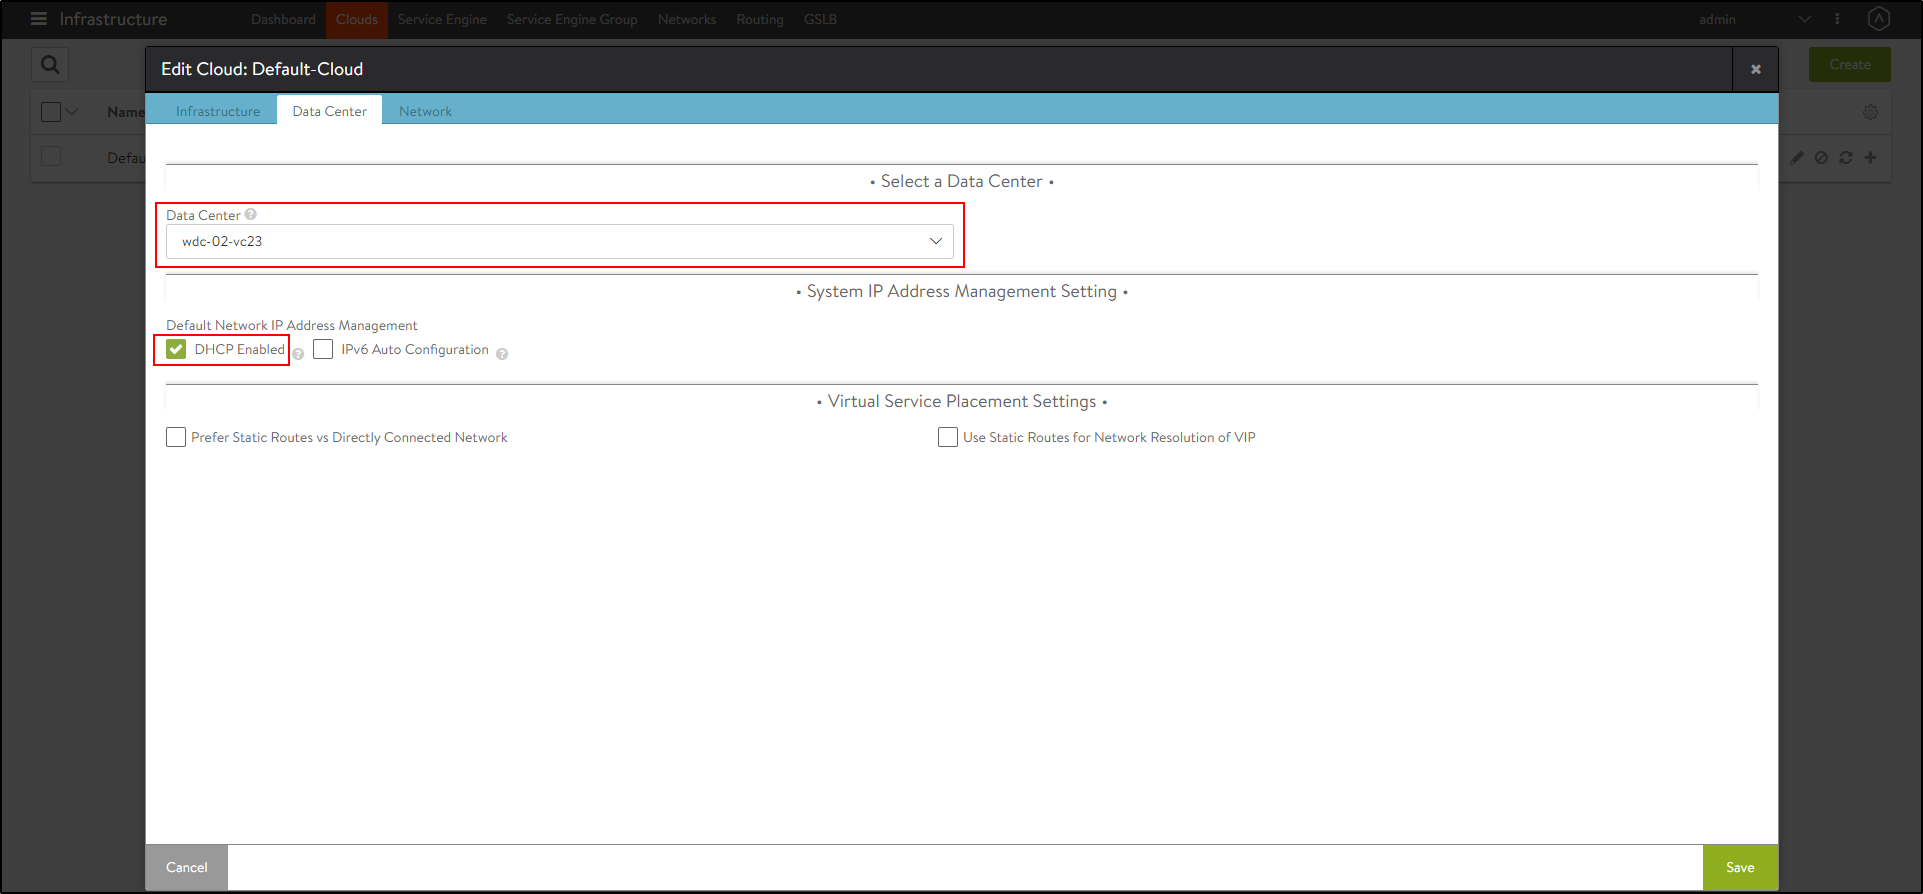
Under the Data Center tab, select the Data Center and enable DHCP as the IP address management scheme.
-
Under the Network tab, select the Management Network.
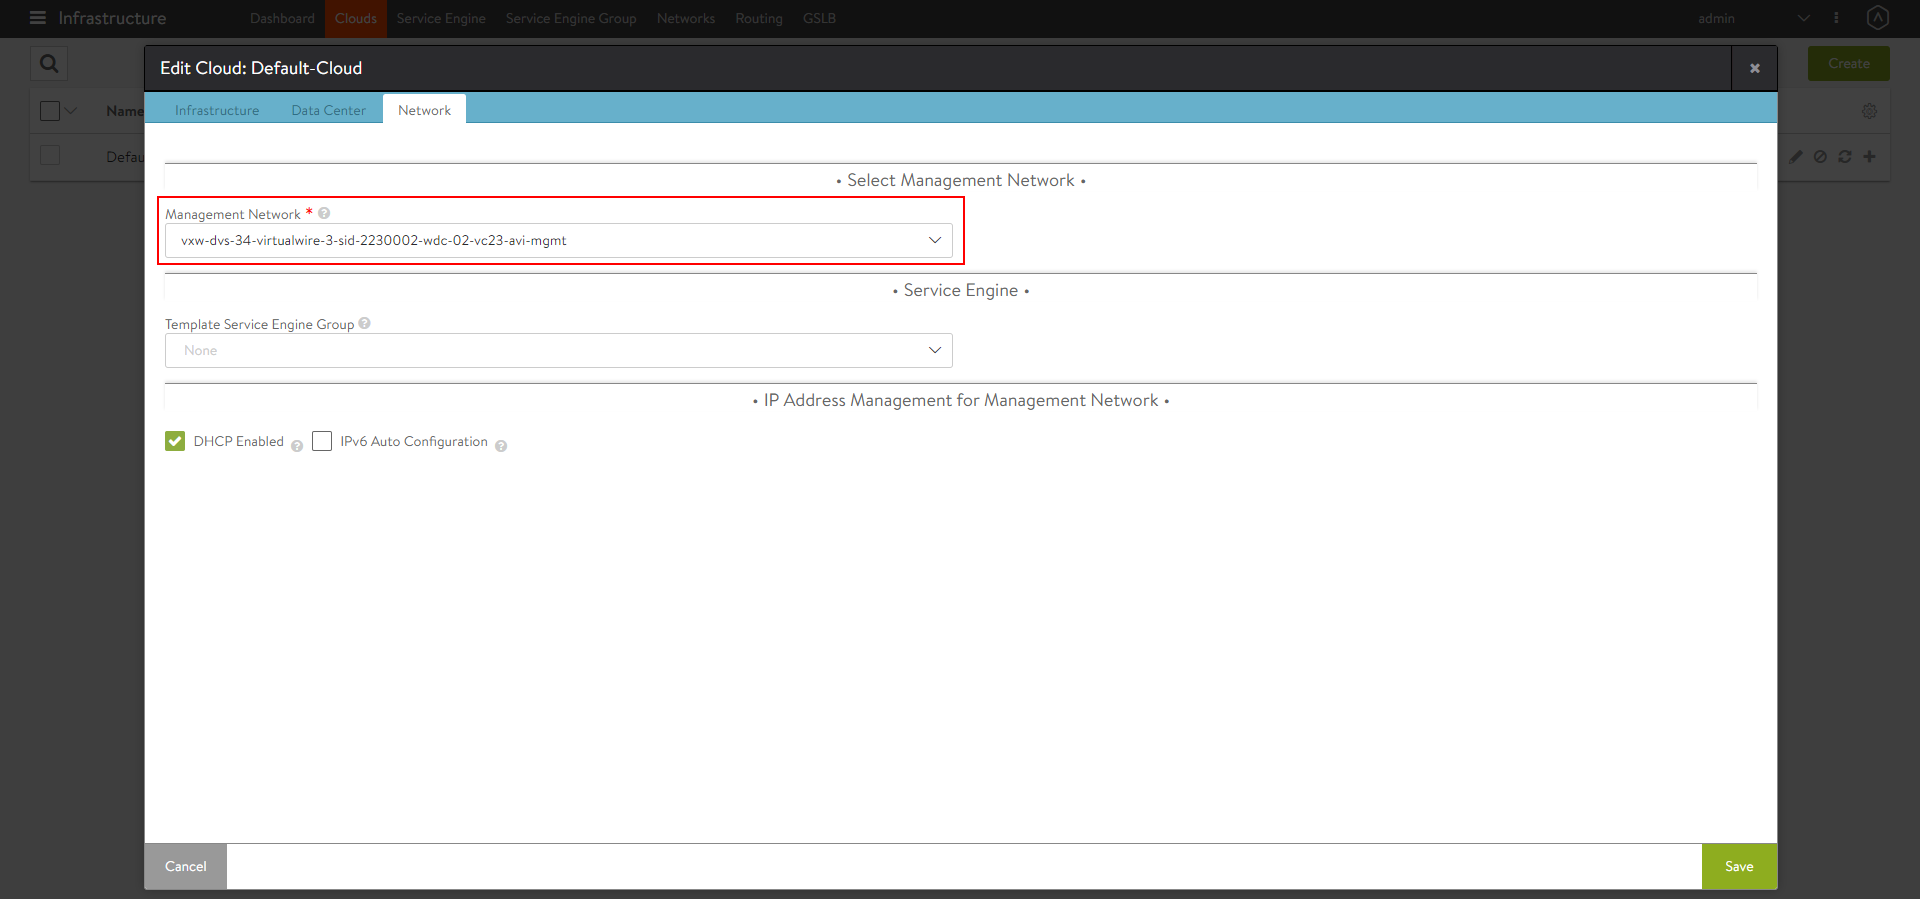
- Click on Save.
Configure SE Groups and Node Network List
SE Groups
Prior to AKO version 1.2.1, VRF contexts were created per cluster for route segregation. Starting with AKO version 1.2.1, AKO supports SE groups. Using SE groups, all the clusters can now share the same VRF. Each AKO instance mapped to a unique serviceEngineGroupName. This will be used to push the routes on the SE to reach the pods. Each cluster needs a dedicated SE group, which cannot be shared by any other cluster or workload.
Note If the label is already configured, ensure the cluster name matches with the value.
Pre-requisites
-
Ensure the Avi Controller is of version 18.2.10 or later.
-
Create SE groups per AKO cluster (out-of-band)
Node Network List
In a vCenter cloud, nodeNetworkList is a list of PG networks that OpenShift/Kubernetes nodes are a part of. Each node has a CIDR range allocated by Kubernetes. For each node network, the list of all CIDRs has to be mentioned in the nodeNetworkList.
For example, consider the Kubernetes nodes are a part of two PG networks - pg1-net and pg2-net.
There are two nodes which belong to pg1-net with CIDRs 10.1.1.0/24 and 10.1.2.0/24.
There are three nodes which belong to pg2-net with CIDRs 20.1.1.0/24, 20.1.2.0/24, and 20.1.3.0/24.
Then nodeNetworkList contains:
- pg1-net
- 10.1.1.0/24
- 10.1.2.0/24
- pg2-net
- 20.1.1.0/24
- 20.1.2.0/24
- 20.1.3.0/24
Note: The nodeNetworkList is only used in the ClusterIP deployment of AKO and in vCenter cloud and only when disableStaticRouteSync is set to False.
If two Kubernetes clusters have overlapping CIDRs, the SE needs to identify the right gateway for each of the overlapping CIDR groups. This is achieved by specifying the right placement network for the pools that helps the Service Engine place the pools appropriately.
Configure the fields serviceEngineGroupName and nodeNetworkList in the values.yaml file.
Install Helm CLI
Helm is an application manager for OpenShift/Kubernetes. Helm charts are helpful in configuring the application.
Refer to the Helm Installation for more information.
AKO can be installed with or without internet access on the cluster.
Install AKO for Kubernetes
- Install AKO using the helm command.
Note: Use your Avi Controller IP in the command mentioned below:helm install ako/ako --generate-name --version 1.2.1 -f values.yaml --set ControllerSettings.controllerIP=<controller_ip> --set avicredentials.username=<avi-ctrl-username> --set avicredentials.password=>avi-ctrl-password>--namespace=avi-system - To verify if the pod has been deployed, use the
kubectl get podscommand as shown below:# kubectl get pods -n avi-system NAME READY STATUS RESTARTS AGE ako-1586350094-86f76bd59d-c269s 1/1 Running 0 25h root@dev:~/ako/helm#
AKO in OpenShift Cluster
Starting with AKO version 1.2.1, AKO can be used in the in an OpenShift cluster to configure routes and services of type Loadbalancer.
Pre-requisites for Using AKO in OpenShift Cluster
-
Ensure the OpenShift version is 4.4 or higher to perform a Helm-based AKO installation.
Note: For OpenShift 4.x releases prior to 4.4 that do not have Helm, AKO needs to be either installed manually or Helm 3 needs to be manually deployed in the OpenShift cluster.
Note: Ingresses, if created in the OpenShift cluster will not be handled by AKO.
Install AKO for OpenShift
- Create the
avi-systemnamespace.oc new-project avi-system - Add the AKO repository
helm repo add ako https://avinetworks.github.io/avi-helm-charts/charts/ako/ako - Search for available charts
helm search repo NAME CHART VERSION APP VERSION DESCRIPTION ako/ako 1.2.1 1.2.1 A helm chart for Avi Kubernetes Operator -
Edit the values.yaml file.
- Install AKO
helm install ako/ako --generate-name --version 1.2.1 -f values.yaml --set ControllerSettings.controllerIP=<controller_ip> --set avicredentials.username=<avi-ctrl-username> --set avicredentials.password=<avi-ctrl-password> --namespace=avi-system - Verify the installation
 helm list -n avi-system

 NAME          	NAMESPACE
 ako-1593523840	avi-system
Installing AKO Offline Using Helm
Pre-requisites for Installation
- The Docker image downloaded from the Avi Portal
- A private container registry to upload the AKO Docker image
- Helm version 3.0 or higher installed
Installing AKO
To install AKO offline using Helm,
- Extract the .tar file to get the AKO installation directory with the helm and docker images.
tar -zxvf ako_cpr_sample.tar.gz ako/ ako/install_docs.txt ako/ako-1.2.1-docker.tar.gz ako/ako-1.2.1-helm.tgz -
Change the working directory to this path:
cd ako/. - Load the docker image in one of your machines.
sudo docker load < ako-1.2.1-docker.tar.gz -
Push the docker image to your private registry. For more information, click here.
-
Extract the AKO Helm package. This will create a sub-directory ako/ako which contains the Helm charts for AKO (ako/chart.yaml crds templates values.yaml).
-
Update the helm values.yaml with the required AKO configuration (Controller IP/credentials, docker registry information etc).
- Create the namespace
avi-systemon the OpenShift/Kubernetes cluster.kubectl create namespace avi-system - Install AKO using the updated helm charts.
helm install ./ako --generate-name --namespace=avi-system
Upgrade AKO
AKO is stateless in nature. It can be rebooted/re-created without impacting the state of the existing objects in Avi if there’s no requirement of an update to them.
AKO will be upgraded using Helm.
During the upgrade process a new docker image will be pulled from the configured repository and the AKO pod will be restarted.
On restarting, the AKO pod will re-evaluate the checksums of the existing Avi objects with the REST layer’s intended object checksums and do the necessary updates.
To upgrade AKO,
- Sync the latest versions to your local repository:
helm repo updateThe latest AKO release version is now synced into the repository and is available.
- Verify the availability of the latest version:
# helm search repo --versions NAME CHART VERSION APP VERSION DESCRIPTION ako/ako 1.2.1 1.2.1 A helm chart for Avi Kubernetes Operator ako/ako 1.1.1 1.1.1 A helm chart for Avi Kubernetes Operator ako/ako 0.9.1 0.9.1 A helm chart for Avi Kubernetes Operator - Run the Helm upgrade command:
helm upgrade <release-name> <ako-chart-name> -n avi-system --values <value-yaml-file-path>
Upgrading AKO Offline Using Helm
To upgrade AKO without using the online Helm repository,
-
Follow the steps 1 to 6 from Installing AKO Offline Using Helm.
-
Use the following command:
helm upgrade <release-name> ./ako -n avi-system
Delete AKO
- Edit the
configmapused for AKO and set thedeleteConfigflag to true if you want to delete the AKO created objects. Else skip to step 2.
kubectl edit configmap avi-k8s-config -n avi-system - Delete AKO using the command shown below:
helm delete $(helm list -n avi-system -q) -n avi-system
Note: Do not delete the configmap avi-k8s-config manually, unless you are doing a complete Helm uninstall. The AKO pod has to be rebooted if you delete and the avi-k8s-config configmap has to be reconfigured.
Document Revision History
| Date | Change Summary |
|---|---|
| November 23, 2020 | Updated the Upgrade Procedure for AKO version 1.2.1 to 1.2.3 |
| September 16, 2020 | Published the Installation Guide for AKO version 1.2.1 |
| July 20, 2020 | Published the Installation Guide for AKO version 1.2.1 (Tech Preview) |