Configure Avi Vantage for VMware Horizon
Overview
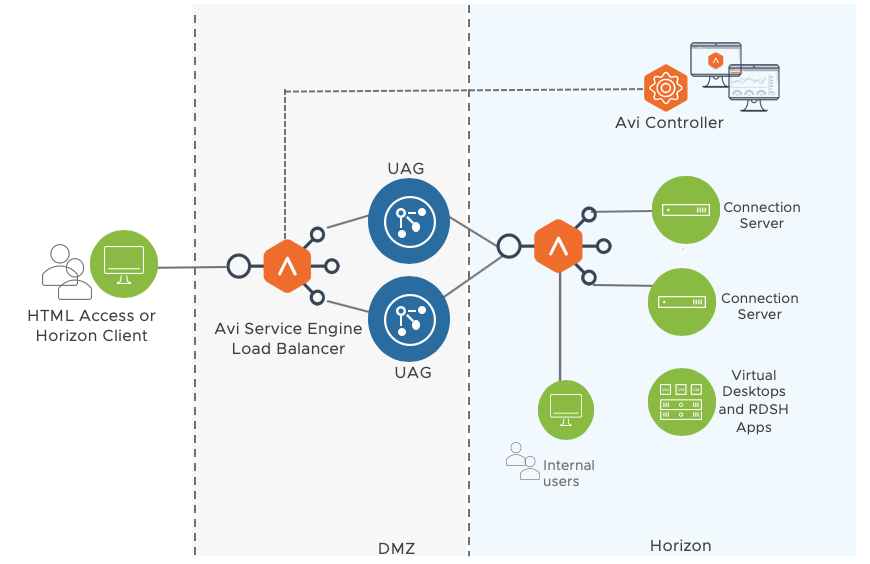
This article shows how Avi Vantage can be configured for load balancing in VMware Horizon deployments. Avi Vantage can be deployed in front of Unified Access Gateways (UAG) and/or in front of the connection servers as required.
Prerequisites
To configure Avi Vantage for VMware Horizon deployments, ensure the following prerequisites are met:
- The Horizon environment is up and running
- The Avi Controller is deployed. Refer to Installing Avi Vantage for VMware vCenter
for more information - The vCenter cloud on the Avi Controller is created
Avi Vantage for UAG Load Balancing
There are three ways to deploy Avi Vantage for UAG load balancing:
Avi Vantage for Connection Server Load Balancing
Avi Vantage can be used to load balance traffic to the connection servers as well. A single HTTPS virtual service can service both internal clients directly and external clients via UAG. Refer to the Connection Server Load Balancing section to know more.
Configuring UAG Load Balancing
The following steps are one-time configurations for UAG load balancing:
- Create custom health monitor for UAG
- Create SSL profile and install SSL certificate (required for L7 VIP)
Configuring Single VIP with Two Virtual Services
Single VIP with two virtual services can be configured as shown below:
- Create IP group with UAG as members
- Create custom Health Monitor for UAG
- Create pools
- Create SSL profile and install SSL certificate
- Disable Connection Multiplexing
- Create an L7 virtual service
- Create an L4 virtual service using the L7 virtual service as shared VIP and specify all the ports required for secondary protocols
Creating IP Group
IP groups are comma-separated lists of IP addresses that may be referenced by profiles, policies, and logs. Since same UAG servers are used as pool members in two different pools, IP groups can be attached to the pool instead of directly attaching servers to the pool. Any configuration change to the pool members like addition or removal of servers needs to be done at the IP Group level.
To create an IP group,
- From the Avi UI, navigate to Templates > Groups > IP Groups.
- Click on Create IP Group.
- Under IP Information, enter the IP Address to be added, and click on Add Server.
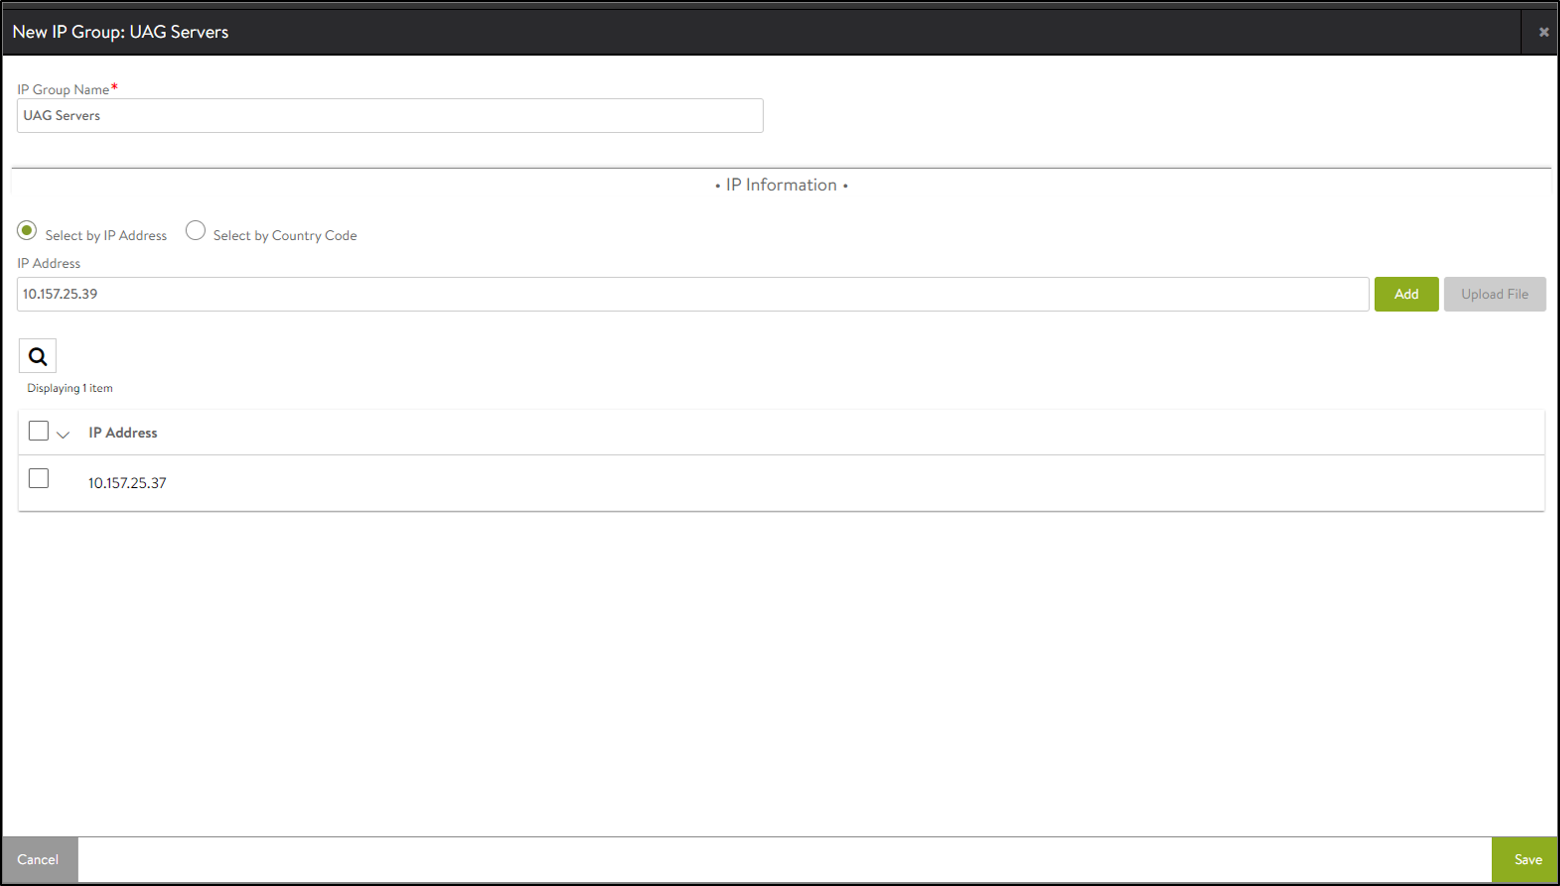
- Click on Save.
Creating Custom Health Monitor for Horizon
To create a custom health monitor,
- From the Avi UI, navigate to Templates > Profiles > Health Monitors.
- Click on Create.
- Select the vCenter cloud that was created for Horizon.
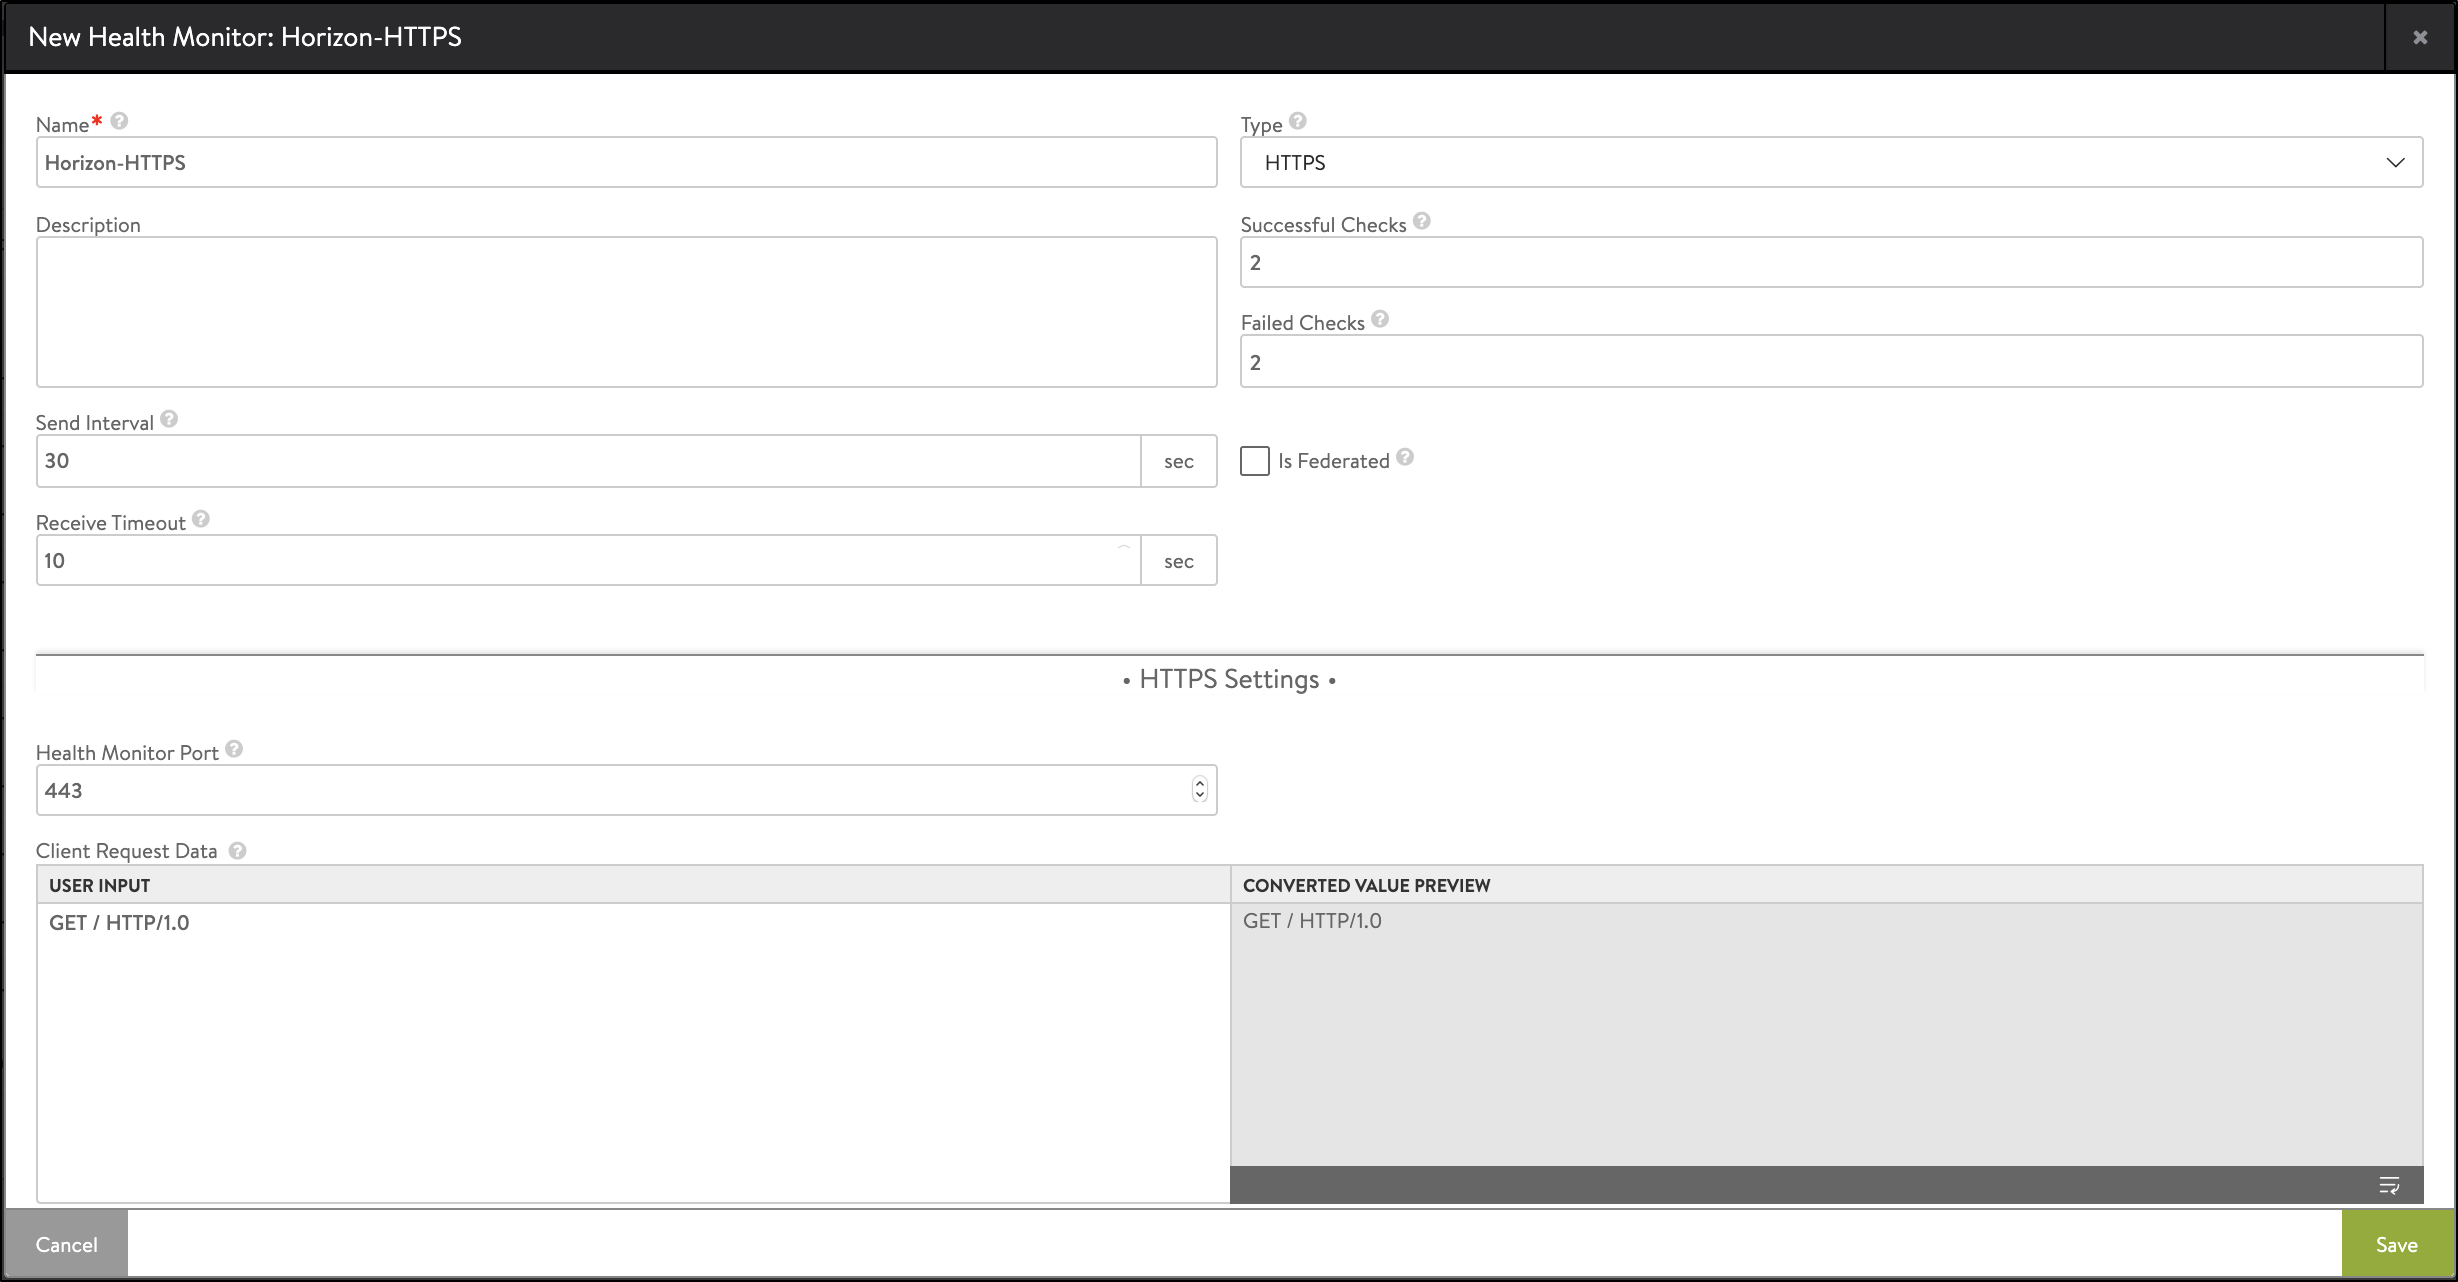
- Enter the following details in the New Health Monitor screen.
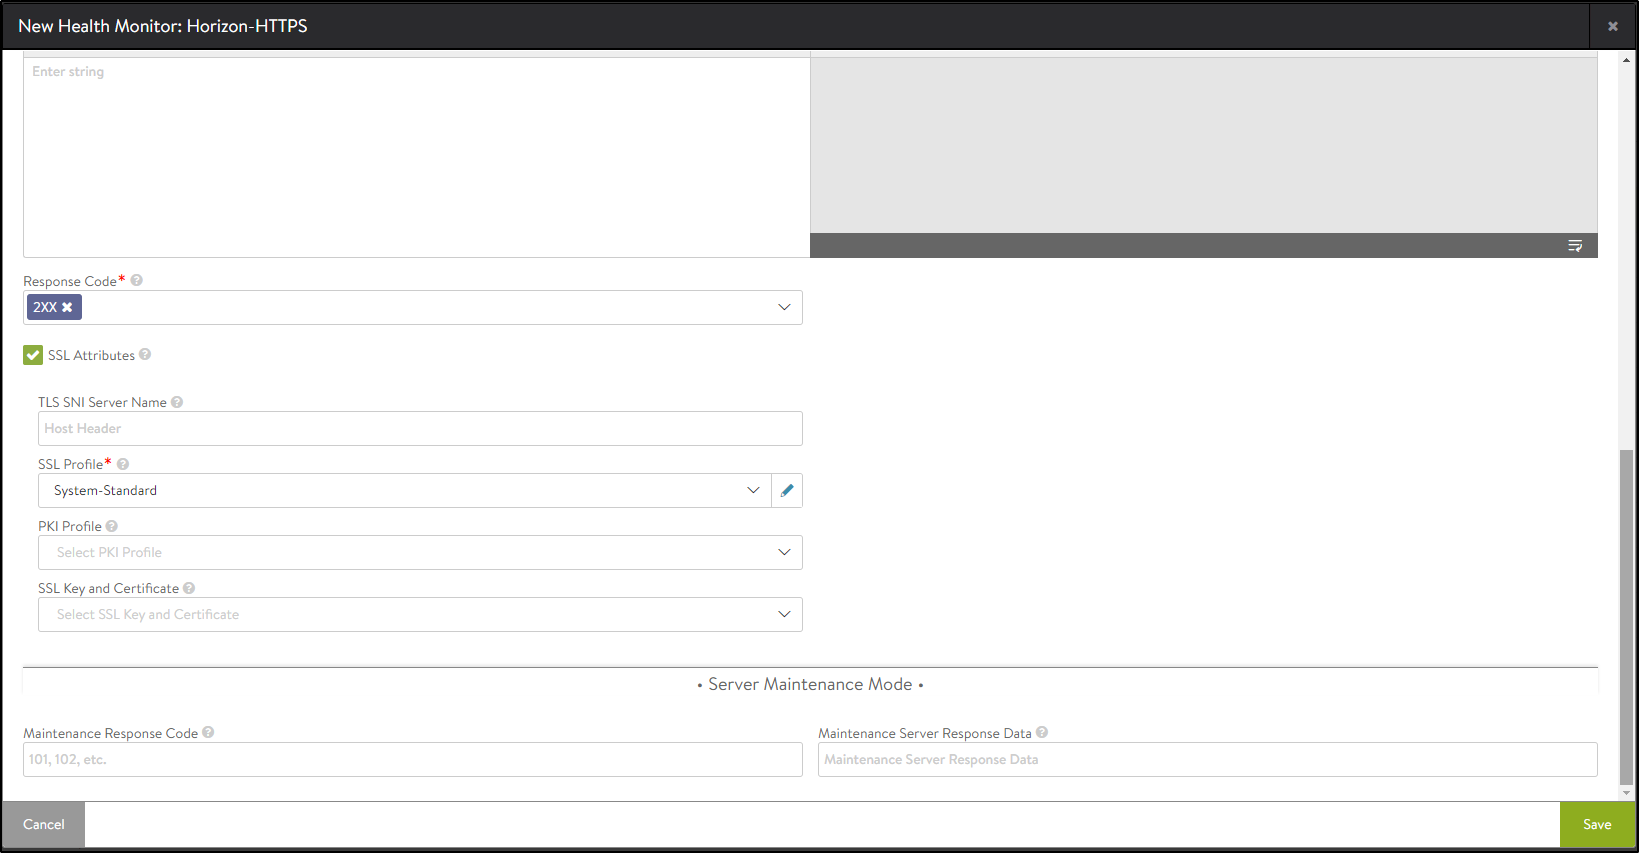
Field Value Send Interval 30 Receive Timeout 10 Client Requested Data GET /favicon.ico HTTP/1.0 Response Code 2xx The New Health Monitor screen is as shown below:
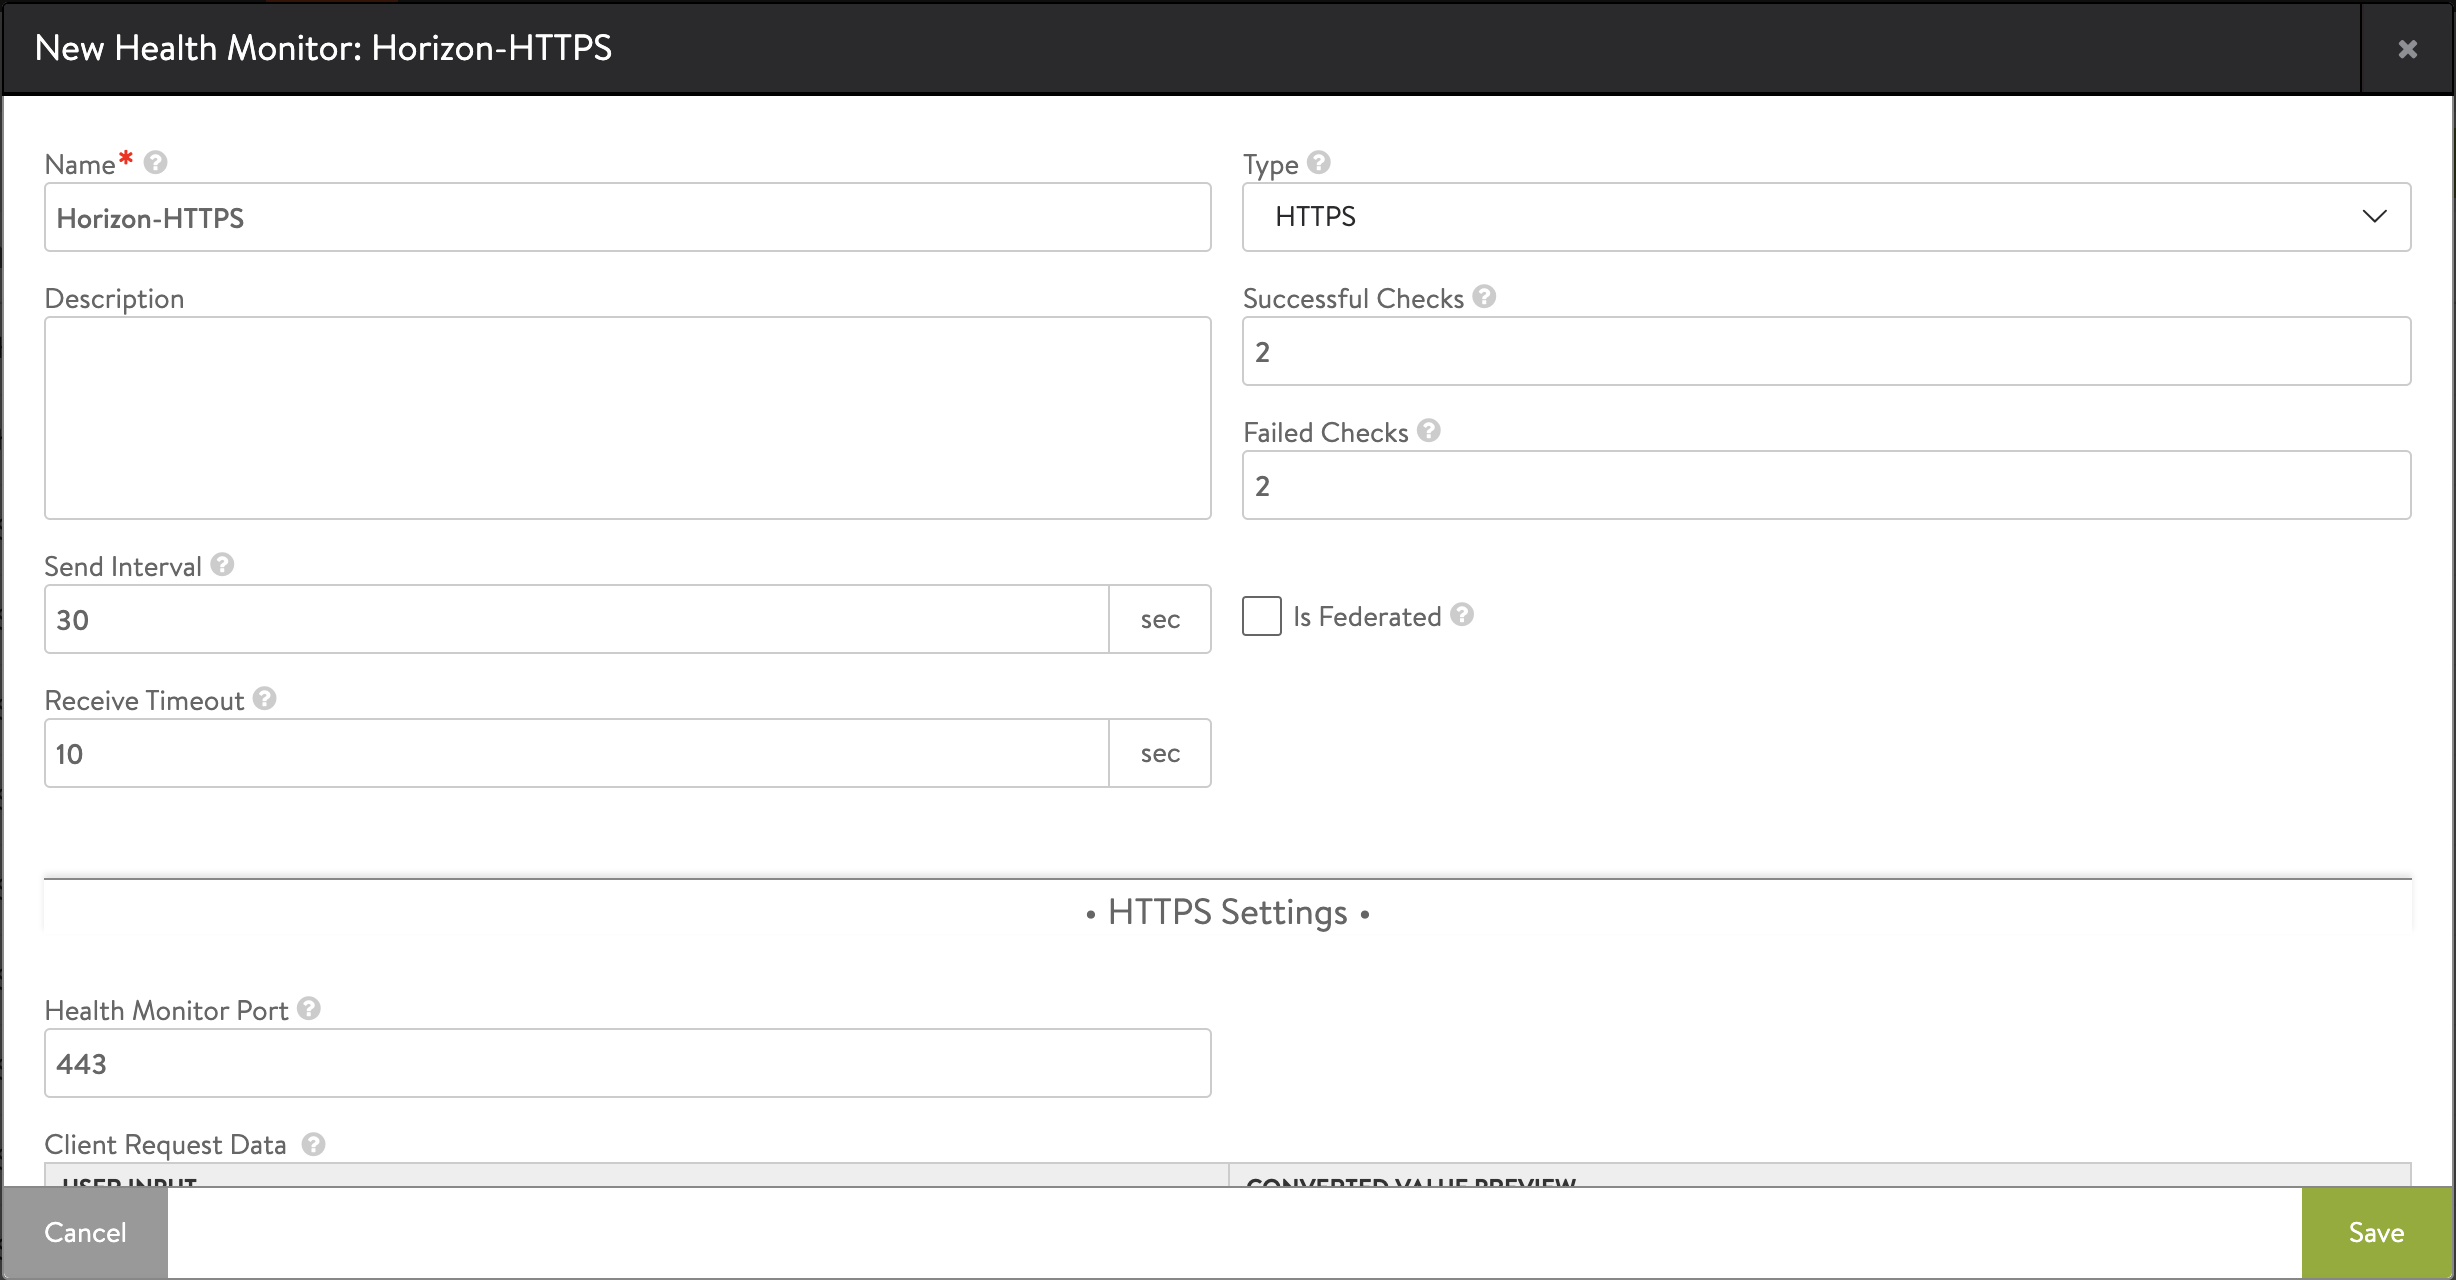

- Click on Save.
Creating Pools
Pools maintain the list of servers assigned to them and perform health monitoring, load balancing, persistence, and functions that involve Avi Vantage-to-server interaction. A typical virtual service will point to one pool.
A pool includes the IP address of the UAG servers i.e. UAG server01 and UAG server02.
Create two pools:
- For L7 (HTTPS) i.e. Horizon-L7-pool
- For secondary protocols named as Horizon-L4-pool
These two pools are required to attach to the two virtual services which will be created.
Consistent hash with source IP address as the key should be configured as the hash algorithm to maintain source IP affinity.
Creating the Horizon L7 Pool
To create the pool,
- In Avi Vantage, navigate to Applications > Pools.
- Select the vCenter cloud from the Select Cloud sub-screen.
- Click on Next.
- Click on Create Pool.
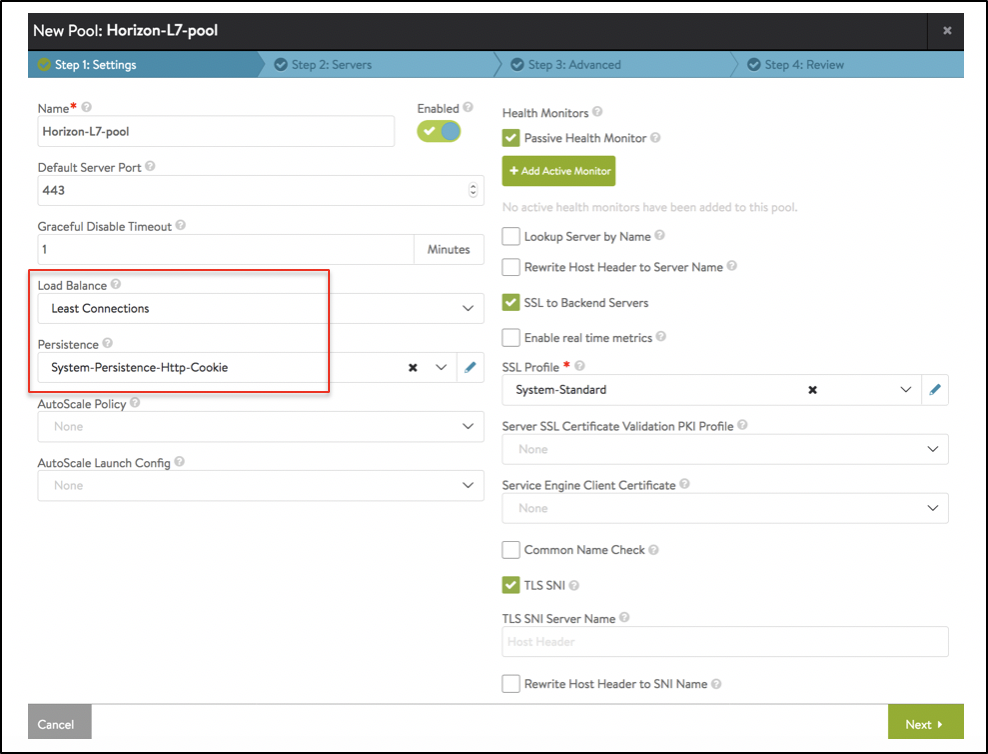
- In the New Pool: screen, update the details as shown below:
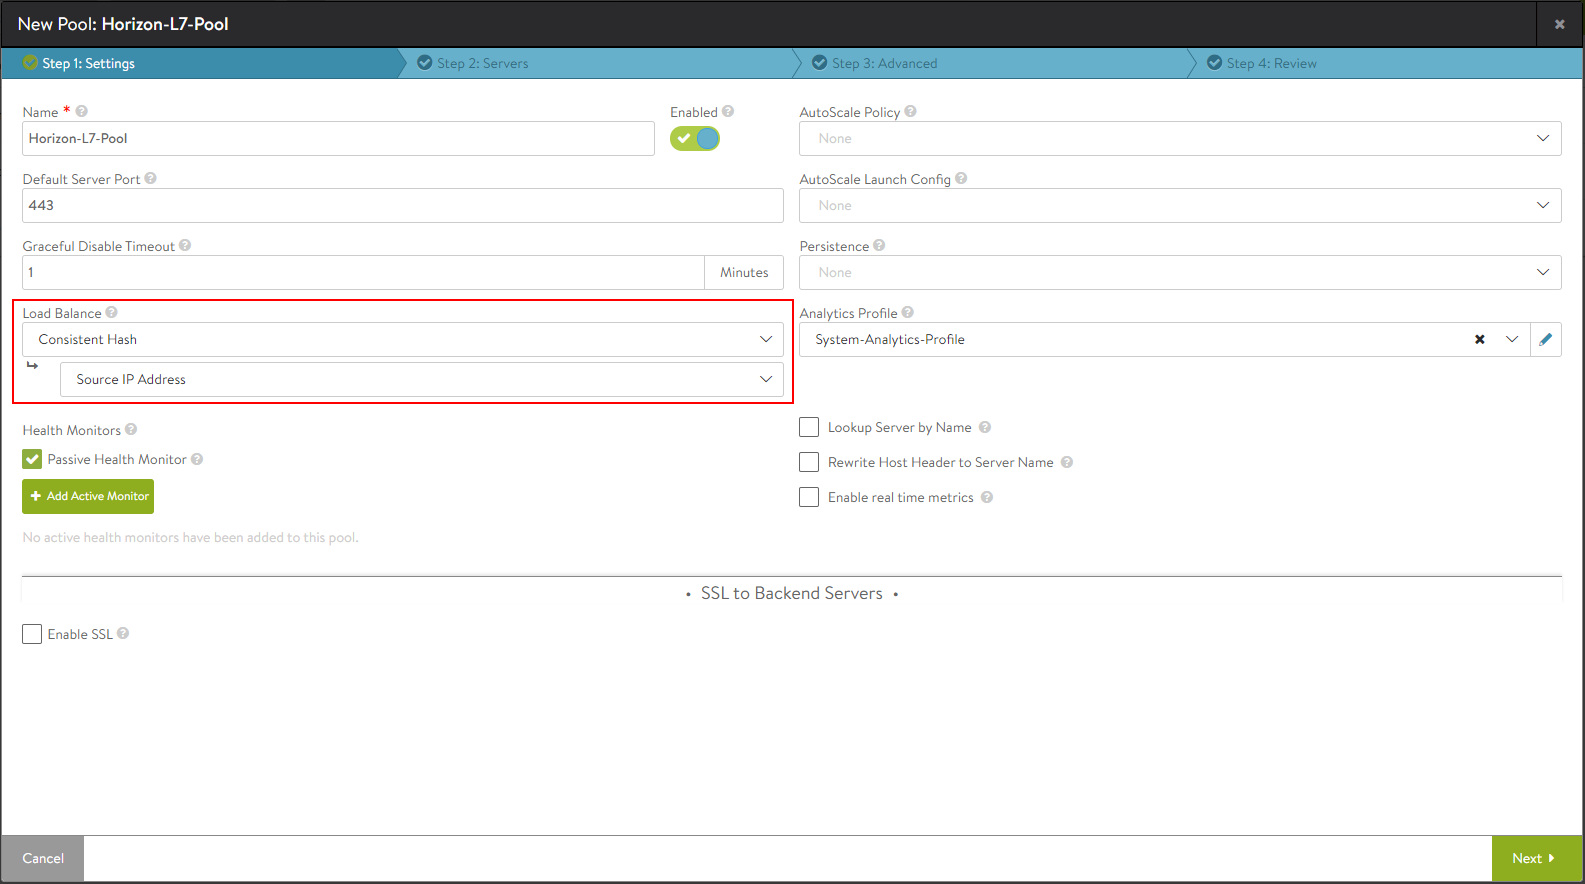 Note: The load balancing algorithm is configured as Consistent Hash with Source IP Address as the hash key.
 - To bind the monitor, click on Add Active Monitor and select the HTTPS monitor that was created.
- Click on Next.
- Click on Enable SSL and select the appropriate SSL profile as shown below:
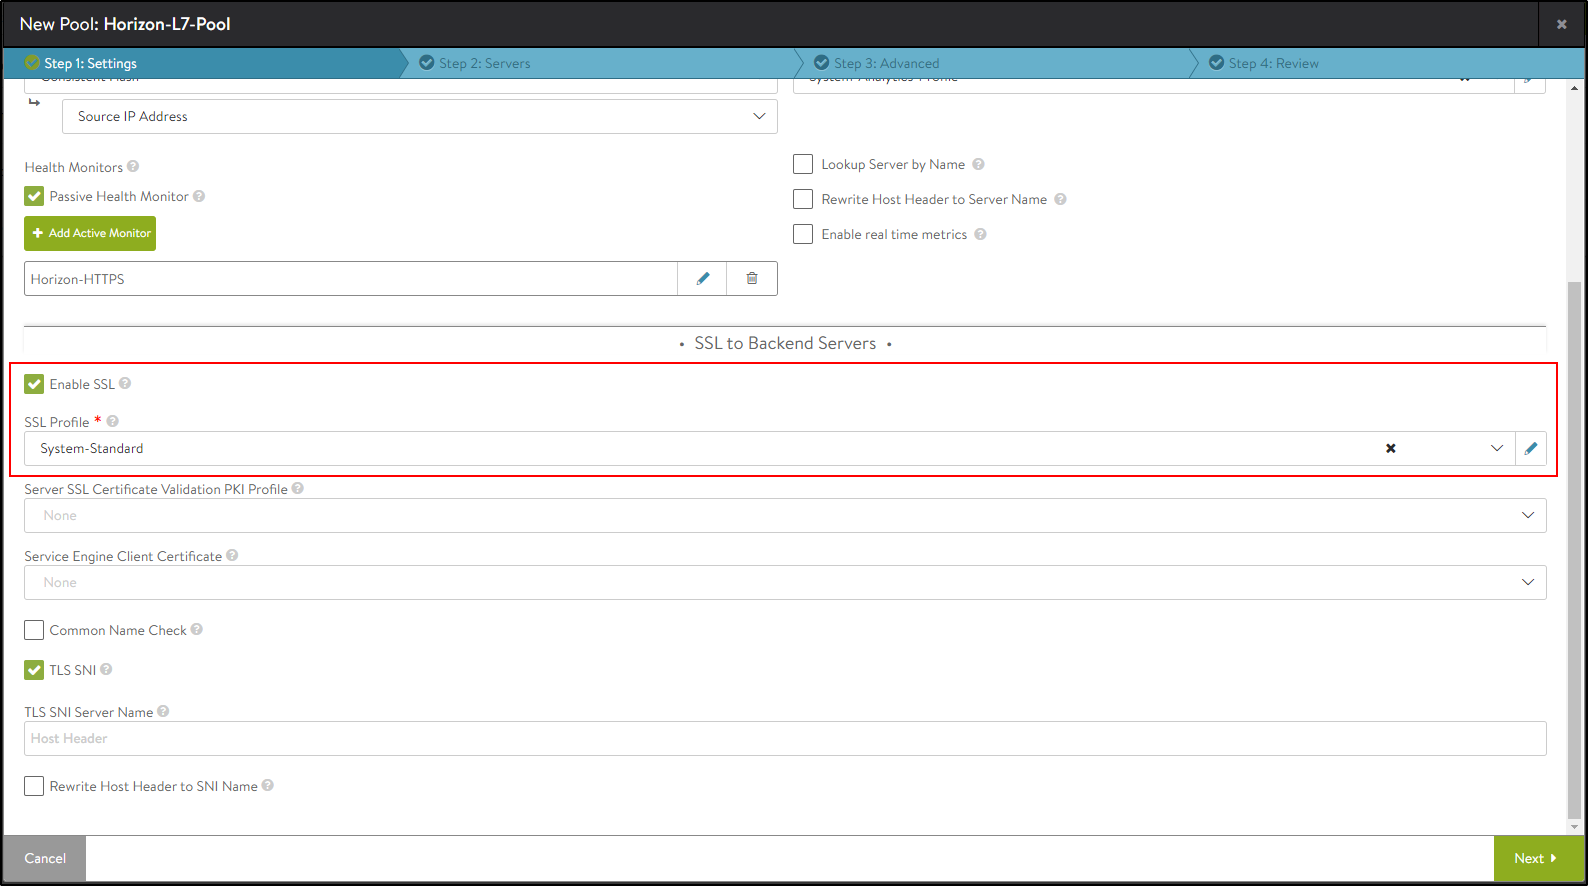
- Click on Next.
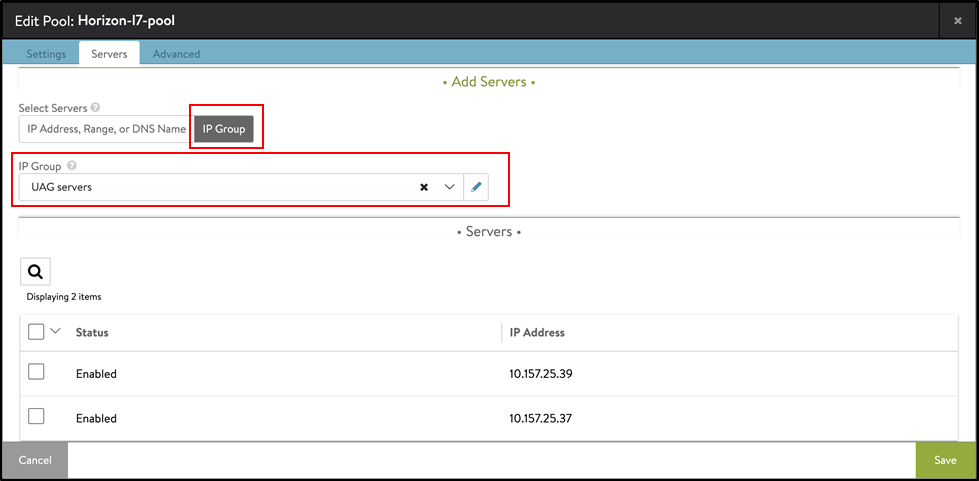
- In the Step 2: Servers tab, add the IP Group of the UAG servers created earlier.
- Click on Next.
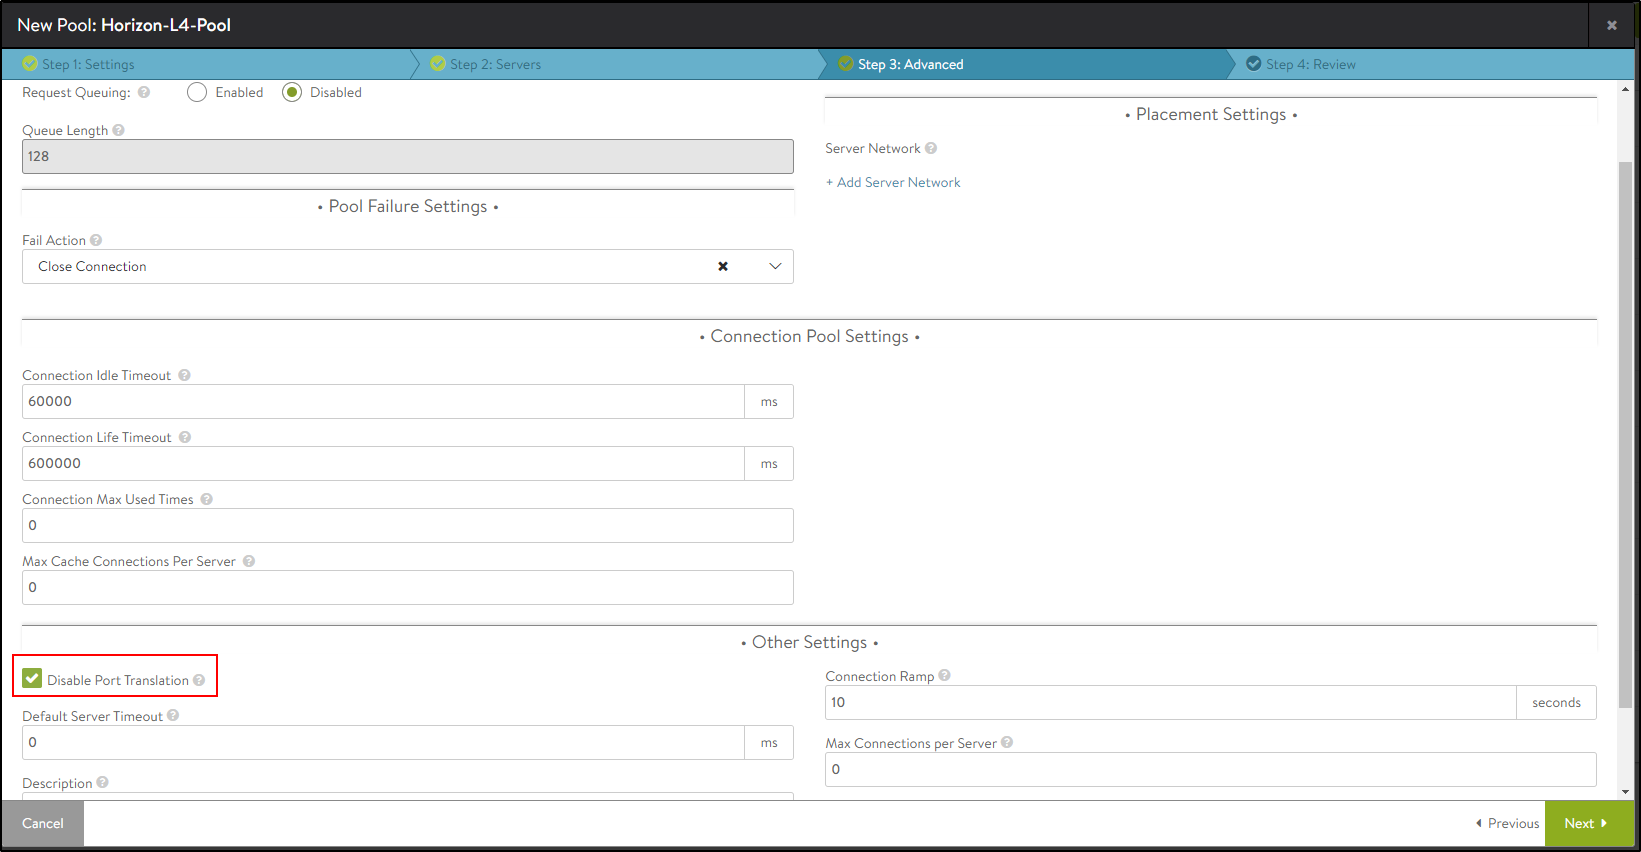
- Navigate to Step 3: Advanced tab > Step 4: Review.
- Click on Next and then click on Save.
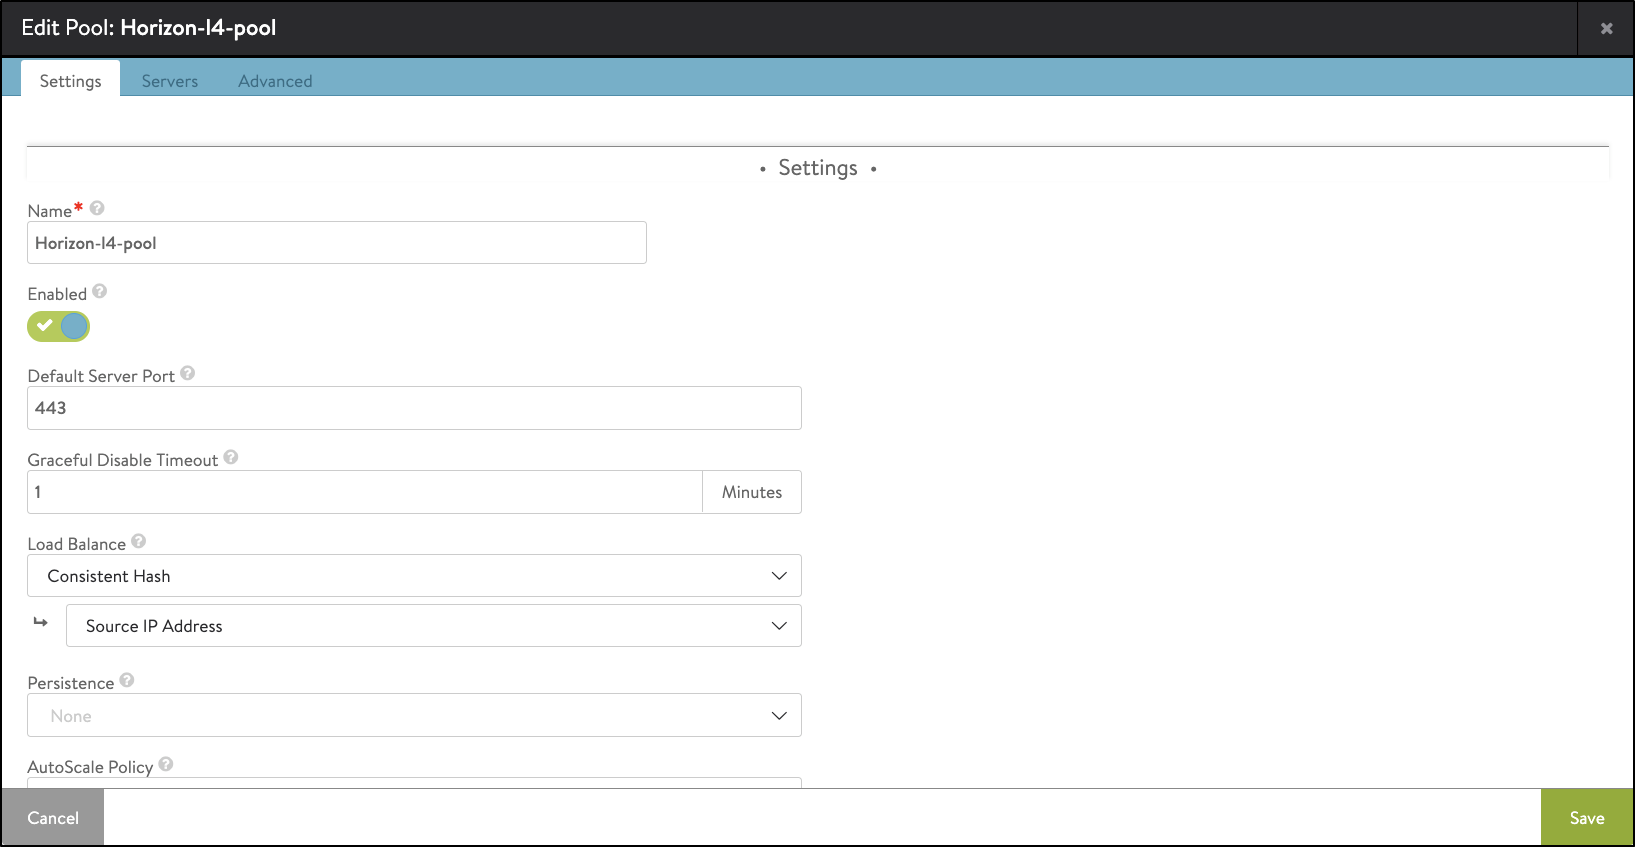
Creating the Horizon L4 Pool
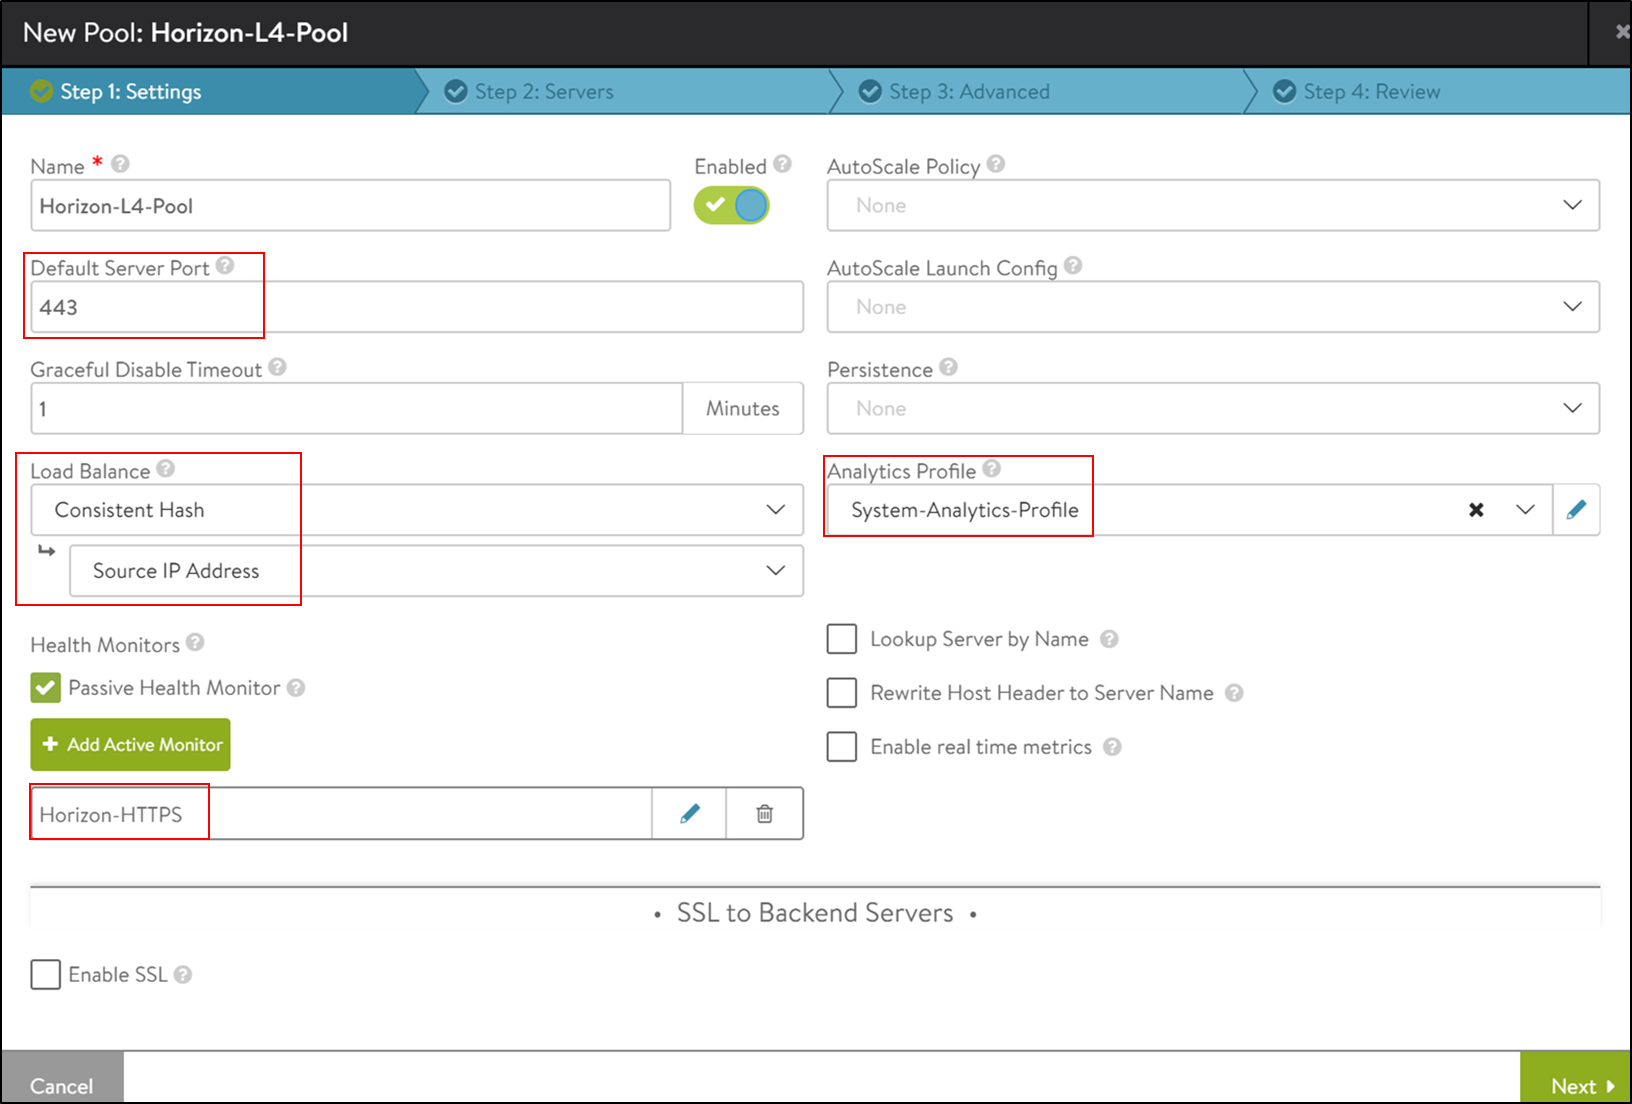
Create a pool with the name Horizon-l4-pool. Ensure that the pool configuration (port , UAG server IP , load balancing algorithm , health monitor etc.) is the same as the Horizon L7 Pool.
Note: Configure the default server port to 443 and the load balancing algorithm as Consistent Hash with Source IP Address.
 Under the Step 2: Servers tab, add the IP Group of the UAG servers created earlier.
Install the SSL certificate Required for L7 VIP
The SSL connection is being terminated at Avi virtual service. Therefore, the SSL certificate must be assigned to the virtual service . It is advised to install a certificate which is signed by a valid certificate authority instead of using self-signed certificates.
Install the certificate in Avi Vantage, and ensure the CA certificate is imported and linked. For instructions, refer to Import Certificates.
Note: For this set up, a certificate named Horizon_Certificate has been installed.
Disabling Connection Multiplexing
In case of UAG load balancing, disable connection multiplexing for the System-Secure-HTTP-VDI profile.
To disable connection multiplexing,
- Navigate to Templates > Profiles> Application > System-Secure-HTTP-VDI.
- Click on the edit icon.
-
Disable the option Connection Multiplexing as shown below:
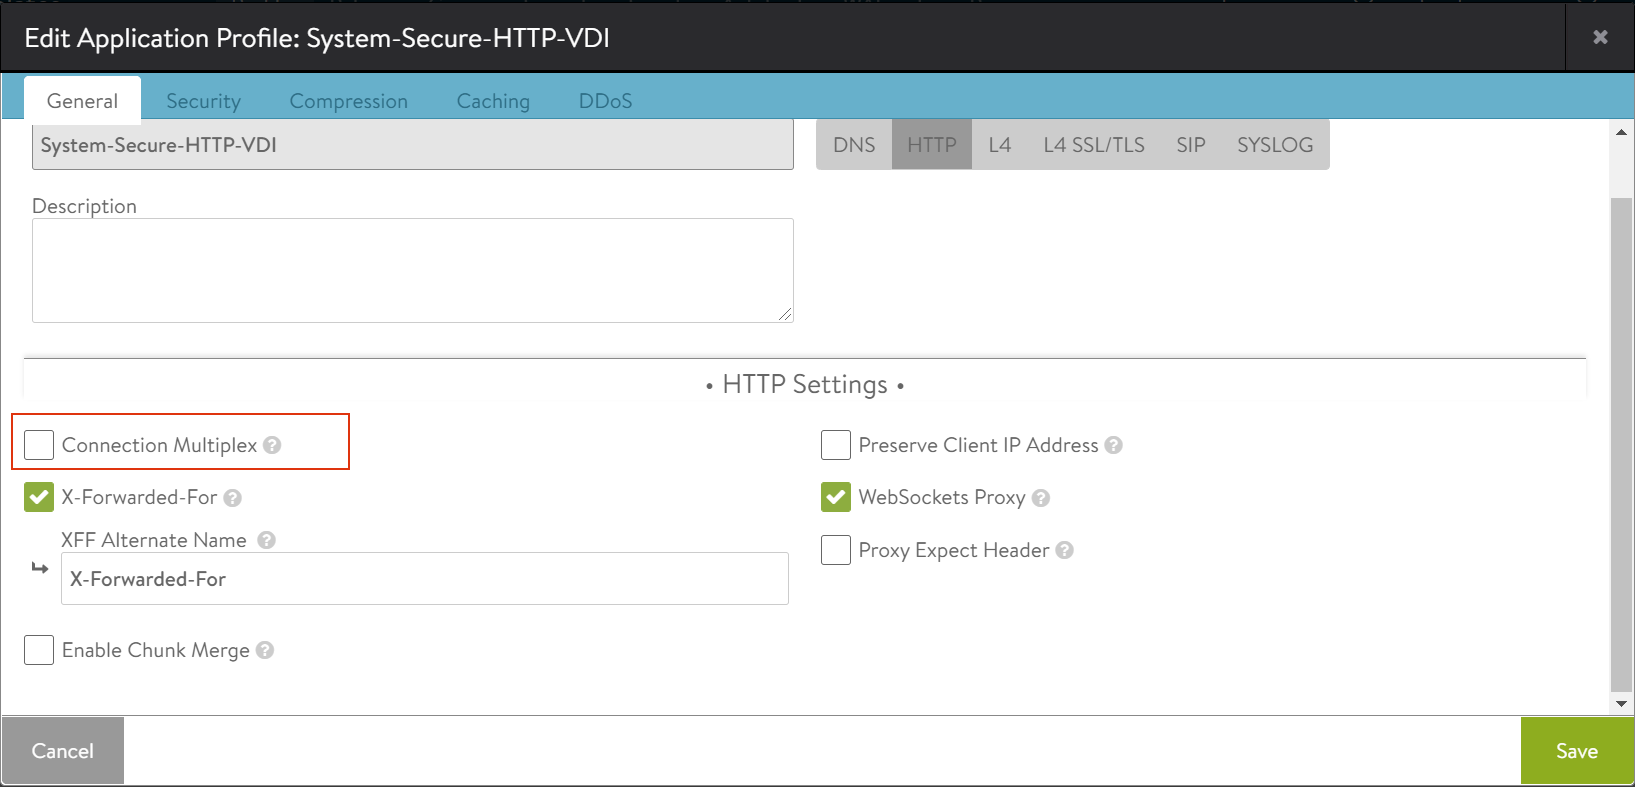
- Click on Save.
Creating L7 Virtual Service
To create the new L7 virtual service,
- From the Avi UI, navigate to Applications > Virtual Services.
- Click on Create Virtual Service > Advanced Setup.
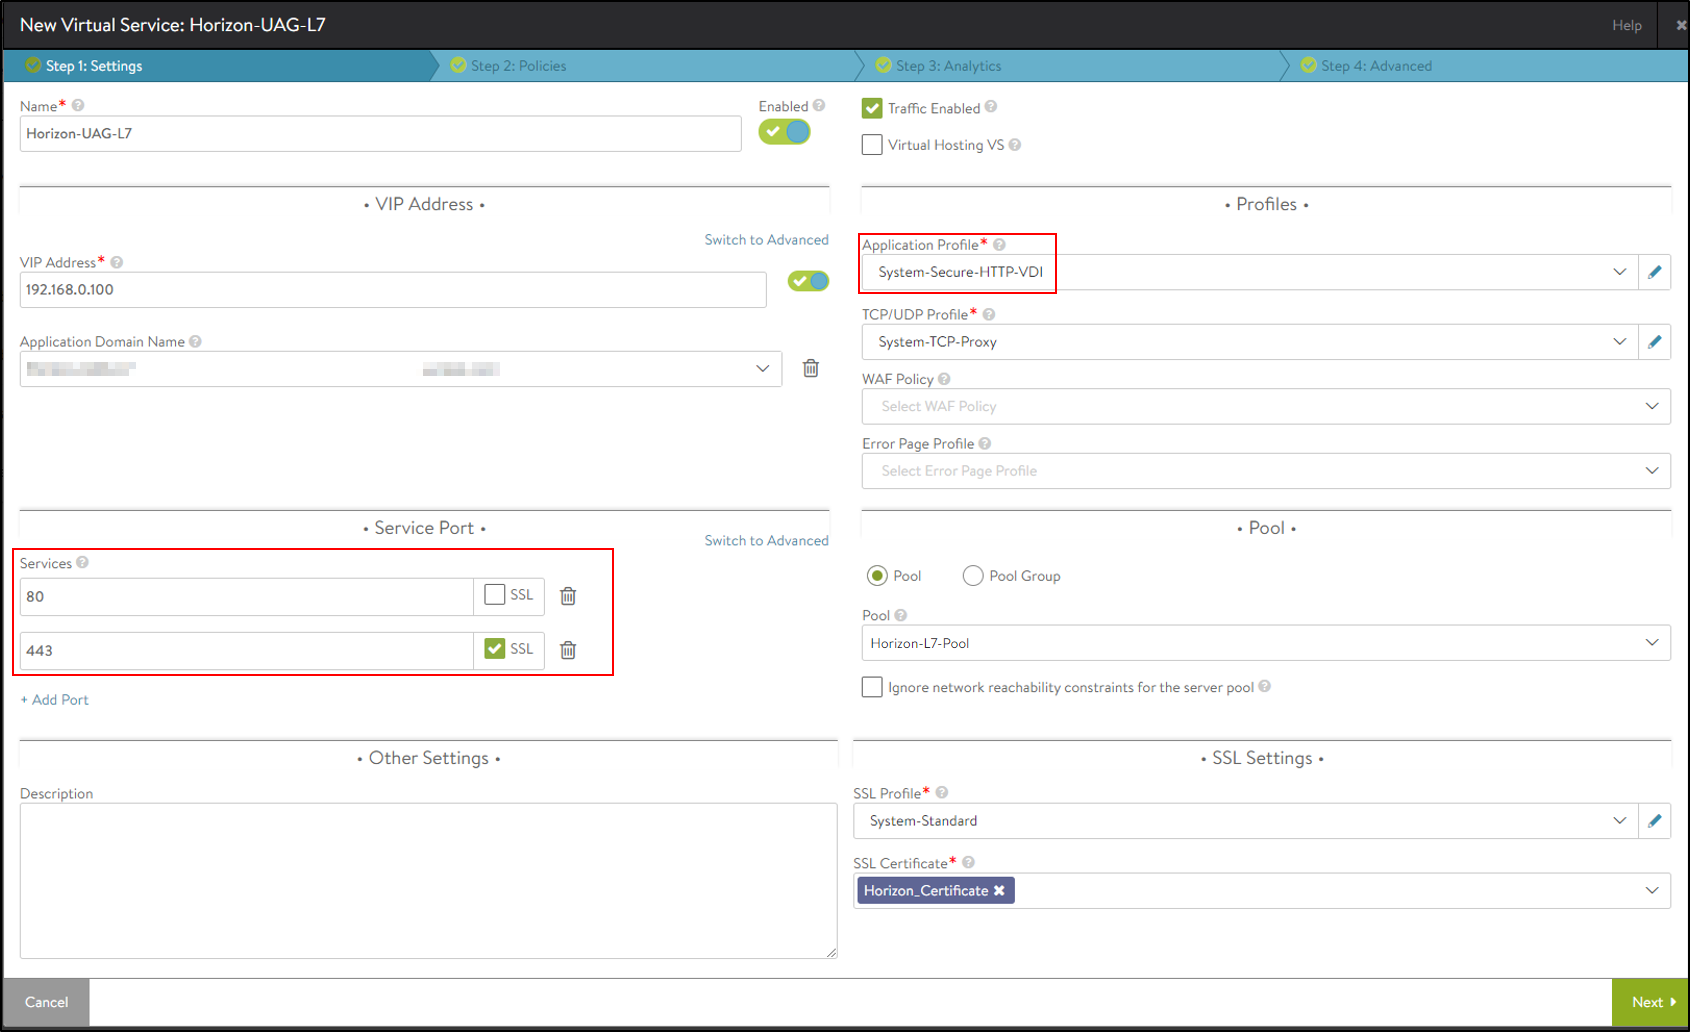
- Use the System-Secure-HTTP-VDI as the Application Profile.
- Select the SSL Profile that was created with Enable SSL Session Reuse disabled.
- Configure the virtual service as shown below:
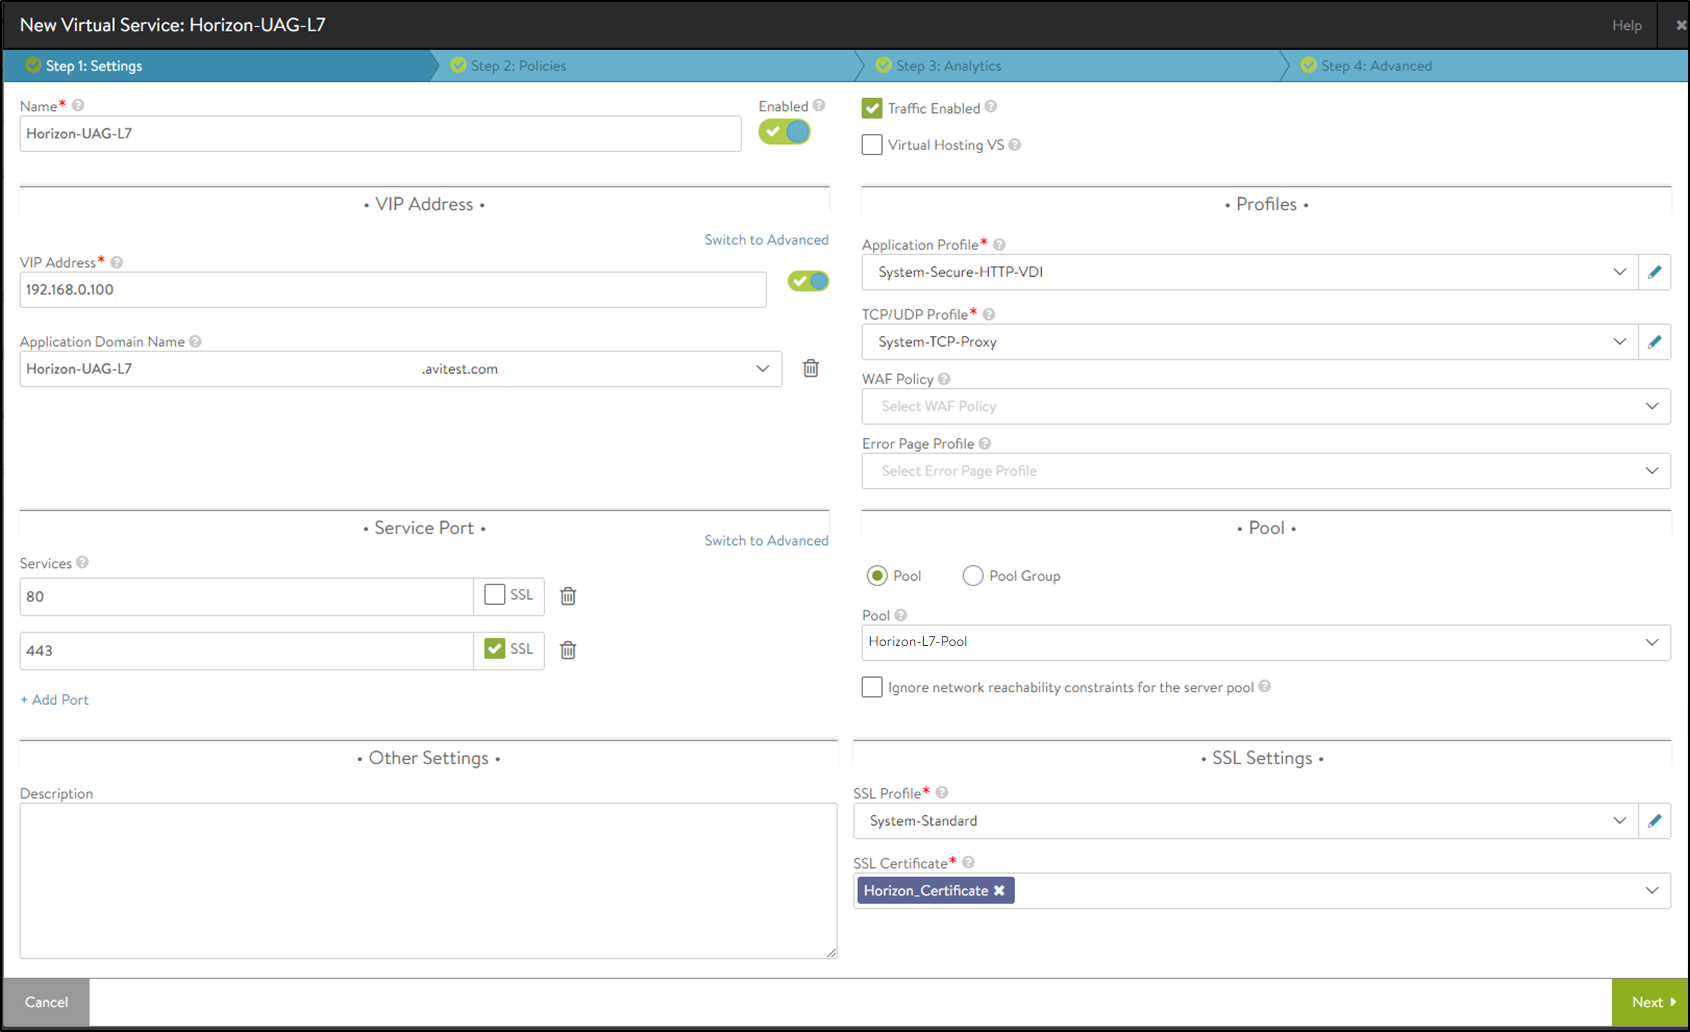
- Click on Next.
- Click on Next > Save.
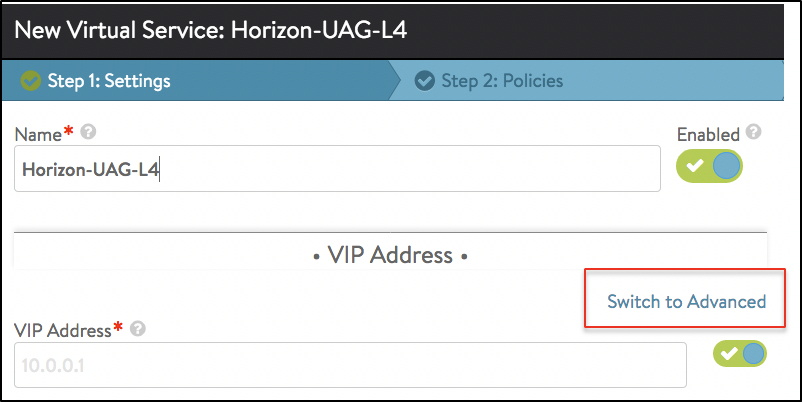
Creating L4 Virtual Service
Create another virtual service which will share the same IP address as that of the L7 VIP. This will make sure that we need only one virtual IP address for both the primary and secondary protocols. L7 virtual service will handle the primary protocol and the tunnel whereas L4 virtual service will handle other secondary protocols.
To create an L4 virtual service,
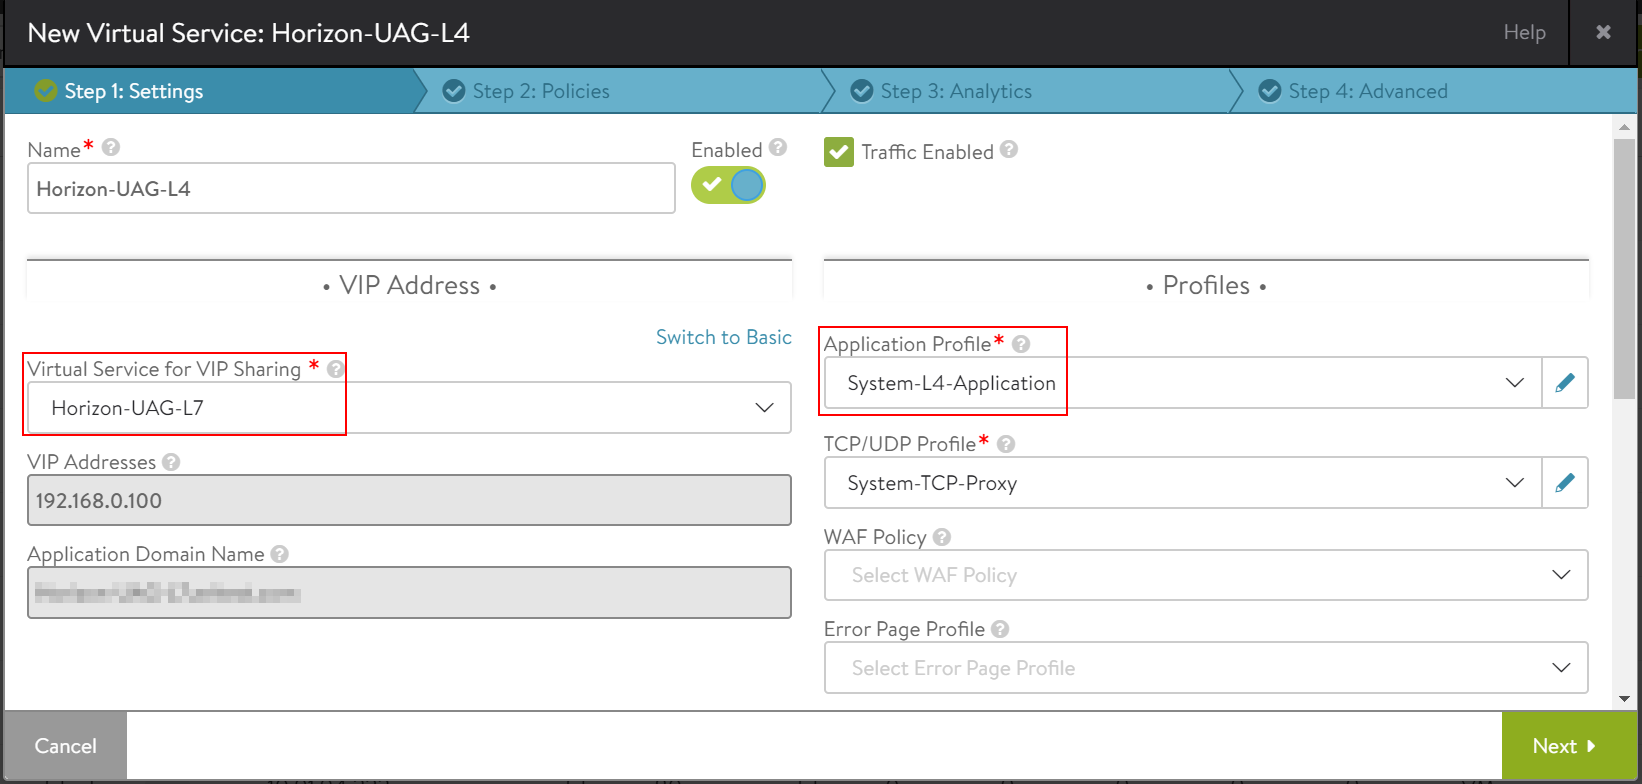
- Click on Create Virtual Service > Advanced Setup.
- In the New Virtual Service screen, click on Switch to Advanced under VIP Address as shown below:
- Select the L7 virtual service that was created as the Virtual Service for VIP Sharing as shown below:
- Under Service Port > Services, click on Switch to Advanced.
- Add the port numbers for the secondary protocols as shown below:
- 443 UDP to override TCP/UDP and use System-UDP-Fast-Path-VDI as the profile
- Add 8443 for Blast
- Add 8443 UDP to override TCP/UDP and use System-UDP-Fast-Path-VDI as the profile
- Add 4172 for PCoIP
- Add 4172 UDP to override TCP/UDP and use System-UDP-Fast-Path-VDI as the profile
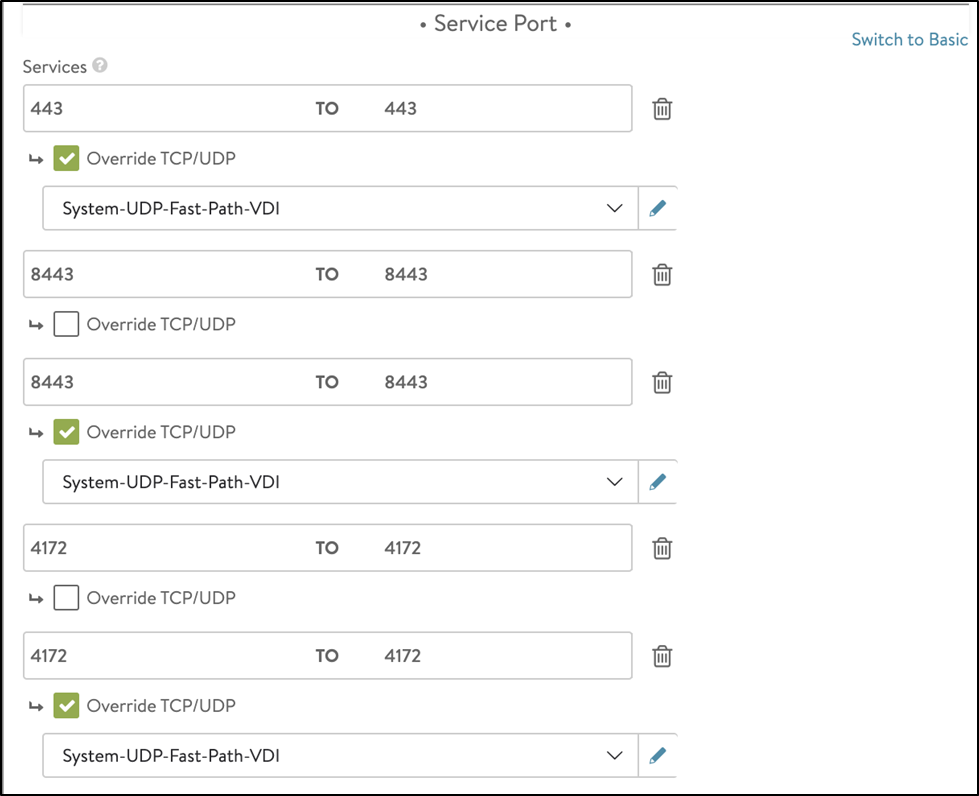
The virtual service is configured as shown below:

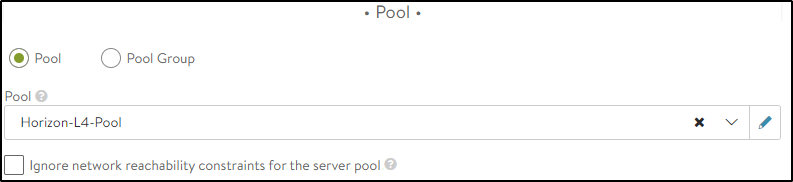
- Under the section Pool, select the option Pool and choose the Horizon Pool as shown below:
- Click on Next.
- Click on Next > Save.
With this, the configuration is complete and ready to use the Avi load balancer for Horizon.
Note: Ensure the following:
- L4 and L7 pools have the same configuration.
- The option Disable Port Translation is enabled under Advanced Settings for an L4 pool.
Configuring Single L4 Virtual Service on Avi Vantage
In this design, a single Virtual Service with an L4 profile services all protocols.
Configuring L4 Virtual Service on Avi Vantage
L4 virtual service configuration on Av Vantage is done in the following steps:
- Create custom health monitor for UAG.
- Create a Pool
- Create an L4 Virtual Service
Creating a Pool
- From the Avi UI, navigate to Applications > Pools.
- Click on Pool.
- Configure the pool as shown below:
- Click on +Add Health Monitor and select the Horizon HTTPS Monitor that was created.
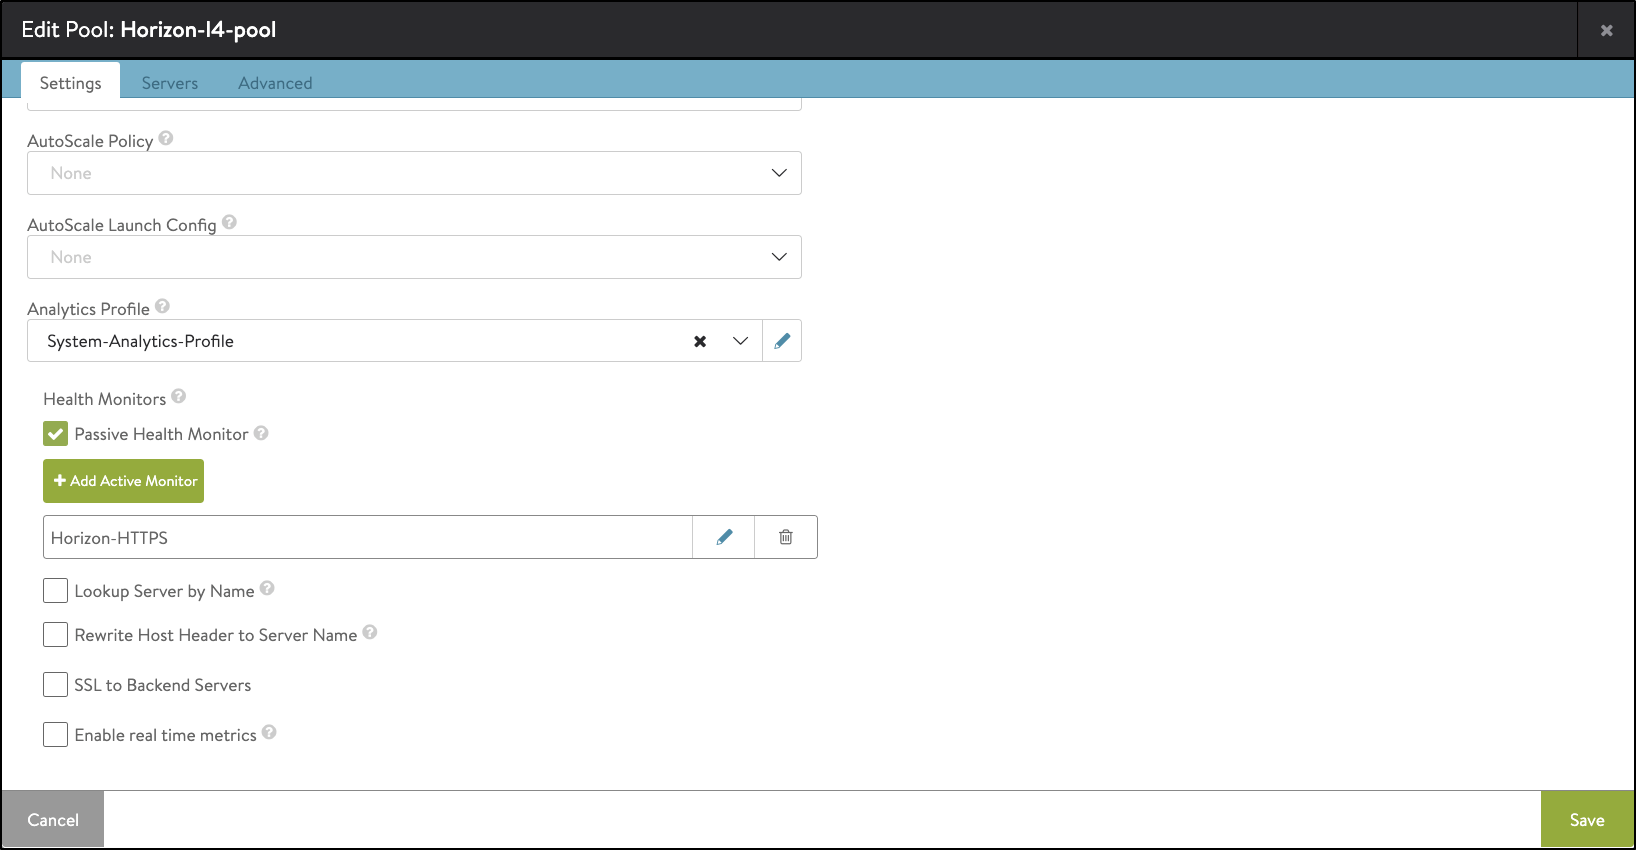
- Navigate to Step 3: Advanced.
- Select Disable Port Translation as shown below:
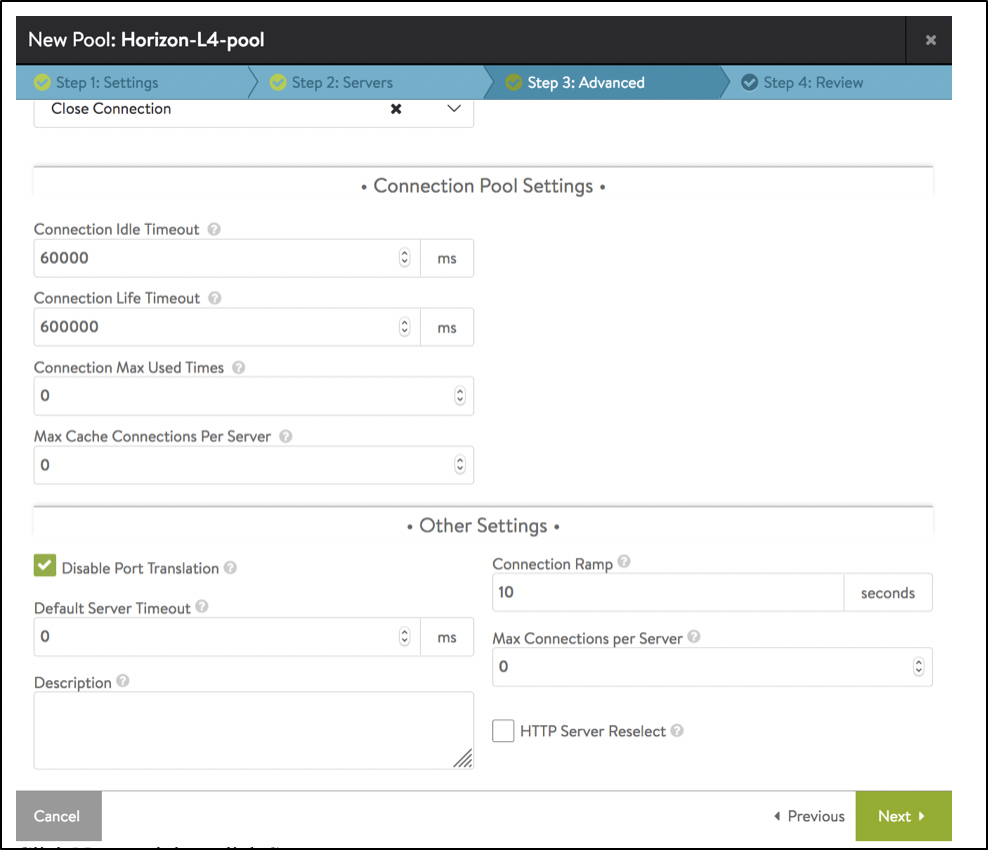
- Click on Next > Save.
Creating L4 Virtual Service
- From the Avi UI, navigate to Applications > Virtual Services.
- Click on Create Virtual Services > Advanced Setup.
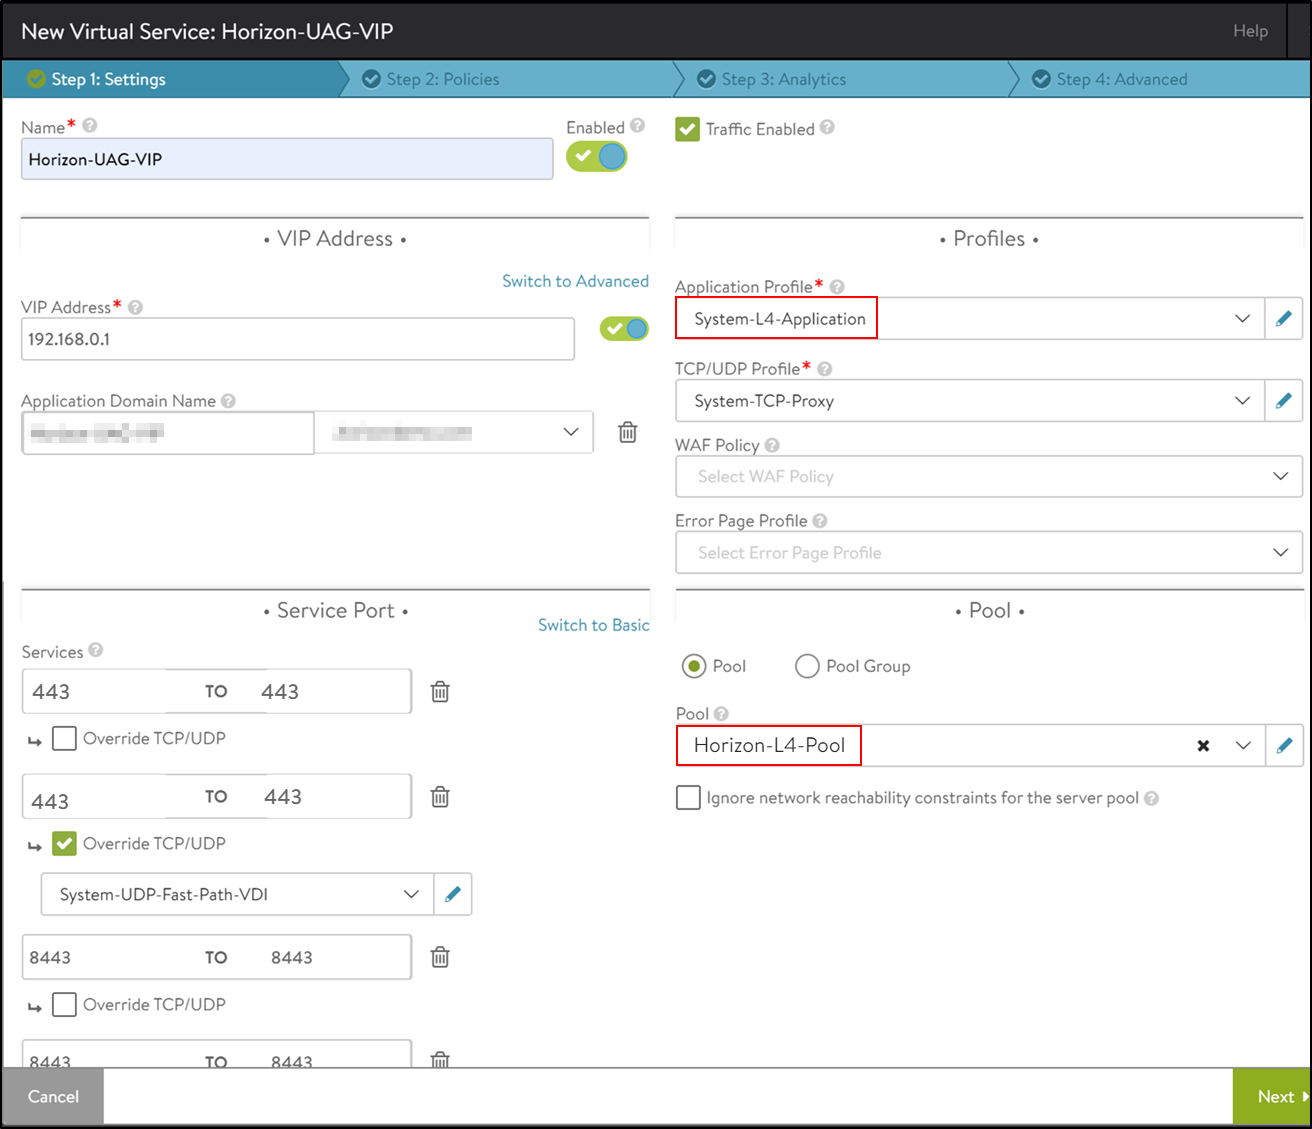
- In the New Virtual Service: screen, enter the virtual service name and other details.
- Under Service Port, click on Switch to Advanced.
- Add the following port numbers for both the primary and secondary protocols:
- 443 for primary HTTPS protocol
- 443 UDP to override TCP/UDP and use System-UDP-Fast-Path-VDI as the profile
- 8443 for Blast
- 8443 UDP to override TCP/UDP and use System-UDP-Fast-Path-VDI as the profile
- 4172 for PCoIP
- 4172 UDP to override TCP/UDP and use System-UDP-Fast-Path-VDI as the profile
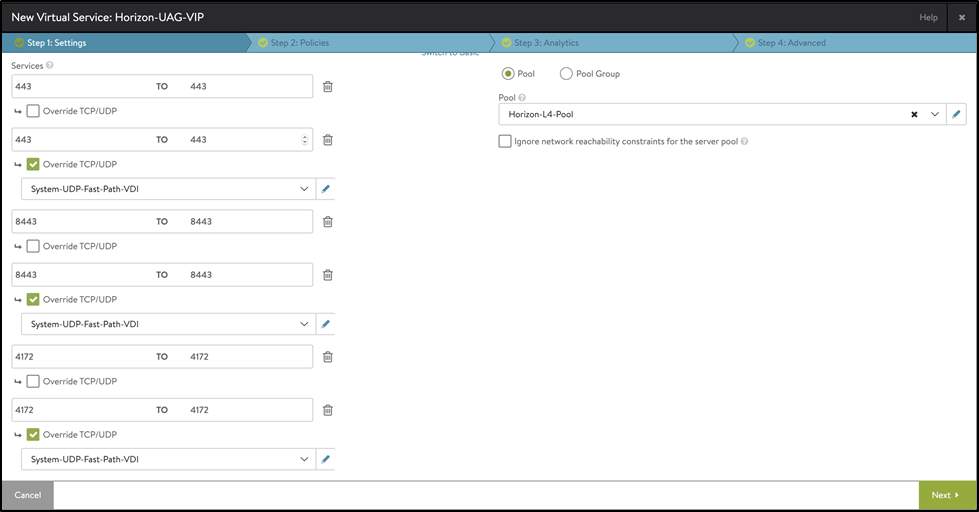
Note: The application profile and the pool (Horizon-L4-pool)are bound to the virtual service.
- Click on Next > Next> Save.
With this, the configuration is complete and ready to use the Avi Vantage load balancer for Horizon.
Configuration Automation
If required, use Ansible playbooks or Terraform to automate the configuration for shared VIP and L4 VIP.
Configuring (n+1)VIP in Avi Vantage
In this design, only the primary HTTPS protocol will be load balanced by Avi. UAGs have to be configured with public IPs and the Blast External URL and PCoIP External URL on each UAG will be configured to the same UAG.
Follow the steps below to configure (n+1)VIP in Avi Vantage:
- Create a custom health monitor for UAG
- Create a Pool
- Disable Connection Multiplexing for the
System-Secure-HTTP-VDIprofile. - Create an L7 Virtual Service
Create a Pool
- From the Avi UI, navigate to Applications > Pools.
- Click on Create Pool.
- In the New Pool: screen enter details as shown below:
 Note: HTTP-cookie is used for creating persistence. The persistence profile can be modified if required. For more information, read the Persistence Profile article.
 - To bind the monitor, click on Add Active Monitor and select the HTTPS monitor that was created. Note: It is recommended to create a HTTPS type monitor with the required timers. Set the timeout interval to be more than six seconds to account for any delay caused by connection servers response to the health monitor probes, if connection servers are configured with full logging level (used for debugging).
- Click on Next.
- Click on Add Server.
- Add the IP address of UAG server01.
- Click on Add Server.
-
Add the IP address of UAG server02.
The New Pool: screen appears as shown below:

- Click on Next > Save.
Creating L7 Virtual Service
To create the L7 virtual service,
- From the Avi UI, navigate to Applications > Virtual Services.
- Click on Create Virtual Service > Advanced Setup.
- Configure the virtual service as shown below:
- Click on Next.
Note: Ensure that connection multiplexing is disabled for the System-Secure-HTTP-VDI profile. To know how to disable connection multiplexing, click here.
Load Balancing Traffic to Connection Servers
Both L4 and L7 virtual services are supported to Load balance traffic to connection servers. However, it is recommended to use L7 virtual services. This guide discussed using L7 virtual service to load balance traffic to connection servers.
Using an L7 Virtual Service
Create Custom Health Monitor for Connection Servers
- From the Avi UI, navigate to Templates > Profiles > Health Monitors.
- Click on Create.
- In the New Health Monitor screen, select the Type as HTTPS.
- Set the Send Interval to 30 seconds and Receive Timeout to 10 seconds.
The New Health Monitor screen is as shown below:
- Select the Response Code as 2xx.
- Select an appropriate SSL Profile.
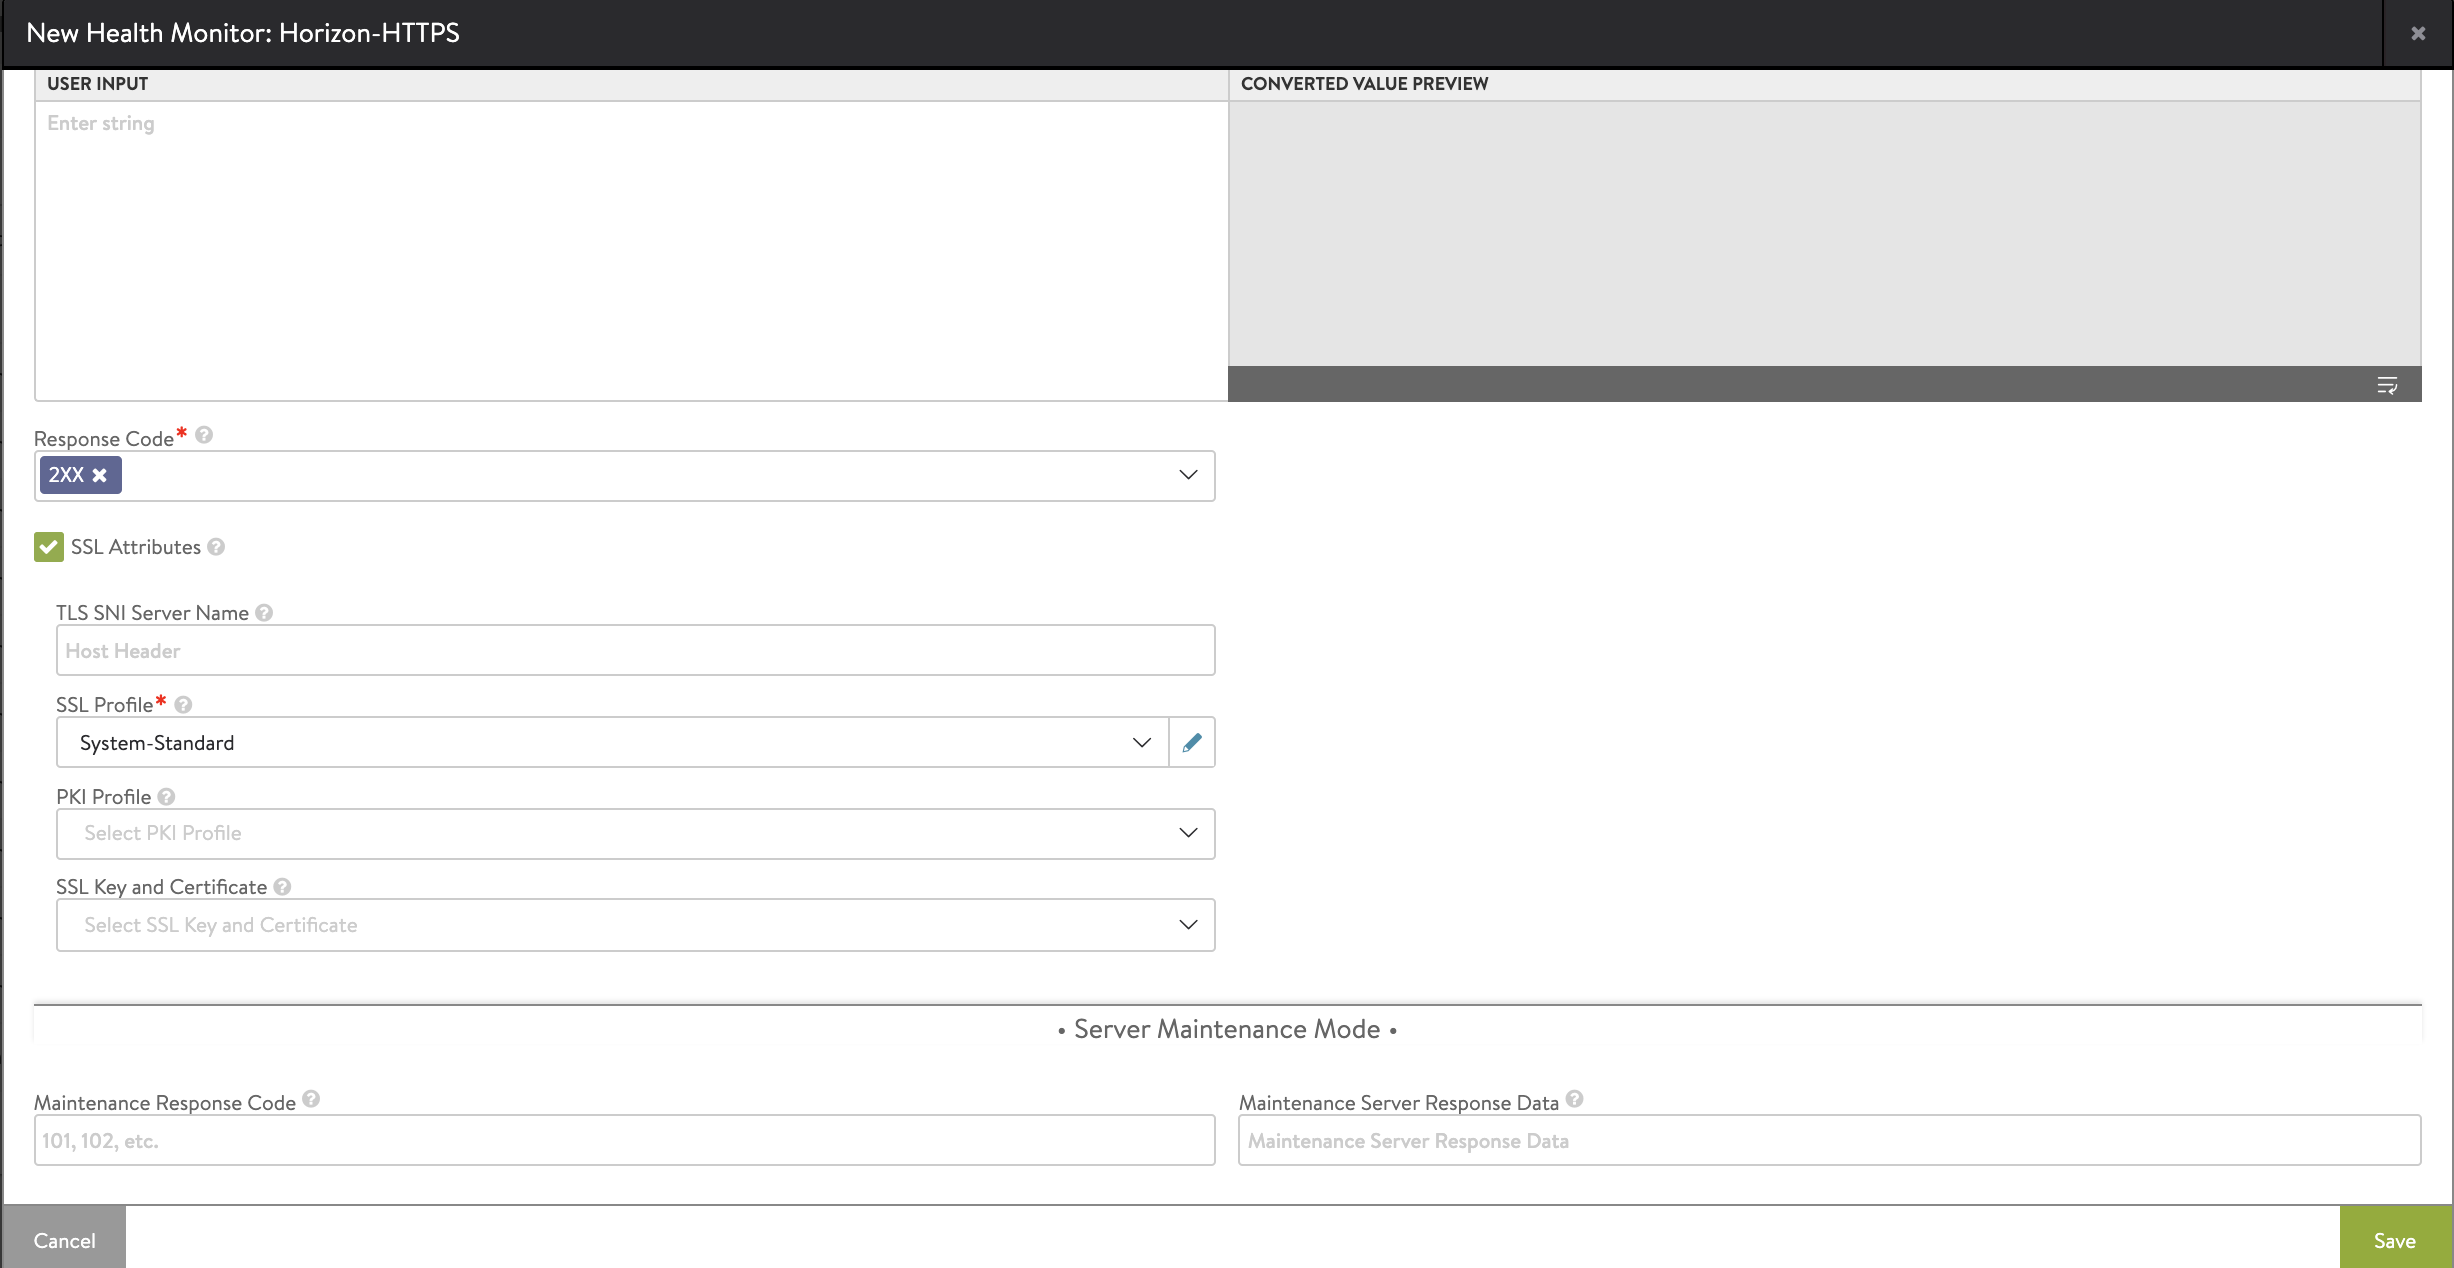
- Click on Save.
Create an SSL Profile
Create an SSL profile with session reuse disabled. Follow the steps shown below: To create a new SSL profile,
- In the Avi UI, navigate to Templates > Security > SSL/TLS Profile > Create > Application Profile.
- In the New SSL/TLS Profile screen, select the Ciphers and the TLS version.
- Enable TLS 1.1 and TLS 1.2 for backward compatibility with older Horizon clients.
- Ensure the option Enable SSL Session Reuse is disabled.
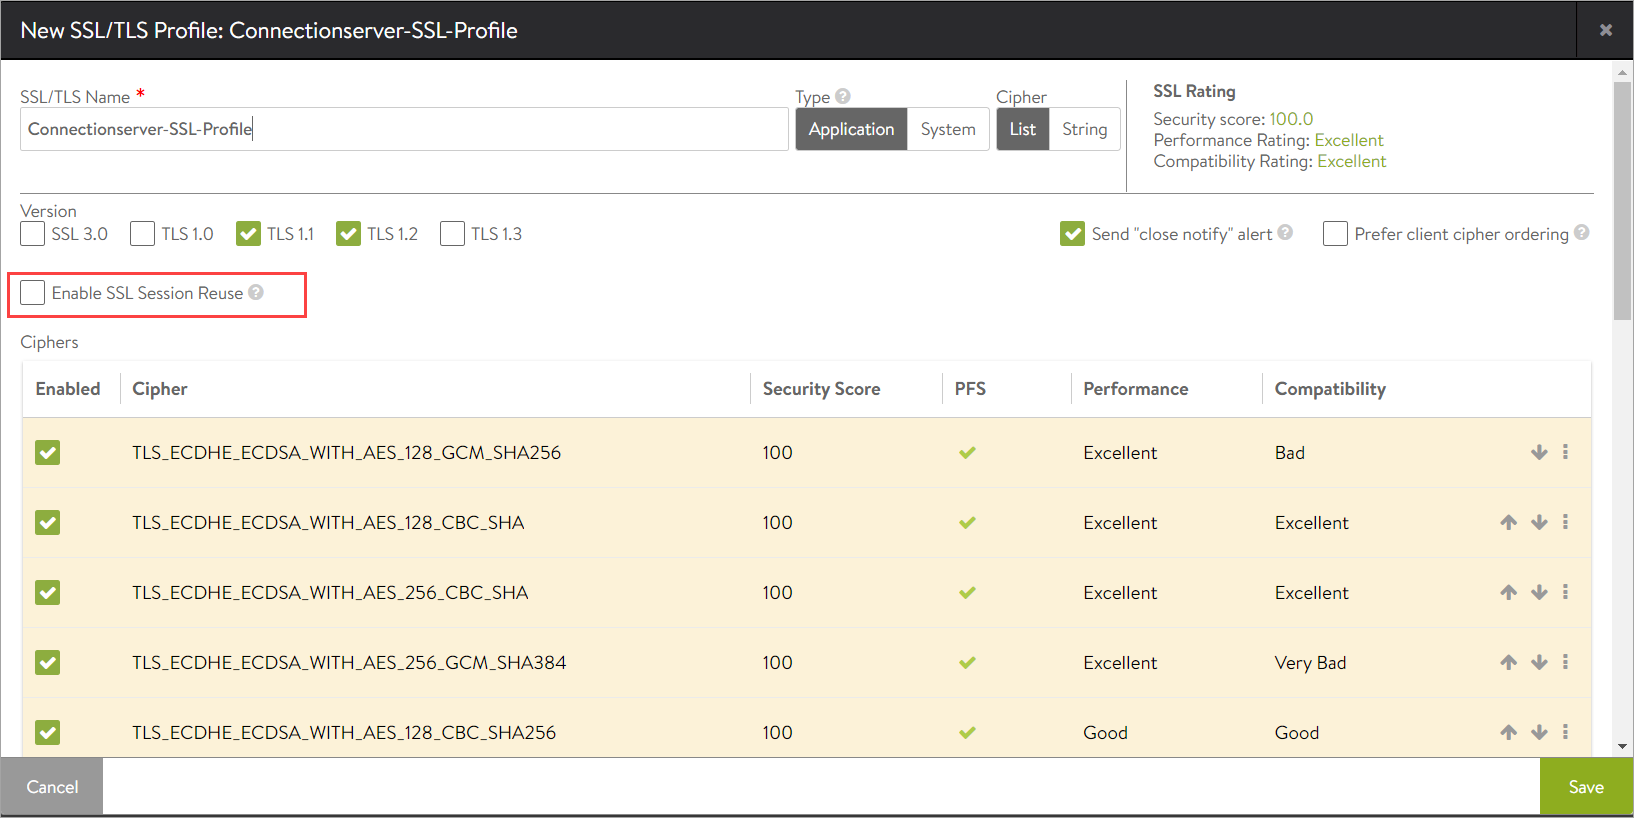
- Click on Save.
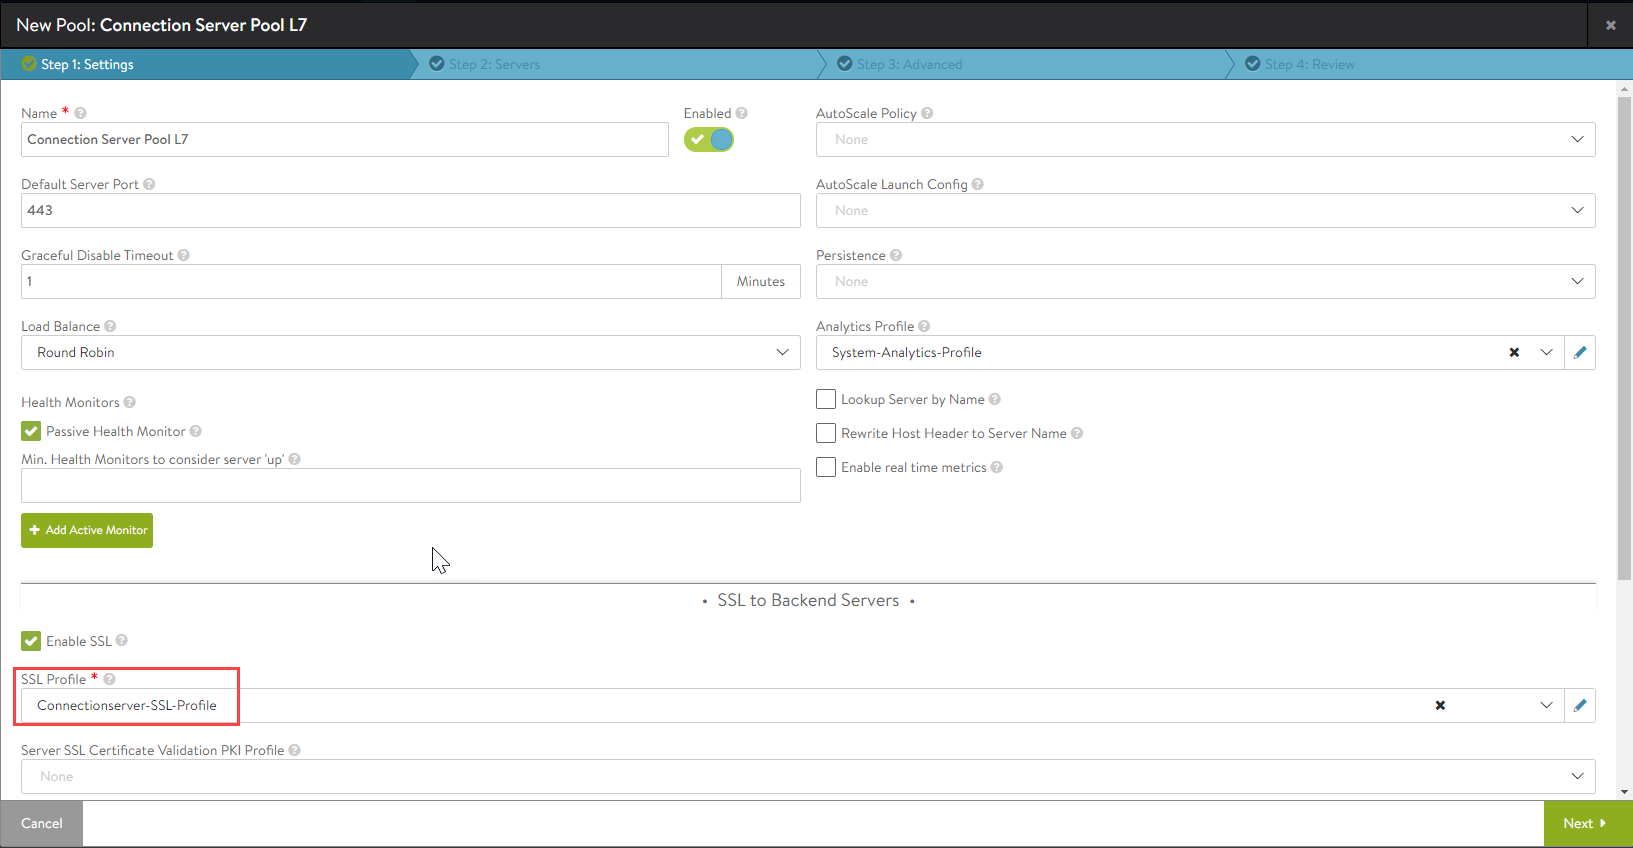
Creating a Pool
If connection servers are configured in the replication mode then persistence on the connection server is not required. In the non-replication mode, use Consistent Hash - Source IP address as the load balancing algorithm.
Enable SSL to backend and select the appropriate SSL profile (Connection-Server-SSL-Profile used here). To create a pool, from the Avi UI,
- Navigate to Applications > Pools.
- Click on Create Pool.
- Enter the details as shown below:
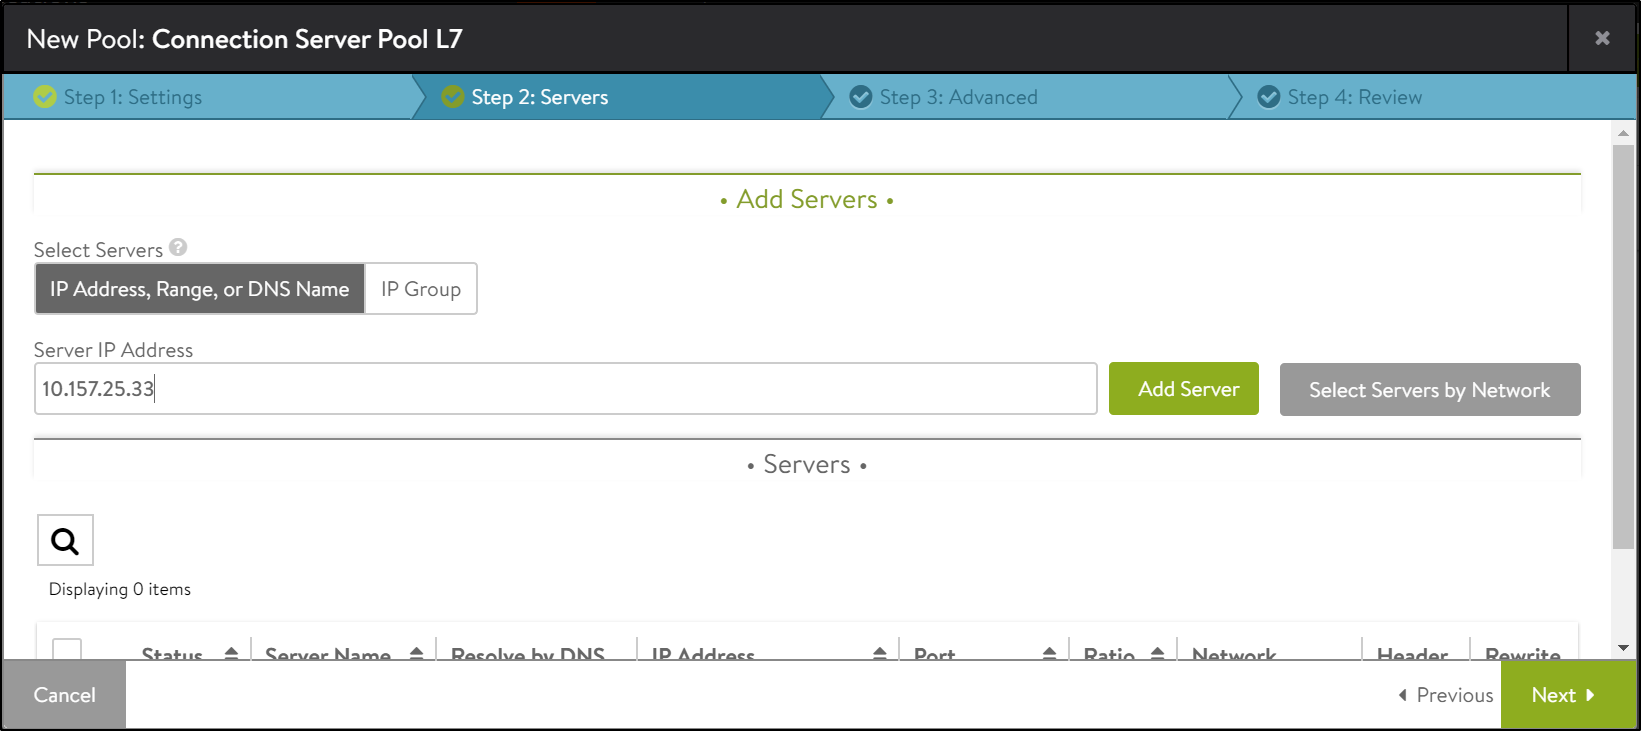
- Click on Next.
- Enter the Server IP Address and click on Add Server.
- Click Next and enter the details as required under the Advanced tab.
- Click Next and click Save.
Creating an Application Profile
Use an HTTPS application profile, with Connection Multiplex and X-Forwarded-For disabled

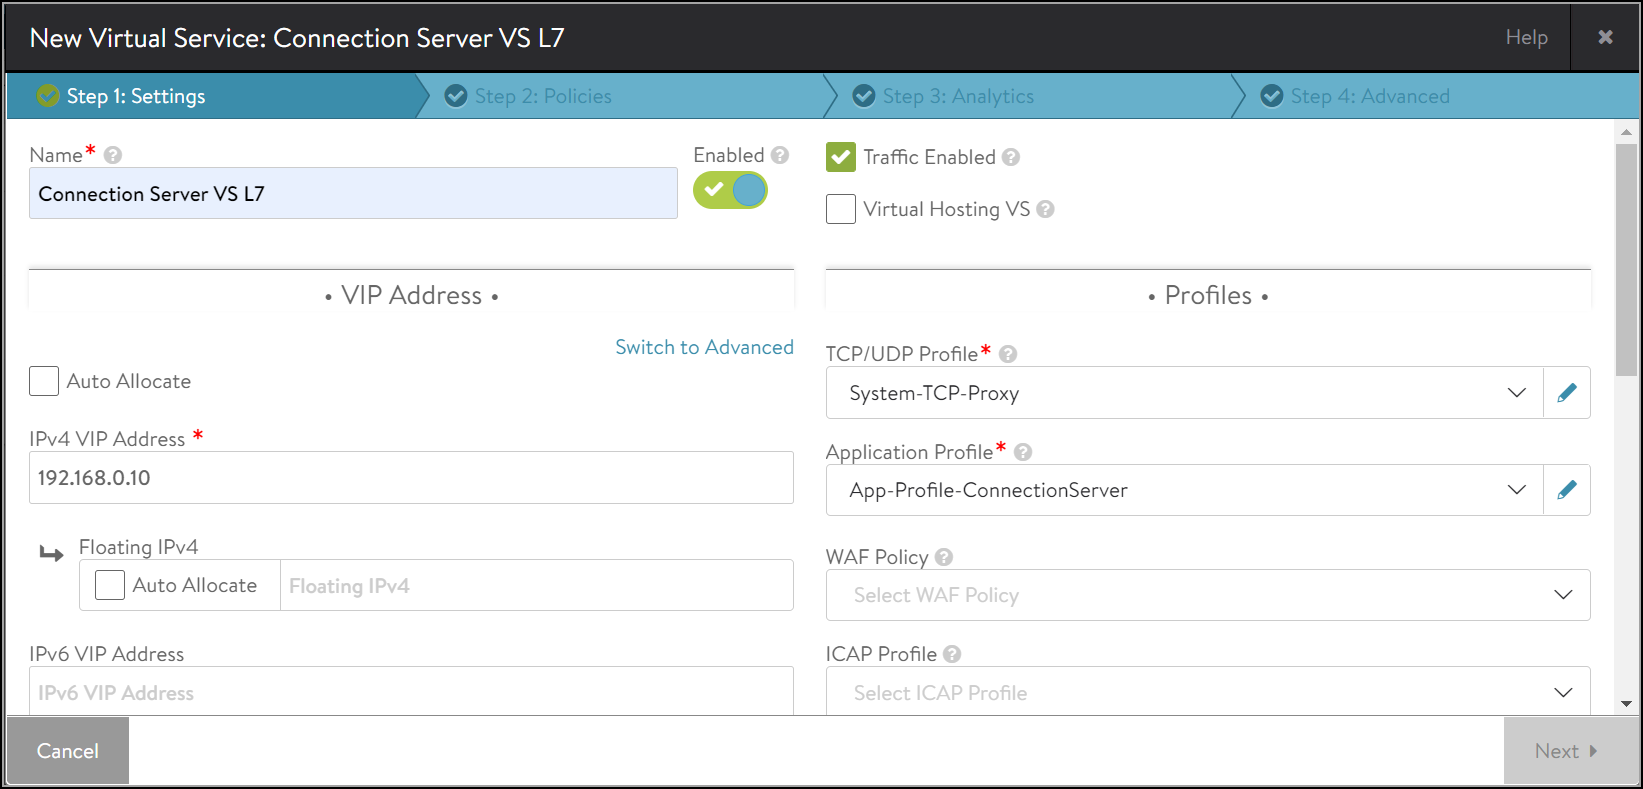
Creating an L7 Virtual Service
To create the L7 virtual service,
- Navigate to Applications > Virtual Services.
- Click on Create Virtual Service > Advanced Setup.
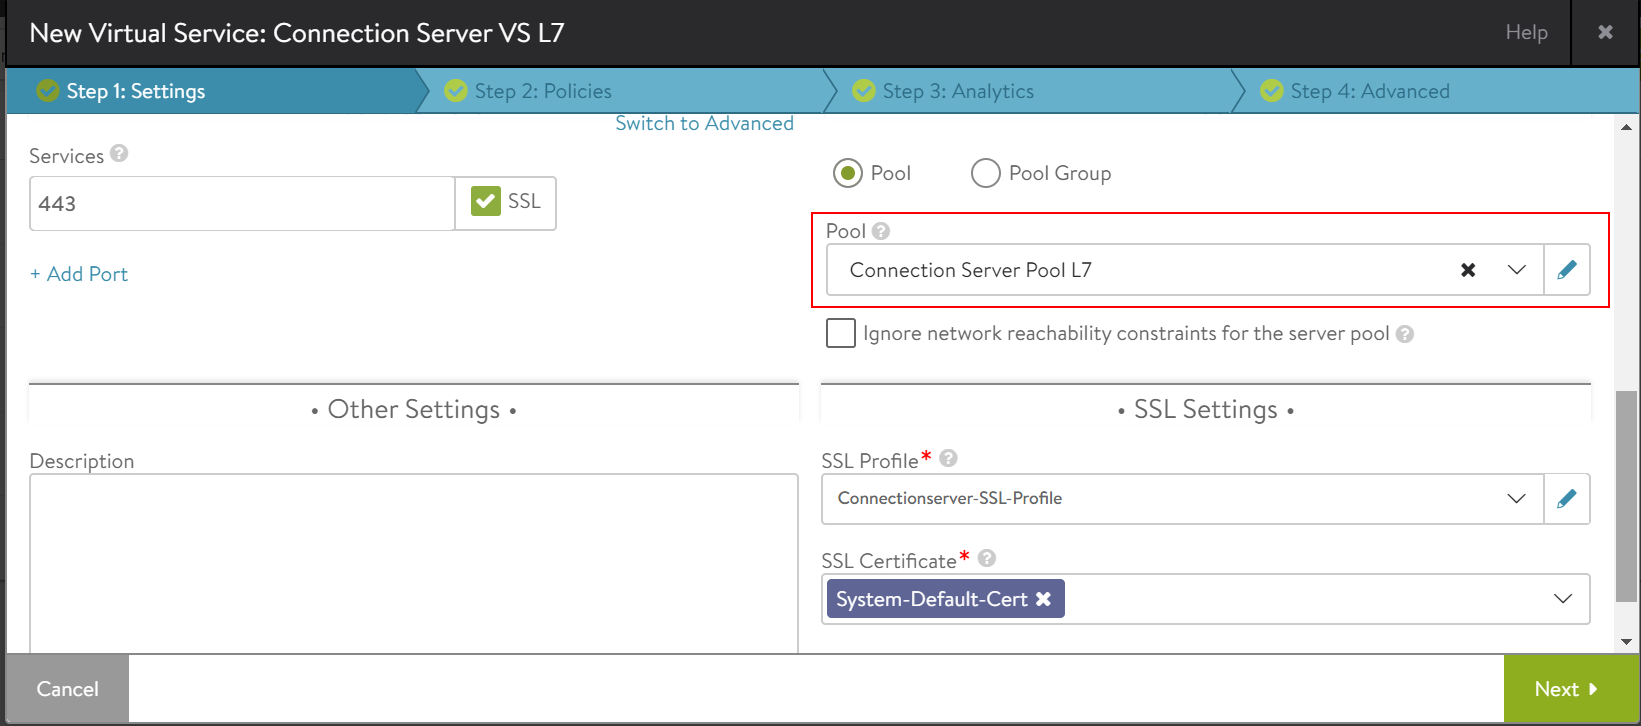
- Enable SSL and choose the required SSL Profile.
- Select the Connection Server Pool. The virtual service is as shown below:
- Click on Next and navigate to Step 4: Advanced.
- Click on Save.
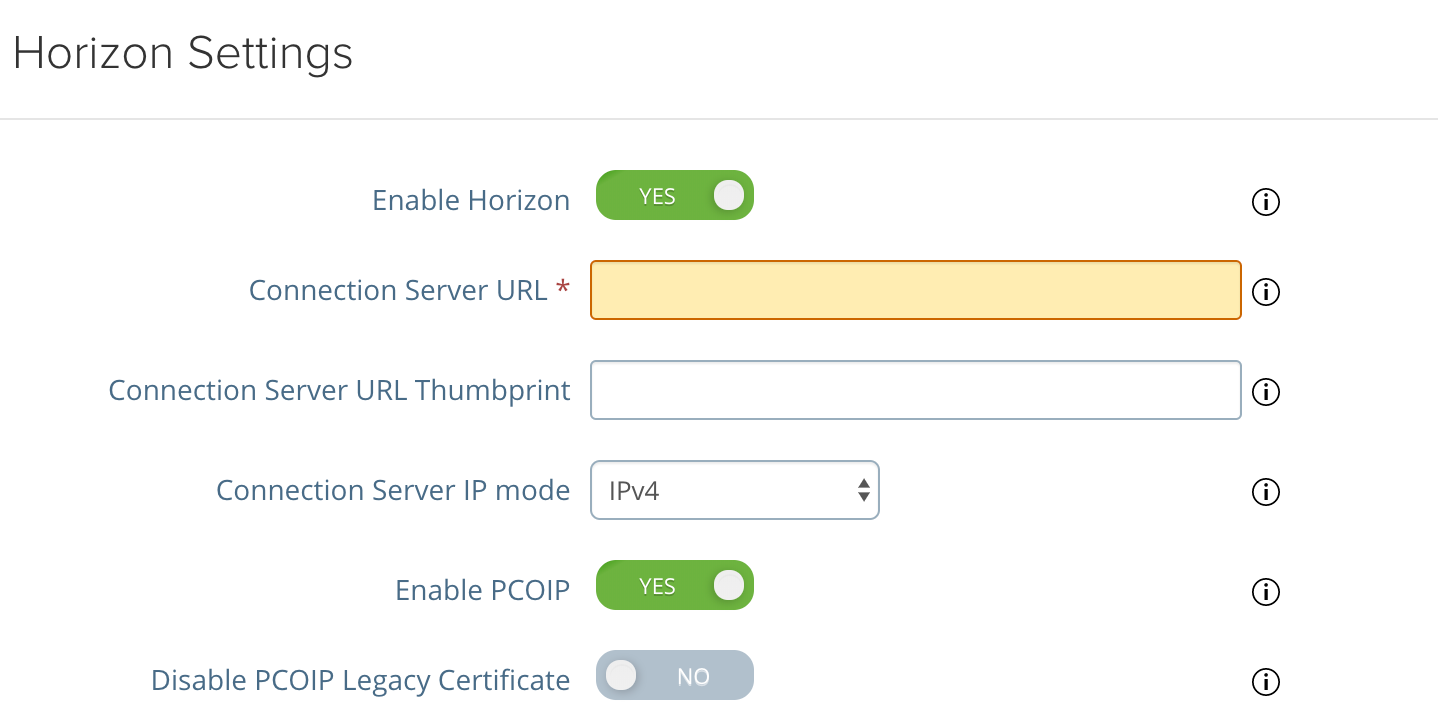
The following are the changes in the UAG server when the load balancer is present between the UAG and connection server:
-
The connection server URL should point to the Avi load balancer.
-
The connection server URL thumb print:
-
For an L7 virtual service: The connection server URL thumbprint is taken from the certificate that is bound to the Avi load balancer.
-
For an L4 virtual service: The connection server URL thumbprint is be taken from the certificate that is present in the connection server itself.
-
For an L4 virtual service with SSL (System-SSL-Application) the connection server URL thumbprint is taken from the certificate that is bound to the Avi load balancer.
-
Note: In case of connection servers, connection multiplexing has to be disabled for the System-Secure-HTTP-VDI profile. To know how to disable connection multiplexing, click here.
Enabling WAF For UAG Traffic
Avi Vantage supports WAF for HTTP/HTTPS traffic for Horizon deployments. WAF rules are supported for L7 virtual service for primary protocol (XML/API) traffic.
Notes:
- It is recommended to use the default CRS rules. The other rules for response inspection are not required and these signatures or rules should not be enabled in CRS rules.
- It is mandatory to add the WAF policy and allowed URI containing /ice/tunnel/ and /ice/reconnect to make sure the WAF feature works seamlessly with the horizon application. Similarly, allow other /ice/ related URIs, if any. Allowing all URIs beginning with /ice is a best practice.
-
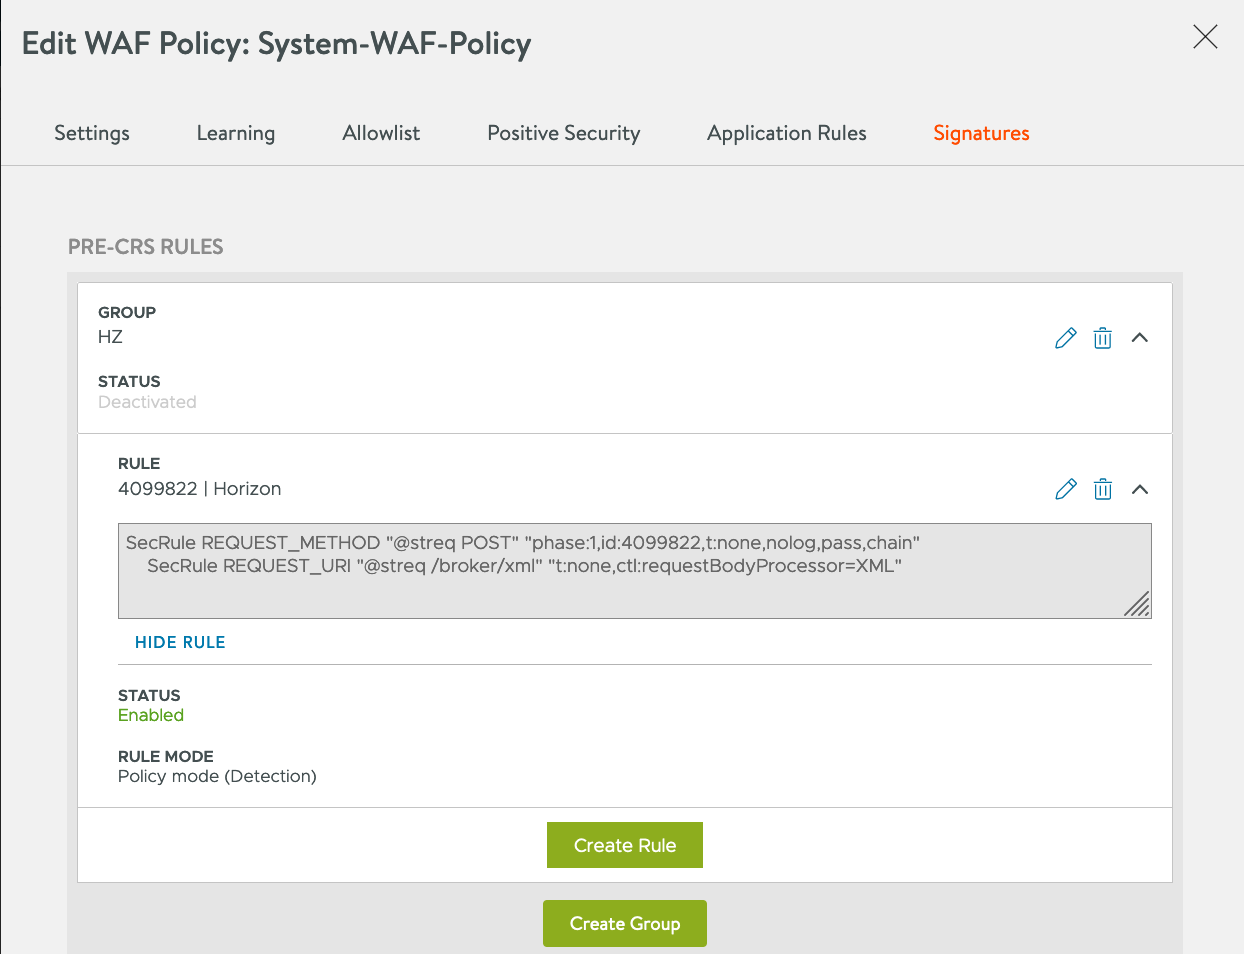
Use the following to add a pre-CRS rule as shown below.
SecRule REQUEST_METHOD "@streq POST" "phase:1,id:4099822,t:none,nolog,pass,chain" SecRule REQUEST_URI "@streq /broker/xml" "t:none,ctl:requestBodyProcessor=XML" - It is recommended to disable command injection rule(932105).
Create a L7 virtual service (or use the existing virtual service) and follow the steps mentioned below:
-
Creating a WAF profile
Navigate to Template > WAF > WAF Profile. Click on create to create a new profile. Provide the desired name and leave the remaining fields as default as shown below.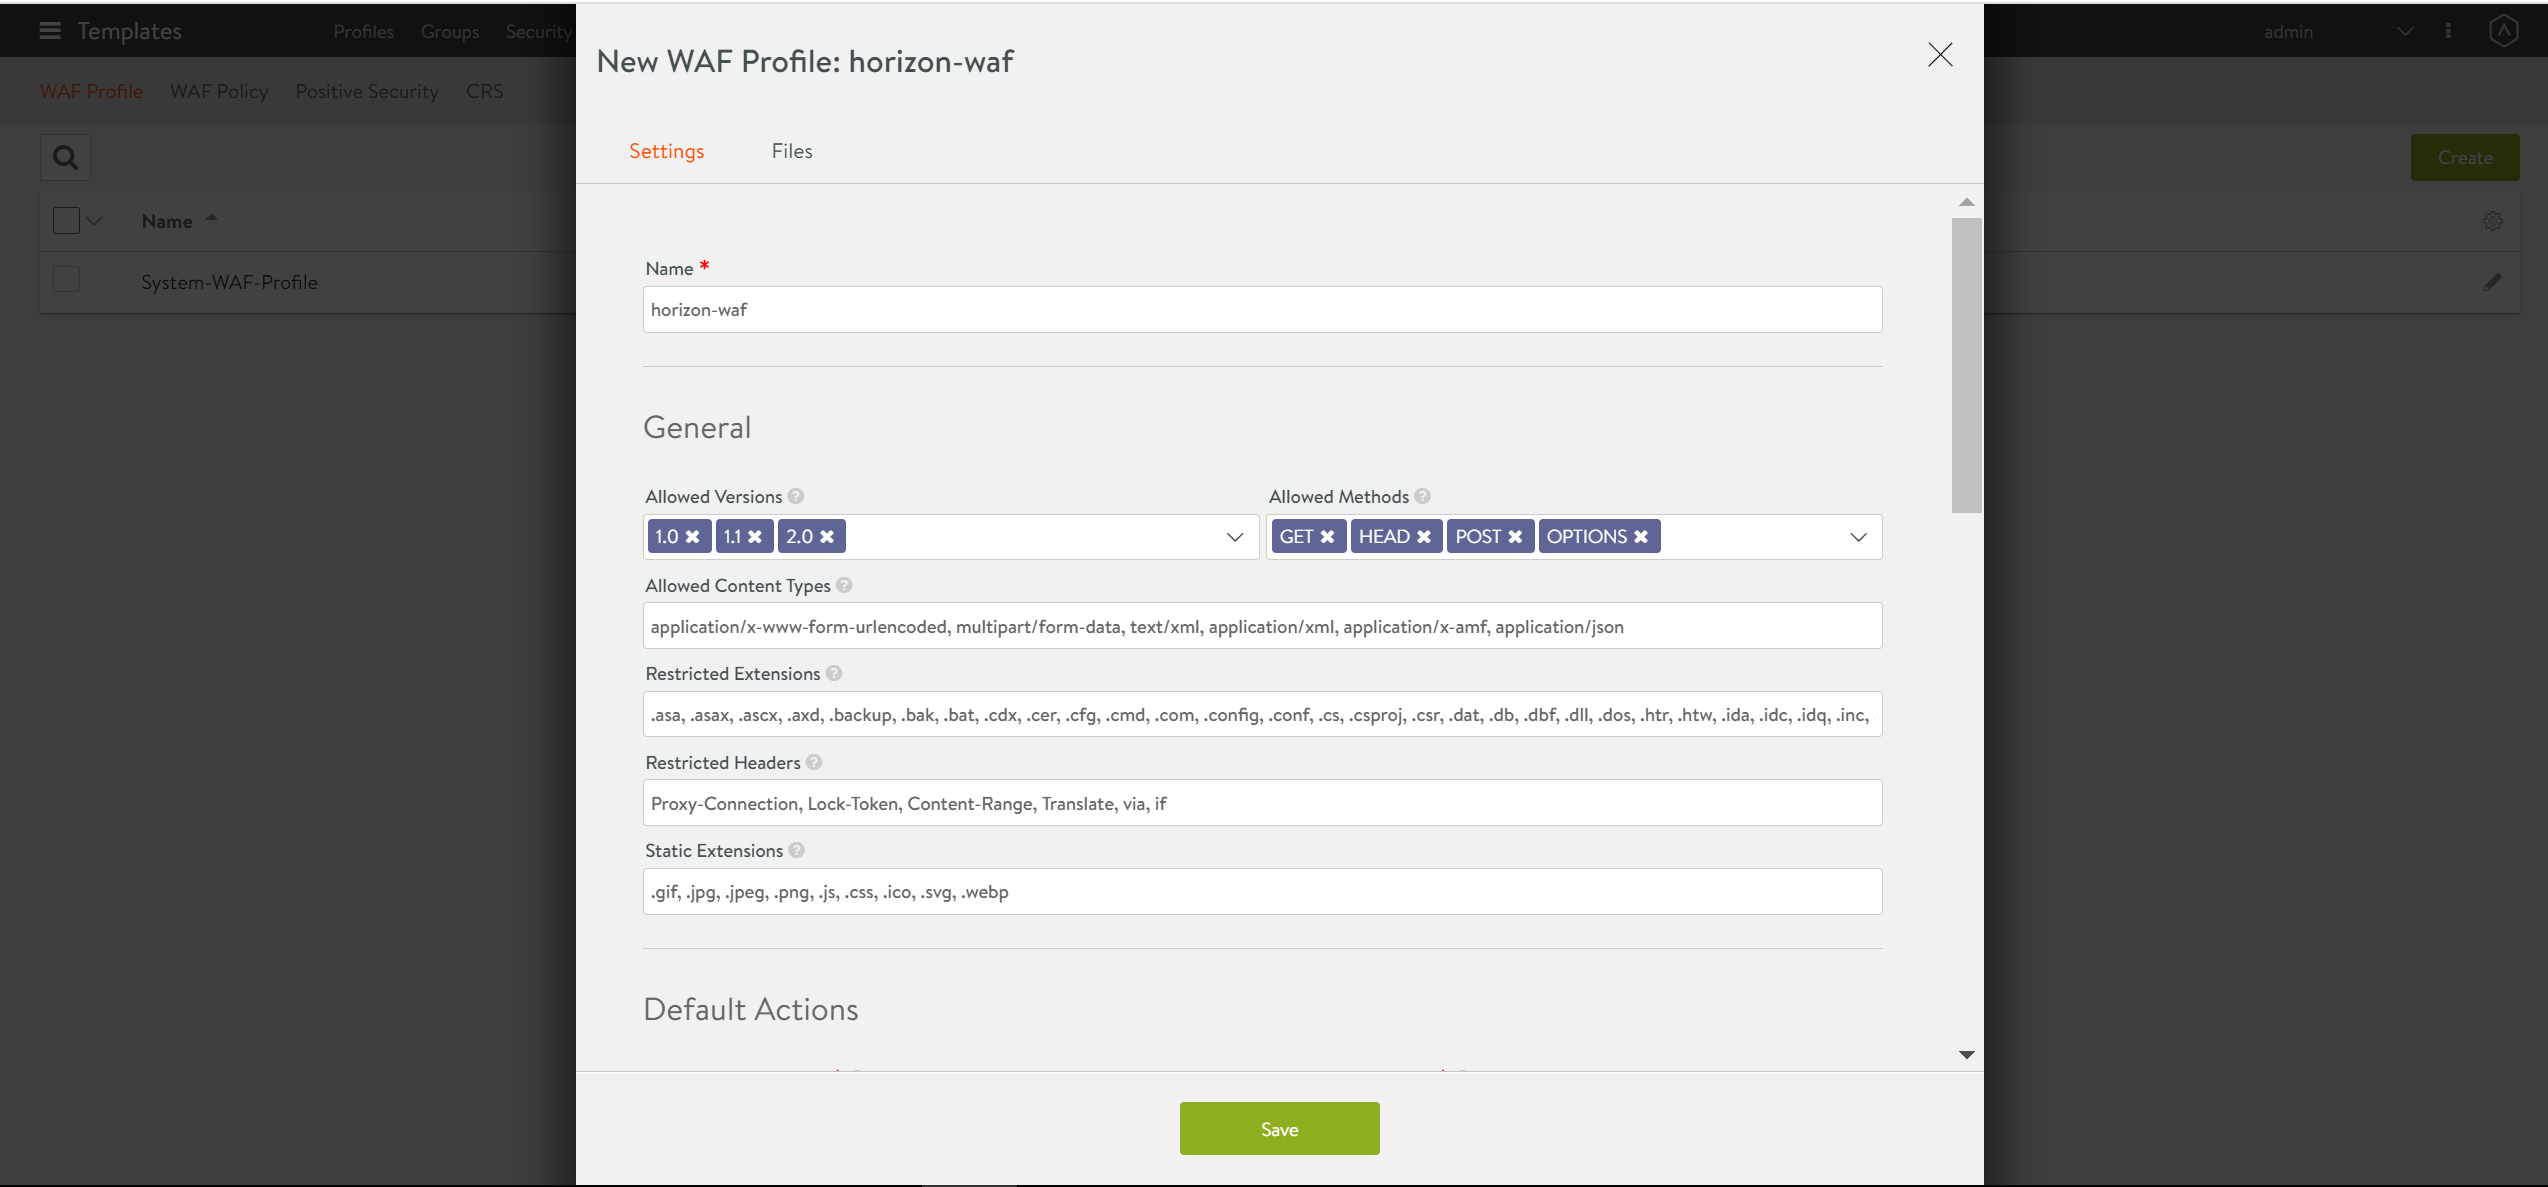
-
Creating WAF policy
Navigate to Template > WAF > WAF Policy. Select the WAF profile created in the previous step. The default profile can be used too.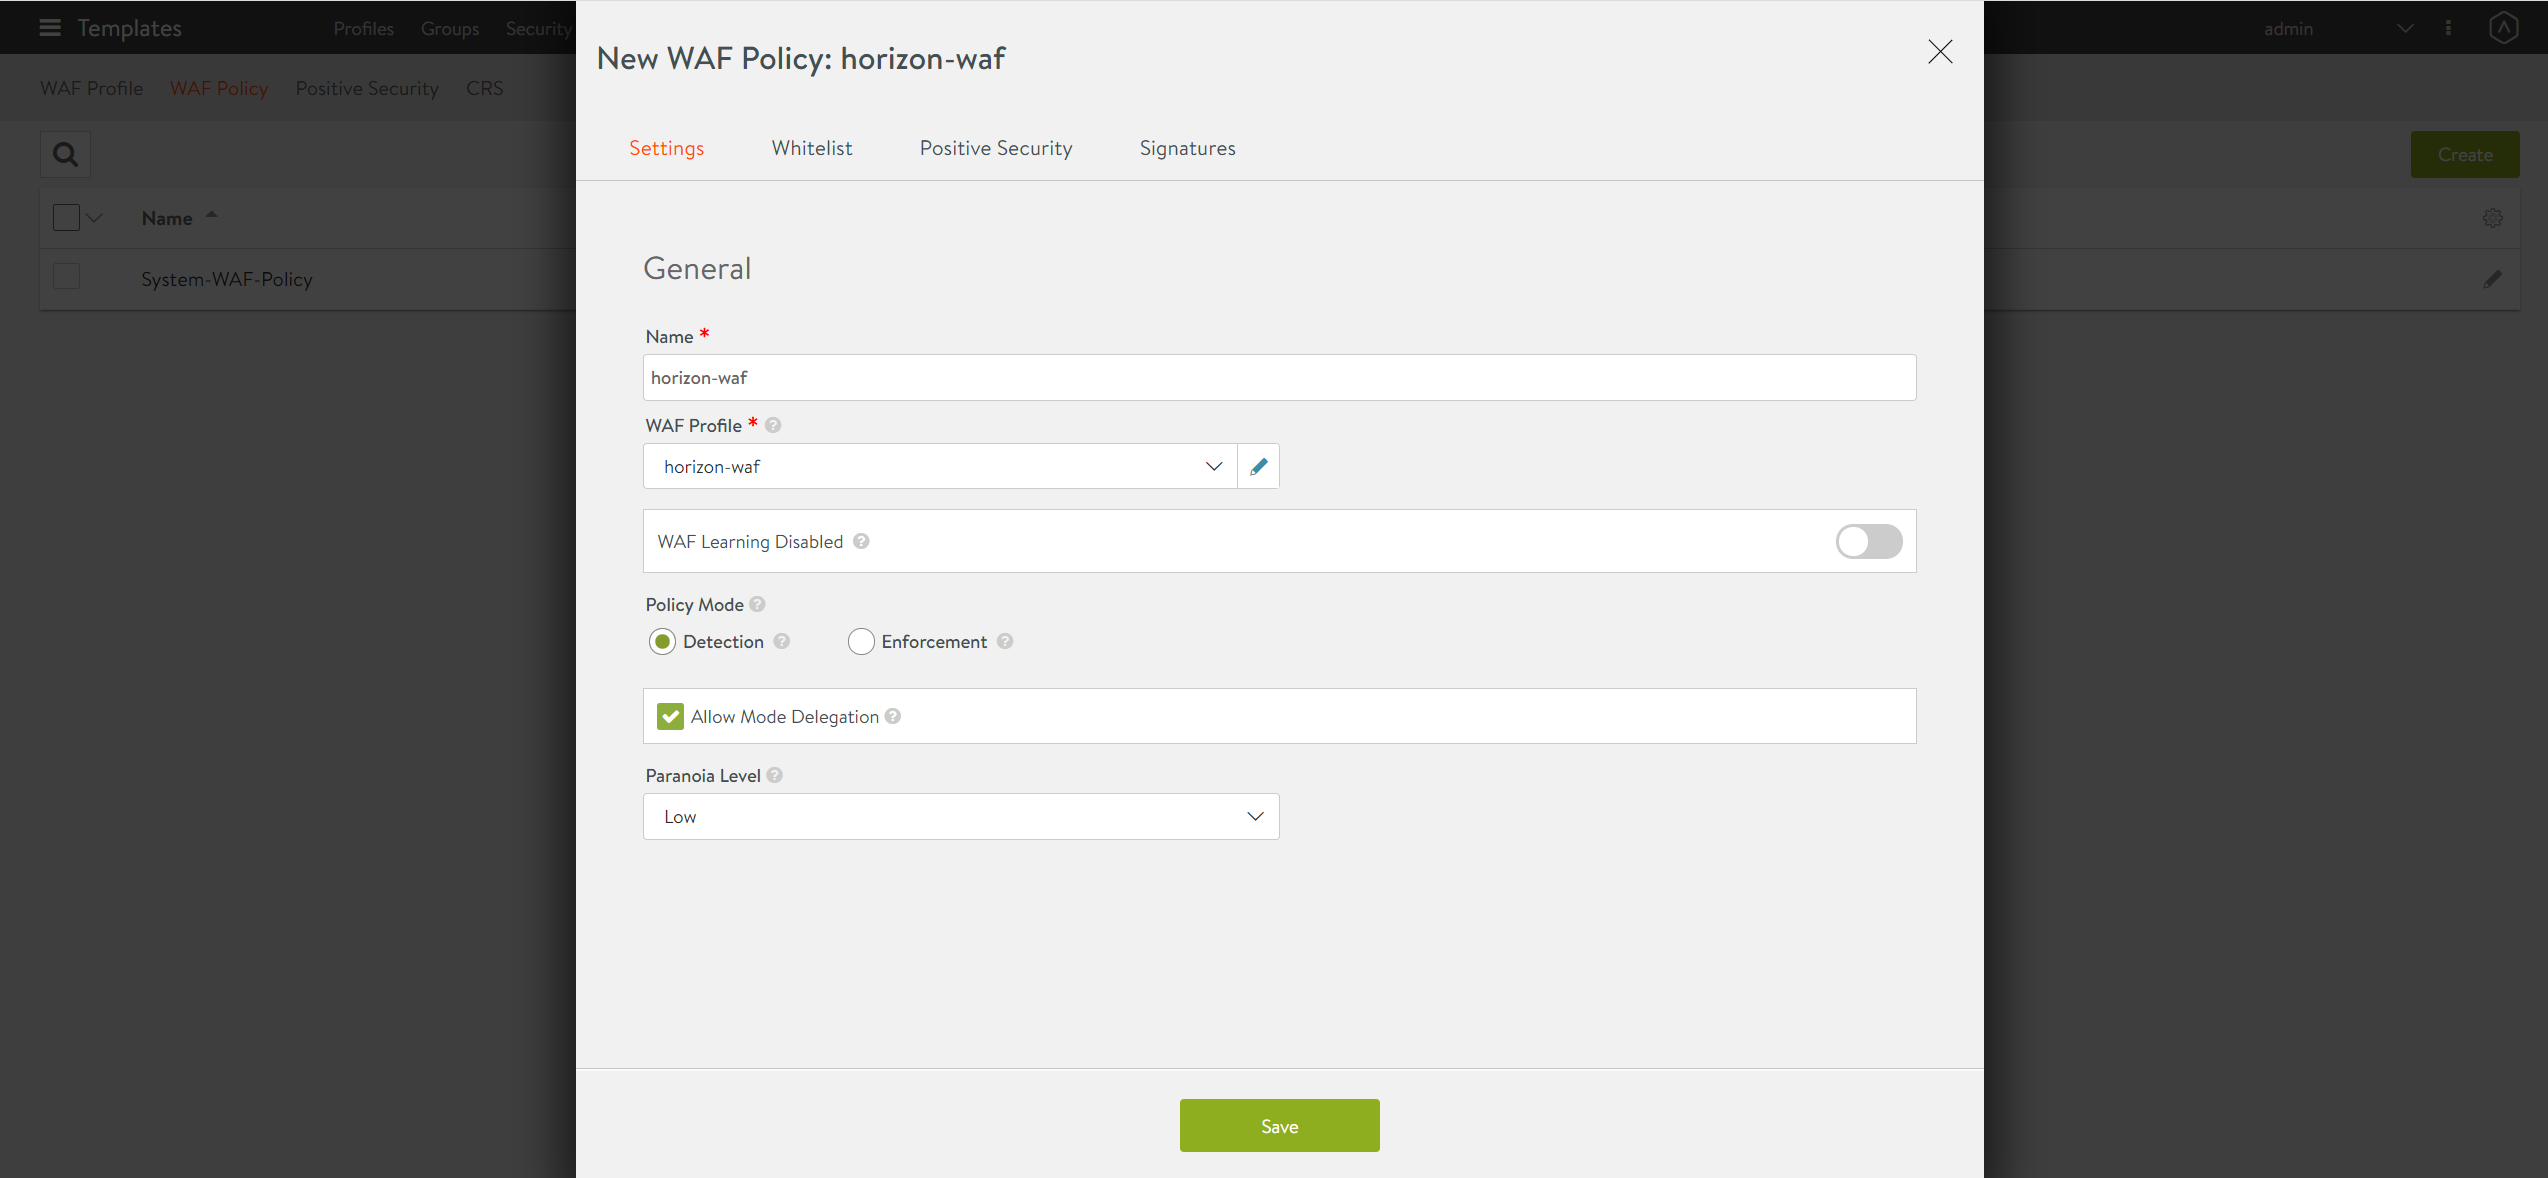
-
Adding a allowlist rule
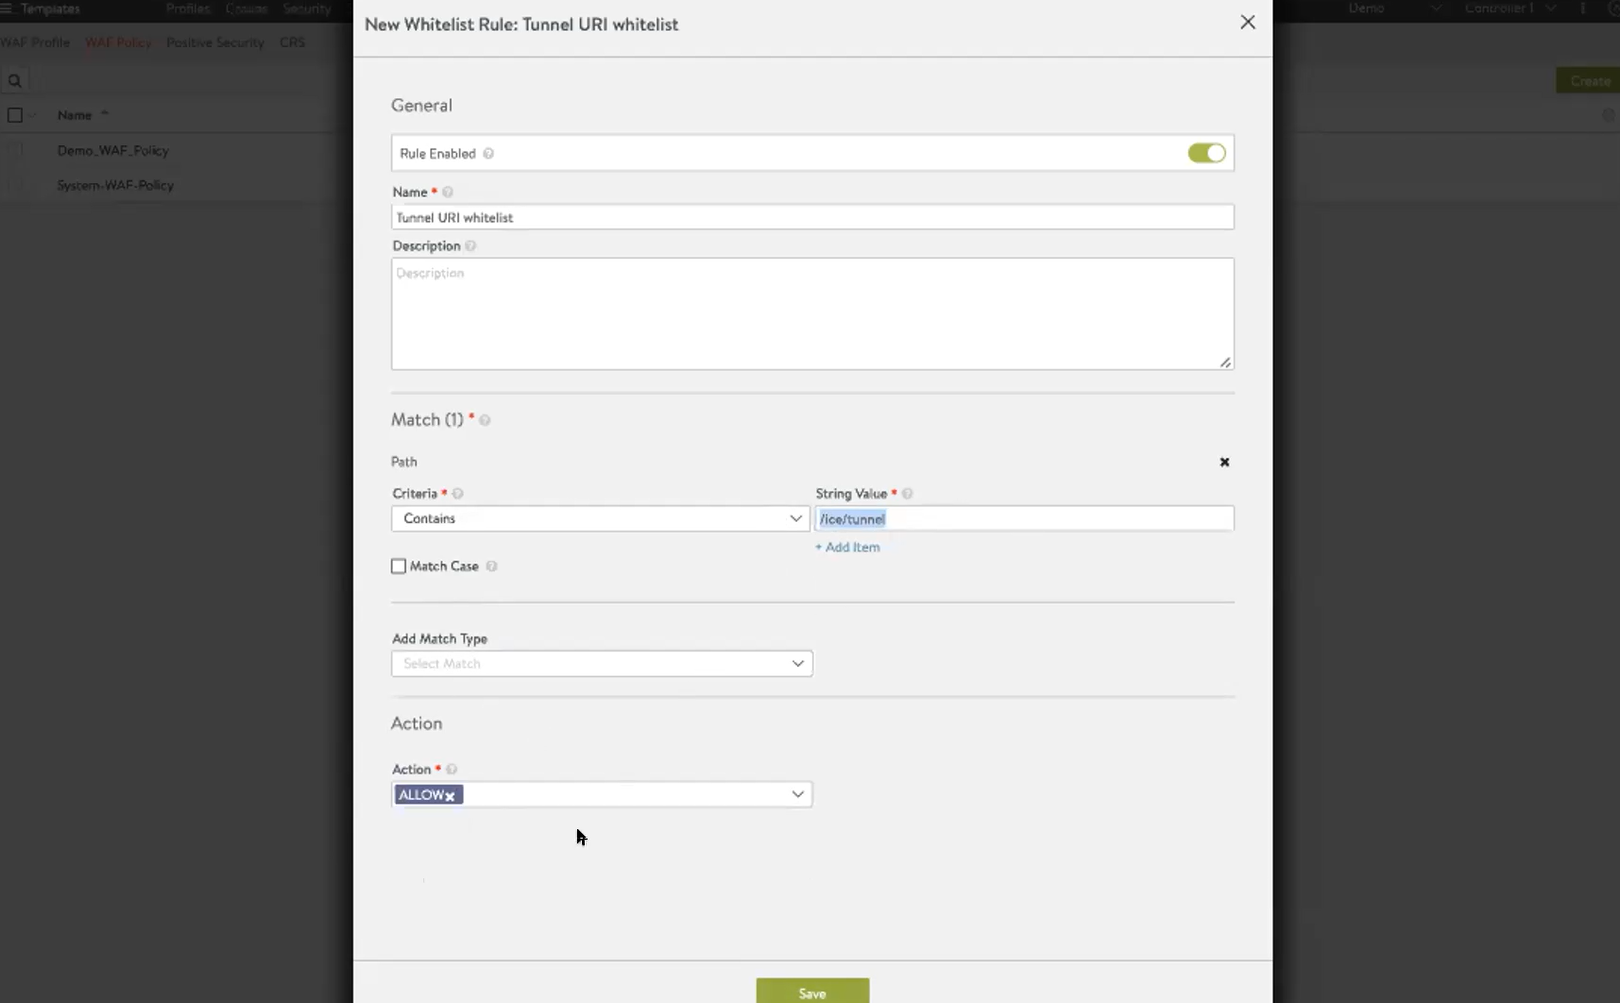
This allowlist makes sure WAF does not block the request having URI which contains /ice/tunnel. This is a mandatory step. Select the Allowlist tab, click on Add Rule.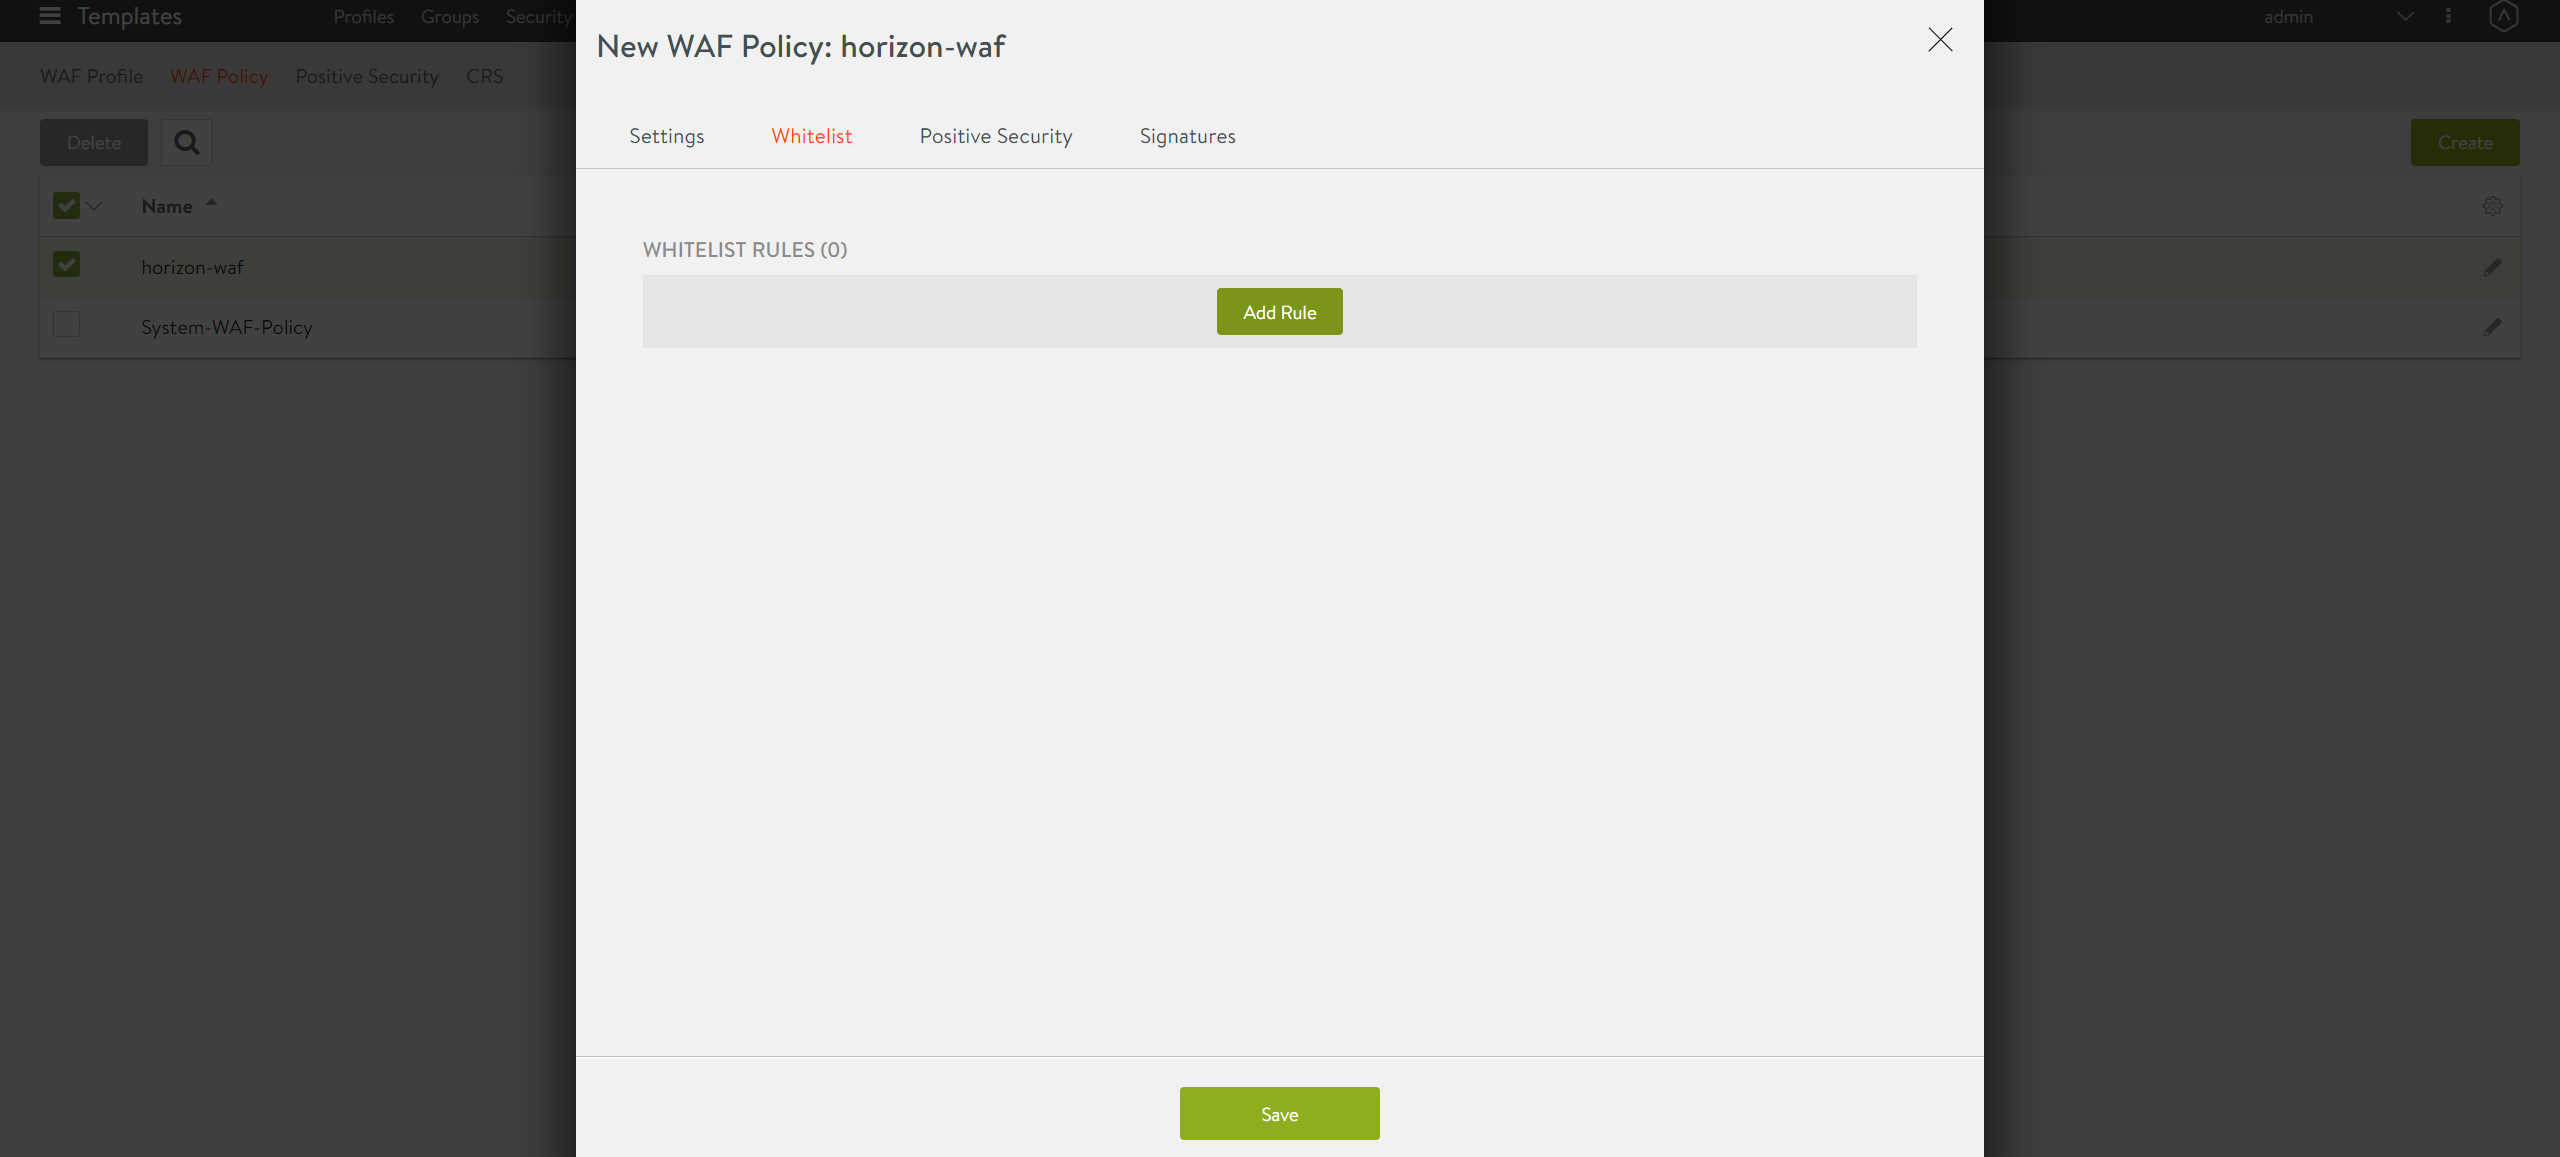
Provide the following attributes:- Criteria: Contains
- String Value: /ice/tunnel/
- Action: ALLOW
To allow all URIs beginning with /ice, create the rule as shown below:
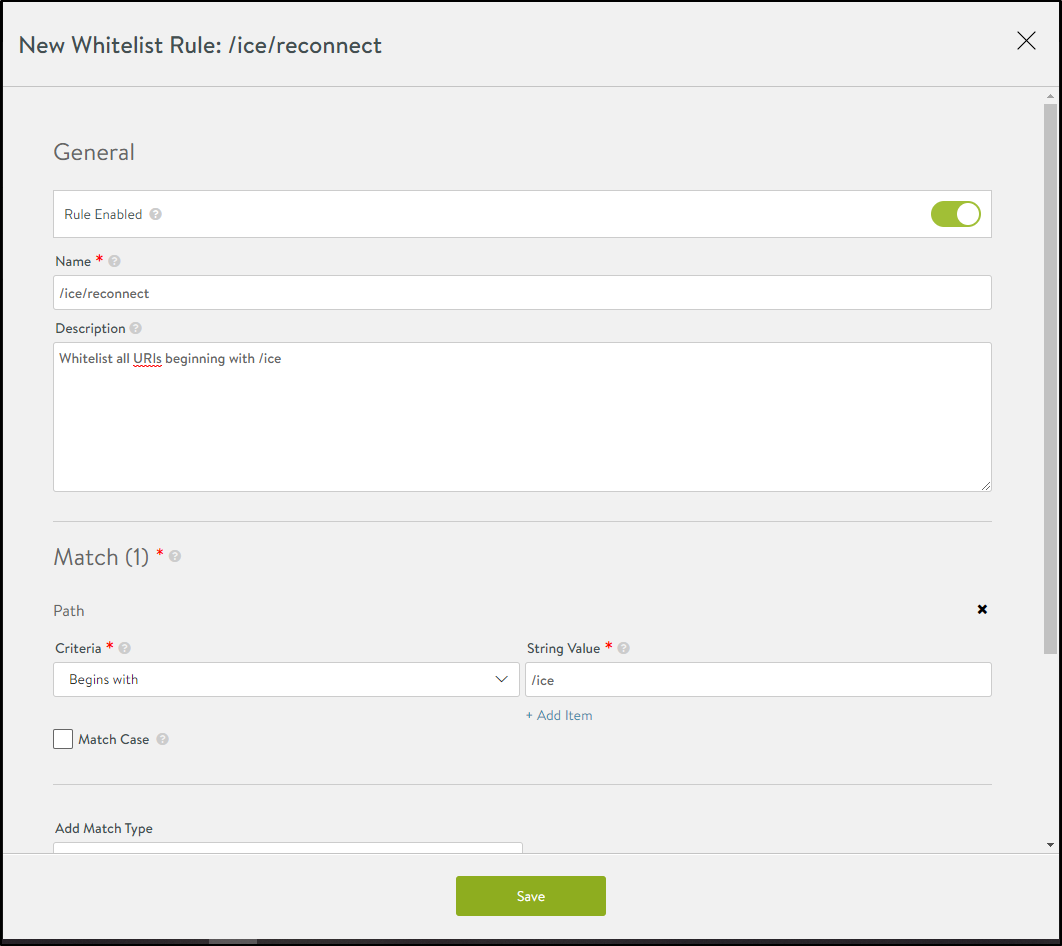
Similarly, you can create another allowlist rule for /ice/reconnect.
To add pre-CRS rule, click Save and click on Signatures > Add PRE-CRS Rules as shown below.
-
Associating with the required virtual service
Once the WAF profile is ready, navigate to Application > Virtual Service. Select the required L7 virtual service and associate the WAF policy created in the previous step as shown below.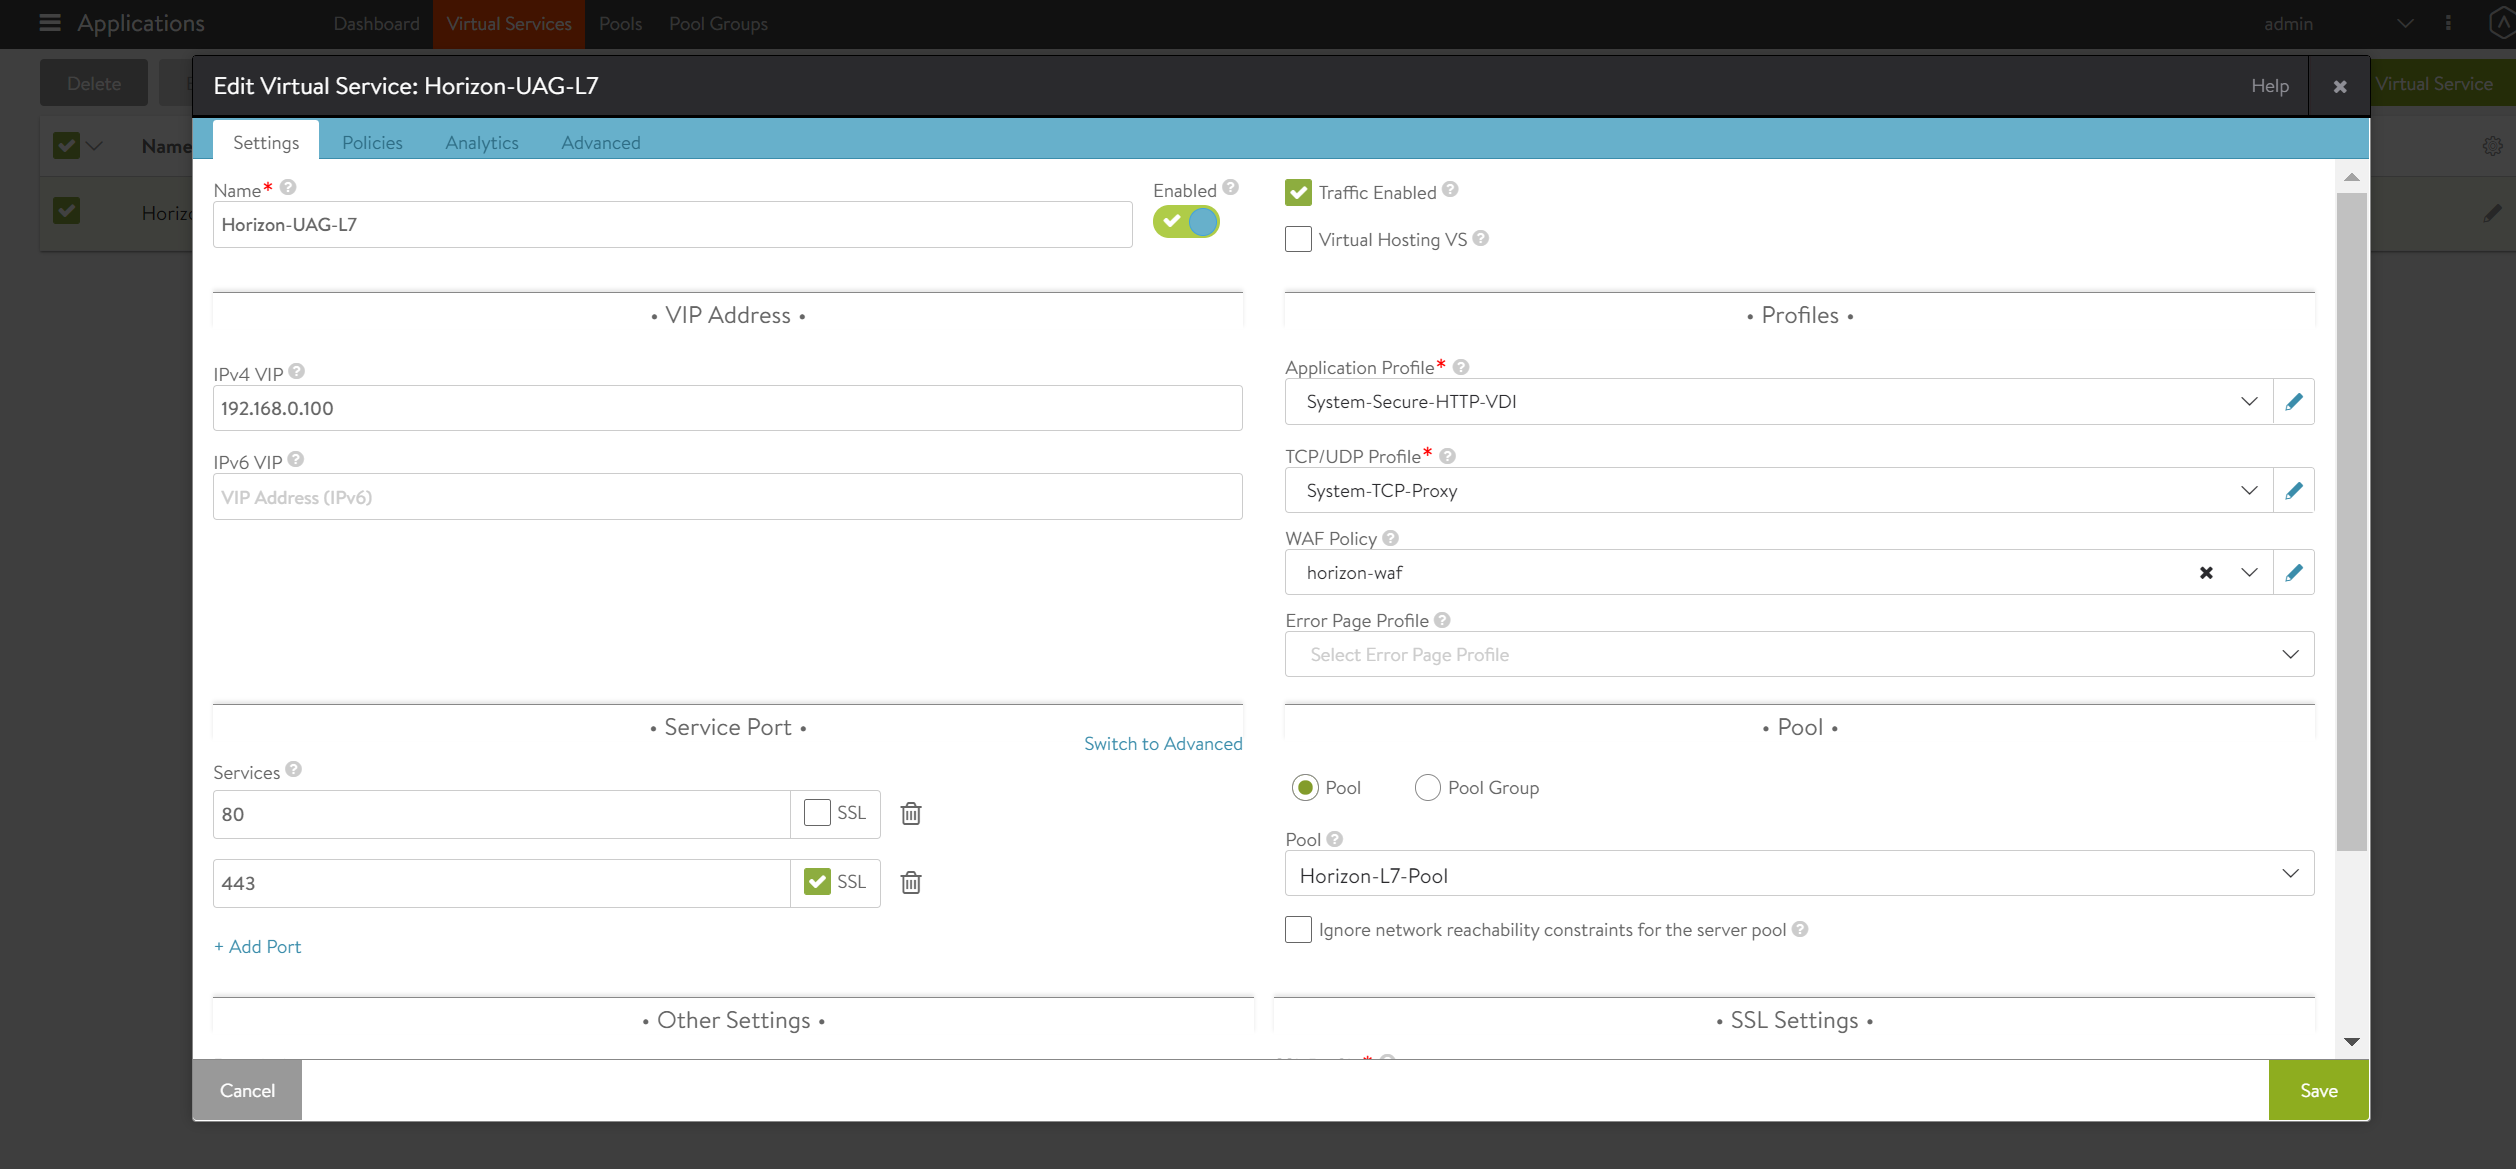
Load Balancing App Volume Manager
Load balancing for app volume manager is achieved by configuring an L7 virtual service with HTTPS application profile.
To configure an L7 virtual service with HTTPS application profile,
-
Create a new SSL profile (Optional), if required. However, the default SSL profile can be used if the default configurations do not have to be modified.
Note: For the purpose of this document, the default SSL profile is used.
Creating a Custom Health Monitor for App Volume Manager
To create a custom health monitor,
-
From the Avi UI, navigate to Templates > Profiles > Health Monitors.
-
Click on Create.
-
Select the vCenter cloud that was created for Horizon components.
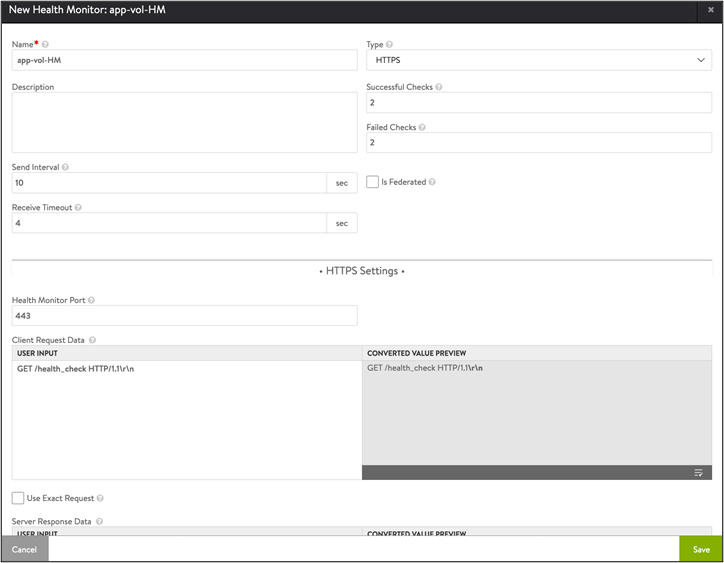
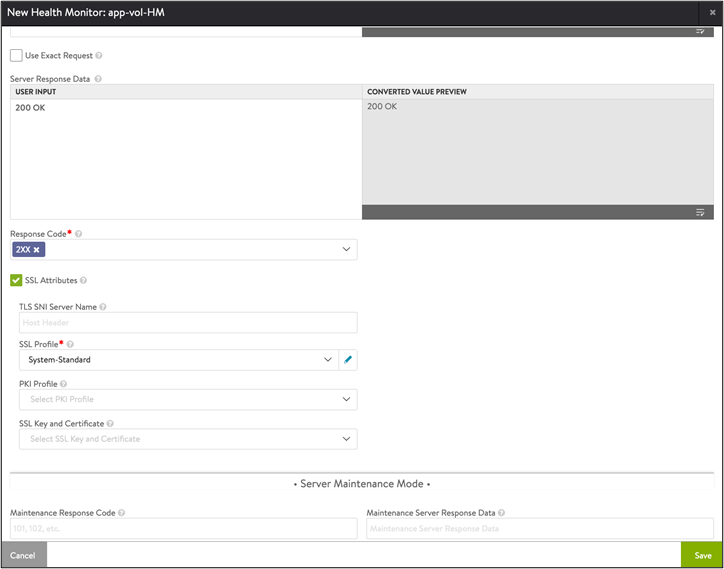
- Enter the following details in the New Health Monitor screen:
Field Value Send Interval 30 Recieve Timeout 10 Client Request Data GET /health_check HTTP/1.0 Response Code 2xx The New Health Monitor screen is as shown below:
- Click on Save.
Install the SSL certificate Required for L7 VIP
The SSL connection is being terminated at Avi virtual service. Therefore, the SSL certificate must be assigned to the virtual service. It is recommended to install a certificate which is signed by a valid certificate authority instead of using self-signed certificates.
Install the certificate in Avi Vantage and ensure the CA certificate is imported and linked. For instructions, refer to Import Certificates
Note: For this set up, a certificate named Horizon_Certificate has been installed. You can install a different certificate for the app volume manager.
Creating the App Volume Manager Pool
-
From the Avi UI, navigate to Applications > Pools.
-
Select the vCenter cloud from the Select Cloud sub-screen.
-
Click on Next.
-
Click on Create Pool.
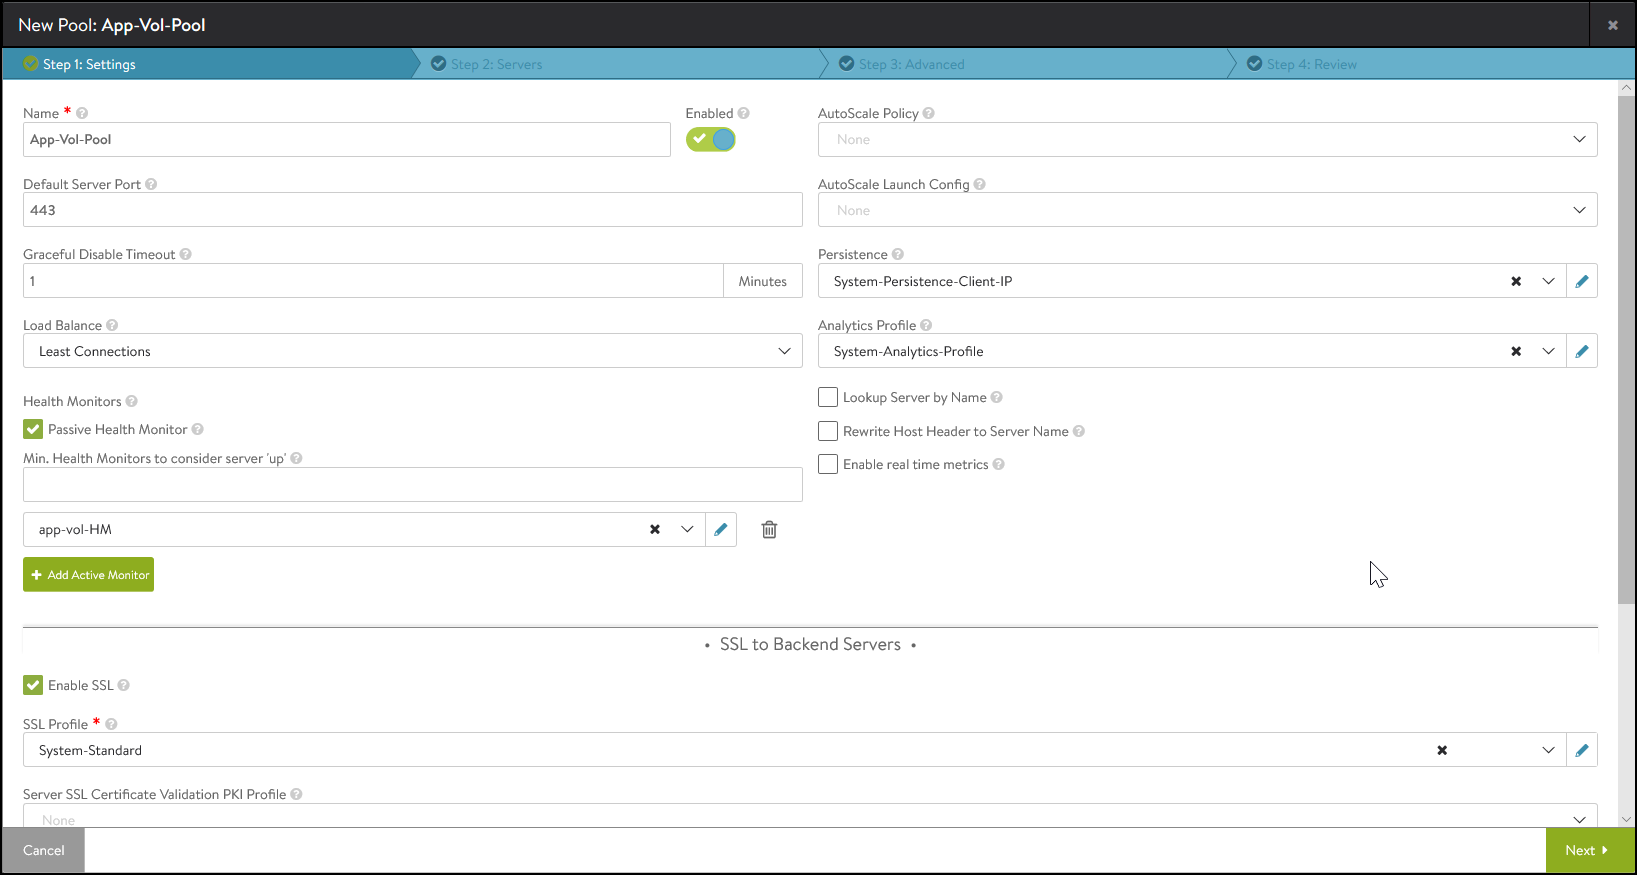
- In the New Pool: screen, update the details as shown below:
Field Value Default Server Port 443 Persistence System-Persistence-Client-IP Load Balance Least Connections Analytics Profile Systems-Analytics-Profile -
To bind the monitor, click on Add Active Monitor and select the HTTPS Health Monitor that was created.
-
Under SSL to Backend Servers, select Enable SSL.
-
Select System-Standard as the SSL Profile.
The New Pool screen appears as shown below:
-
Click on Next.
-
Enter the Server IP Address and click on Add Server.
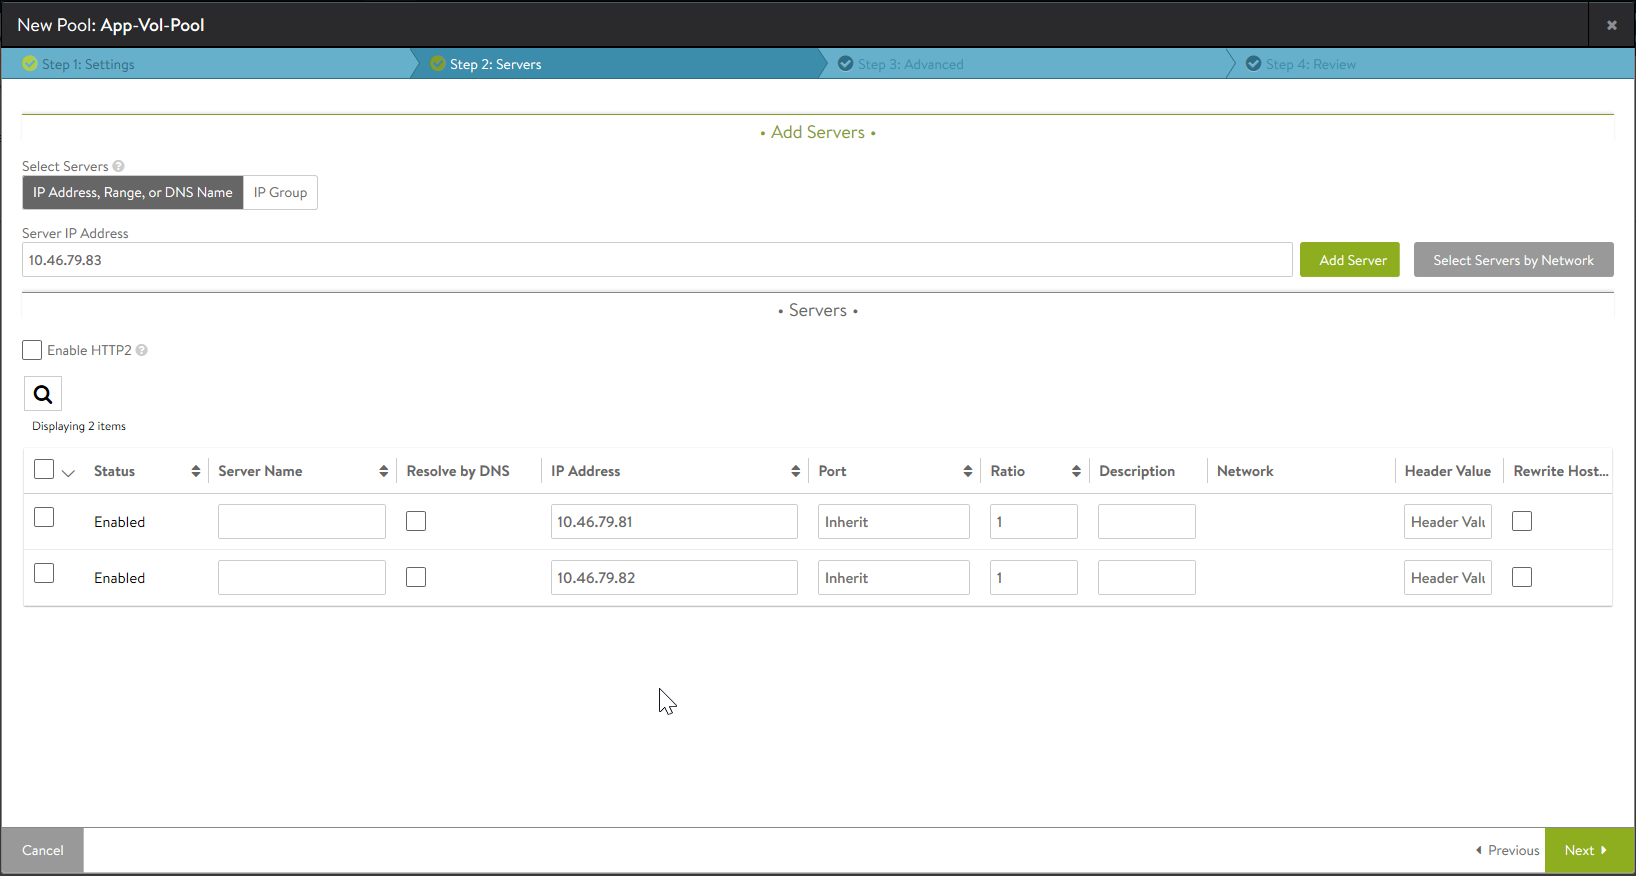
- Click on Next and Save.
Creating Application Profile
-
From the Avi UI, navigate to Templates > Profiles.
-
Click on Create.
-
Enter the Name of the profile.
-
Select the Type as HTTP.
-
Ensure Connection Multiplex is disabled.
The New Application Profile screen is as shown below:
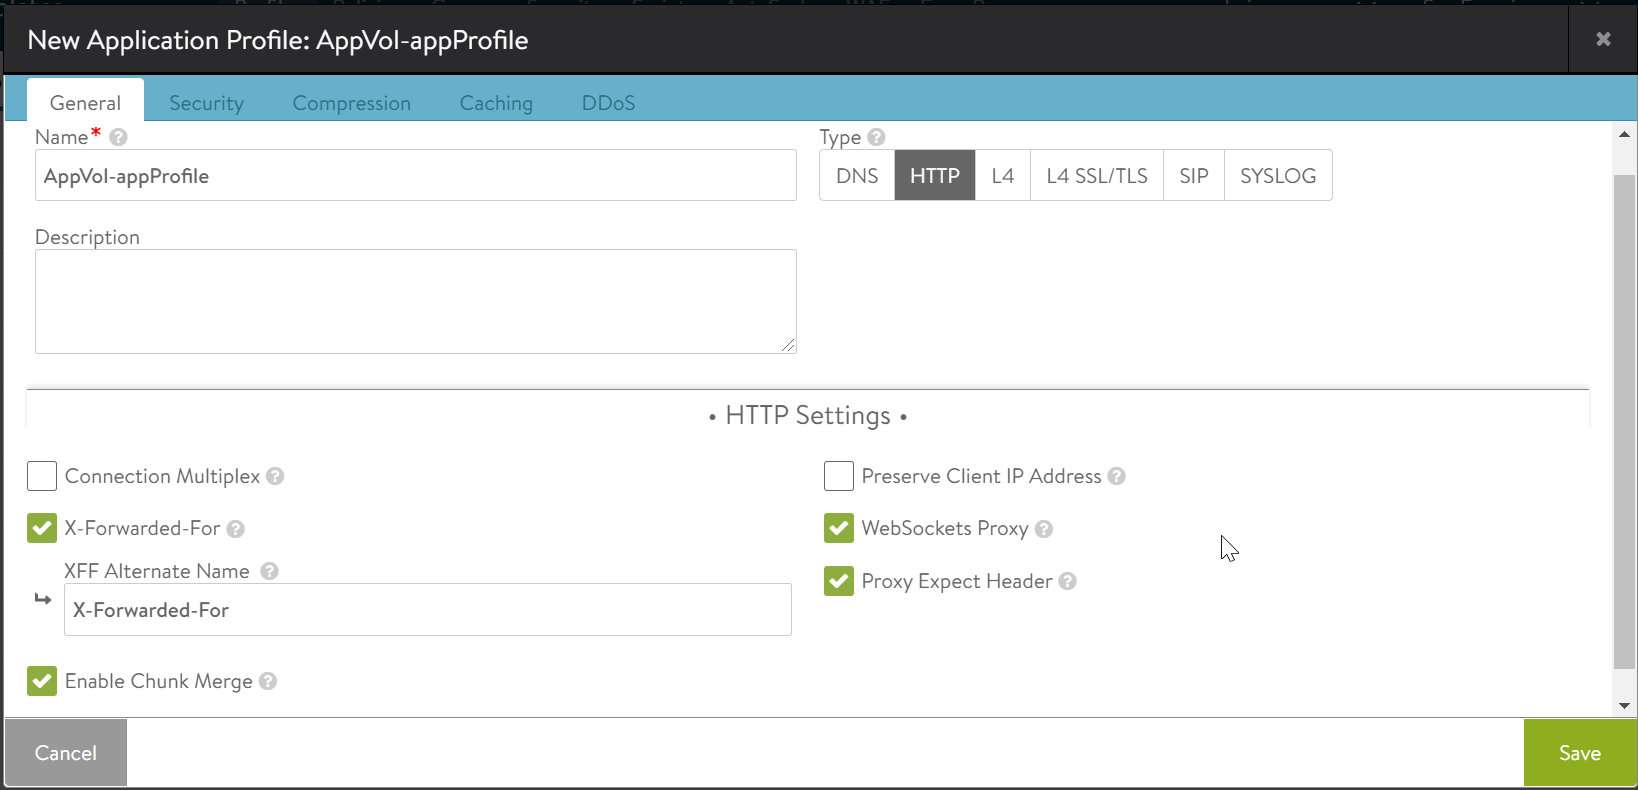
-
Click on Save.
Creating L7 Virtual Service
To create the new L7 virtual service,
-
From the Avi UI, navigate to Applications > Virtual Services.
-
Click on Create Virtual Service > Advanced Setup.
-
In the New Virtual Service screen, enter the virtual service Name.
-
Under VIP Address, enter the IPv4 VIP Address.
-
Select the Application Profile that was created.
-
Under Service Port,click on Add Port, enter 443 as the Port and select SSL.
-
Under Pool, select the pool that was created for app volumes.
-
Under SSL Settings, select System-Standard as the SSL Profile and select the SSL Certificate.
The New Virtual Service is as shown below:
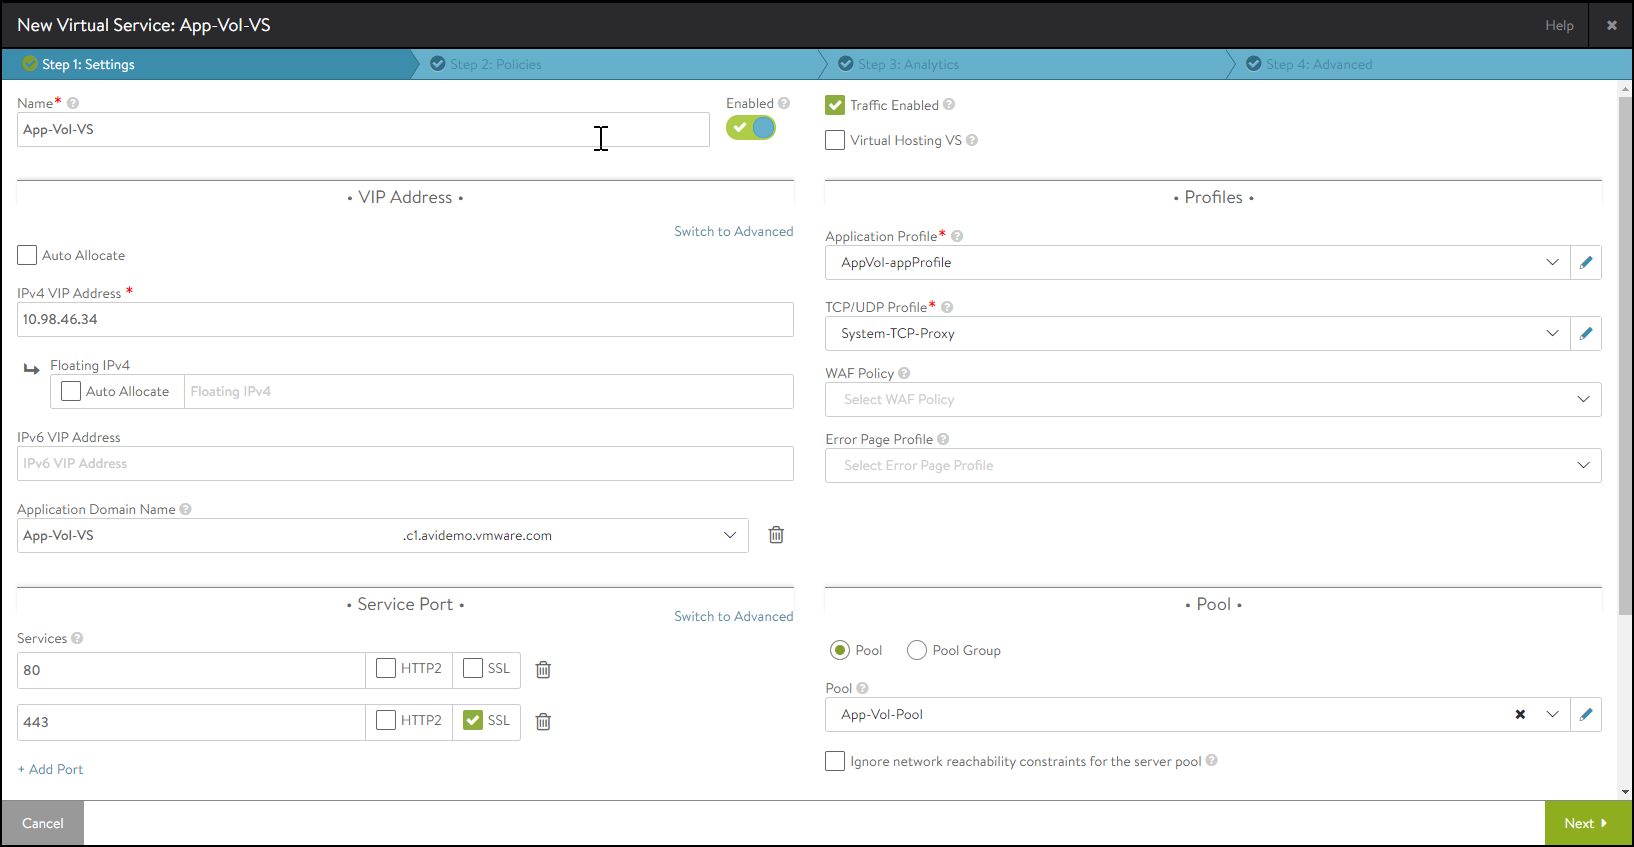
-
Click on Next.
-
Navigate to Step4: Advanced and click on Save.