Avi Vantage Installation on Nutanix Acropolis Hypervisor
Overview
Avi Vantage supports running in the Nutanix Acropolis hypervisor orchestrated by Prism. This guide discusses the steps required to install Avi Vantage in this environment.
Hardware Requirements for Virtual Machine
The following are the requirements for Avi Controller and Service Engines for the deployment:
- Avi Controller:
- At least 8 vCPUs and 24 GB memory
- A NIC for the management network. This is the network used for accessing the web interface. The Controller also uses this network to communicate with the Avi Service Engines (SEs).
- SEs:
- At least 2 vCPUs and 2 GB memory
- A NIC for the management network as the first interface, and additional NICs for the data networks.
The resources suggested in the hardware requirements guide are minimum recommendations for the deployment.
Software Requirements
- Nutanix Acropolis 4.6+: Prism is required for creating the Avi VMs. For more information on creating VMs on Nutanix, refer to Creating VMs.
The following are the only versions tested and qualified for Avi Vantage version 18.2.9 onwards:
-
Hypervisor: Nutanix AHV (Version 2018.05.01 - Community License)
-
AOS version: ce-2018.05.01-stable
-
NCC Version: 3.5.1
-
LCM Version: 1.4.f2bd889
Deploying Avi Controller
Follow the steps mentioned below for deploying an Avi Controller through the Prism Image Service.
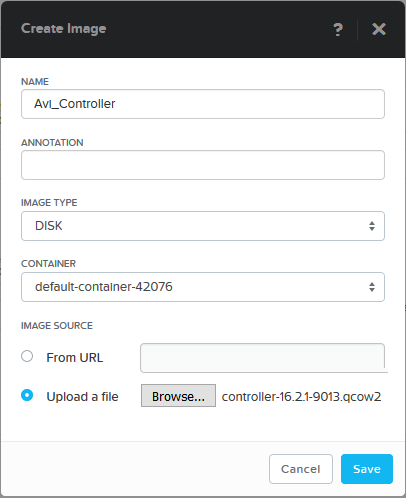
- Upload the Avi Controller image to the Prism Image Service. Select the Settings button at the top right and go to Image Configuration to upload the files. Provide the following information as shown below.
- Name: Set the desired name
- Image Type: Disk
- Create a virtual machine (VM) instance for Avi Controller from Prism. Provide the following details:
- NAME: Desired name
- vCPUs: 1
- Number of Cores per vCPU: 8 (or more)
- Memory: 24 GB
- Disks:
- Remove CD-ROM
- Add new Disk
- Operation: Clone from Image Service
- Image: Select the name of the image created in the previous steps
- Size: Default to 64 GB
- NIC > VLAN Name: Select a network that will be used for management.
This network is used for accessing Avi Controller and for Controller-to-Service Engine communication. For production environments this should be a static address.
Note: For configuring networks and IP addresses for the Controller and SEs, usually, networks should be created beforehand (refer to step 8 in the Nutanix Acropolis 101: Creating VMs tutorial).
Select that network when adding a vNIC to an Avi Controller or SE. Based on how the network was originally set up, the IP address will be static or picked up via DHCP and assigned to the vNIC.
-
Power on the Avi Controller VM. During the initial boot-up, the Avi Controller initializes databases and run through internal setup tasks (may take several minutes).
- Connect to the Avi UI via https://[IP Address].
- Set up the the Avi Controller. From the Avi UI setup wizard, perform the initial configuration of the Avi Controller. Provide a password, DNS, and set the Infrastructure Type to No-Orchestrator.
Deploying Avi Service Engine
-
From the Avi UI, navigate to Infrastructure > Clouds. Click the download icon shown on the right. A small prompt asks which type of SE image is desired, select qcow2. The Avi Controller creates the new SE image, which may take several minutes, depending on disk performance. Once the image is created it will automatically be downloaded to your browser.
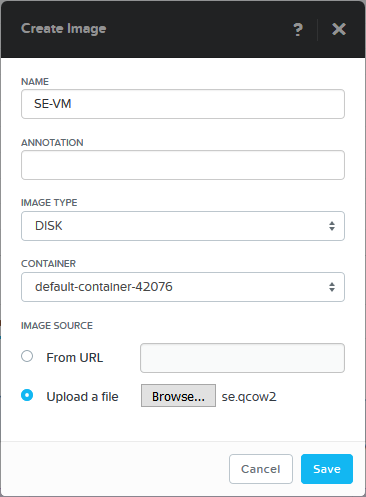
- Upload the SE image to Prism > Image Creation > Upload Image
Navigate to Image Creation > Upload Image to upload the SE image to the Prism. Provide the following information, while uploading the SE image.
- Name
- Image Type: Disk
- Image Source: select the upload file option. Nutanix-3.png
-
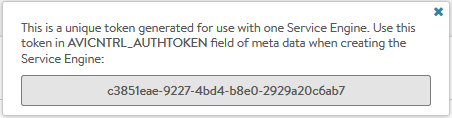
Copy the authentication token: The new SE will be required to authenticate to the Avi Controller by presenting a valid token that is generated by the AviController and placed on the SE. This token may be used only once, and will expire if not used within one hour. Navigate to Infrastructure > Clouds and click the key icon to generate a new token. Copy the token, which will be used at the end of the next step.
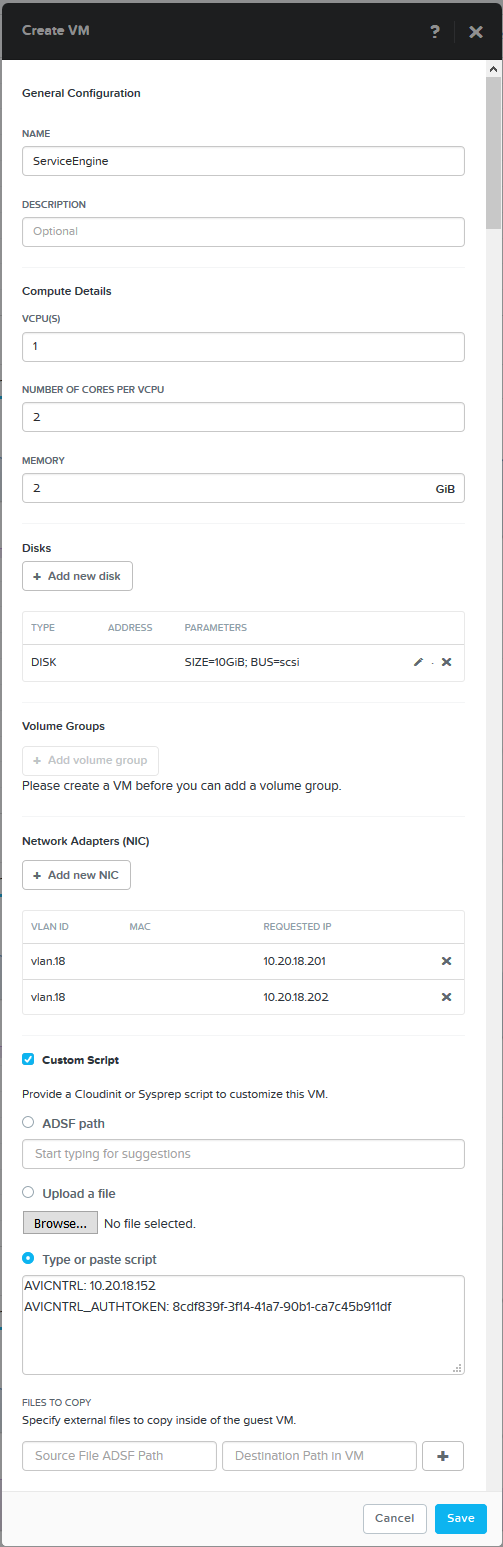
- Create the SE VM from Prism.
- NAME
- vCPUs: 1
- Cores per vCPU: 2
- Memory: 2 GB
- Disks:
- Remove CD-ROM
- Add Disk:
- Operation: Clone from Image Service
- Image: Select the SE image name
- Size: 10 GB
- Network Adapters:
- Create one NIC in the management network used by the Avi Controller. This NIC is reserved for management.
- Create additional NICs as necessary for access to client and server networks for load balancing traffic. Note that while the management network may be used for load-balanced traffic, it will require a second NIC configured for that network.
- Custom Scripts: Paste the following information into this section. This info is used to tell the Service Engine about the Controller IP address and the auth token it should present. The auth token should have already been generated in step 3. See the graphic for an example.
AVICNTRL: [Controller IP address] AVICNTRL_AUTHTOKEN: [Auth token]
Note: Starting with Avi Vantage release 18.2.3, no-access cloud is supported for Nutanix Acropolis. Provide value for the following attributes in addition to the Avi Controller IP address and the authentication token.
- Service Engine (SE) default gateway
- SE management IP address
- Subnet mask for SE’s management IP address
   AVICNTRL: [Controller IP address]
   AVICNTRL_AUTHTOKEN: [Auth token]
   avi.default-gw.SE: [SE Default Gateway]
   avi.mgmt-ip.SE:  [SE Management IP]
   avi.mgmt-mask.SE:  [SE Management IP mask]
Power on the SE VM. To verify connectivity between the SE and Controller, navigate to Infrastructure > Dashboard and check the SE icon. The SE icon should be present and green. Repeat as necessary to create any additional Service Engines.
Service Engine upgrade in Nutanix AHV environment
Service Engine upgrade in Nutanix AHV environment needs to ensure the below:
Scenario 1:
The followings are mandatory steps to be performed prior to the upgrading Service Engine on the Avi Vantage with the version less than the 18.2.9 version to the Avi Vantage with (18.2.9+18.2.9-2p2), or the higher version:
Please apply the following SE group properties change:
[admin]: >configure serviceenginegroup <se-grp name>
[admin]: configure serviceenginegroup> se_dpdk_pmd 2
[admin]: configure serviceenginegroup> se_use_dpdk 2
Note: (18.2.9+ and 18.2.9-2p2 patch) is the recommended minimum version.
Scenario 2:
Upgrade from Avi Vantage >=18.2.9 version to a higher version:
For SEs provisioned fresh on an Avi Vantage 18.2.9 version & higher, there is no need to change the settings present in the SE group properties pre-upgrade.
Deploying VRF on Nutanix
ervice Engine upgrade in Nutanix AHV environment needs to ensure the below: When Avi Vantage runs on Nutanix, you can create new VRFs, if required, and move interfaces to it.
Refer to VRF Support for vCenter Deployments for more details.