Load Balancing UAGs in Horizon Cloud on Azure Deployments
Overview
Horizon Cloud on Microsoft Azure simplifies the delivery of virtual desktops and apps. With a single solution, organizations can easily deploy and manage virtual applications and desktops on Microsoft Azure while leveraging cloud resources. IT can save time getting up and running with an easy deployment process, simplified management, and an architecture built for the cloud.
The Horizon Cloud on Azure is offered in a Bring your own subscription model. In this model,
- VMware manages the Horizon Cloud deployment on Azure, including provisioning and lifecycle management of all components.
- The provisioning is done in a customer-owned, but VMware-managed Azure Subscription.
For more information on the Horizon cloud, refer to the Horizon Cloud - A Cloud-Native Virtual Desktop Platform article.
Avi on Microsoft Azure
Avi provides an enterprise grade, full featured load balancing, WAF with 100% REST API automation, and analytics that can be deployed in Microsoft Azure.
For more information, refer to the Solution Guide for Azure Integration with Avi Vantage.
Avi for Horizon Cloud on Azure
Avi Vantage can be used to provide application delivery features (load balancing, WAF, and GSLB) for Horizon Cloud on Azure deployments.
The key benefits of using Avi Vantage are:
- Consistent application delivery policies in multi-cloud Horizon deployments, spanning on-premises as well as public cloud pods.
- Ability to leverage Avi Vantage’s analytics capabilities such as metrics and per-request logs for better visibility and troubleshooting.
- Elastic scale-out of load balancing capacity when required.
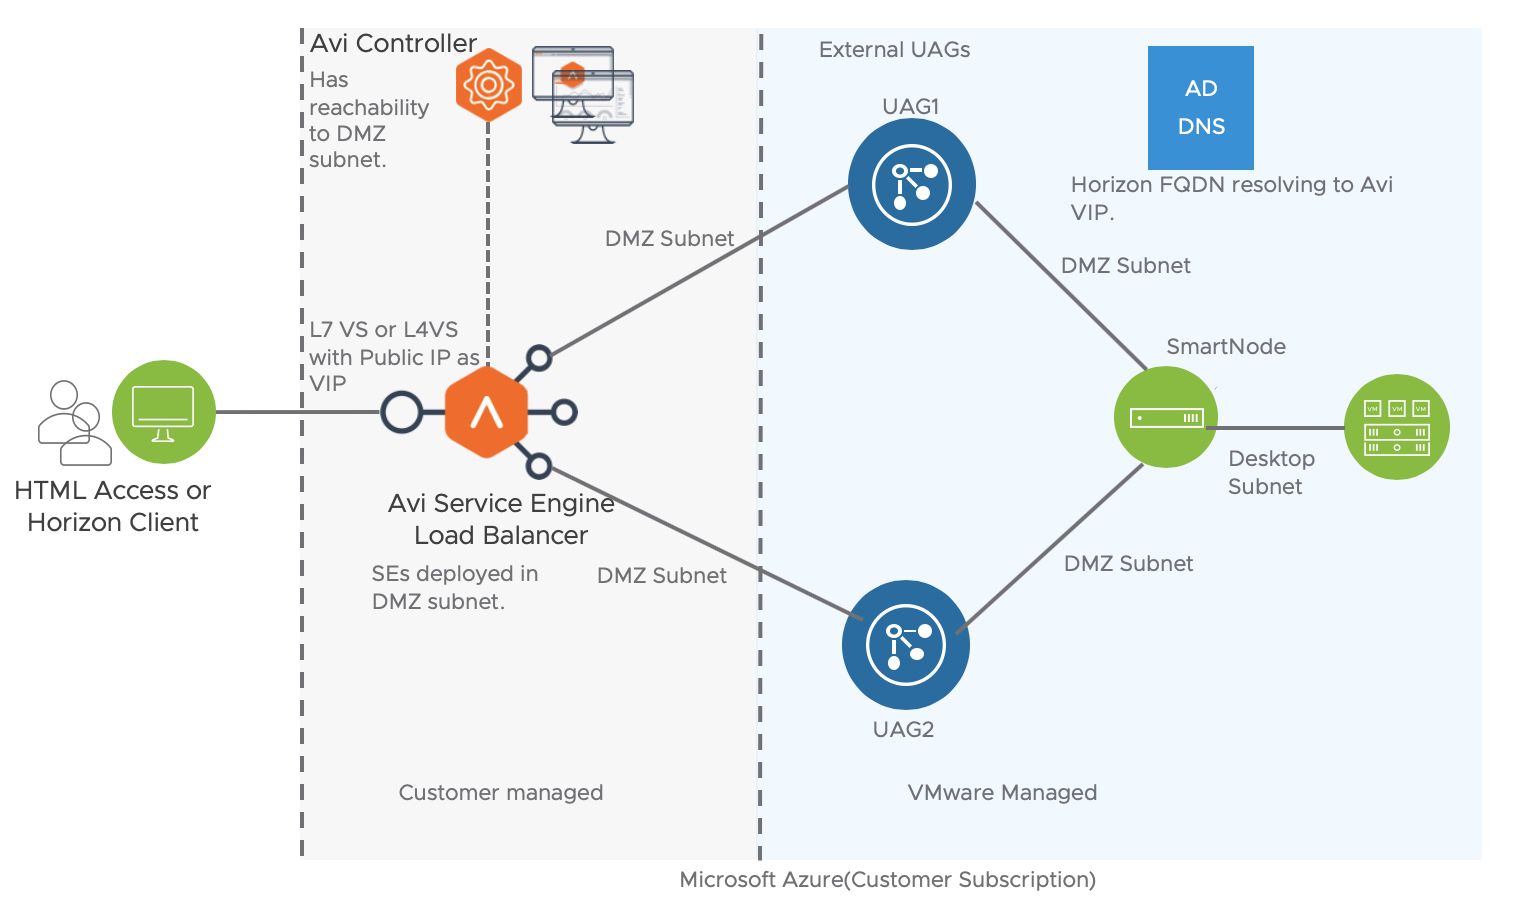
Reference Design
Currently, Avi Vantage is provided as a customer-managed installation for Horizon Cloud on Azure.
In this scenario,
- VMware manages the Horizon Cloud deployment on Azure, including provisioning and lifecycle management of all components.
- The provisioning is done in a customer-owned, but VMware-managed Azure Subscription.
In addition,
- Avi Vantage is deployed by the customer in the same subscription, sharing the Azure Virtual Network (VNet) with the Horizon Cloud objects.
- While provisioning the cloud pod, some configurations have to be included/ modified, as detailed in the guide below.
Provisioning the Horizon Pod with Avi Vantage as Load Balancer
For a new deployment, follow the steps below to provision a Horizon Pod with Avi Vantage:
-
Deploy the Avi Controller and configure an Azure Cloud in the Controller
-
Create the Horizon Cloud Pod
-
Modify Network Security Group for External UAGs on Azure
-
Configure the virtual service on the Avi Controller
Deploying and Configuring the Avi Controller on Azure
Follow the steps in the Avi Deployment Guide for Microsoft Azure to install and configure an Avi Controller Cluster.
Installing the Avi Controller
Refer to the section Avi Controller Instantiation in the Avi Deployment Guide for Microsoft Azure for detailed steps on installing an Avi Controller.
Notes:
- The Avi Controller is a control-plane entity. Operators can connect to the Controller for configuration, operations, and analytics.
- The Controller can be instantiated in a separate resource group within the subscription, and provided an IP address from the same VNet as being used for Horizon Cloud.
- The Avi Controller can alternately be installed on-premises, or in another Subscription / VNet. In such cases, the Controller should have IP connectivity to the Azure end-points as well as peering to the Horizon Cloud Pod VNet.
Configuring the Azure Cloud
Refer to the section Avi Vantage Configuration in the Avi Deployment Guide for details on initializing the Controller, and configuring an Azure Cloud within the Controller so that it can provision Avi Service Engines.
Notes:
- It is recommended that a separate Resource Group be used for the Azure Cloud connector being configured.
- The VNet should be the same as being used for Horizon Cloud.
- Dedicated management network should be enabled. This ensures that a separate NIC is used for Controller - to - Service Engine communication.
The following Azure-related steps should be performed before creating the Avi virtual service:
Deploying the Horizon Cloud Pod
The Horizon Cloud pod can be provisioned from here.
Refer to the VMware Horizon Cloud Service Documentation for the steps to deploy the Horizon Cloud pod.
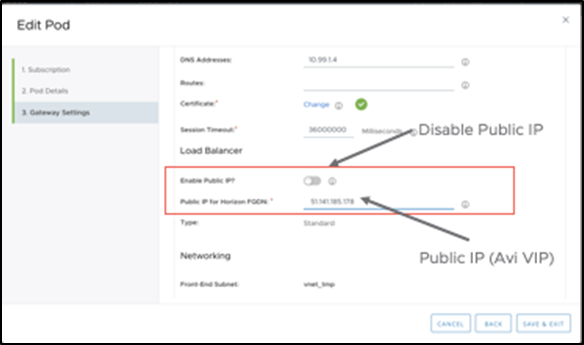
By default, the Horizon Cloud on Azure provisions a fresh public IP from the Azure IP address space for load balancing external UAGs. This IP is configured on an Azure Load Balancer which is provisioned as part of the standard pod deployment. This IP is also configured on the UAGs as the PCoIP URL.
To use Avi Vantage instead, disable the automatic allocation during pod deployment, and instead provide a public IP (which will be hosted on the Avi virtual service).
In the external UAG configuration setting,
-
Disable the option Enable Public IP.
-
Enter any unused IP.
Note: Replace this IP with the actual virtual service IP from the Avi virtual service once the virtual service has been created.

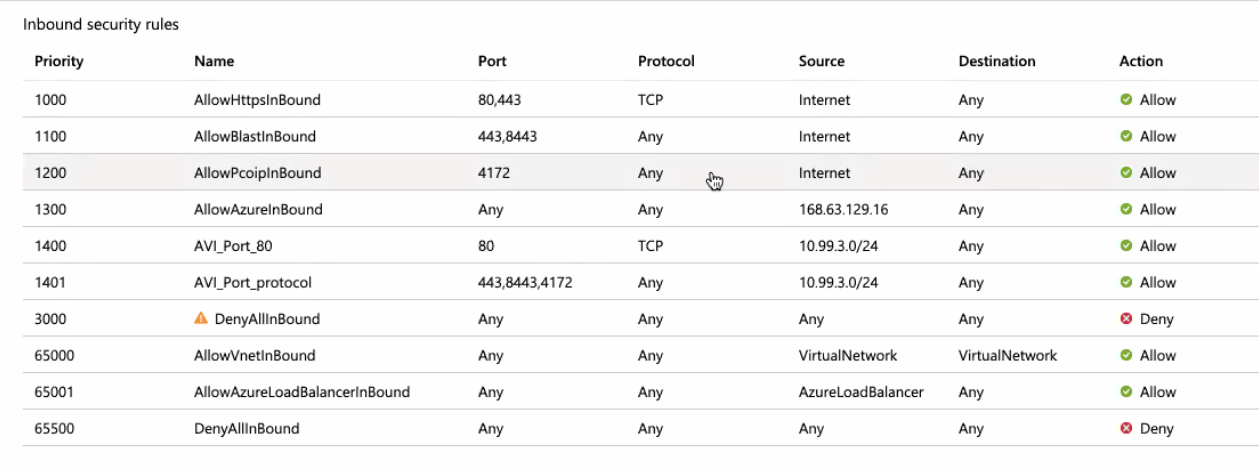
Modifying Network Security Group for External UAGs
Modify the Azure Network Security Group associated with the external UAGs.
The Horizon Cloud configures Azure Network Security Groups (NSG) to restrict access to the UAGs.
The default NSG for external UAGs allows traffic from control and data ports, originating from the internet.
Modify the NSG to allow incoming traffic on the same ports, but originating in the DMZ subnet.
Creating Virtual Services on Avi
There are two options to deploy Avi for UAG load balancing in Azure.
- Single VIP with two virtual services
- Single L4 virtual service
For more information on these design options, refer to Reference Architecture for Horizon.
Single VIP with Two Virtual Services
To configure single VIP with two virtual services, follow the steps given below:
-
Create an L4 virtual service using the L7 virtual service as shared VIP and specify all the ports required for secondary protocols
Creating an IP Group
IP groups are comma-separated lists of IP addresses that may be referenced by profiles, policies, and logs. Since the same UAG servers are used as pool members in two different pools, IP groups can be attached to the pool instead of directly attaching servers to the pool. Any configuration change to the pool members like addition or removal of servers needs to be done at the IP Group level.
-
From the Avi UI, navigate to Templates > Groups > IP Groups.
-
Click on Create IP Group.
-
In the New IP Group screen, enter the IP Group Name.
-
Click on the option Select by IP Address.
- Enter the IP addresses of the UAG servers to which traffic is load balanced.
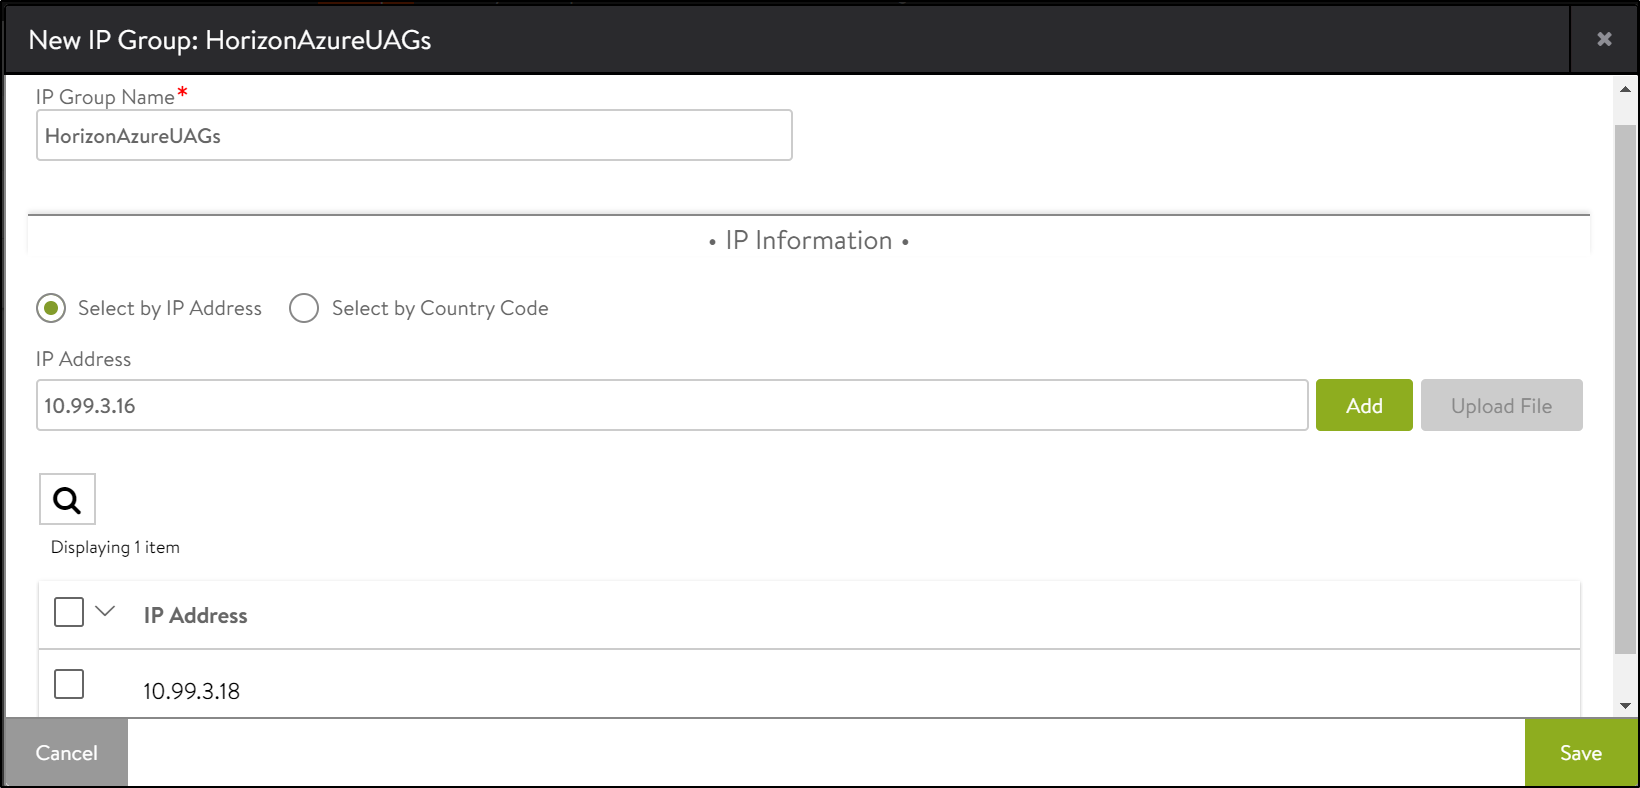
- Click on Save.
The IP addresses of the UAG will be available on the Azure portal once the UAGs are deployed.
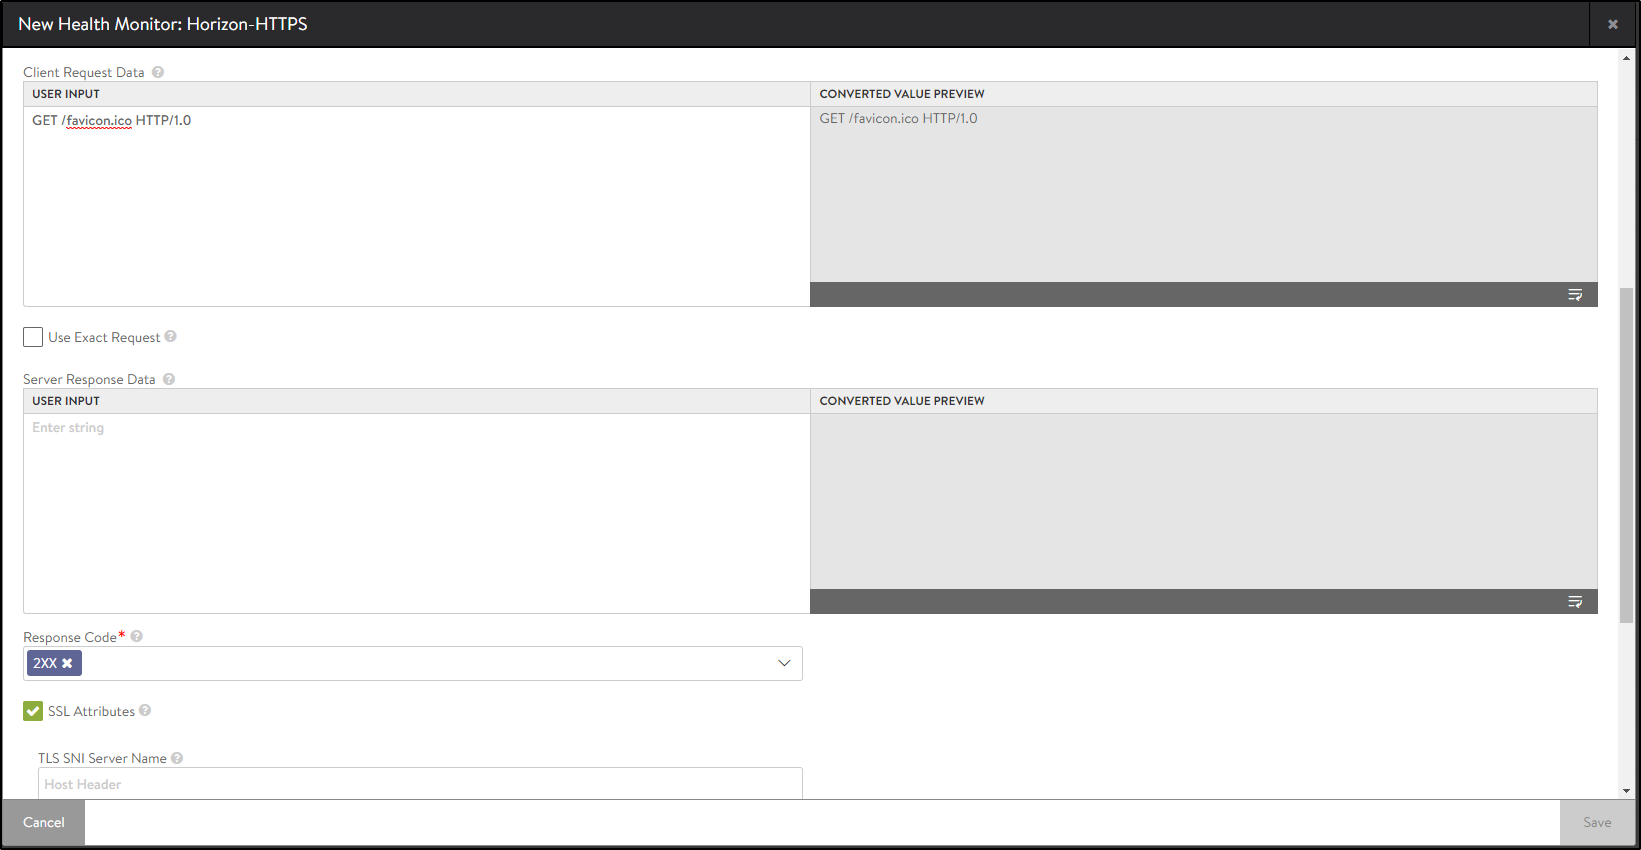
Creating Custom Health Monitor for Horizon
To create a custom health monitor,
-
From the Avi UI, navigate to Templates > Profiles > Health Monitors.
-
Click on Create.
-
Select the Azure cloud that was created for Horizon.
-
Enter the following details in the New Health Monitor screen.
Field Value Send Interval 30 Receive Timeout 10 Client Requested Data GET /favicon.ico HTTP/1.0 Response Code 2xx The New Health Monitor screen is as shown below:


-
Click on Save.
Creating Pools
Pools maintain the list of servers assigned to them and perform health monitoring, load balancing, persistence, and functions that involve Avi Vantage-to-server interaction.
A pool includes the IP address of the UAG servers i.e. UAG server01 and UAG server02.
Create two pools:
- For L7 (HTTPS) i.e. Horizon-L7-pool
- For secondary protocols named as Horizon-L4-pool
These two pools are required to attach to the two virtual services which will be created.
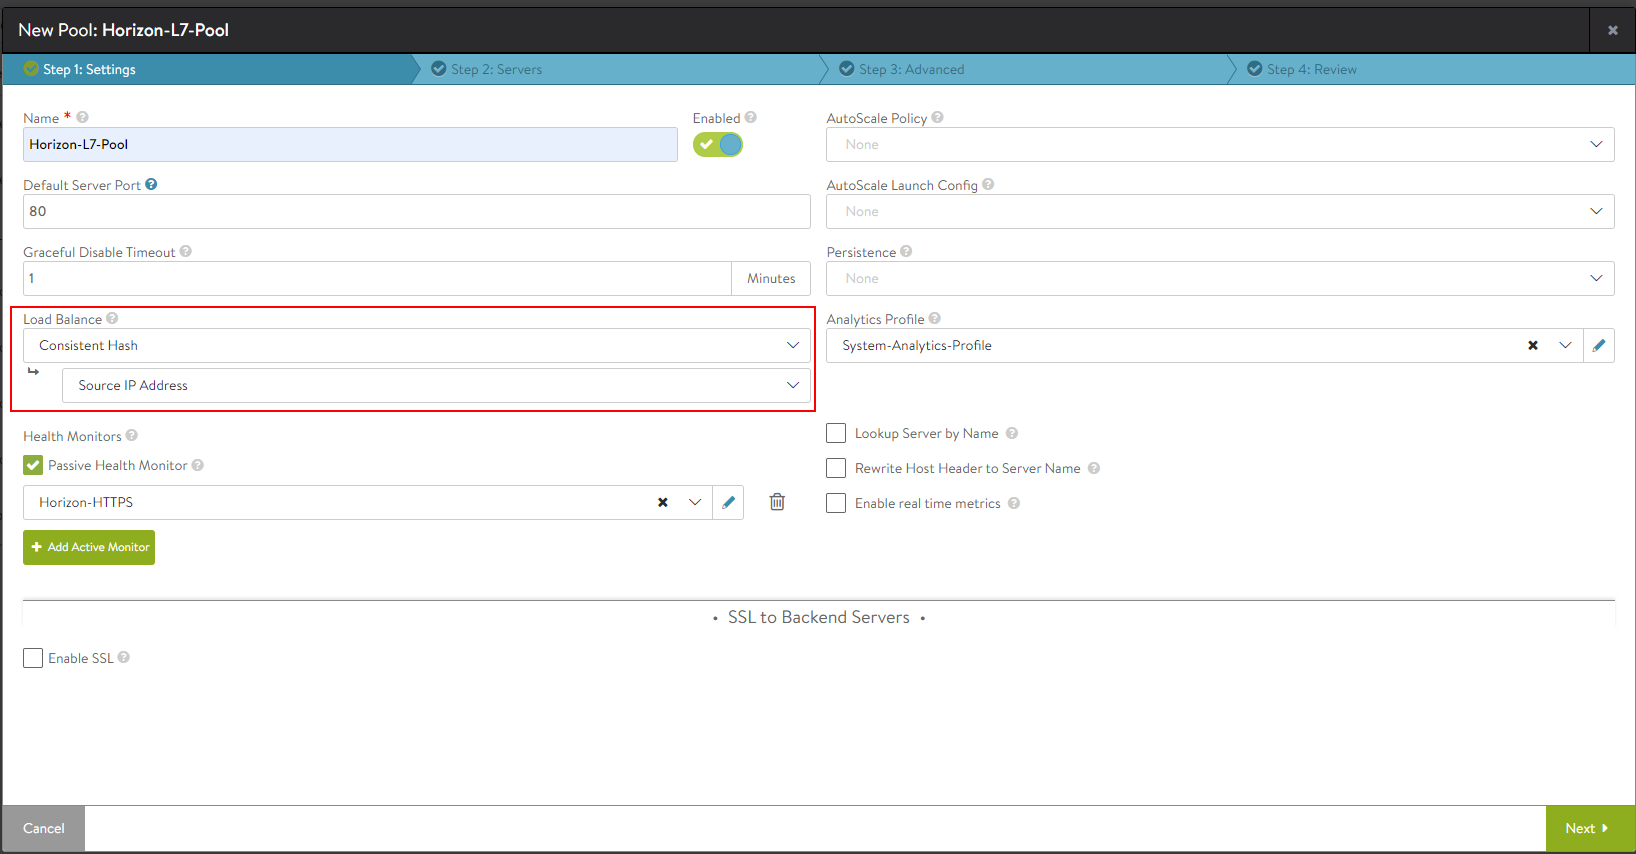
Consistent hash with source IP address as the key should be configured as the hash algorithm to maintain source IP affinity.
To create the pool,
-
In Avi Vantage, navigate to Applications > Pools.
-
Select the Azure cloud created from the Select Cloud sub-screen.
-
Click on Next.
-
Click on Create Pool.
-
In the New Pool: screen, under Step 1: Settings, select the Load Balance algorithm as Consistent Hash with the Source IP Address as the hash key.
-
To bind the monitor, click on Add Active Monitor and select the Custom Health monitor that was created.
-
Click on Next.
-
Click on Enable SSL and select the appropriate SSL profile as shown below:
-
Click on Next.
-
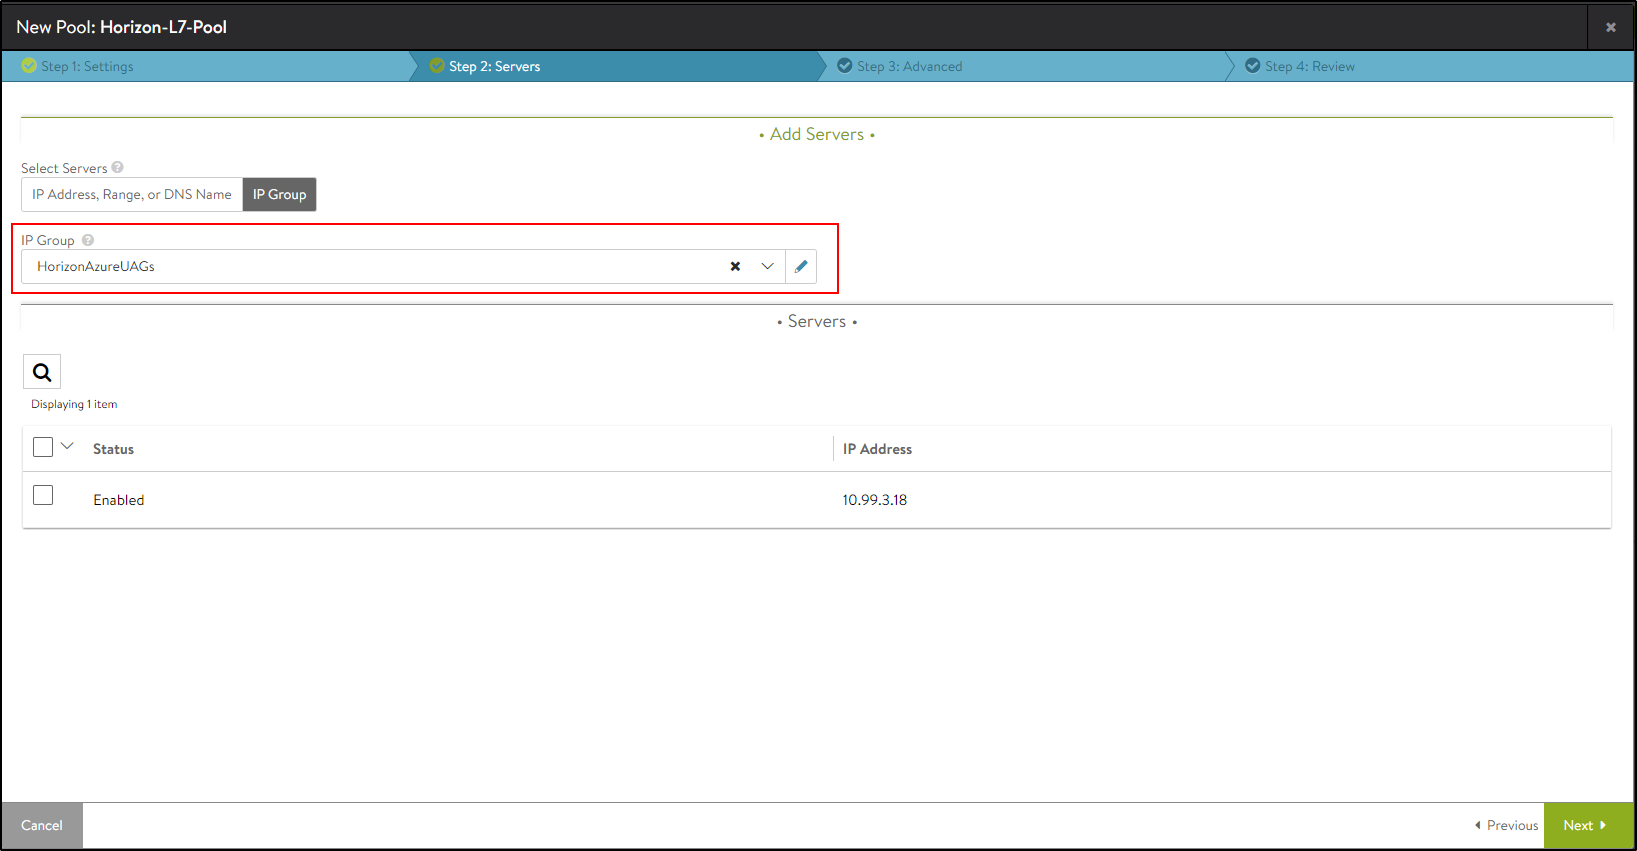
In the Step 2: Servers tab, underSelect Servers click on the option IP Group.
-
Select the IP Group of the UAG servers created earlier.
-
Click on Next.
-
Navigate to Step 3: Advanced tab > Step 4: Review.
-
Click on Next and then click on Save.
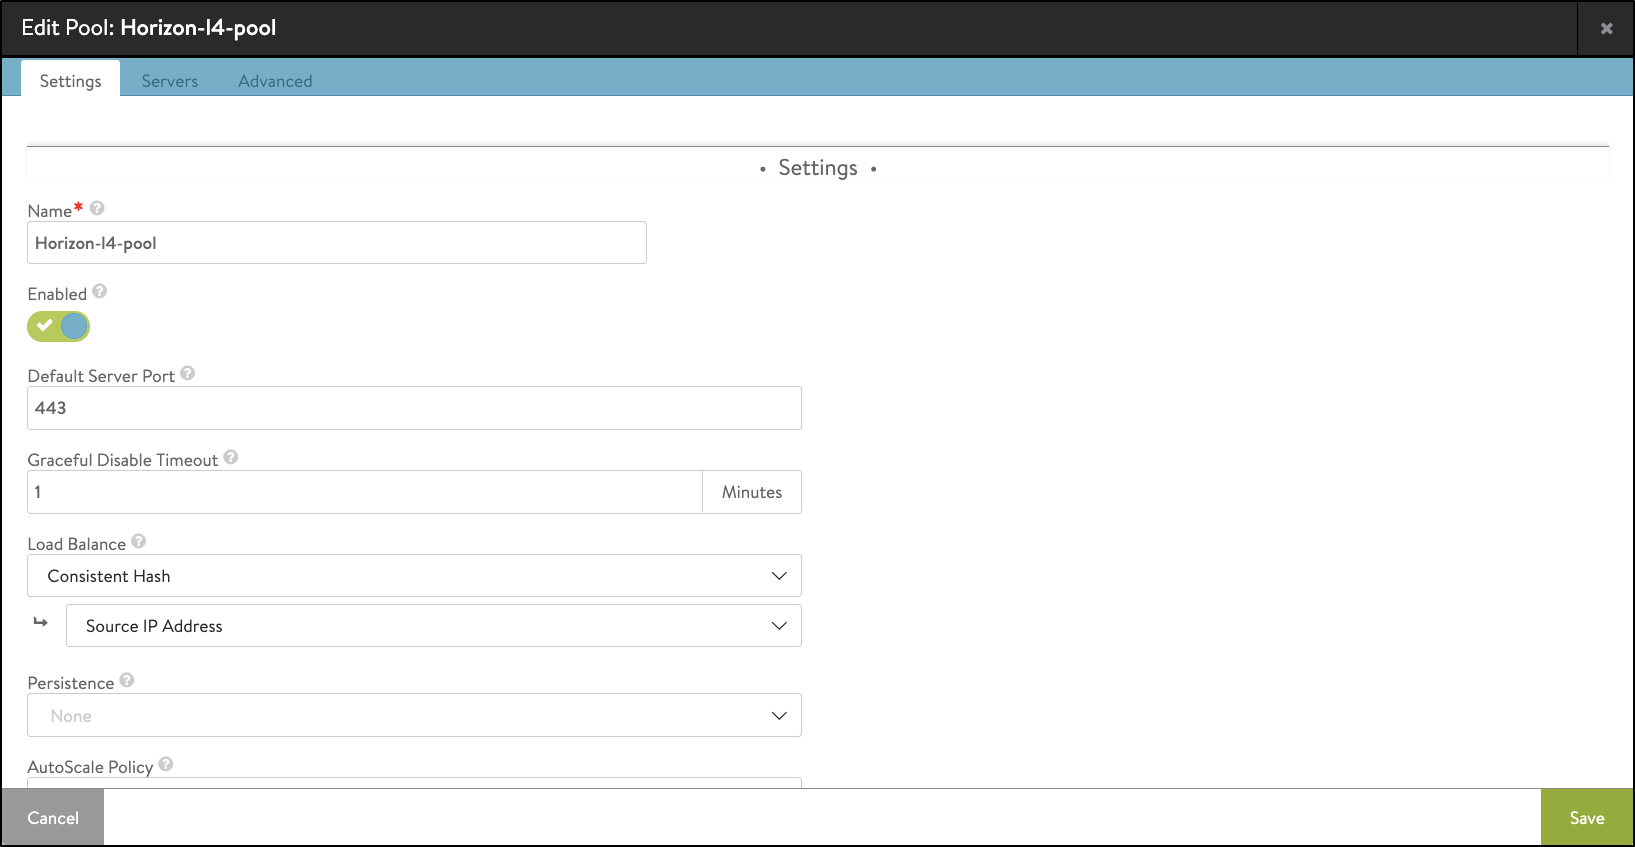
Creating the Horizon L4 Pool
Follow the same steps as creating the Horizon L7 pool and create another pool with the name Horizon-l4-pool.
Note: Configure the default server port to 443 and the load balancing algorithm as Consistent Hash with Source IP Address.
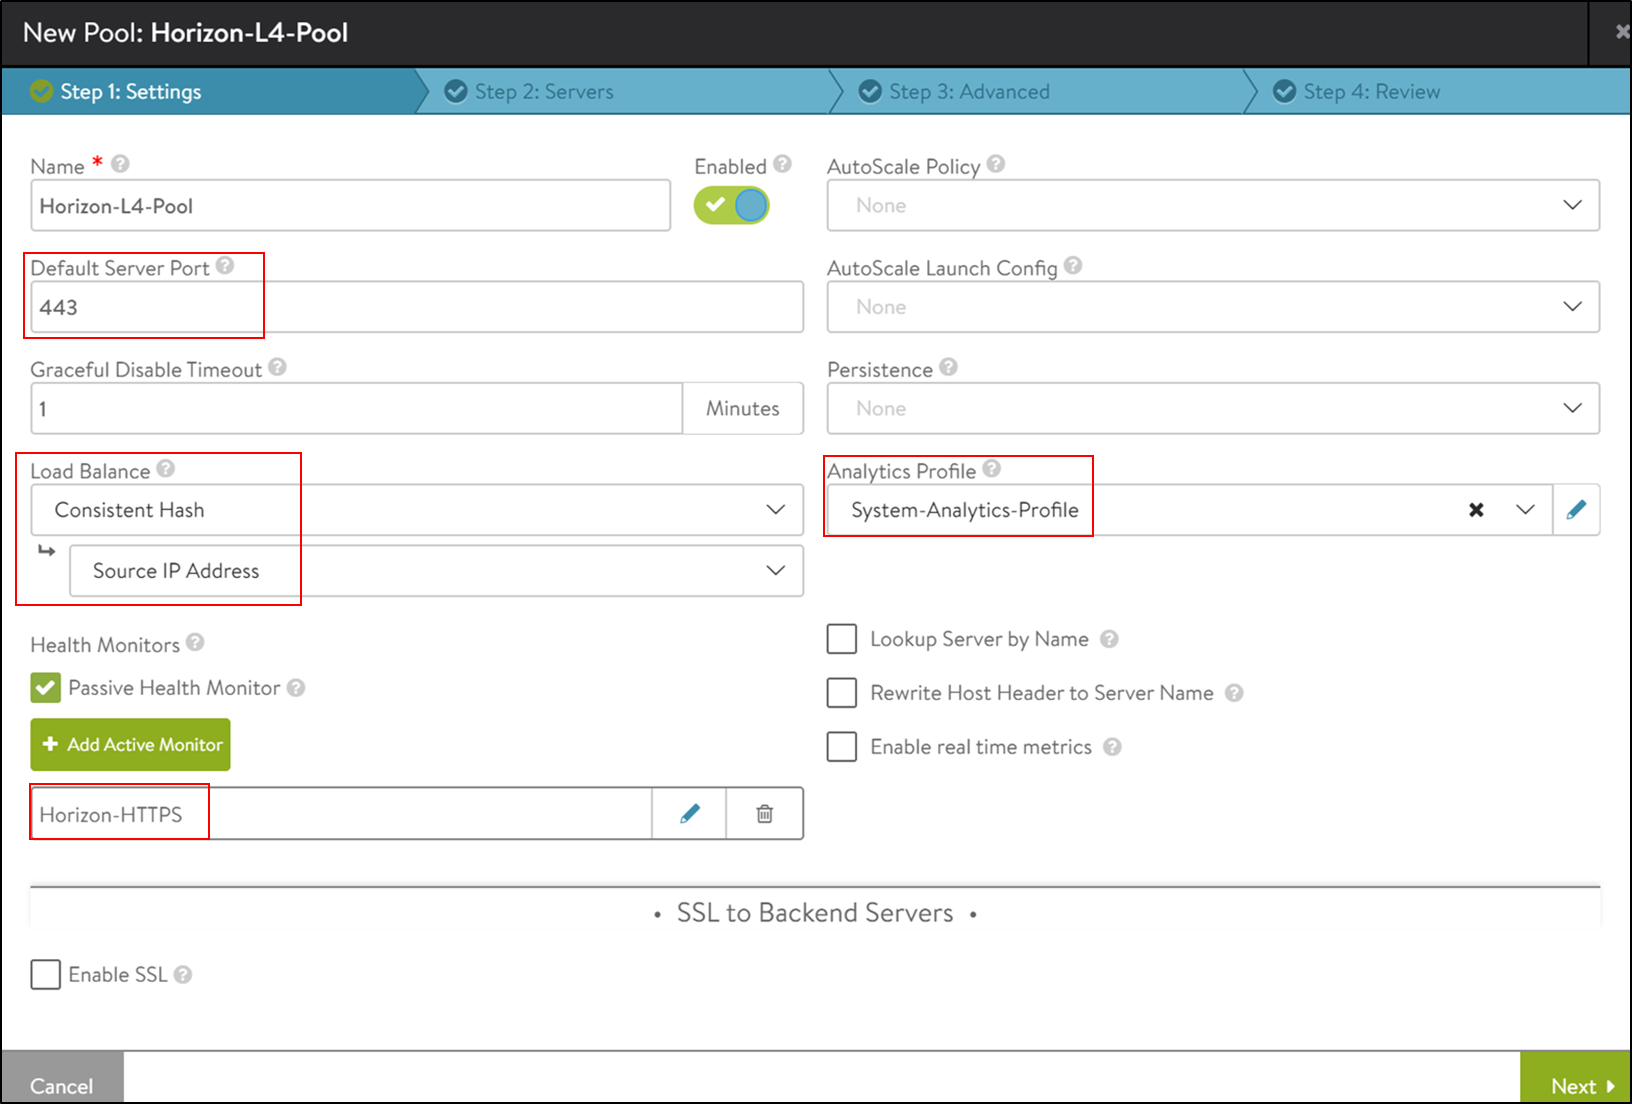
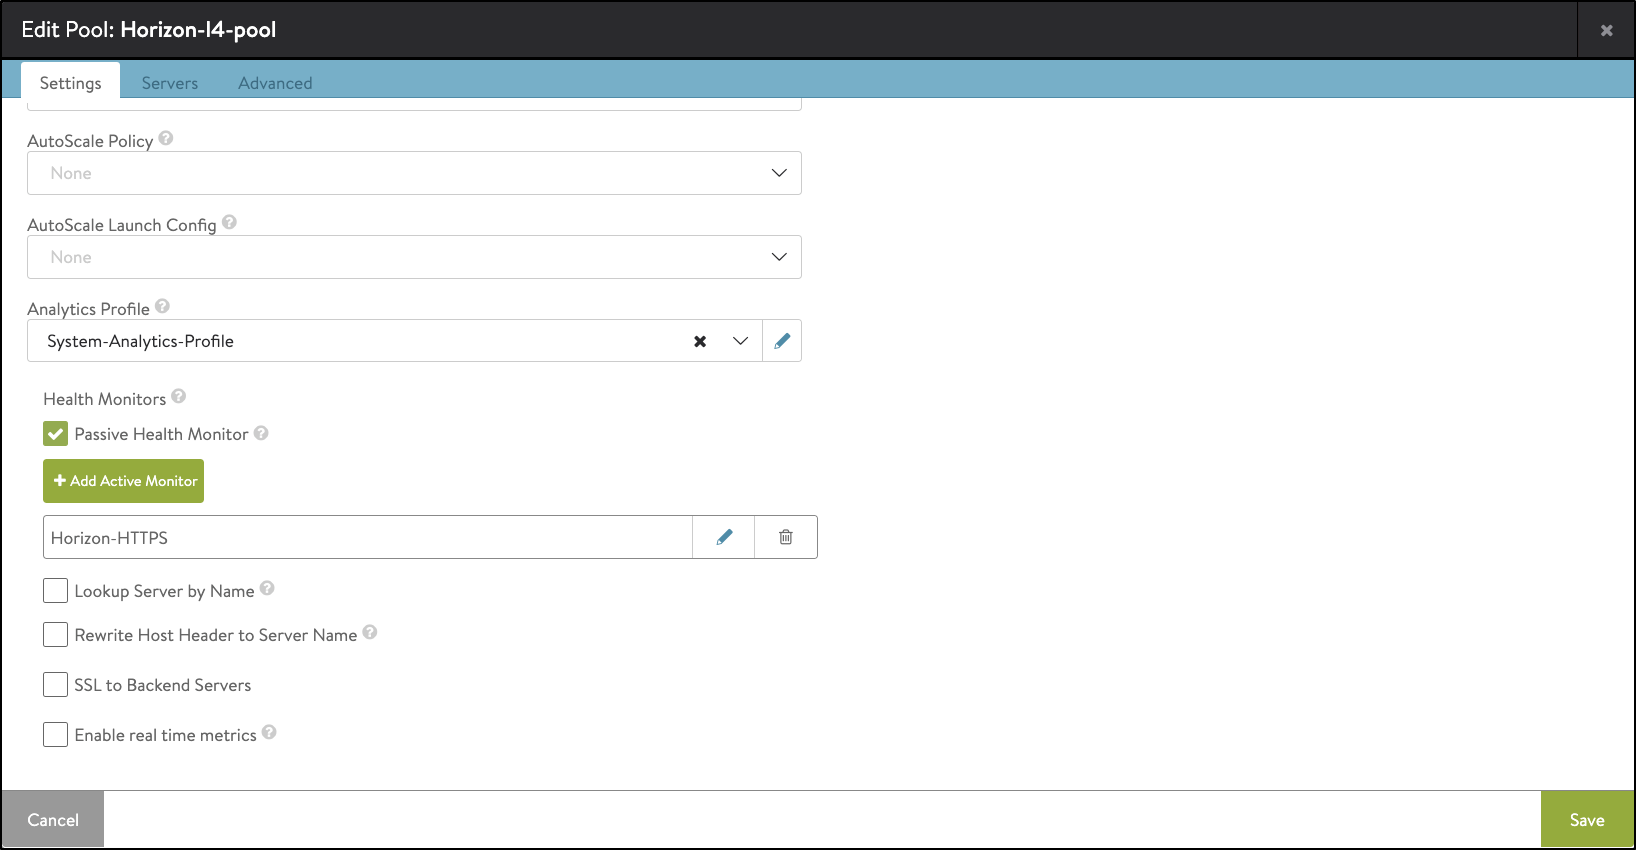
Under the Step 2: Servers tab, add the IP Group of the UAG servers created earlier.
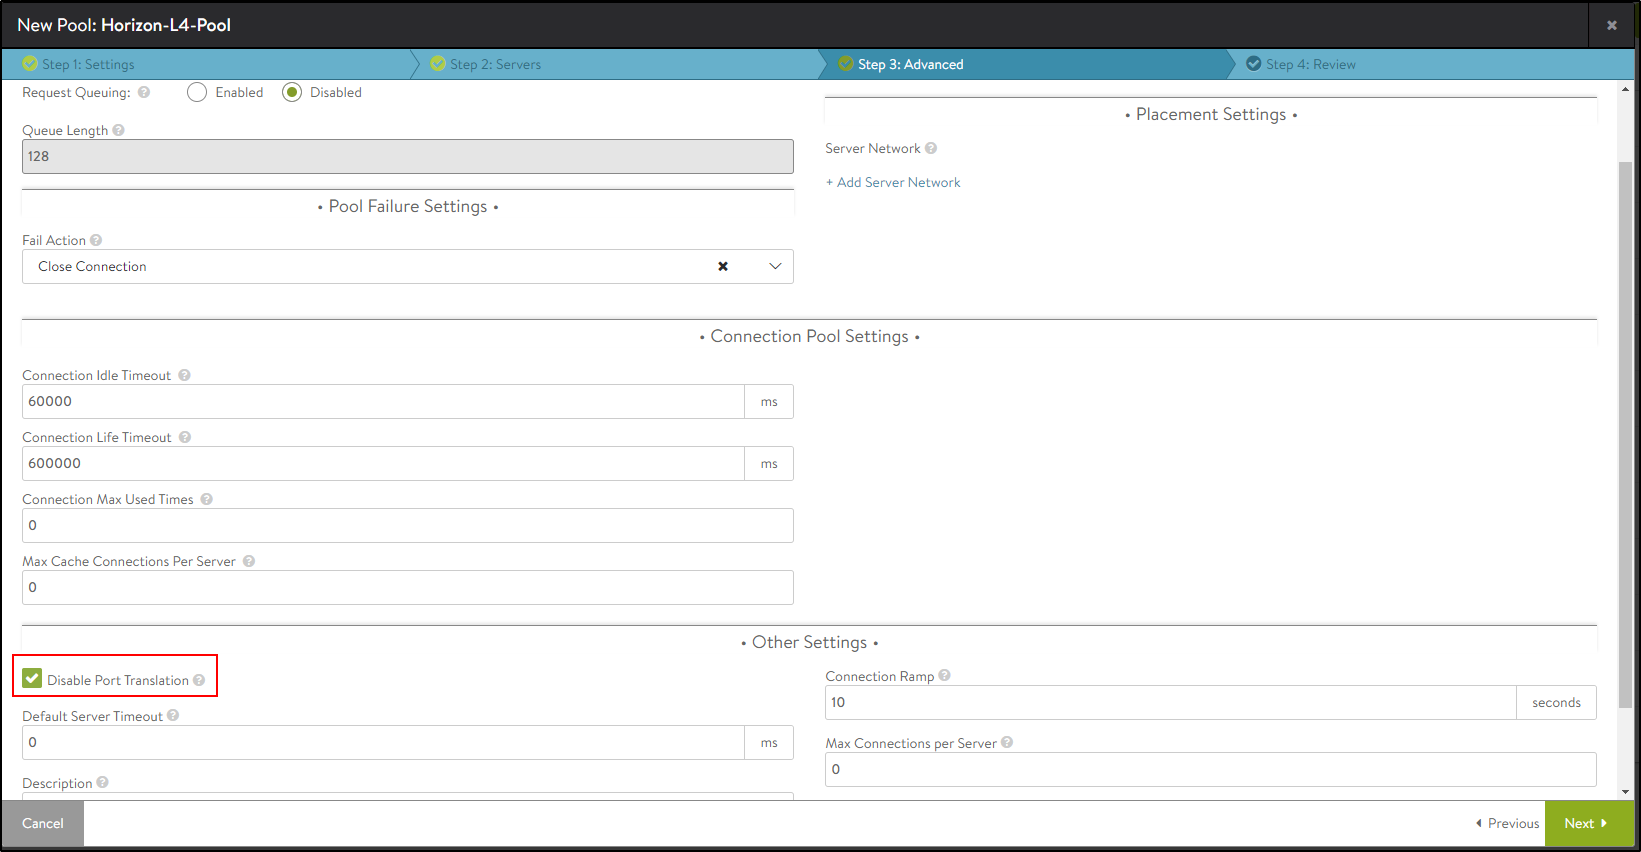
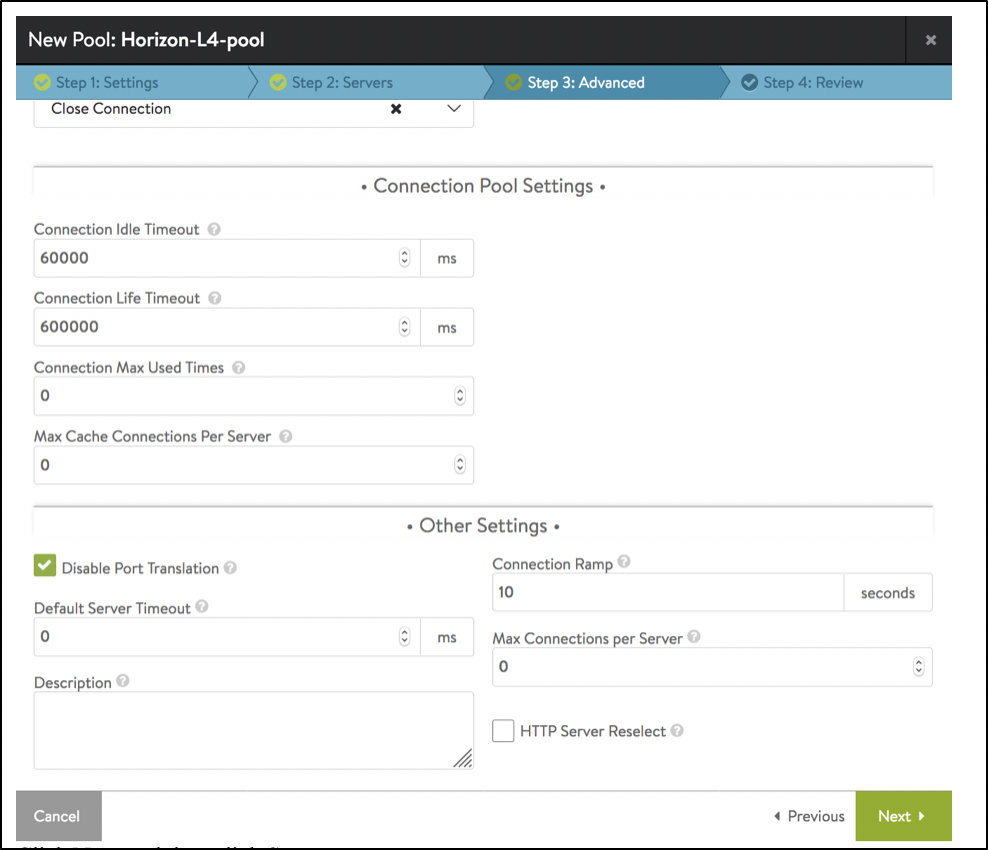
Under the Step 3: Advanced tab, enable Disable Port Translation to ensure that the destination port of the traffic does not change to the default server port set in the first pane(443).
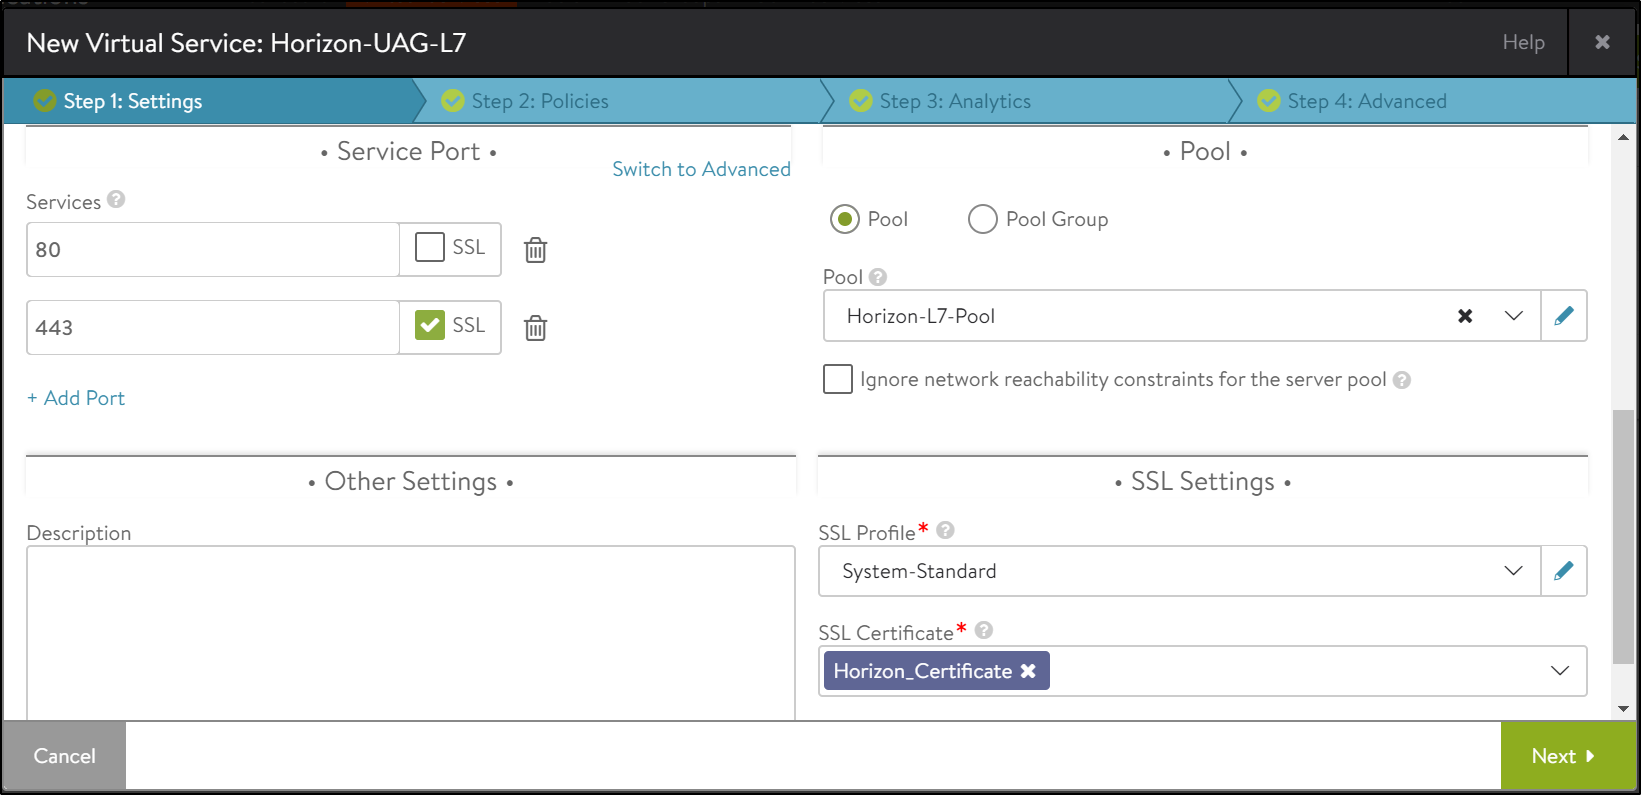
Installing the SSL Certificate Required for L7 VIP
The SSL connection is being terminated at Avi virtual service. Therefore, the SSL certificate must be assigned to the virtual service . It is advised to install a certificate which is signed by a valid certificate authority instead of using self-signed certificates.
Install the certificate in Avi Vantage, and ensure the CA certificate is imported and linked. For instructions, refer to Import Certificates.
Note: For this set up, a certificate named Horizon_Certificate has been installed.
Creating a New SE Group
Create a new SE group for load balancing the External UAGs.
-
Go to Infrastructure > Service Engine Group > Select the Azure cloud that was created.
-
Click on Create Service Engine Group.
-
Under the Basic Settings tab, configure the following:
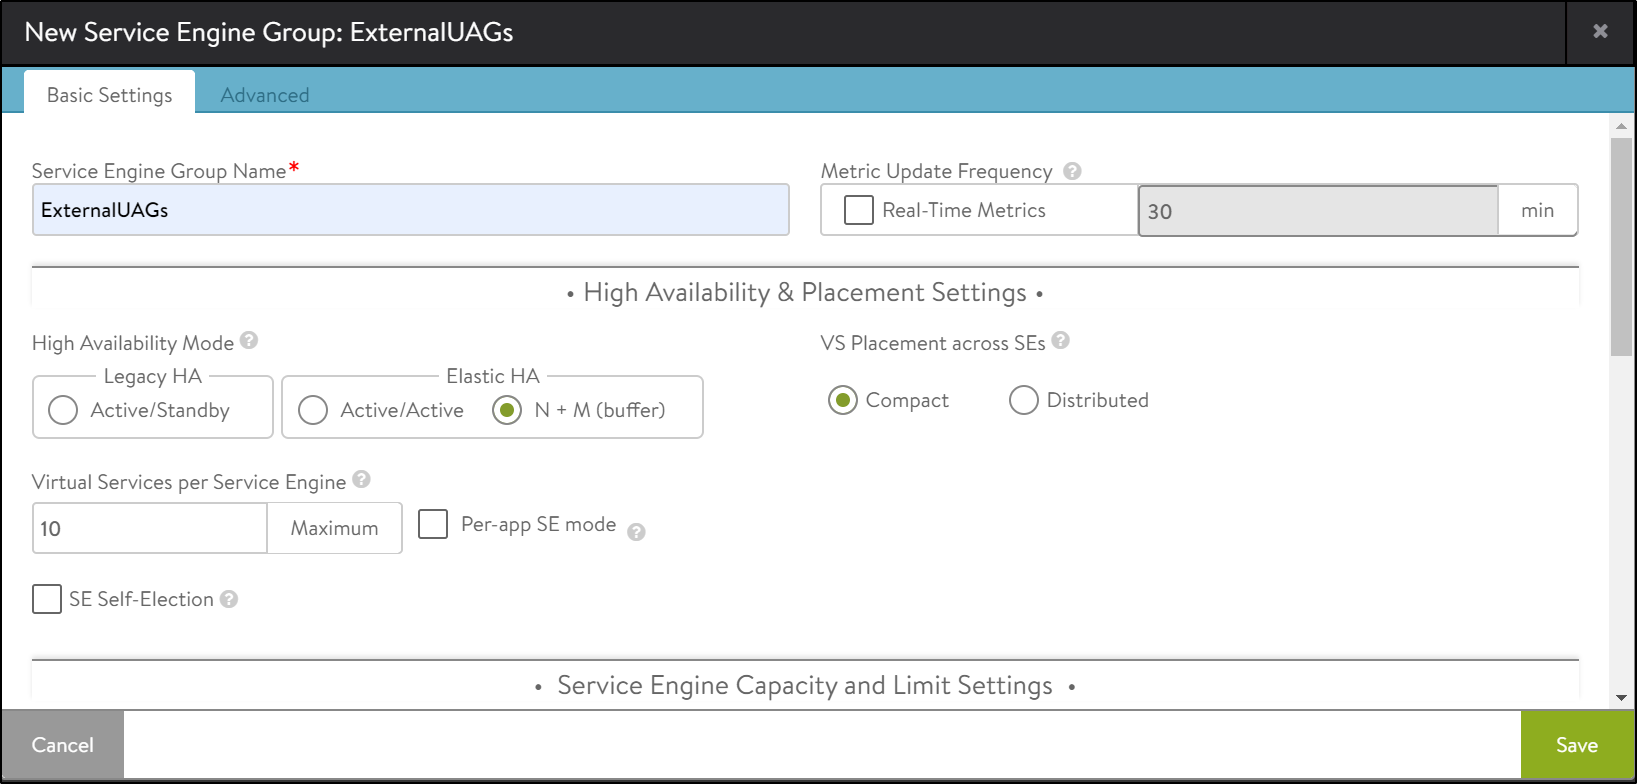
-
Click on the Advanced tab.
-
Under Override Data Network, select the data subnet that the external UAGs reside in.
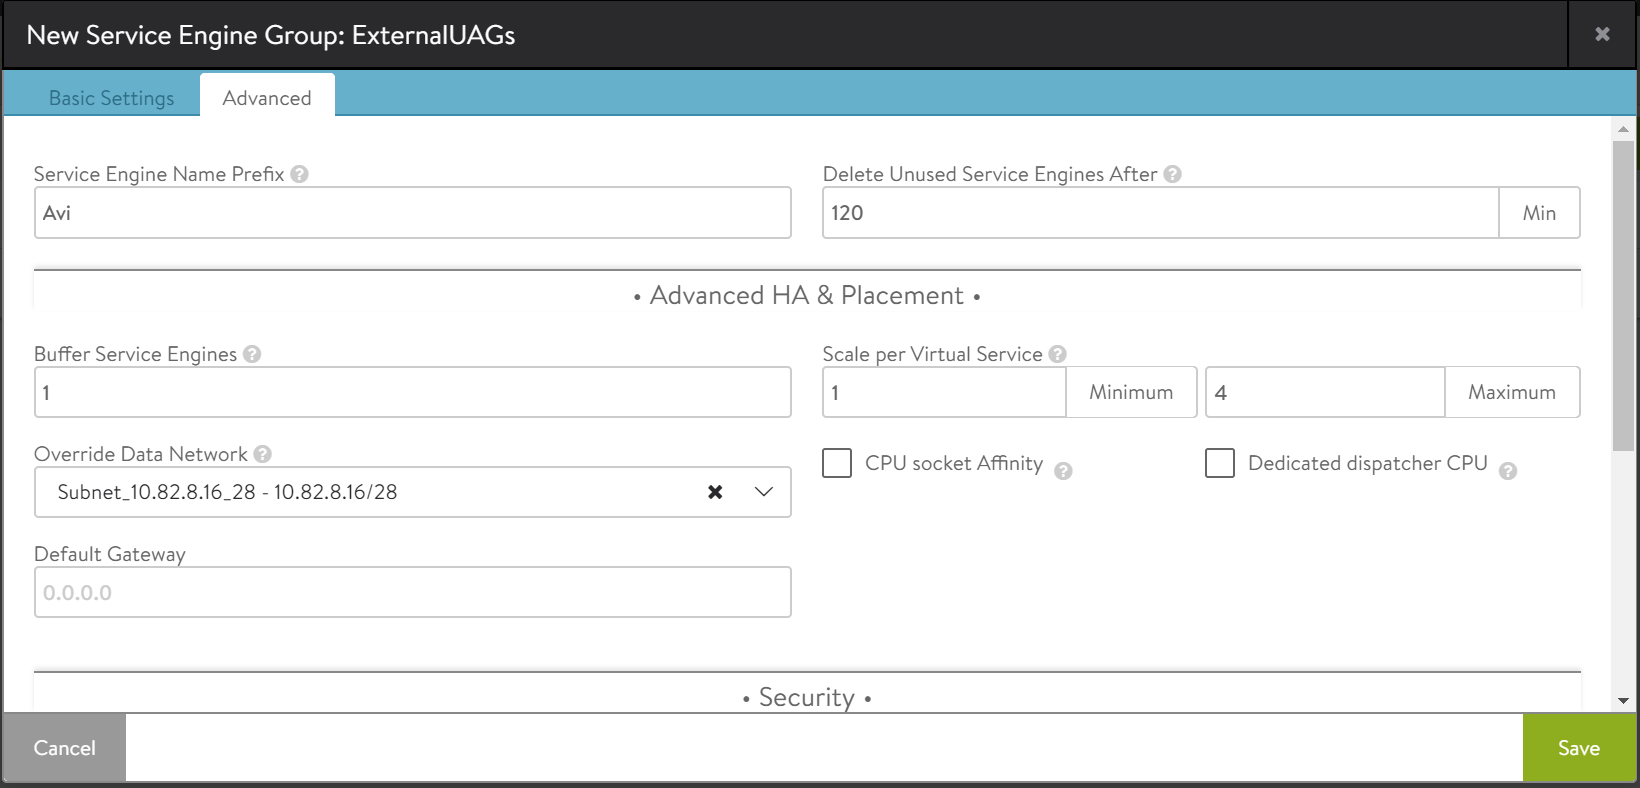
-
Click on Save.
Enabling Azure Standard ALB
To configure a Service Engine group with the standard ALB flag override,
[admin:10-52-0-71]: > configure serviceenginegroup ExternalUAGs

[admin:10-52-0-71]: serviceenginegroup> use_standard_alb

[admin:10-52-0-71]: serviceenginegroup> save
Creating L7 Virtual Service
To create the new L7 virtual service,
-
From the Avi UI, navigate to Applications > Virtual Services.
-
Click on Create Virtual Service > Advanced Setup.
-
Use the System-Secure-HTTP-VDI as the Application Profile
-
Configure the virtual service as shown below:
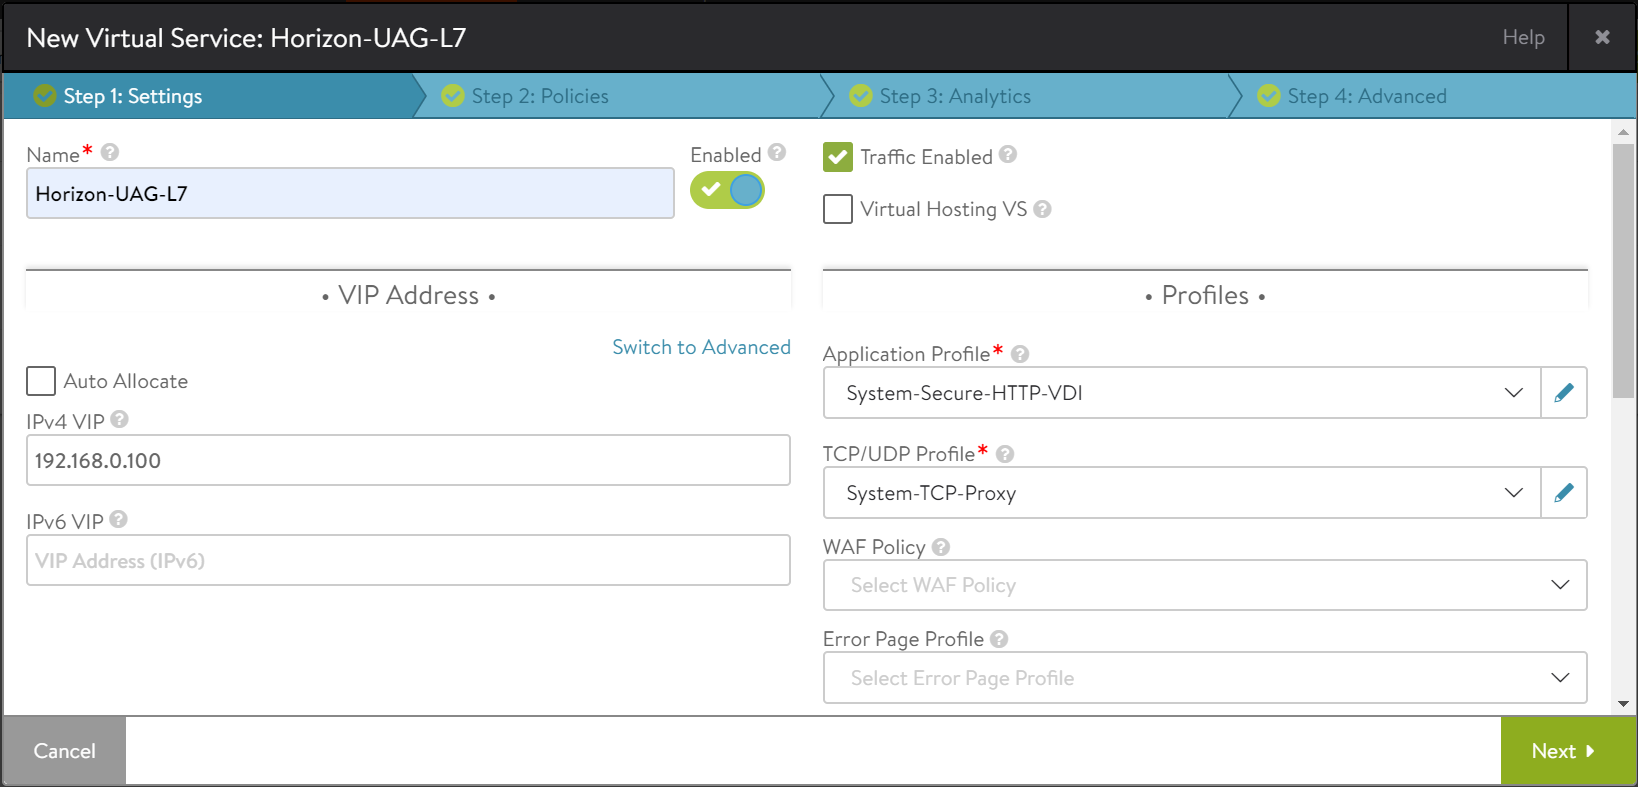
-
Click on Next.
-
Navigate to the Advanced tab.
-
Select External UAGs as the SE Group.
-
Click on Next > Save.
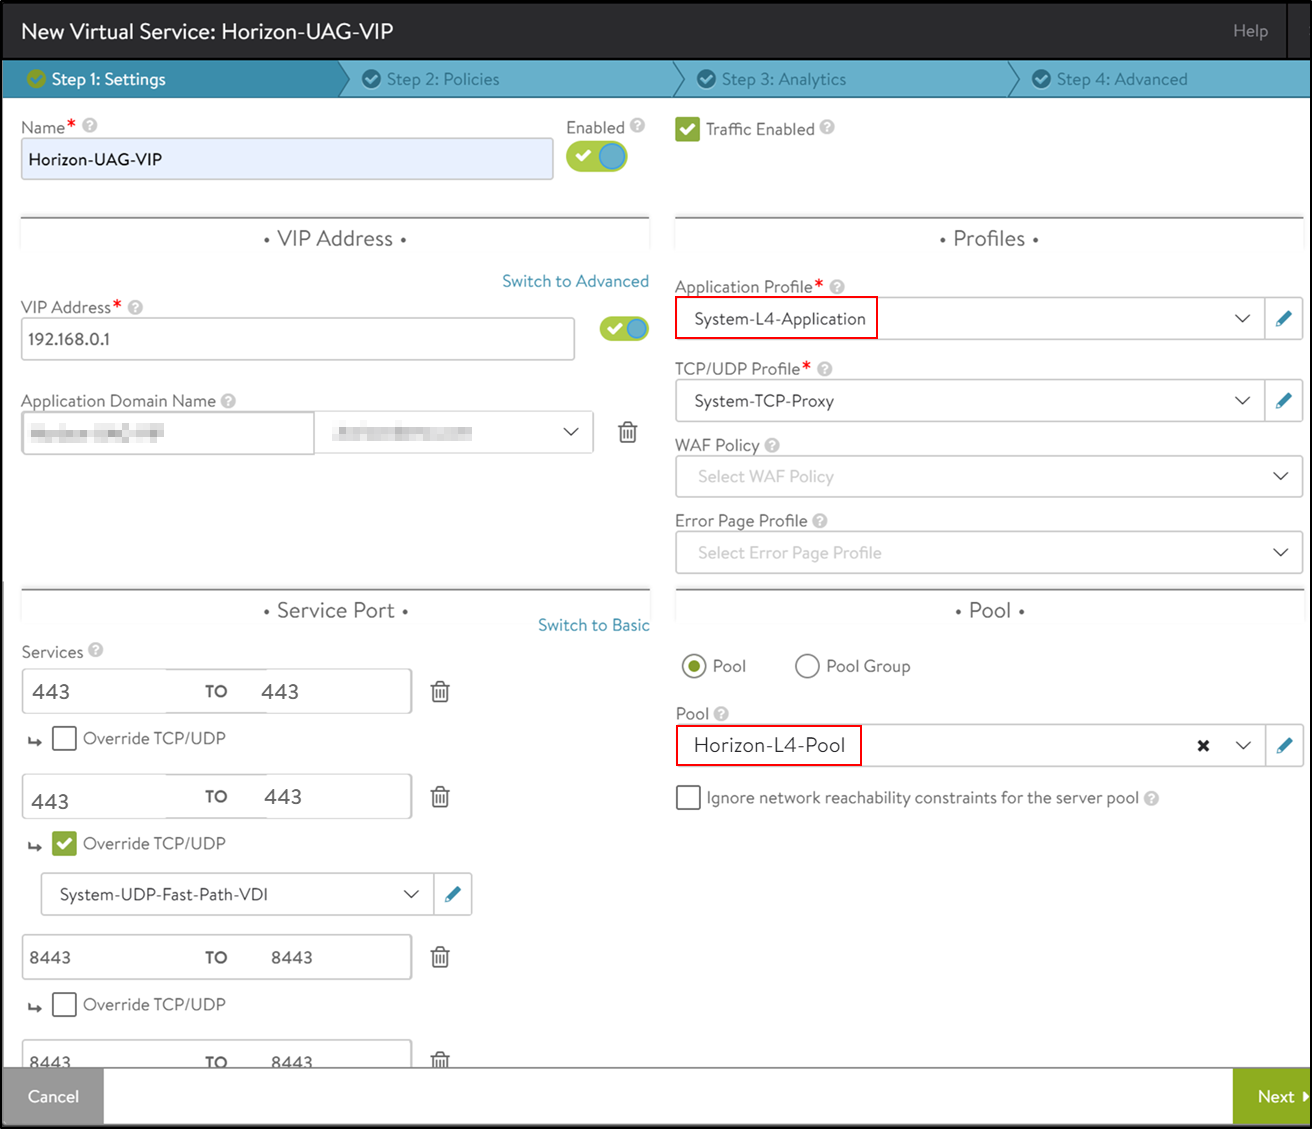
Creating L4 Virtual Service
Create another virtual service which will share the same IP address as that of the L7 VIP. This will make sure that we need only one virtual IP address for both the primary and secondary protocols. L7 virtual service will handle the primary protocol and the tunnel whereas L4 virtual service will handle other secondary protocols.
To create an L4 virtual service,
-
Click on Create Virtual Service > Advanced Setup.
-
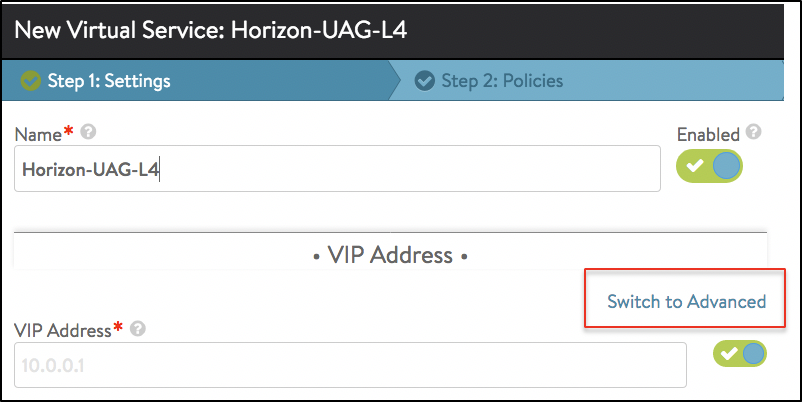
In the New Virtual Service screen, click on Switch to Advanced under VIP Address as shown below:
-
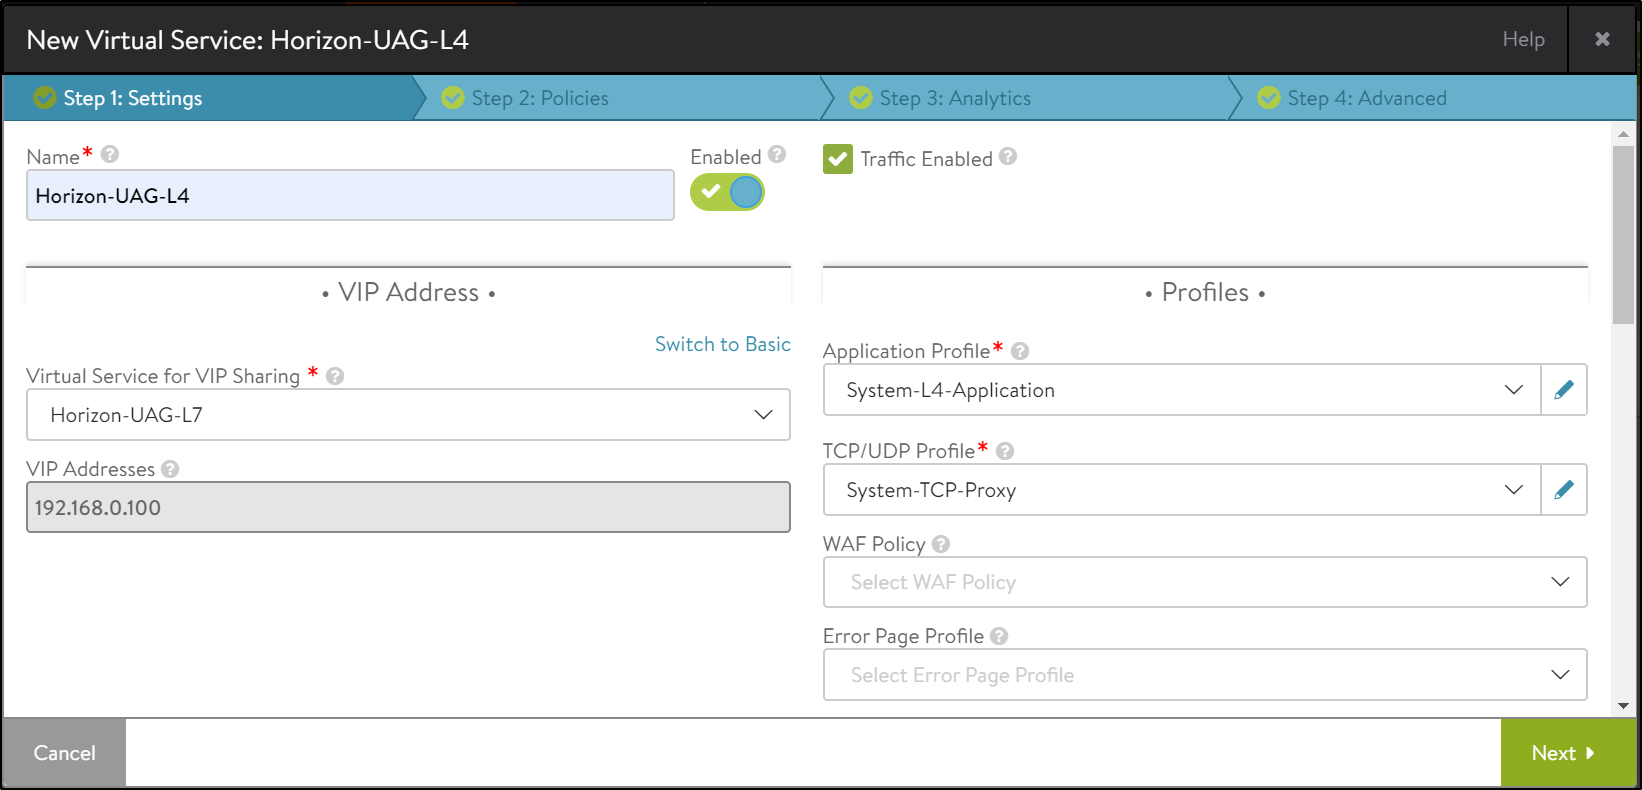
Select the L7 virtual service that was created as the Virtual Service for VIP Sharing as shown below:
-
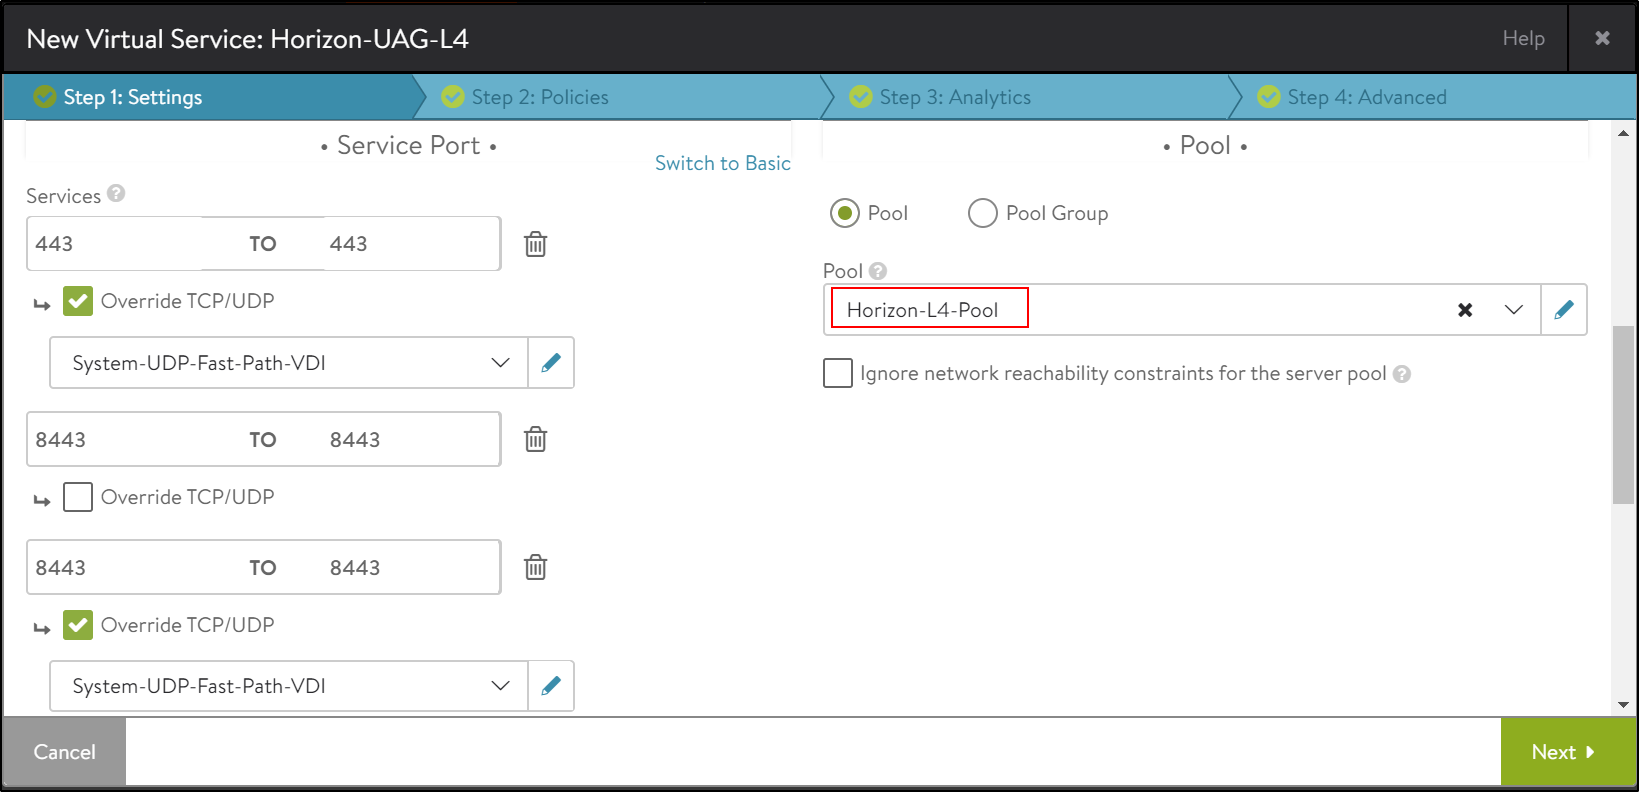
Under Service Port > Services, click on Switch to Advanced.
- Add the port numbers for the secondary protocols as shown below:
- 443 UDP to override TCP/UDP and use System-UDP-Fast-Path-VDI as the profile
- Add 8443 for Blast
- Add 8443 UDP to override TCP/UDP and use System-UDP-Fast-Path-VDI as the profile
- Add 4172 for PCoIP
- Add 4172 UDP to override TCP/UDP and use System-UDP-Fast-Path-VDI as the profile
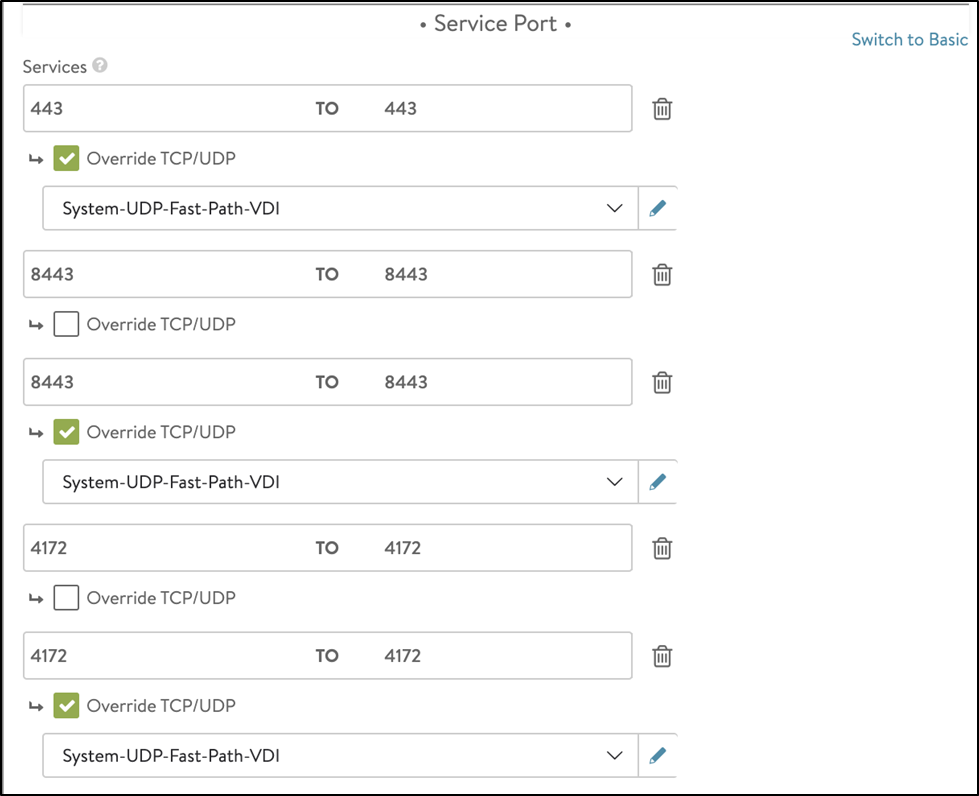
-
Select the Horizon-L4-Pool.
The virtual service is configured as shown below:
-
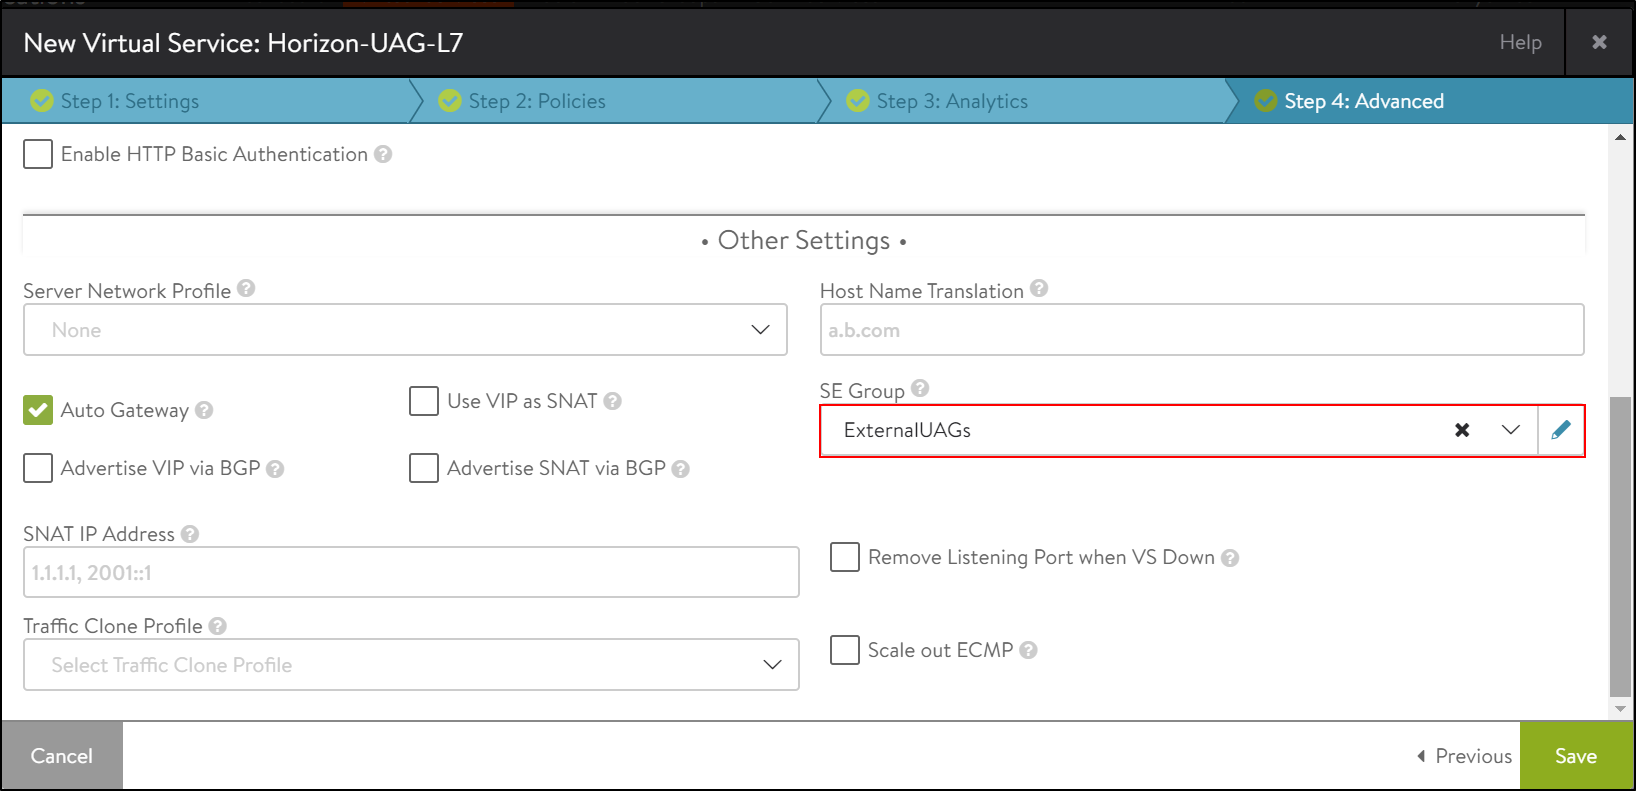
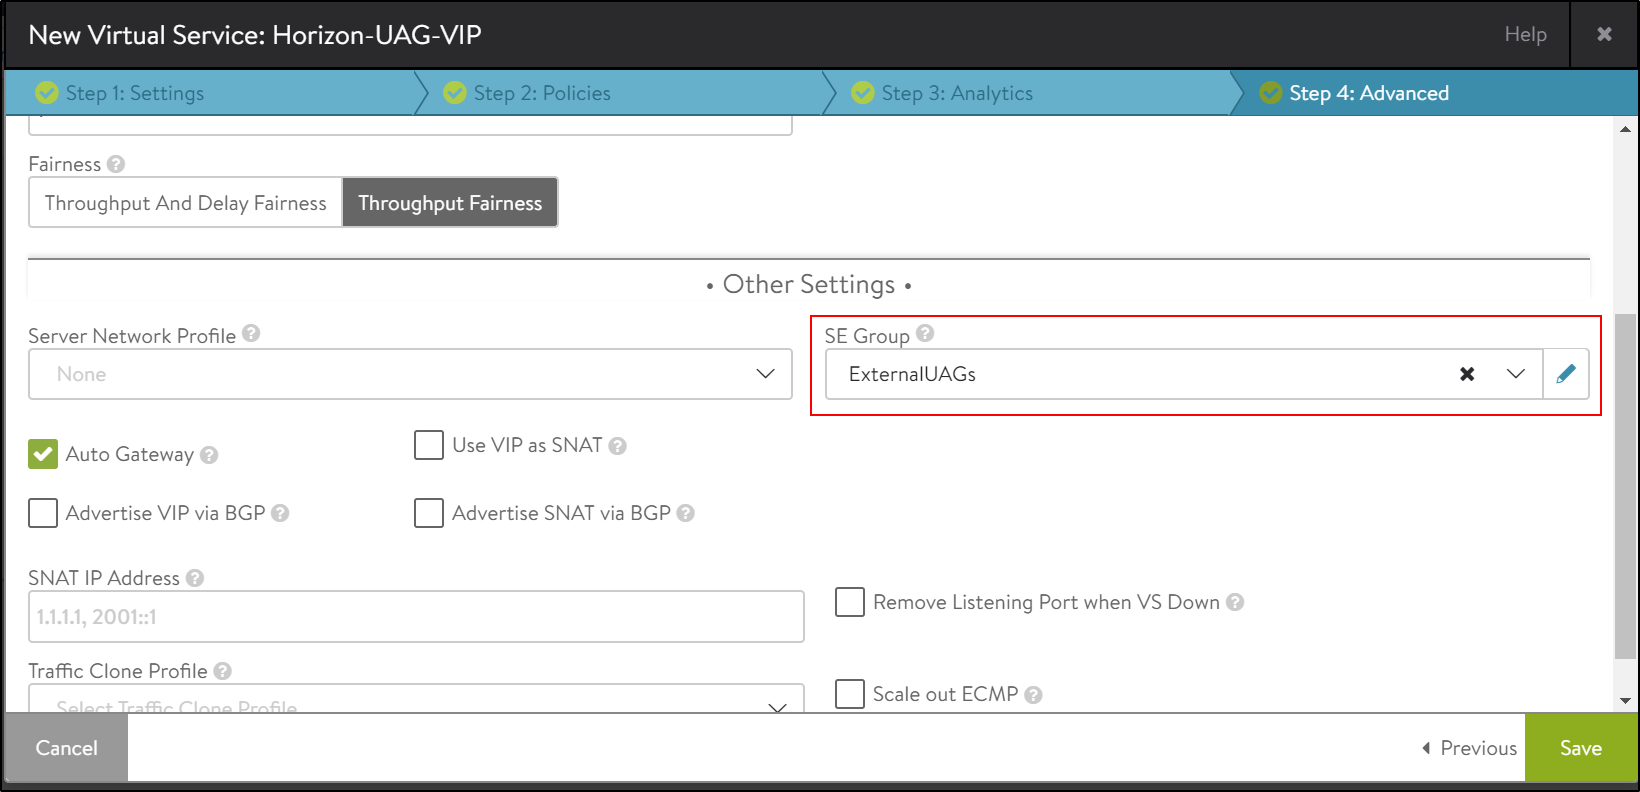
Click on Next and navigate to the Step 4: Advanced Tab.
-
Select ExternalUAGs as the SE Group as shown below:
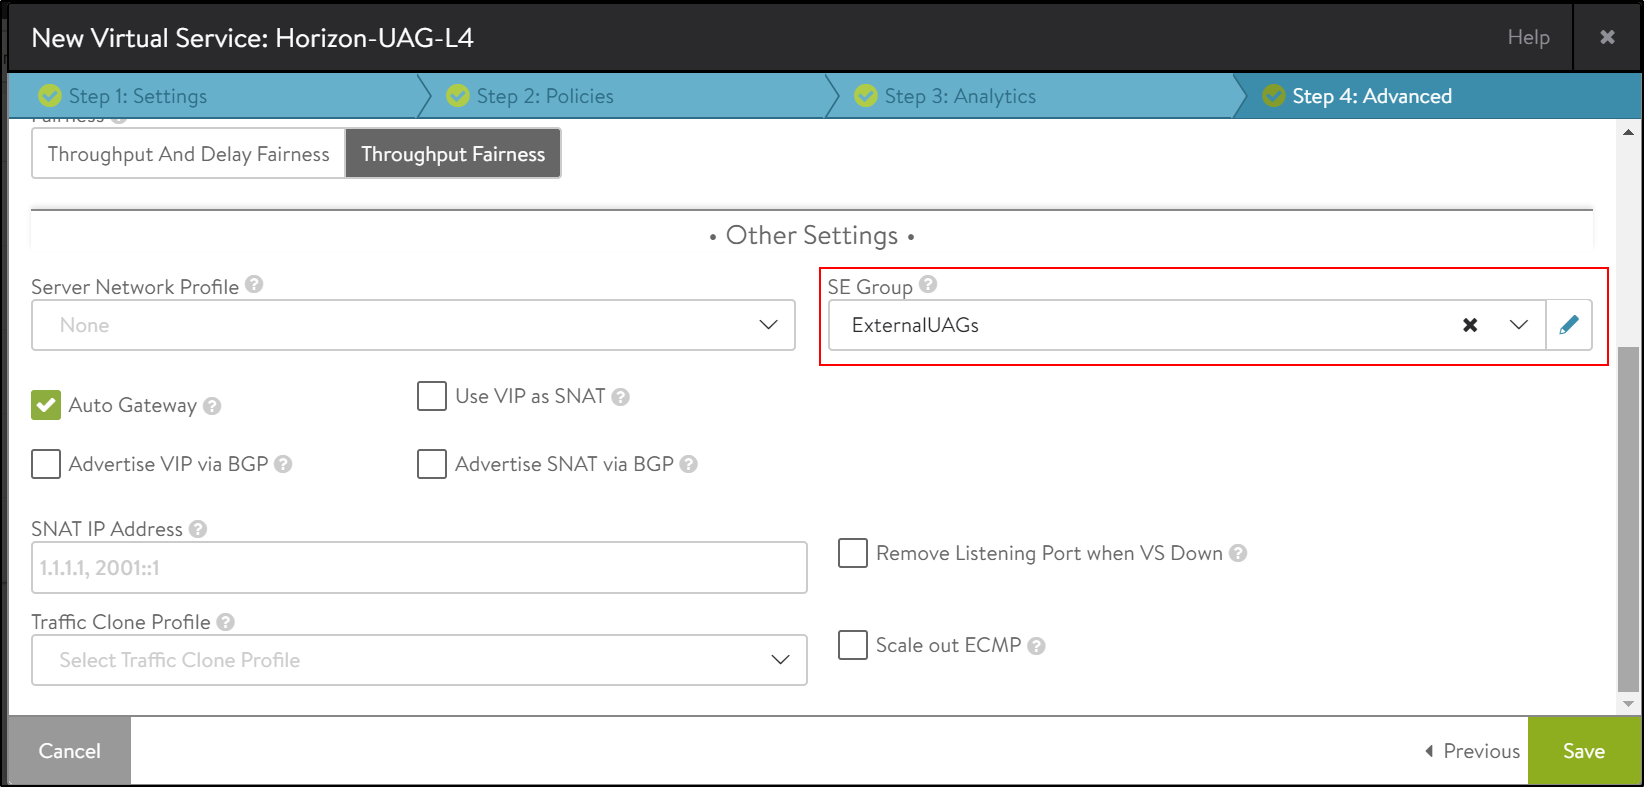
- Click on Save.
Load Balancing Internal UAGs with Avi
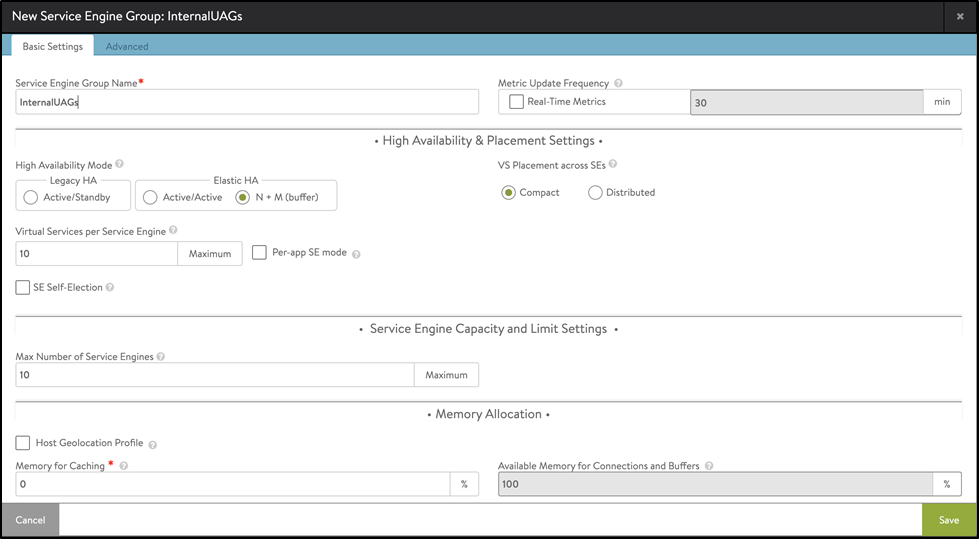
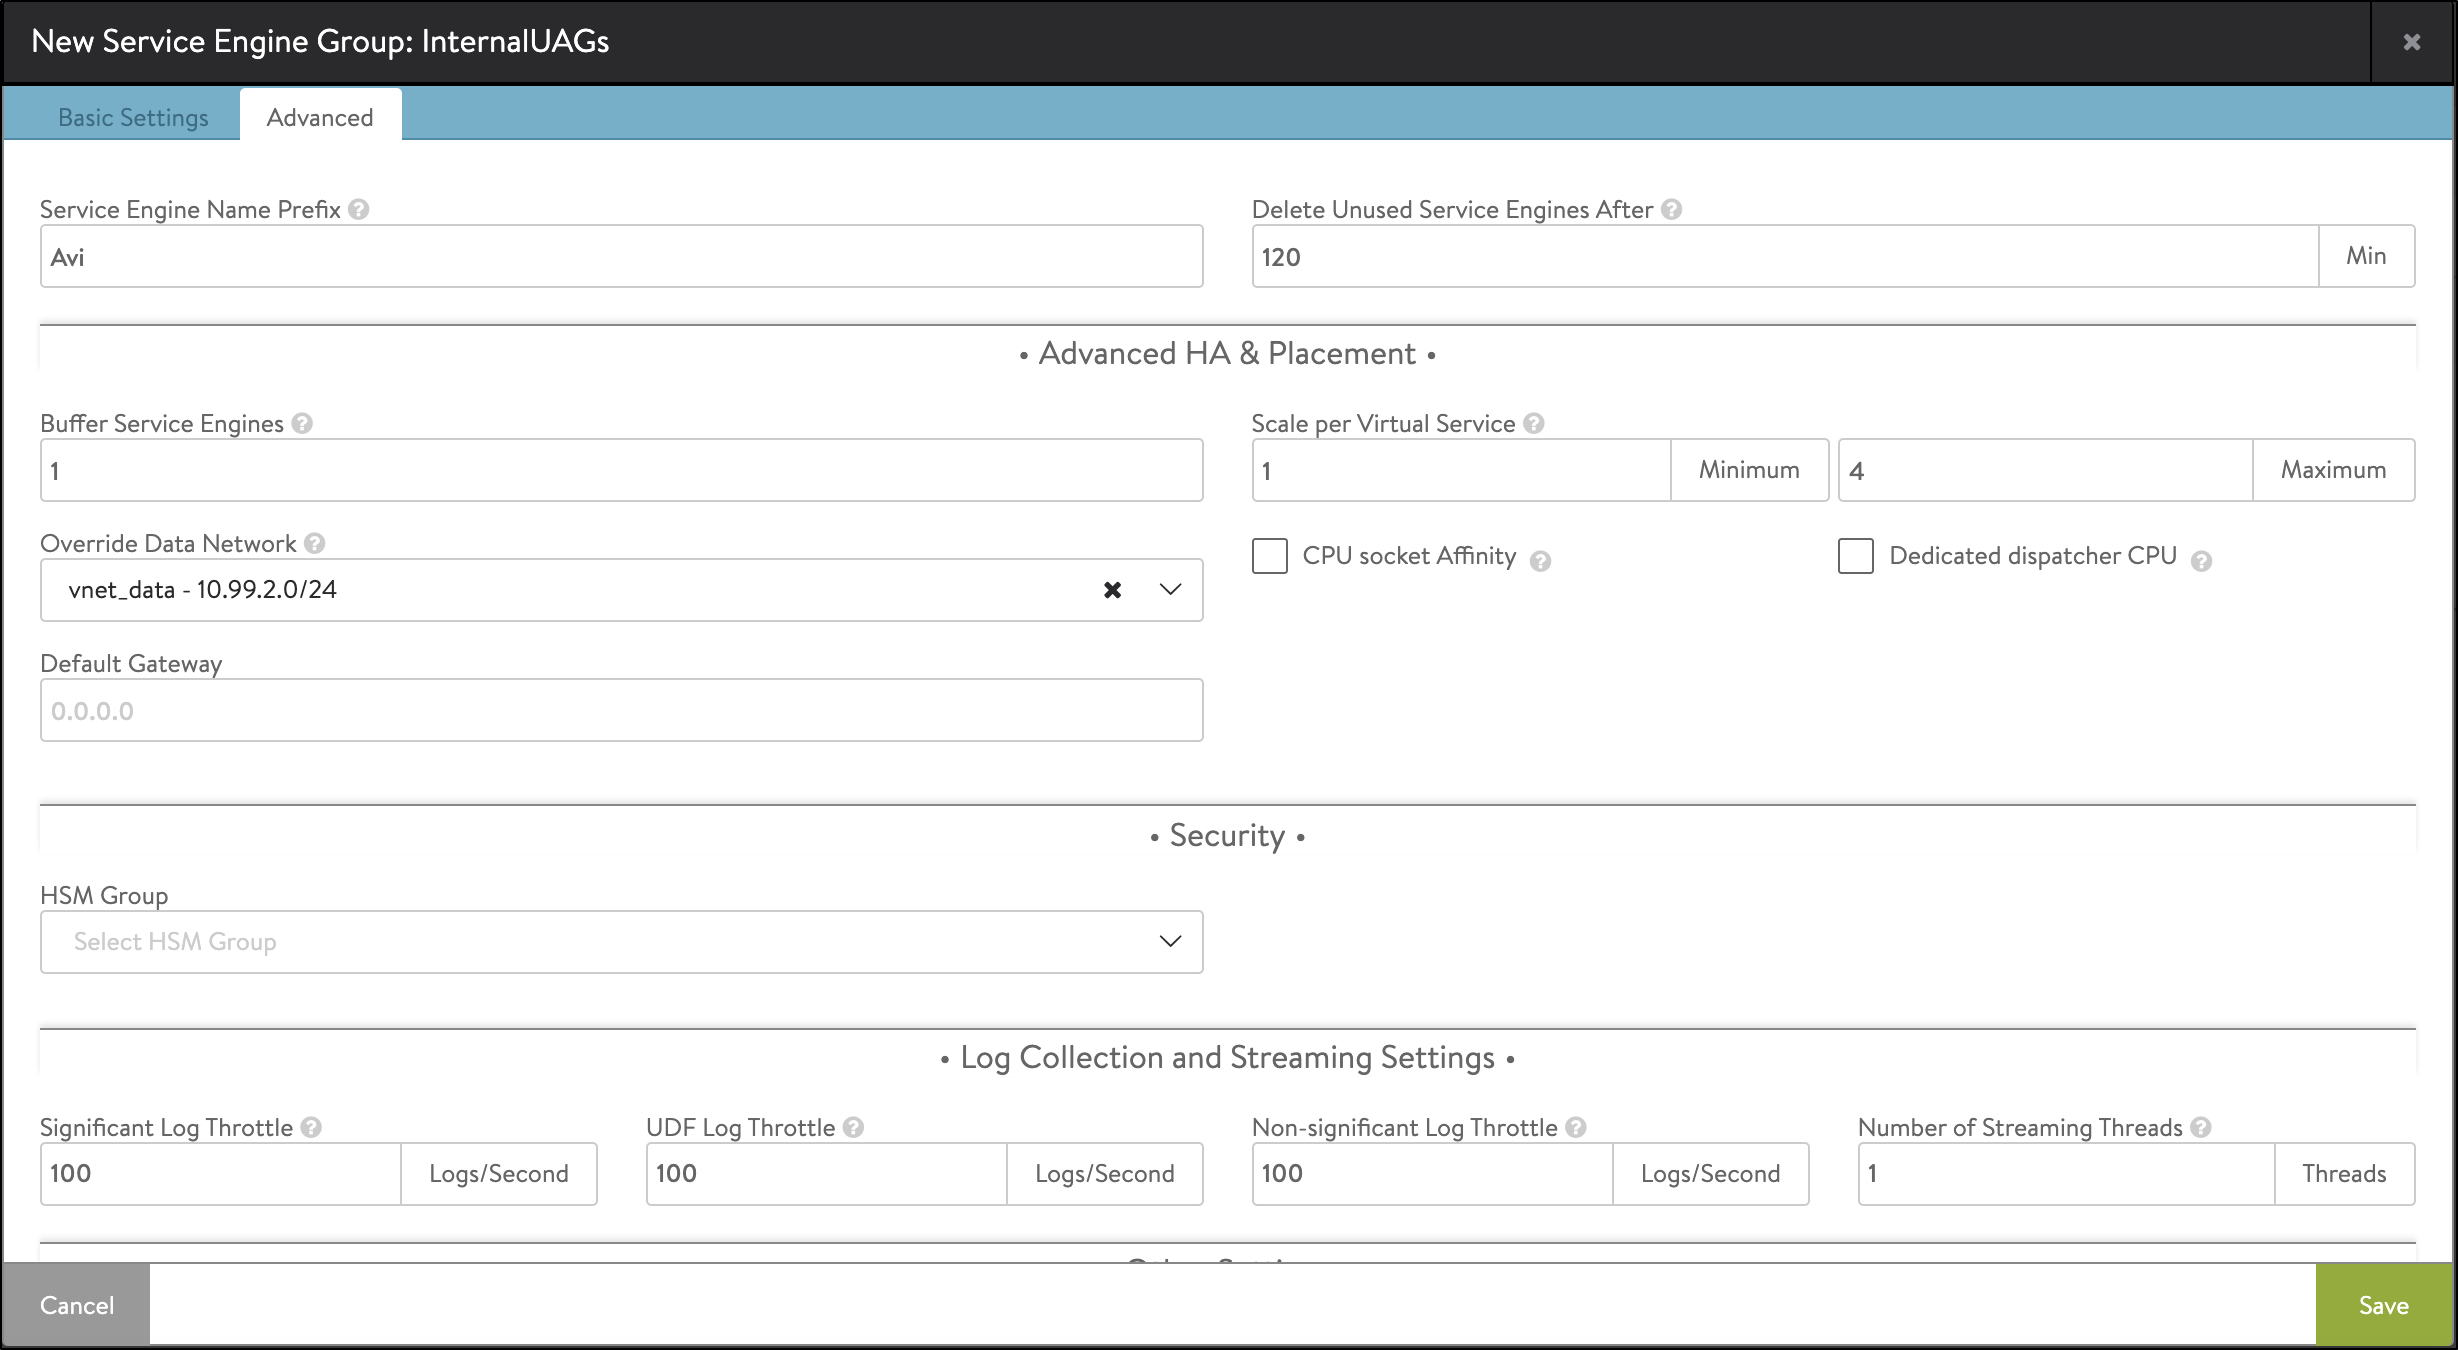
If internal UAGs have been deployed in the pod, another set of Avi virtual services should be used to load balance these UAGs. To isolate the Avi Service Engines for internal UAGs from the external UAGs, a separate Service Engine Group should be created and used for the internal UAG virtual services.
In addition, as the internal UAGs have their front-end IPs residing in the data subnet (instead of the DMZ subnet as was the case with external UAGs, the SE Group properties should be modified to reflect this).
Create a new SE group for Internal UAGs as shown below:
Creating pools, the health monitor, and the virtual service for internal UAGs are similar to that of external UAGs. Refer to Creating a New SE Group for detailed steps.
Best Practice
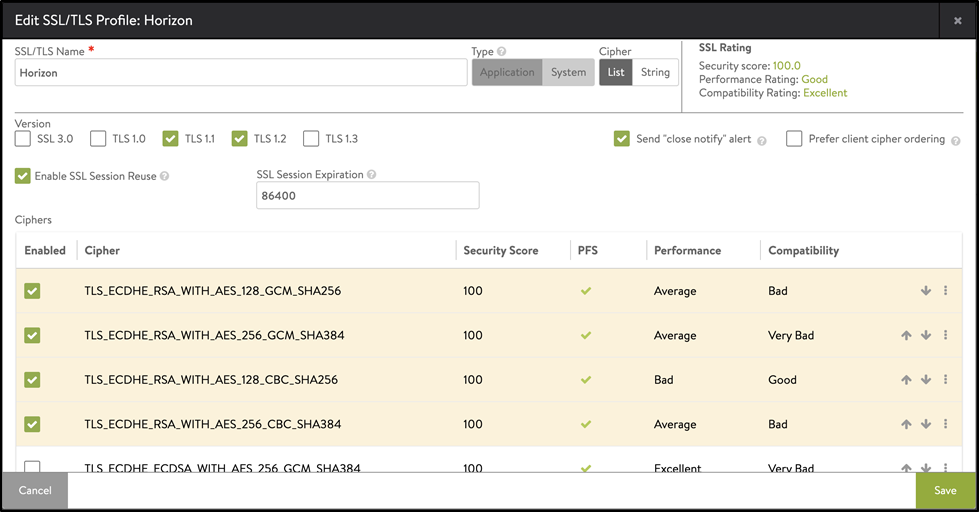
It is recommended to create a new SSL profile and bind the same to the virtual service instead of using the default SSL profile for higher security ratings. To create a new SSL profile,
-
From the Avi UI, navigate to Templates > Security > SSL/TLS Profile > Create > Application Profile.
-
In the New SSL/TLS Profile screen, select the Ciphers and the TLS version.
-
Enable TLS 1.1 and TLS 1.2 for backward compatibility with older Horizon clients.
-
Click on Save.
This profile will ensure that there are no issues with backward compatibility with old clients and also avoid security related issues.
Configuring Single L4 Virtual Service on Avi Vantage
In this design, a single virtual service with an L4 profile services all protocols.
Configuring L4 Virtual Service on Avi Vantage
L4 virtual service configuration on Av Vantage is done in the following steps:
-
Create custom health monitor for UAG.
Creating a Pool
-
From the Avi UI, navigate to Applications > Pools.
-
Click on Pool.
-
Configure the pool as shown below:
-
Click on +Add Health Monitor and select the Horizon HTTPS Monitor that was created.
-
Navigate to Step 3: Advanced.
-
Select Disable Port Translation as shown below:
-
Click on Next > Save.
Creating L4 Virtual Service
-
From the Avi UI, navigate to Applications > Virtual Services.
-
Click on Create Virtual Services > Advanced Setup.
-
In the New Virtual Service: screen, enter the virtual service name and other details.
-
Under Service Port, click on Switch to Advanced.
- Add the following port numbers for both the primary and secondary protocols:
- 443 for primary HTTPS protocol
- 443 UDP to override TCP/UDP and use System-UDP-Fast-Path-VDI as the profile
- 8443 for Blast
- 8443 UDP to override TCP/UDP and use System-UDP-Fast-Path-VDI as the profile
- 4172 for PCoIP
- 4172 UDP to override TCP/UDP and use System-UDP-Fast-Path-VDI as the profile
Note: The application profile and the pool (Horizon-L4-pool)are bound to the virtual service.
-
Click on Next and navigate to the Step 4: Advanced Tab.
-
Select ExternalUAGs as the SE Group as shown below:
- Click on Save.
With this, the configuration is complete and ready to use the Avi Vantage load balancer for Horizon.
Configuring Avi VIP in the UAG Configuration Setting in Horizon Cloud Pod
Note down the public IP of the Avi virtual service and configure the same IP as the public IP in the UAG configuration setting in the Horizon Cloud pod. Save the Horizon pod configuration so that the Blast and PCoIP URLs on the UAG now point to the Avi Virtual IP.
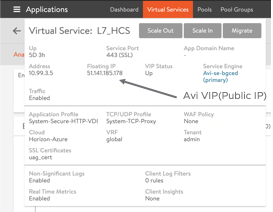
Note: Ensure that the DNS server is appropriately configured to resolve the Horizon FQDN to the Avi Virtual IP.
Work with the VMware Horizon operations team to provide the Avi virtual service IP for the VS just created. The operations team will configure this IP as the PCoIP URL.
Note: If the PCoIP URL is not updated with the Avi VS IP for Internal VS, PCoIP connections via the internal clients will fail. Blast protocol will not be impacted.
Suggested Reading
Document Revision History
| Date | Change Summary |
|---|---|
| July 23, 2020 | Published the article for Load Balancing UAGs in Horizon Cloud on Azure Deployments |