Azure IPAM for OpenShift
Avi Vantage supports IP address management (IPAM) for OpenShift deployed in Azure cloud. This article discusses the deployment and configuration for this feature on Avi Vantage.
Supported Features
- Service principle authentication for Azure.
- Multiple virtual_network_id in the same service subscription.
- DNS for virtual services, hosts, and private VIPs.
- Auto creation of private VIPs for north-south application services.
- Pull subnets from Azure to pick north-south network from the list in UI.
- Cluster federation from Red Hat leveraged across multiple regions.
- One Azure VNet per OpenShift cluster.
- Low Service Engine failure time due to Azure load Balancers that spin up and tear down dynamically.
Notes:
- IPAM is supported only for north-south traffic.
- Starting with AVI Vantage release 20.1.3, Azure IPAM is no longer supported.
For complete information on deploying and configuring OpenShift on Microsoft Azure, refer to Deploying Red Hat OpenShift Container Plaform 3.5 on Microsoft Azure.
Prerequisites
- All OpenShift nodes must be created with one or more availability sets. It is recommended to create the OpenShift master in a separate availability set.
- A resource group with Contributor permission where Avi Controller cluster will be provisioned. It is recommended to keep this as a dedicated resource group. The same resource group can be used by Avi Controller for creating dynamic Azure resources, such as, Azure Load Balancers.
- Credential for the cloud user in Azure active directory. This credential asset could either be a service principle object, as in case of an application or an username/password credential set, as in the case of an user.
- Create custom role by the name AviController using the role file from the github location here. Cloud user needs to have AviController role in the resource group where the VNet and OpenShift nodes are present.
- If Avi Controller is deployed as a container, use “/” instead of “./mnt” OS disk. “./mnt” is a temporary disk in Azure and if a container is deployed here, the virtual machine loses all Controller configuration during a restart.
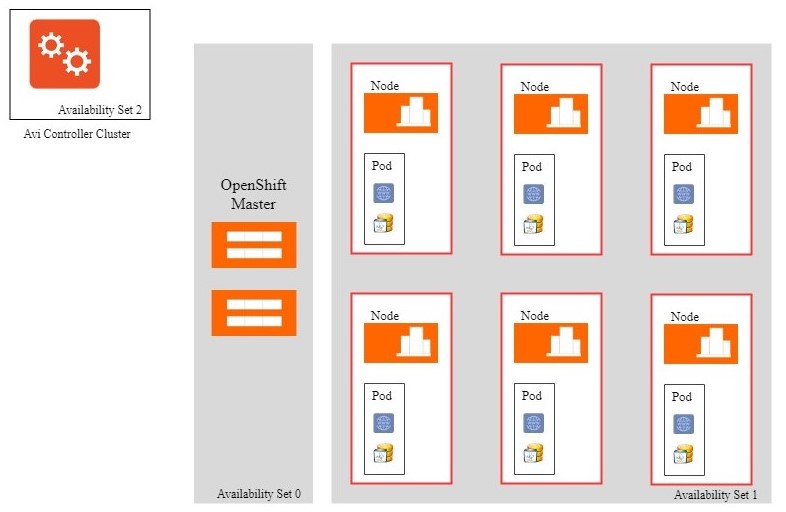
Deployment Topology
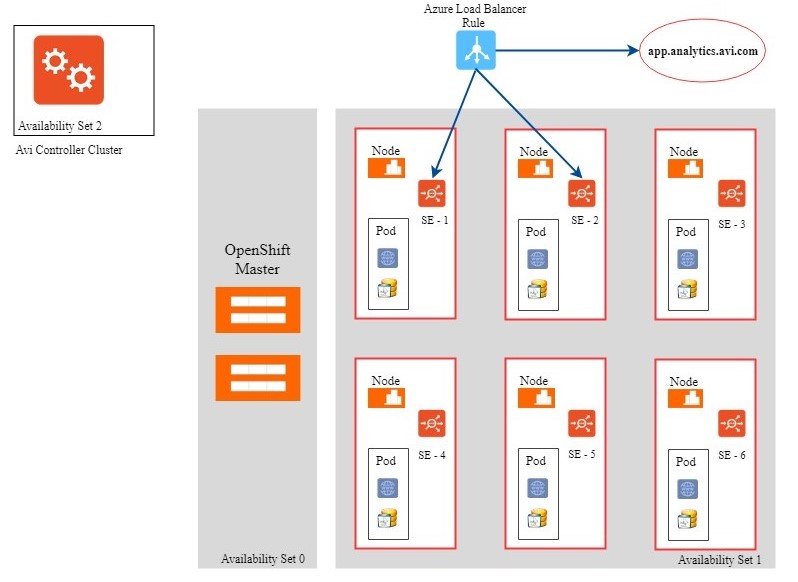
The deployment includes the OpenShift master, OpenShift nodes along with pods, and the Avi Controller cluster in specific availability sets. In the current scenario,
- OpenShift master is in Availability Set 0
- OpenShift nodes and pods are in Availability Set 1
Follow the steps provided to complete the deployment:
- Create an Avi Controller cluster within a resource group.
- Create an Azure resource group by name Avi-res-grp.
- Add a new account in the Active Directory for Avi Controller with
writeaccess to Avi-res-grp.
The Azure Load Balancers will be created in the Avi-res-grp resource group.
Azure IPAM Configuration
To configure an Azure IPAM profile on Avi UI, navigate to Templates > Profiles > IPAM/DNS Profiles and click on Create.
Provide a Name for the profile and choose Azure Platform IPAM from the Type dropdown list.
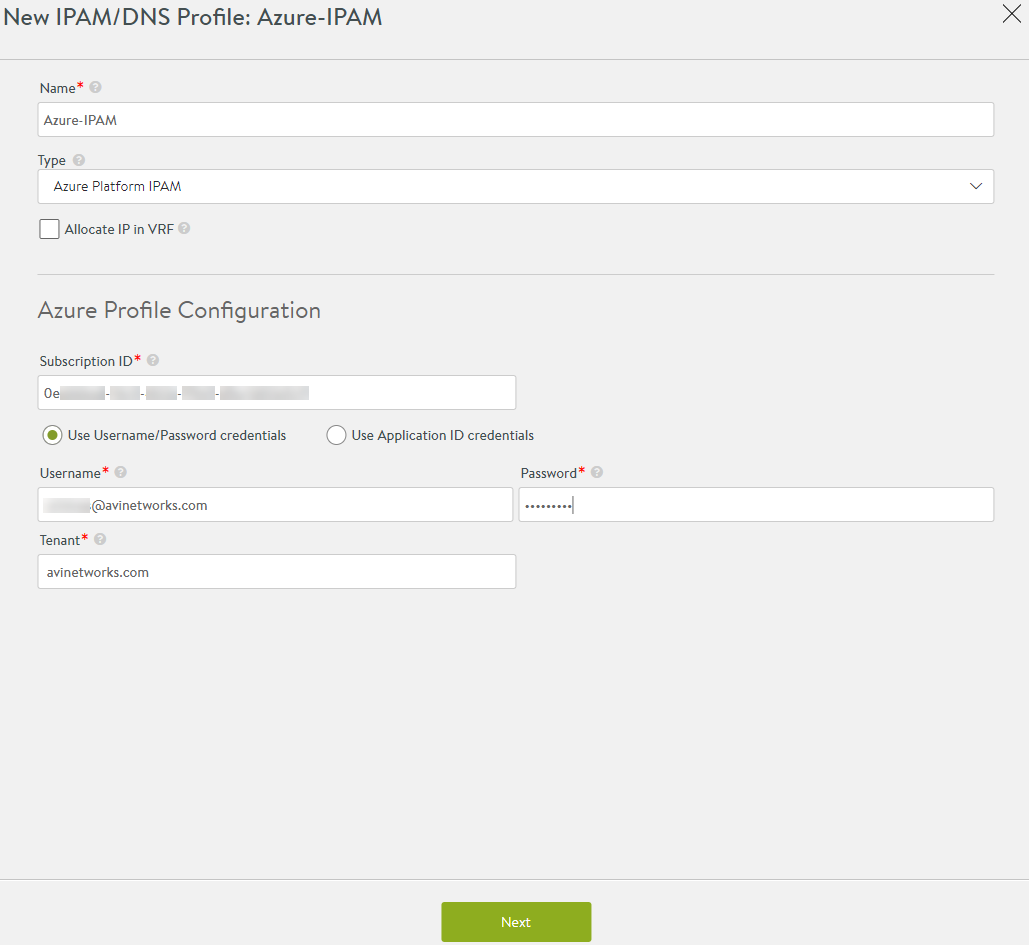
Enter the Subscription ID of the virtual network.
On choosing Username/Password credentials for cloud user in Azure active directory, enter the username, password, and tenant details in the suitable fields.
On selecting Use Application ID credentials, provide the application ID, authentication key, and tenant ID details.
Click on Next to configure Azure profile details.
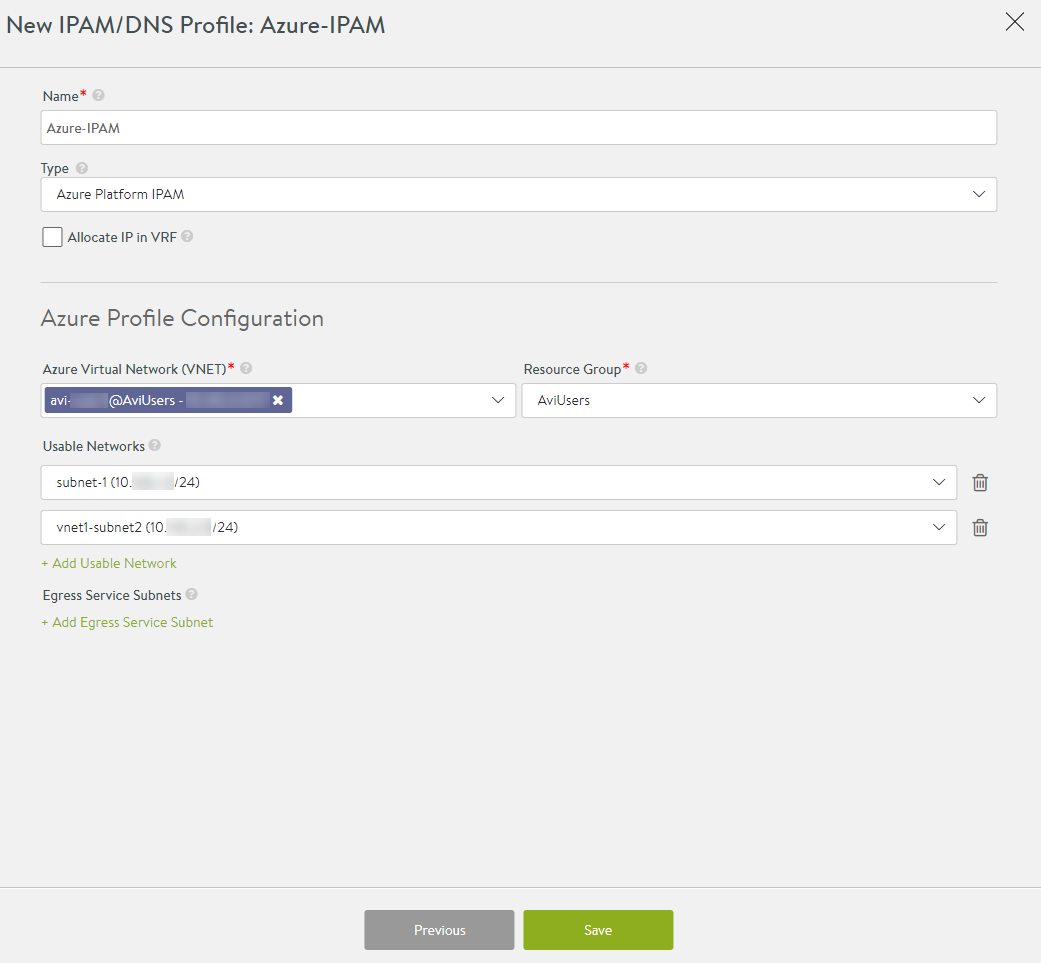
- Azure Virtual Network (VNET): Enter the virtual network where the OpenShift nodes reside
- Resource Group: Enter the resource group that is used for creating dynamic Azure resources.
- Usable Networks: Enter the subnets within the VNet from which the VIP will be allocated.
OpenShift Cloud Creation
The following are the steps involved in OpenShift cloud creation:
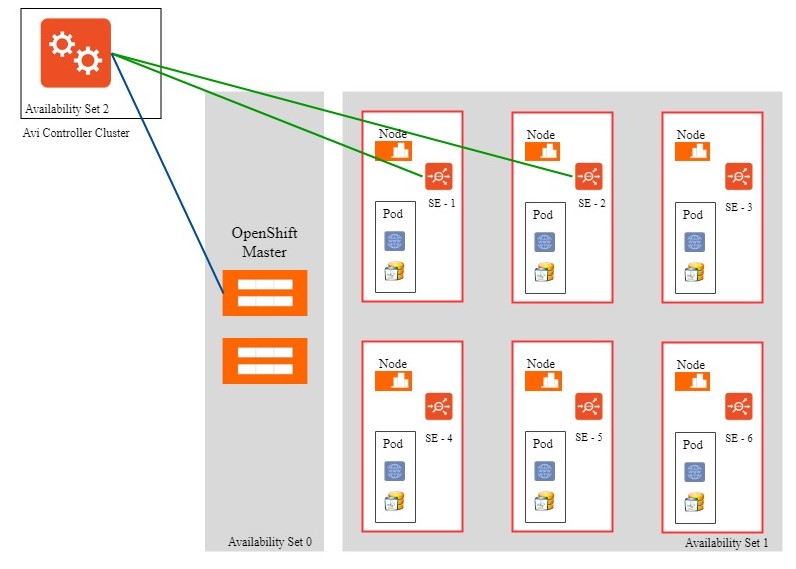
- Avi Controller discovers the OpenShift nodes by contacting the OpenShift master.
- Avi Controller logs into the discovered nodes using SSH and installs Avi Service Engine container within the virtual machine.
- The Service Engines automatically connect to the Controller.
For the complete OpenShift cloud configuration sequence, refer to Configure OpenShift/Kubernetes Cloud.
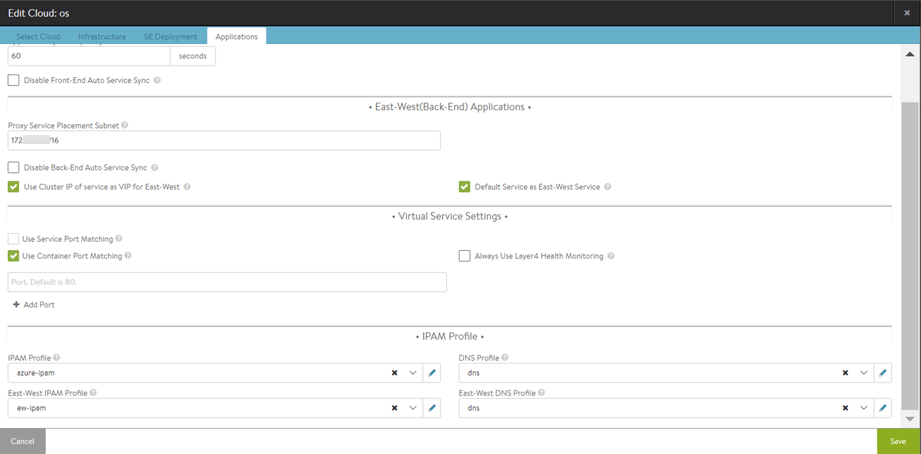
To complete the setup, configure the IPAM and DNS profile paramaters. Under Applications, navigate to the IPAM Profile section.
Enter the Azure IPAM profile name under IPAM Profile field so that the profile is associated with OpenShift cloud as north-south IPAM.
Under DNS Profile, configure the Avi Vantage DNS for north-south internal DNS.
Application Creation
The following are the steps involved in creating an application:
- Create the deployment service and route in OpenShift.
- Avi Controller automatically creates a virtual service and places it on one or more Service Engines depending on the Service Engine group parameters.
- This trigger creates an Azure Load Balancer per Service Engine group.
- Avi Controller adds an Azure Load Balancer rule
-vip-1 port 443 -{SE-1, SE-2} - Avi Controller adds an entry to the DNS Service (Avi DNS)
app.analytics.avi.com A vip-1
Service Engine Failure Handling
Service Engine failure is detected by Azure Load Balancer health checks. The failure detection time is about 10 seconds. The SE/SE heartbeat and SE/Controller detects a Service Engine failure within one or two seconds. For more information on this, refer to Service Engine Failure Detection.
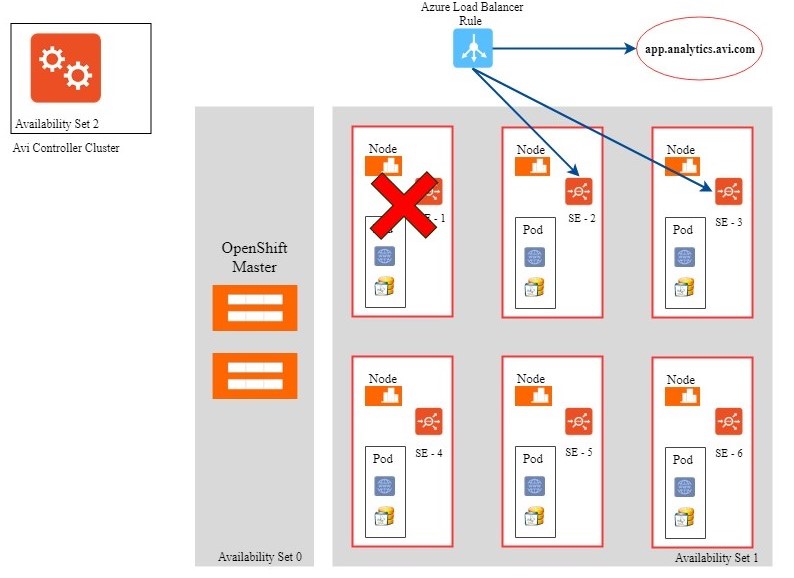
Consider an Azure Load Balancer rule, -vip-1 port 443 –SE-1,SE-2.
On detecting that SE-1 is down, Azure Load Balancer stops using SE-1 for the VIP-1 rule.
Following this the Controller automatically changes the Azure Load Balancer rule for VIP-1 from SE-1, SE-2 to SE-2, SE-3, as follows:
-vip-1 port 443 –SE-2,SE-3
Note: The Azure APIs will take about more than 30 seconds to complete this transition and so expect a drop in the capacity level during this period.
Scalability
Azure Load Balancer has a limit of 250 rules per Azure Load Balancer instance. This translates to 125 VIPs, considering each virtual service has to serve at least two ports (80, 443).
To scale beyond 125 VIPs, you can use one of the following two options:
-
Shared VIP: Supports better scaling with a single SE group for a large number of OpenShift routes.
For more information on OpenShift routes, refer to OpenShift Routes Virtual Service Configuration. -
Multiple SE groups: Associates applications to different SE groups using key-value annotation.
Shared VIP
In a shared VIP setup, a common virtual IP can host a large number of applications. Multiple routes on OpenShift maps to a single virtual service on Avi Controller.
- For HTTP, the virtual service switches to different backend pools based on the rules.
- For HTTPS, virtual service switches to the child virtual service based on the URL.
To enable this feature, annotate all namespaces on OpenShift with the avi_virtualservice: shared tag.
Follow the table below to understand the configuration specifies of Avi Vantage parameters in relation to the OpenShift route for HTTP and HTTPS applications:
| Openshift route | Avi Vantage Object | Description |
|---|---|---|
| Dedicated VIP per route | virtual service, pool | Every route creates a virtual service and pool. Absence of annotation route_virtualservice creates a dedicated virtual service that uses a VIP per route. |
| Shared VIP: HTTP traffic – unsecure or path-based routes | pool | HTTP_Policy is used in the parent virtual service to switch host or path to the appropraie pool. Annotation route_virtualservice specifies the parent virtual service to which this route is attached. |
| Shared VIP: HTTPS traffic – secure routes | Child virtual hosted or SNI virtual service, pool | SNI is used to route traffic to the appropriate child virtual service or pool. Annotation route_virtualservice specifies the parent virtual service to which this route is attached. |
Multiple SE Groups
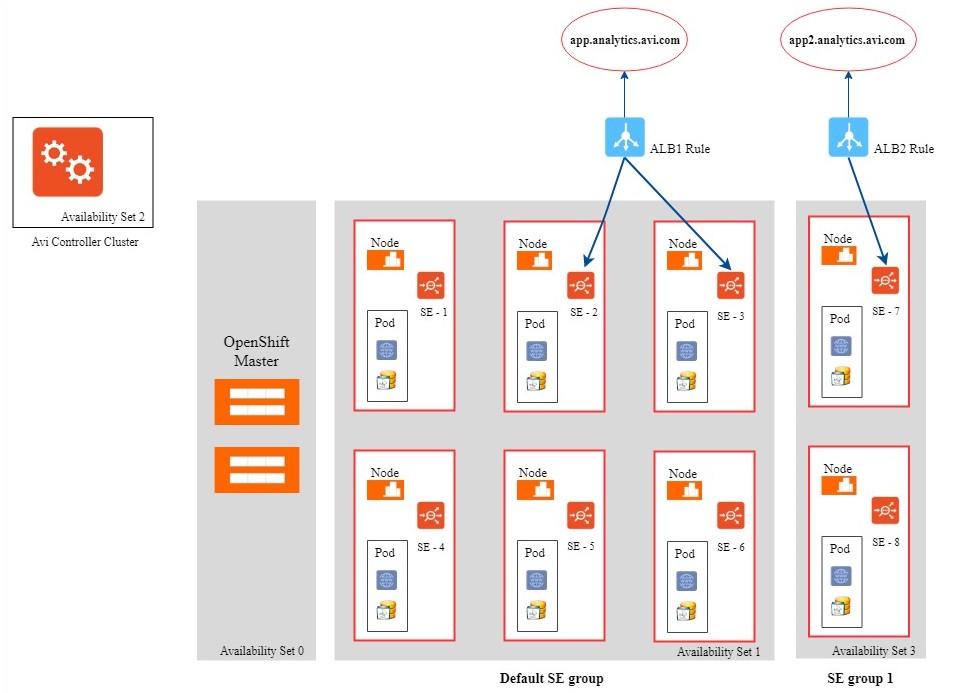
By creating multiple SE groups, applications are associated to different SE groups using key-value annotation.
The following three are the prerequisite configuration, following which the virtual service with be associated with different SE groups:
- During a new OpenShift cluster creation, label each node in ansible inventory host files, as shown in the example below:
 [nodes]
 10.145.1.7 openshift_node_labels="{'availability_set': 'blue'}" openshift_hostname=10.145.1.7 openshift_public_hostname=10.145.1.7
 10.145.1.9 openshift_node_labels="{'availability_set': 'blue'}" openshift_hostname=10.145.1.9 openshift_public_hostname=10.145.1.9
 10.145.1.6 openshift_node_labels="{'availability_set': 'red'}" openshift_hostname=10.145.1.6 openshift_public_hostname=10.145.1.6
 10.145.2.12 openshift_node_labels="{'availability_set': 'red'}" openshift_hostname=10.145.2.12 openshift_public_hostname=10.145.2.12
If the OpenShift cluster has already been created, then set the nodes’ association as shown below
oc label node node_value availability_set=blue - On Avi Controller, perform the following functions:
- Create an OpenShift cloud
- Create SE groups for different availability set with
key=availability_setandvalue=set_number, as in this example value=blue.
Following this, the Service Engines will automatically be re-assigned to the corresponding SE groups.
Associate virtual service to different SE groups, as shown in the example below:
"avi_proxy":
"{\"virtualservice\":
    {\"analytics_policy\":
        {\"metrics_realtime_update\": {\"duration\": 0, \"enabled\": true},
        {\"client_insights\": \"NO_INSIGHTS\",
        \"full_client_logs\": {\"enabled\":true}},
       \"se_group_ref\": \"/api/serviceenginegroup?name=Default-Group\"},
        \"pool\": {\"inline_health_monitor\": false,
        \"health_monitor_refs\": {\"/api/healthmonitor?name=System-HTTP\"}
         }
    }
 }"