Deploying Avi Vantage in GCP with BYOIP
This article explains provisioning and configuring Avi Vantage in Google Cloud Platform (GCP) with support for Bring Your Own IP Address (BYOIP).
Note: Starting with Avi Vantage version 20.1.3, Linux Server Cloud and GCP IPAM on GCP are not supported. For more details on Internal Load Balancer and BYOIP, refer to GCP VIP as Internal Load Balancer and BYOIP.
Overview
About Google Cloud Platform (GCP)
Google Cloud Platform is a cloud computing service that offers hosting services on the same supporting infrastructure that Google uses internally for end-user products such as search and YouTube. Cloud Platform provides developer products to build a range of programs from simple websites to complex applications.
Google Cloud Platform is a part of the Google Cloud enterprise services suite that provides a set of modular cloud-based services with a host of development tools that includes hosting and computing, cloud storage, data storage, translation APIs, and prediction APIs.
About Avi Vantage
The Avi Vantage Platform provides enterprise-grade distributed ADC solutions for on-premise and public-cloud infrastructure. Avi Vantage also provides built-in analytics to diagnose and improve the end-user application experience, helping in easy operations for network administrators.
Avi Vantage is a complete software solution which runs on commodity x86 servers or as a virtual machine (VM) and is entirely accessible via REST API calls.
Public IP Support for BYOIP in GCP
Google has introduced public IP support for Internal Load Balancing in GCP. With this, you can host your public IPs to the Google cloud. Starting with release 18.1.2, Avi Vantage supports this feature in Google cloud, where you can create a load balancer with a VIP from the GCP VPC subnet. You also need to create a static route in GCP with the public IP as the destination and the VIP as next hop.
BYOIP in GCP
GCP offers Internal Load Balancing for TCP and UDP traffic. This enables you to operate and scale your services behind a private load balancing IP address that is accessible only to your internal virtual machine instances.
Using the load balancer you can configure a private load balancing IP address to be the frontend for your private backend instances. With this, you will not need a public IP address for your load balancing service. The internal client requests will stay internal to your VPC network and the region, resulting in lower latency, as all load-balanced traffic will be restricted within Google’s network.
Features
- Works with auto mode VPC networks, custom mode VPC networks, and legacy networks.
- Allows autoscaling across a region, where it can be implemented within the regional managed instance groups, thus making services immune to zonal failures.
- Supports traditional 3-tier web services, where the web tier uses external load balancers such as HTTP, HTTPS, or TCP/UDP network load balancing. This also supports instances running the application tier or the backend databases that are deployed behind the Internal Load Balancer.
Load Balancing and Health Check Support
- Supports load balancing TCP and UDP traffic to an internal IP address. You can also configure the Internal Load Balancing IP from within your VPC network.
- Supports load balancing across instances in a region. This allows instantiating instances in multiple availability zones within the same region.
- Provides fully managed load balancing service that scales as required, to handle client traffic.
- GCP health check system monitors the backend instances. You can configure TCP, SSL (TLS), HTTP, or HTTPS health check for these instances.
Considerations
- Health check probes are in the address range of 130.211.0.0/22 to 35.191.0.0/16. Add firewall rules to allow these addresses.
- If all instances are unhealthy in the backend service, then the ILB will load balance the traffic among all instances.
VIP - Internal Load Balancer (ILB)
The VIP reachability is through Internal Load Balancer (ILB) where VIP will be allocated from a GCP subnet and the VIP will be frontend IP of the ILB. The ILB backends will be all the SEs on which the VS is placed.
The ILB works across projects in a shared VPC case. Only auto allocate of VIP is supported.
You can create all the GCP resources for ILB in the SE’s project. However, you cannot update the forwarding rule port once you create the same.
Floating/Public IP - GCP Route with ILB as next-hop
The floating IP will be a GCP Route with destination IP as the public IP (BYOIP or GCP allocated) and next hop as the ILB.
You can configure GCP cloud routers to advertise the FIP routes through BGP.
Limitations
- ILB supports UDP and TCP. However, in the case of UDP the health check type is not UDP (due to Google limitation) and so the failover time is higher.
- The virtual IP cannot be shared by other virtual services as the forwarding ports cannot be updated. A new forwarding rule with the same IP but different port is not allowed in GCP.
- A virtual service can only have upto 5 ports as the forwarding rule can have only 5 ports.
- The health check is done on the same port as the VIP and not on the instance IP.
- If Avi Service Engine is in N backend service then it will receive N health check probes per health check interval.
- Ensure that the VIP is not configured in the same subnet as that of Avi Service Engine.
Deploying BYOIP

Source: https://cloud.google.com/docs/
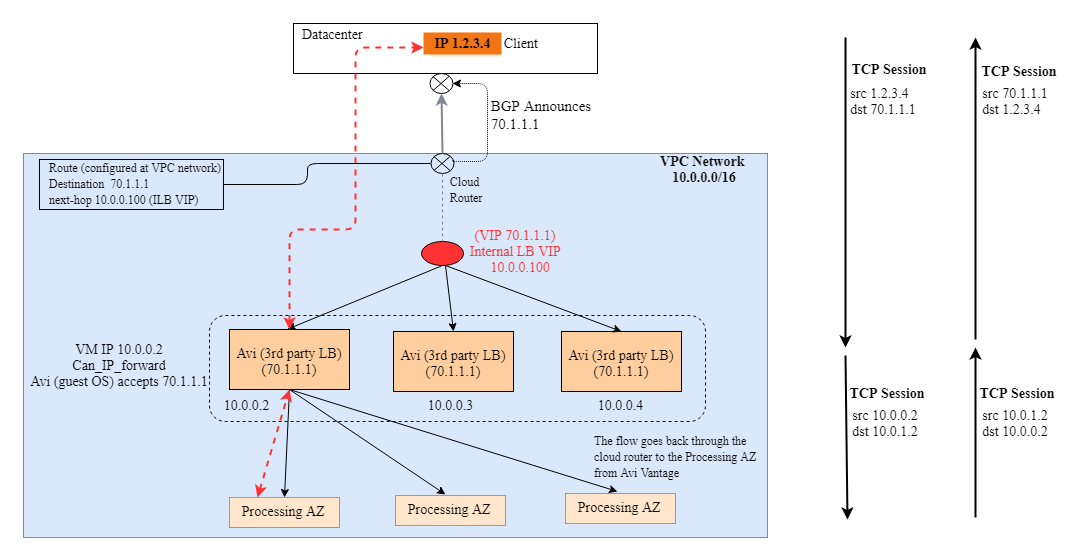
With BYOIP, you can configure a private RFC 1918 address as the load balancing IP address and configure backend instance groups to handle requests that are sent to the load balancing IP address from client instances.
The backend instance groups can be zonal or regional, which enables you to configure instance groups according to your availability requirements.
The traffic sourced from the client instances to the ILB must belong to the same VPC network and region, but can be in different subnets as compared to the load balancing IP address and the backend.
The following figure represents a sample deployment:
Provisioning Multi-Project
A virtual private cloud (VPC) is a global private isolated virtual network partition that provides managed networking functionality to the GCP resources. BYOIP in GCP supports shared VPC, also known as XPN, that allows you to connect resources from multiple projects to a common VPC network.
On using shared VPC, you need to designate a project as a host project and one or more projects as service projects.
Host Project - This contains one or more shared VPC networks. One or more service projects can be attached to the host project to use the shared network resources.
Service Project - This is any project that participates in a shared VPC by being attached to the host project. Starting with the release 18.1.2, you can configure new IPAM fields in Avi Vantage and cross-project deployment is also supported.
Reach out to your Google support contact for allowing specific projects.
GCP Settings
The Avi Controller, Service Engines, and the network can all be in different projects. By default, GCP adds a service account to each VM in the following format: [PROJECT_NUMBER]-compute@developer.gserviceaccount.com.
For integration with Avi Vantage,
- Set up the service account in editor role for the Controller VM to call the Google cloud APIs.
- Add this service account as a member to the Service Engines’ and XPN project.
- Map this account to the virtual machines created, so that the required permissions are allotted.
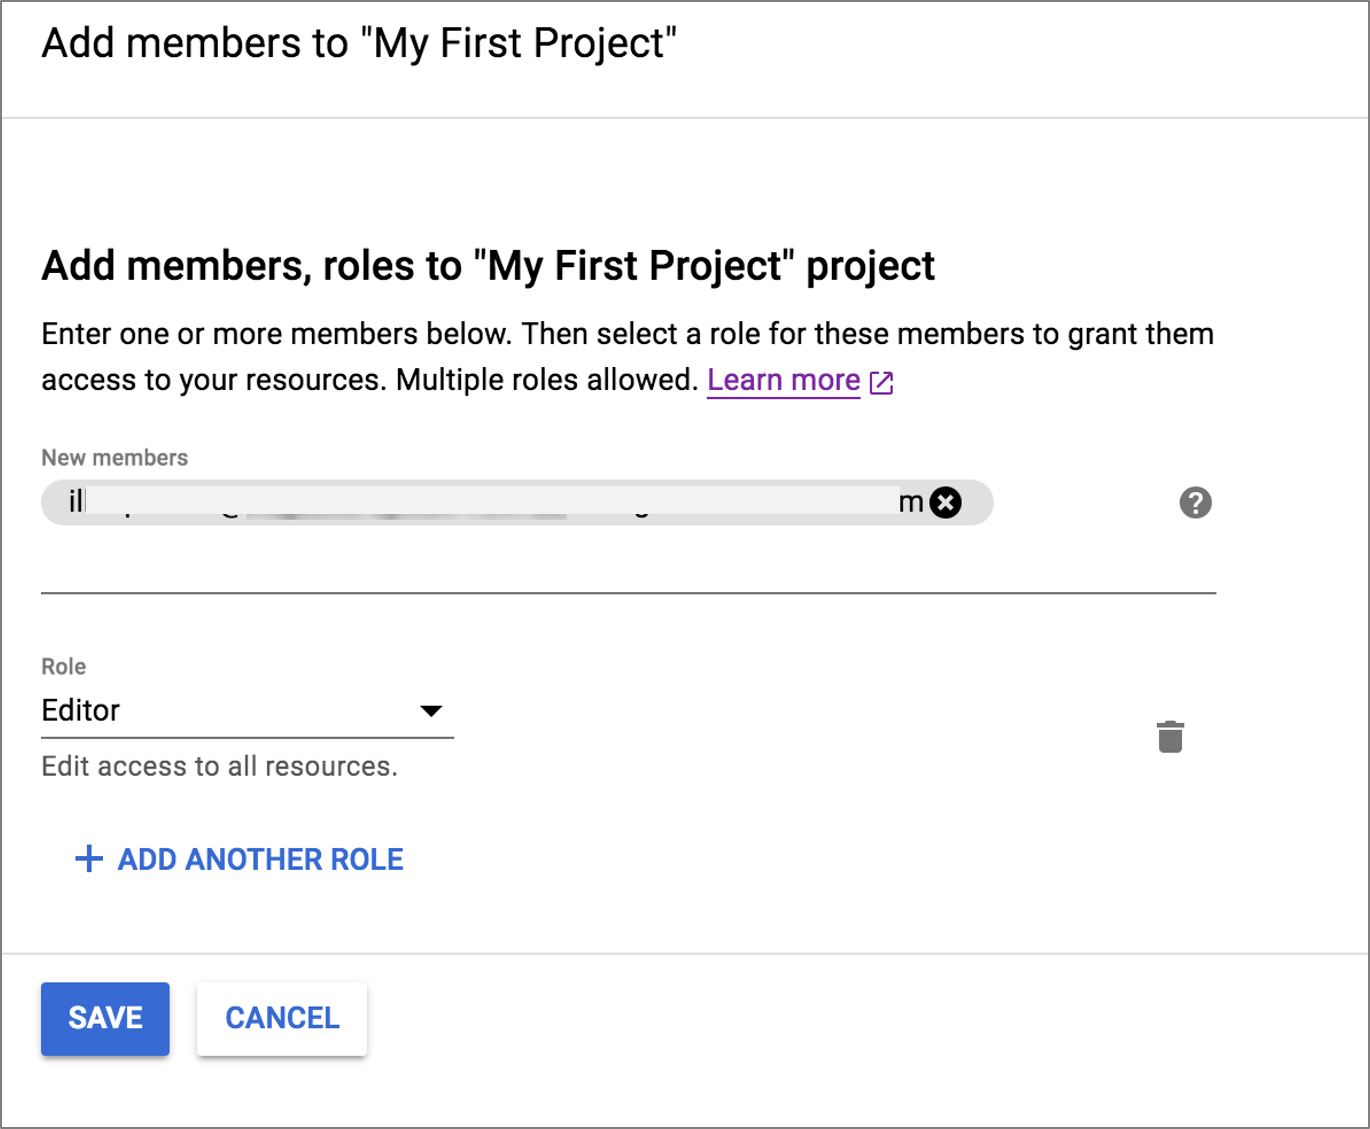
The following is an example of creating a new service account :
ilb-xpn-test@option.iam.gserviceaccount.com in the Controller project:
Avi Vantage Configuration
Follow the steps below to configure Avi Vantage BYOIP support in GCP:
- Setting up the Avi Controller VM
- Configuring GCP IPAM
- Attaching GCP IPAM
- Setting up Service Engine
- Configuring Virtual Service
Setting up the Avi Controller VM
Follow the instructions outlined in Installing Avi Vantage for a Linux Server Cloud to install or run the Avi Controller on the previously created instance. Also ensure that the Service Engine status is active, indicated as Green.
Configuring GCP IPAM
CLI Configuration
You can configure GCP IPAM using the commands as shown below.
      [admin:10-1-1-1]: > configure ipamdnsproviderprofile gcp-ipam
      [admin:10-1-1-1]: ipamdnsproviderprofile> type ipamdns_type_gcp
      [admin:10-1-1-1]: ipamdnsproviderprofile> gcp_profile
      [admin:10-1-1-1]: ipamdnsproviderprofile:gcp_profile> **use_gcp_network**
      [admin:10-1-1-1]: ipamdnsproviderprofile:gcp_profile> vpc_network_name gcp_vcp
      [admin:10-1-1-1]: ipamdnsproviderprofile:gcp_profile> region_name us-central1
      [admin:10-1-1-1]: ipamdnsproviderprofile:gcp_profile> network_host_project_id net1
      [admin:10-1-1-1]: ipamdnsproviderprofile:gcp_profile> save
      [admin:10-1-1-1]: ipamdnsproviderprofile> save

    +-------------------------+-------------------------------------------------------------+
    | Field                   | Value                                                       |
    +-------------------------+-------------------------------------------------------------+
    | uuid                    | ipamdnsproviderprofile-e39d51e5-2170-415d-b4ac-7a82068b2bc5 |
    | name                    | gcp-ipam                                                    |
    | type                    | IPAMDNS_TYPE_GCP                                            |
    | gcp_profile             |                                                             |
    | match_se_group_subnet   | False                                                       |
    | **use_gcp_network**     | True                                                        |
    | region_name             | us-central1                                                 |
    | vpc_network_name        | gcp_vcp                                                     |
    | allocate_ip_in_vrf      | False                                                       |
    | network_host_project_id | net1                                                        |
    | tenant_ref              | admin                                                       |
    +-------------------------+-------------------------------------------------------------+
Note: The field use_gcp_network is not available in the UI currently. This option can be enabled only via the CLI.
UI Configuration
-
Navigate to Templates > Profiles > IPAM/DNS Profiles and click on Create.
-
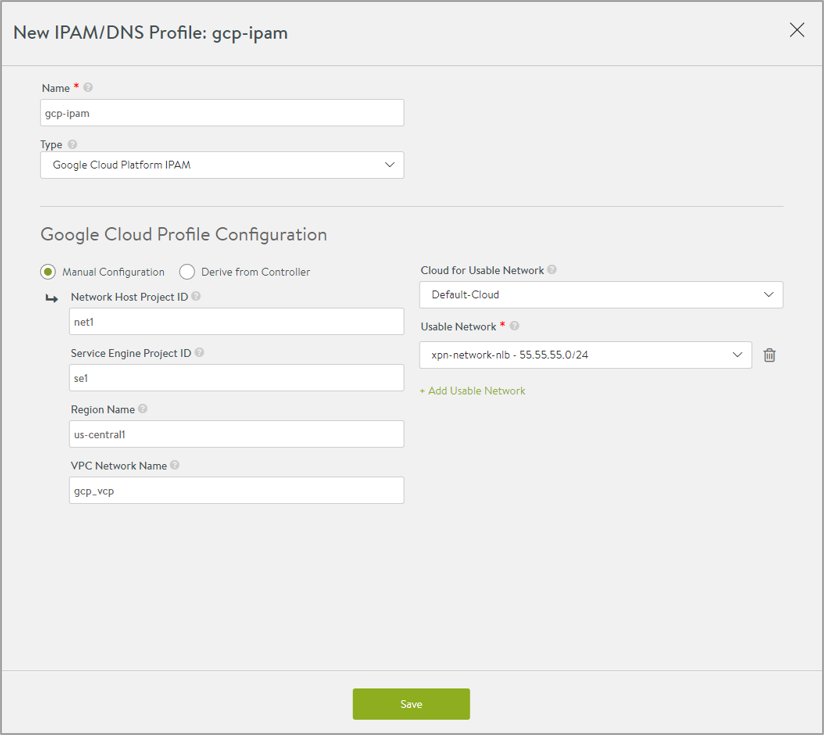
Choose the Type as Google Cloud Platform IPAM from the drop-down list.
For the Profile Configuration, click on Manual Configuration, to enter the details for:
- Network Host Project ID
- Service Engine Project ID
- Region Name
- VPC Network Name
You can alternatively select the option for Derive from Controller, to obtain parameters for the profile configuration.
-
Click on Add Usable Network to specify the network details.
Attaching GCP IPAM
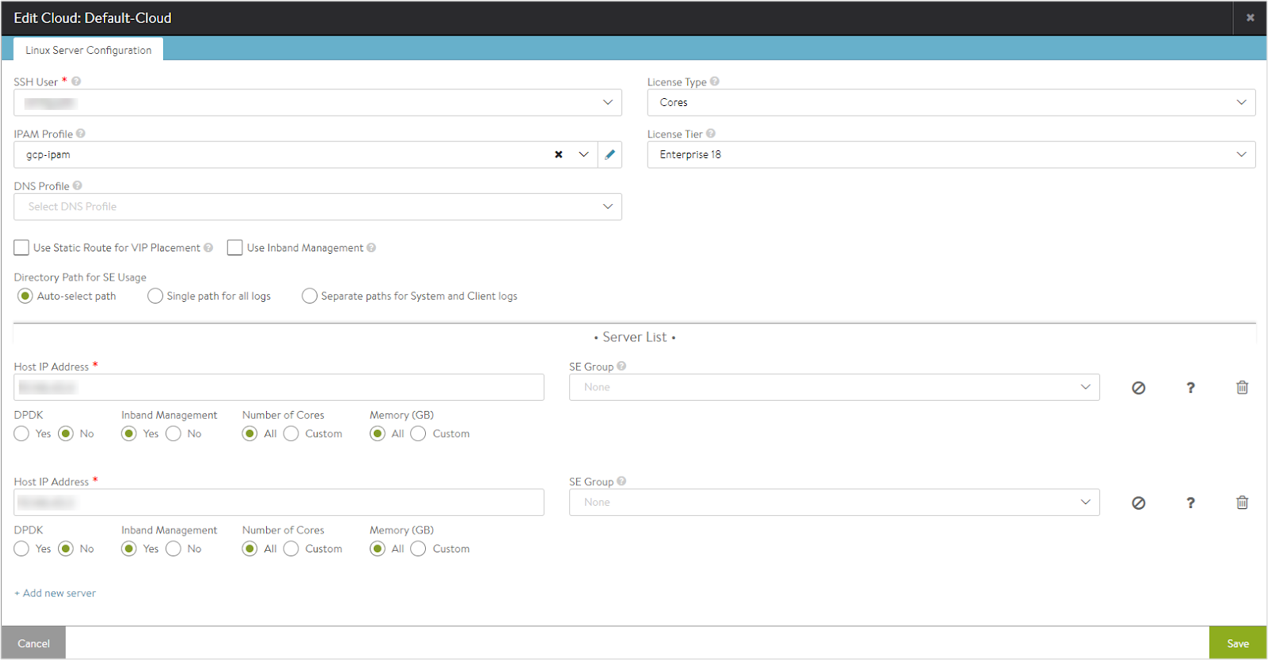
To attach GCP IPAM to a Linux Server cloud, edit the Default-Cloud. Choose the GCP IPAM provider.
Setting up Service Engine
-
Follow the instructions provided in the Installation and Configuration of Avi Controller & Avi Service Engines section in the Avi Deployment Guide for Google Cloud Platform (GCP) document for creating Service Engines.
-
Add the created Service Engines to the Linux Server cloud.
-
Configure the Linux server cloud using the IP addresses of the Service Engine instances.
Configuring Virtual Service
Follow the instructions provided in the Creating Virtual Service and Verifying Traffic section in the Avi Deployment Guide for Google Cloud Platform (GCP) document for creating virtual services.
Ensure that the VIP configured is not in the same subnet as that of the service engines.
Cloud Router Integration
Google Cloud Router enables dynamic exchange of routes between the Virtual Private Cloud (VPC) and on-premises networks by using Border Gateway Protocol (BGP).
Starting with Avi Vantage release 18.2.5, the GCP Cloud Router will be updated by the Avi Controller.
Prerequisites
The following permissions are required for updating the Cloud Router:
For more information, refer to Creating Custom Roles.
Limitations
- Multiple clusters cannot share the same Cloud Router as the update cannot be coordinated between them.
- Multiple Avi clouds cannot share the same Cloud Router.
- If a Cloud Router is removed from the Avi cloud configuration then the Avi Floating IPs (FIP) which are on the Cloud Router have to be manually deleted from the Cloud Router in GCP since Avi Vantage will no longer manage that Router.
Configuring Cloud Routers
- Create the Cloud Router in the network project and in the region where the service engine VMs are created. Refer to Creating Cloud Routers to know more.
- Add the Cloud Router names in the
custom_tagsfield of the cloud as shown in the configuration below:[admin:10-152-134-17]: > configure cloud Default-Cloud [admin:10-152-134-17]: cloud> custom_tags New object being created [admin:10-152-134-17]: cloud:custom_tags> tag_key cloud_router_ids [admin:10-152-134-17]: cloud:custom_tags> tag_val "router-1, router-2" [admin:10-152-134-17]: cloud:custom_tags> save [admin:10-152-134-17]: cloud> save +--------------------------------+--------------------------------------------+ | Field | Value | +--------------------------------+--------------------------------------------+ | uuid | cloud-1a388500-1d6c-45e0-a557-f7b79af6f362 | | name | Default-Cloud | | vtype | CLOUD_LINUXSERVER | | apic_mode | False | | linuxserver_configuration | | | se_sys_disk_size_GB | 10 | | se_log_disk_size_GB | 5 | | se_inband_mgmt | False | | ssh_user_ref | user1 | | dhcp_enabled | False | | mtu | 1500 bytes | | prefer_static_routes | False | | enable_vip_static_routes | False | | license_type | LIC_CORES | | ipam_provider_ref | gcp-ipam | | custom_tags[1] | | | tag_key | cloud_router_ids | | tag_val | router-1, router-2 | | state_based_dns_registration | True | | ip6_autocfg_enabled | False | | tenant_ref | admin | | license_tier | ENTERPRISE_18 | | autoscale_polling_interval | 60 seconds | +--------------------------------+--------------------------------------------+Notes:
- Multiple Cloud Routers can be added for an Avi cloud and all will be updated with the FIP.
- Add custom tags for the cloud
tag_keyascloud_router_ids.tag_valis a comma separated list of Cloud Router names.
For each Cloud Router update, there is a corresponding event generated as discussed below:
GCP_CLOUD_ROUTER_UPDATE_SUCCESS- An internal event and will be generated each time the Cloud Router is successfully updated.GCP_CLOUD_ROUTER_UPDATE_FAIL- An external event which will be generated when an update for the Cloud Router fails.
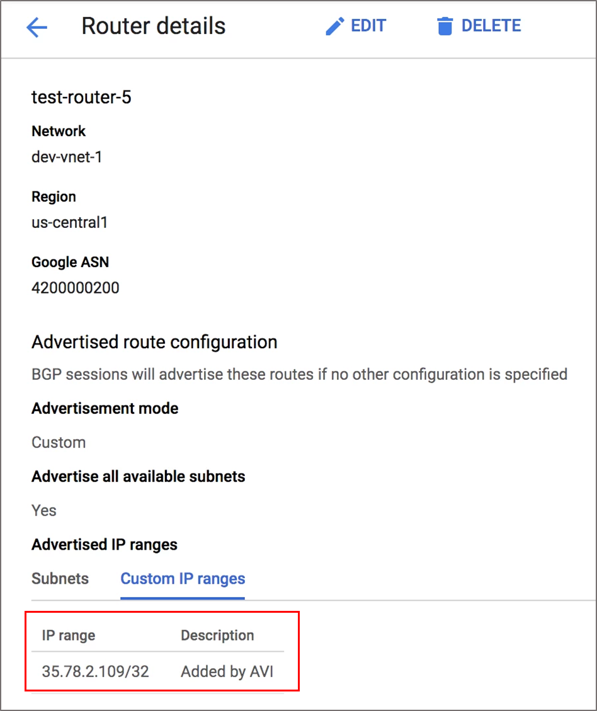
Note: The Cloud Router can have other IPs also which were not created by Avi Vantage. These IPs will remain as is and all the IPs that are configured by Avi Vantage in the Cloud Router will have a description Added by AVI.
Troubleshooting
If a FIP is not getting advertised, view the Custom IP Ranges in Cloud Router Details.
To view the Cloud Router Details,
- Navigate to Hybrid Connectivity > Cloud Routers.
- Click on the Cloud Router required.
- Click on Custom IP ranges tab to view the IP range and Description as shown below:
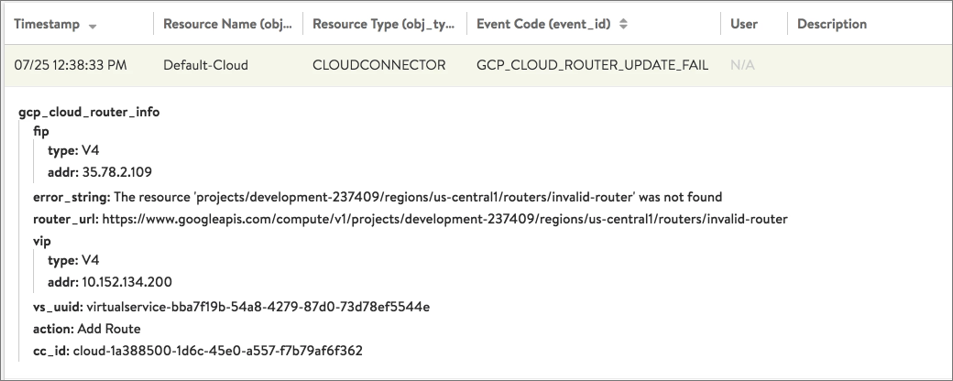
If the FIP is not listed under Custom IP ranges, view the Events page for the Controller in Avi Vantage.
- Navigate to Operations > Events.
- Click on the
GCP_CLOUD_ROUTER_UPDATE_FAILevent to view the error message as shown below: