SSL/TLS Certificates
Overview
NSX Advanced Load Balancer (also known as Avi Vantage) supports terminating client SSL and TLS connections at the virtual service. This requires NSX Advanced Load Balancer to send a certificate to clients that authenticates the site and establishes secure communications. A virtual service that handles secure connections will require both of the following:
- SSL/TLS Profile - Determines the supported ciphers and versions.
ssl_ciphers HIGH:!aNULL:!MD5:+SHA1;and DHE 1024, 2048 etc. are the supported ciphers and cipher sizes. Refer SSL Profile for more details on SSL/TLS profiles. - SSL Certificate - A certificate is presented to clients connecting to the site. SSL certificates may also be used to present to administrators connecting to the NSX Advanced Load Balancer web interface or API, and also for NSX Advanced Load Balancer Service Engines to present to servers when SE-to-server encryption is required with client (the SE) authentication.
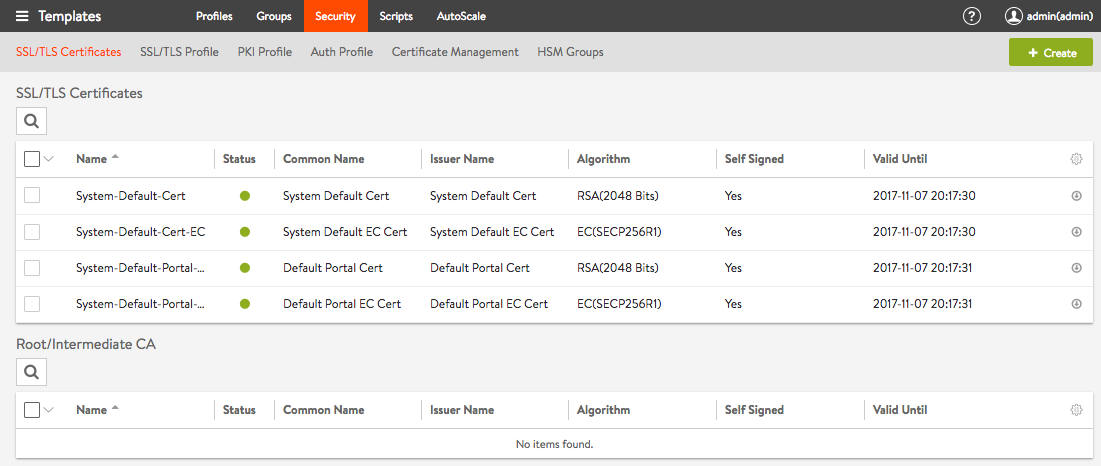
The SSL Certifications tab on Templates > Security page shown below supports import, export, and generation of SSL certificates or certificate requests.
From this page different kinds of certificates may be created:
Newly-created certificates may be either self-signed by NSX Advanced Load Balancer or created as a certificate signing request (CSR) that must be sent to a trusted certificate authority (CA), which then generates a trusted certificate.
- Creating a self-signed certificate generates both the certificate and a corresponding private key.
- Imported existing certificates are not valid until a matching key has been supplied.
- NSX Advanced Load Balancer supports PEM and PKCS #12 formatted certificates.
SSL/TLS Certificates Page
Select Templates > SSL/TLS Certificates to open SSL/TLS Certificates page. This page includes the usual functions, search, create, edit, and delete. Clicking on Export option opens a page with the private key and public certificate. Viewing or exporting the private key generates a system event, tracking the administrator’s export action. NSX Advanced Load Balancer recommends using role-based access to control which users are allowed to use a certificate versus export the key.
The table on the Certificates page contains the following information for each certificate:
- Name — User-friendly name of the certificate. Mousing over the name of the certificate will display any intermediate certificate that has been automatically associated with the certificate.
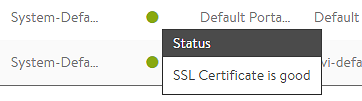
- Status — The known status of the certificate. This is green for good, or yellow, orange, or red if the certificate is expiring soon or has already expired, and gray if the certificate is incomplete.
- Common Name — Fully-qualified name of the site to which the certificate applies. For the site to be considered trusted, this entry must match the hostname the client enters in their browser.
- Email — Specify the email ID.
- Organization Unit — Specify the department name.
- Organization Name — Specify the organization name.
- Locality or City — Specify the locality name.
- State Name or Province — Specify the name of the state.
- Country — Specify the name of the country.
-
Subject Alternate Name — Specify the subject alternate name. This can be a domain name or IP address. This field is added while creating a CSR.
Note: During TLS connections, Chrome browser ensures if the connection to the site is using a secure connection.
Chrome uses Subject Alternate Name to match the domain name and site certificate. If this filed is left blank, then Chrome and Firefox would consider this particular site as an insecure connection and the system displays a warning message. Also, if the certificate does not have the correct subject alternate name extension, then the system
NET::ERR_CERT_COMMON_NAME_INVALIDerror to indicate that the connection is not private. - Algorithm — This will be either EC (elliptic curve cryptography) or RSA.
- Key Size — Select the key size from the drop-down list.
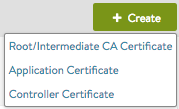
Create Certificate
When creating a new certificate, you can select any of the following certificates:
- Root/Intermediate CA Certificate - This certificate type is used to automatically create the certificate chain for application certificates. There are no configuration options other than import the certificate via a file or paste the text. The root/intermediate certificate will show up in a separate table at the bottom of SSL Certificates page. It is recommended to import the root/intermediate certificate prior to importing an application cert that relies on the intermediate for the chain.
- Application Certificate - This certificate is used for normal SSL termination and decryption on NSX Advanced Load Balancer. This option is also used to import or create a client certificate for NSX Advanced Load Balancer to present to a backend server when NSX Advanced Load Balancer needs to authenticate itself.
- Controller Certificate - This certificate is used for the GUI and API for the Controller cluster. Once uploaded, select the certification via Administration > Settings > Access Settings.
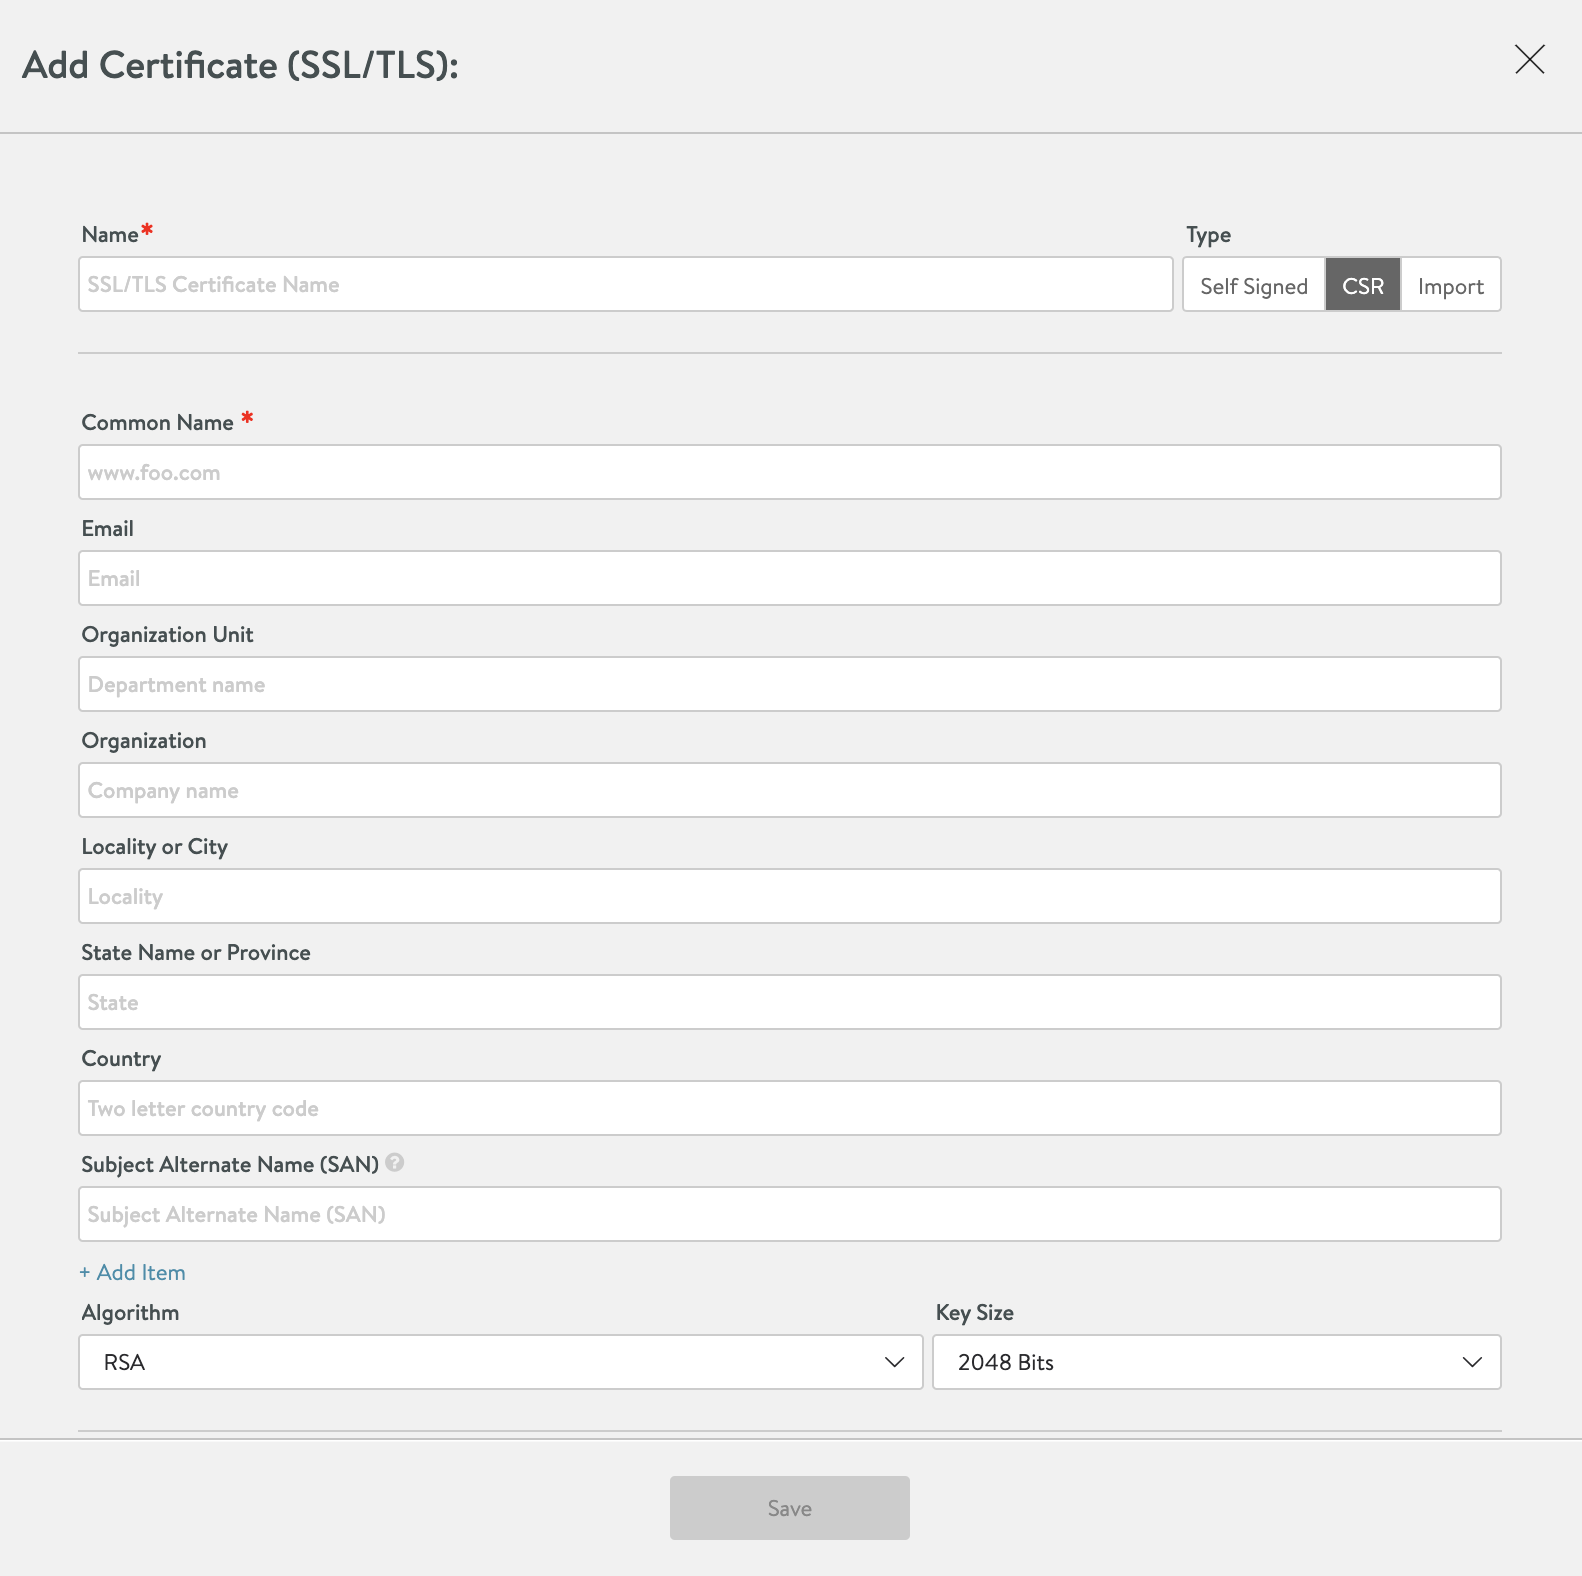
To create a new application or controller certificate, specify the following fields:
- Name - Enter a unique, user-friendly name for the certificate.
- Type - Select the type of certificate from the following options:*
- Self Signed - Quickly create a test certificate that is signed by NSX Advanced Load Balancer. Client browsers will display an error that the certificate is not trusted.
- CSR - Create a valid certificate by first creating the certificate request. This request must be sent to a certificate authority, which will send back a valid certificate that must be imported back into NSX Advanced Load Balancer.
- Import - Import a completed certificate that was either received from a certificate authority or exported from another server.
Self-Signed Certificates
NSX Advanced Load Balancer can generate self-signed certificates. Client browsers do not trust these certificates and will warn the user that the virtual service’s certificate is not part of a trust chain. Self-signed certificates are good for testing or environments where administrators control the clients and can safely bypass the browser’s security alerts. Public websites should never use self-signed certificates. The virtual service health score may reflect a security penalty. If the HTTP application profile has HTTP Strict Transport Security (HSTS) enabled, clients may not be able to access a site with a self-signed certificate.
To create a self-signed certificate, specify the following details:
- Common Name - Specify the fully-qualified name of the site, such as www.avinetworks.com. For the site to be considered trusted, this entry must match the hostname that the client entered in the browser.
- Organization - Specify the company or entity registering the certificate, such as NSX Advanced Load Balancer, Inc. (optional).
- Organization Unit - Specify Group within the organization that is responsible for the certificate, such as Development (optional).
- Country - Country in which the organization is located (optional).
- State - State in which the organization is located (optional).
- Locality - City of the organization (optional).
- Email - The email contact for the certificate (optional).
- Subject Alternate Name (SAN) - The Subject Alternate Name (SAN) lets you specify additional host names to be protected by a single SSL certificate, such as example.com and example.org. The are essentially the alternative identities of the subject that is specified in the Certificate.
- Algorithm - Select either EC (elliptic curve cryptography) or RSA. RSA is older and considered less secure than ECC, but is more compatible with a broader array of older browsers. ECC is newer, less computationally expensive, and generally more secure; however, it is not yet accepted by all clients. NSX Advanced Load Balancer allows a virtual service to be configured with two certificates at a time, one each of RSA and ECC. This enables NSX Advanced Load Balancer to negotiate the optimal algorithm or cipher with the client. If the client supports ECC, NSX Advanced Load Balancer will prefer this algorithm, which gives the added benefit of supporting perfect forward secrecy, which brings better security at minimum additional computational cost.
- Key Size - Select the level of encryption to be used for handshakes:
- 2048-bit is recommended for RSA certificates. Higher values may provide stronger encryption, but dramatically increase the CPU resources required by both NSX Advanced Load Balancer and the client. For stronger encryption, use ECC certificates instead.
- secp256r1 is used for ECC certificates.
- Enable HSM Certificate - Rather than store the private key locally on the NSX Advanced Load Balancer Controller or NSX Advanced Load Balancer Service Engine, it is maintained in an external hardware security module. This option enables referencing an HSM profile containing information about communicating with the HSM.
CSR Certificates
The Certificate Signing Request (CSR) is the first step involved in creating a valid SSL/TLS certificate. The request contains the same parameters as a self-signed certificate. However, NSX Advanced Load Balancer does not sign the completed certificate. Rather, it must be signed by a certificate authority that is trusted by client browsers.
The configuration options for a certificate signing request are the same as for self-signed certificates. Refer the descriptions above for definition of each field.
Once completed, forward the completed CSR to any trusted Certificate Authority (CA), such as Thawte or Verisign by selecting the Certificate Signing Request at the bottom left of the Add Certificate popup. Then either copy-paste it directly to the CA’s website or save it to a file for later use.
Once the CA issues the completed certificate, either paste or upload it into Certificate field at the bottom right of Add Certificate popup. The certificate is not usable on NSX Advanced Load Balancer until this step is complete.
Note: It can take several days for the CA to return the finished certificate. Meanwhile, you can close Add Certificate popup to return to SSL/TLS Certificates page. The new certificate will appear in the table with a gray status, indicating it is still waiting for the completed cert. When you receive the completed certificate, click the edit icon for the certificate to open the Edit Certificate, paste the certificate, and click on Save to finish.
Import Certificates
You can directly import an existing PEM or PKCS /#12 SSL/TLS certificate into NSX Advanced Load Balancer (such as from another server or load balancer). A certificate will have a corresponding private key, which must also be imported. NSX Advanced Load Balancer automatically generates the key for self-signed or CSR certificates, hence such certs do not require separate steps for the key.
To import the certificate:
- Navigate to Templates > Security > SSL/TLS Certificates.
- Click CREATE and select the certificate type such as Application Certificate.
- Click Type and select Import. Certificate or Private Key can be imported by copying-pasting or uploading a file.
- PEM File – PEM files contain Certificate or Private Key in plain-text Base64 encoded format. Certificate and Private Key can be provided in separate PEM Files or combined in a single PEM File.
- If Certificate and Private Key are provided in a single PEM file, navigate to Key text box and follow one of the below steps to import:
- Upload File - Click the Upload File button, select the PEM file (containing both Certificate and Key), click the green Validate button to parse the file. If the upload is successful, both the Key and Certificate text boxes will be populated.
- Paste – Copy and paste into Key text box. Ensure that you do not introduce extra characters in the text, which can occur when using some email clients or rich text editors. If you copy and paste the key and certificate together as one file, click the Validate button to parse the text, both the Key and Certificate text boxes will be populated.
- If Certificate and Private Key are provided in two separate PEM files, follow the below steps to import each individually:
- Certificate - Add the certificate in the Certificate text box by copying-pasting or file upload, as described above.
- Key – Add the private key in the Key text box by copying-pasting or file upload, as described above.
- If Certificate and Private Key are provided in a single PEM file, navigate to Key text box and follow one of the below steps to import:
- PKCS#12 File - PKCS #12 files contain both the certificate and key, PKCS #12 is a binary format, which cannot be copied-pasted, and hence it can be uploaded only. Navigate to the Key and follow the below step to import the PKCS #12 file:
- Upload File - Click the Upload File button, select the PKCS #12 file, click the green Validate button to parse the file. If the upload is successful, both the Key and Certificate text boxes will be populated.
- Key Passphrase - If desired, you can add and validate a key passphrase to encrypt the private key.
- Import - Select Import to finish adding the new certificate and key. The key will be embedded with the certificate and treated as one object within the NSX Advanced Load Balancer UI.
Certificate Authority
Certificates require a trusted chain of authority to be considered valid. If the certificate used is directly generated by a certificate authority that is known to all client browsers, no certificate chain is required. However, if there are multiple levels required, an intermediate certificate may be necessary. Clients will often traverse the path indicated by the certificate to validate on their own if no chain certificate is presented by a site, but this adds additional DNS lookups and time for the initial site load. The ideal scenario is to present the chain certificates along with the site certificate.
If a chain certificate, or rather a certificate for a certificate authority is uploaded via the root/intermediate certificate create option, it will be added to the Certificate Authority section. NSX Advanced Load Balancer will automatically build the certificate chain if it detects a next link in the chain should exist.
To validate a certificate has been attached to a chain certificate, hover over the certificate’s name in SSL Certificates table at the top of the page.
NSX Advanced Load Balancer supports multiple chain paths. For instance, an RSA certificate and an ECC certificate are both named www.avinetworks.com. Each may share the same CA issuer, or they may be chained to different issuers.