Google Cloud Platform Roles and Permissions
This article discusses creating roles and permissions in different deployment examples.
Note: Starting with Avi Vantage version 20.1.3, Linux Server Cloud and GCP IPAM on GCP are not supported.
Overview
A role is a group of permissions that can be assigned to members. Creation of roles and assigning permissions to the roles can be done from the Google Cloud Platform (GCP) console.
The following is a list of GCP specific terminologies used in this article:
| |
|
|---|---|
| Virtual Private Cloud | GCP Virtual Private Cloud (VPC) provides networking functionality to the GCP resources |
| Project | A project organizes all GCP resources. A project consists of a set of users; a set of APIs; and billing, authentication, and monitoring settings for those APIs. |
| Shared VPC (XPN) | Shared VPC allows an organization to connect resources from multiple projects to a common VPC network. When using a shared VPC, one project is designated as a host project and one or more other service projects can be attached to the host project. Shared VPC is also referred to as XPN. |
| Service Account | A service account is a special Google account that belongs to your application or a virtual machine (VM), instead of to an individual end user. Your application uses the service account to call the Google API of a service, so that the users aren't directly involved. |
Roles and Permissions in GCP
When an identity calls a Google Cloud Platform API, Cloud Identity and Access Management (IAM) requires that the identity has the appropriate permissions to use the resource. You can grant permissions by granting roles to a user, a group, or a service account.
Role Types
There are three types of roles in Cloud IAM:
- Primitive roles, which include the Owner, Editor, and Viewer roles that existed prior to the introduction of Cloud IAM
- Predefined roles, which provide granular access for a specific service and are managed by GCP
-
Custom roles, which provide granular access according to a user-specified list of permissions
Excerpt from:cloud.google.comNote: In this KB, all instances of ‘Role(s)’ refer to Custom Roles.
To know more about creating custom roles, refer to Creating and Managing Custom Roles
Let us understand roles and permissions in the following cross project deployment scenarios:
- The Controller, Service Engine and XPN are in the same project
- The Controller and Service Engines are in Projects other than the XPN
Option 1: Controller, Service Engines, and XPN are in the Same Project
In this deployment scenario, the shared VPC(XPN),the Controller, and the Service Engines are all in project A.
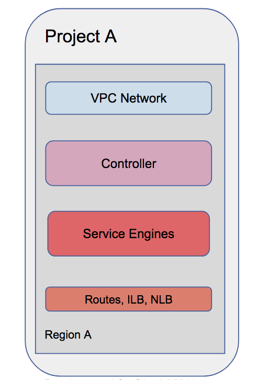
This deployment scenario is discussed under: *Roles and Permissions for the Virtual Machines (VM)
Roles and Permissions for the VM
The Controller
-
When using a default Compute Engine service account(a project has Compute Engine Service Account enabled), select that as the service account and provide
Read Writepermissions for Compute Engine API as shown in the image: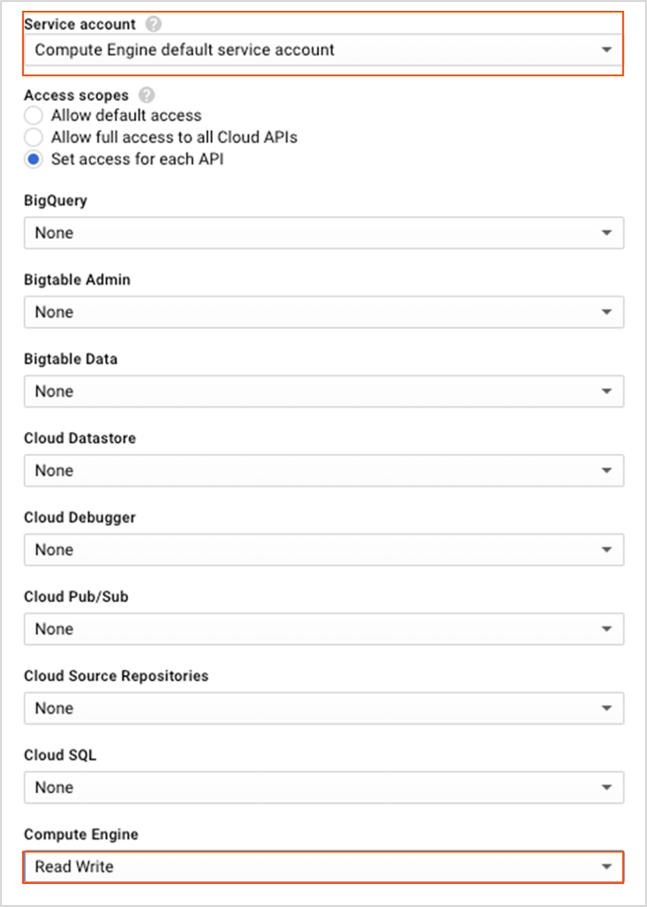
-
When using a non-default service account, refer to Controller Service Account Configuration
Service Engine
-
When using default Compute Engine service account(a project has Compute Engine Service Account enabled), then select that as the service account and provide
Read Onlypermissions for Compute Engine API, as shown in the image: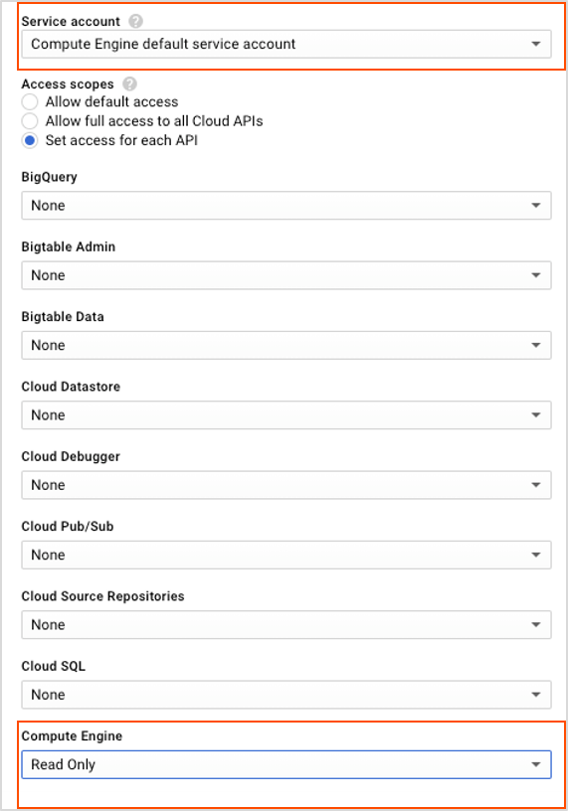
-
When using a non-default service account, refer to Creating Service Account, Role for Service Engine
Configuring IPAM
To configure GCP IPAM,
-
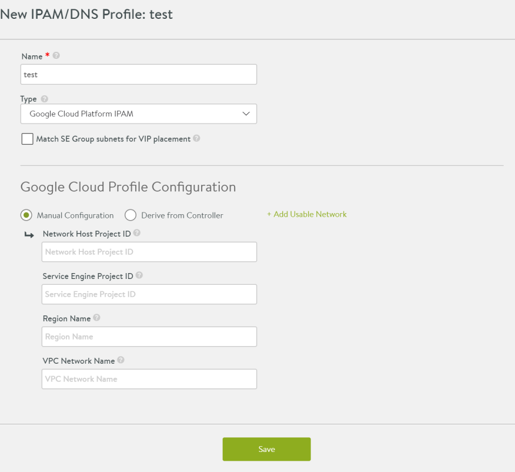
Navigate to Templates > Profiles > IPAM/DNS Profiles and click on Create.
-
Choose the Type as Google Cloud Platform IPAM from the drop-down list.
- Click on Manual Configuration and enter the details for:
- Network Host Project ID
- Service Engine Project ID
- Region Name
- VPC Network Name
- Click on Add Usable Network to specify the network details.
The New IPAM/DNS Profile: screen is as shown below:
Use the configuration specified in the following table to enter the respective fields in the New IPAM/DNS Profile: screen.
| |
|
|---|---|
| usable_network_uuids | AVI Network ID for VIP allocation |
| network_host_project_id | |
| se_project_id | Project A (Project Name of the SEs) |
| region_name | Region A (Region Name of the SEs) |
| vpc_network_name |
Option 2: The Controller and Service Engines are in Projects other than the XPN
In this deployment example Shared VPC is in Project A and the Controller, and Service Engines are in Project B.
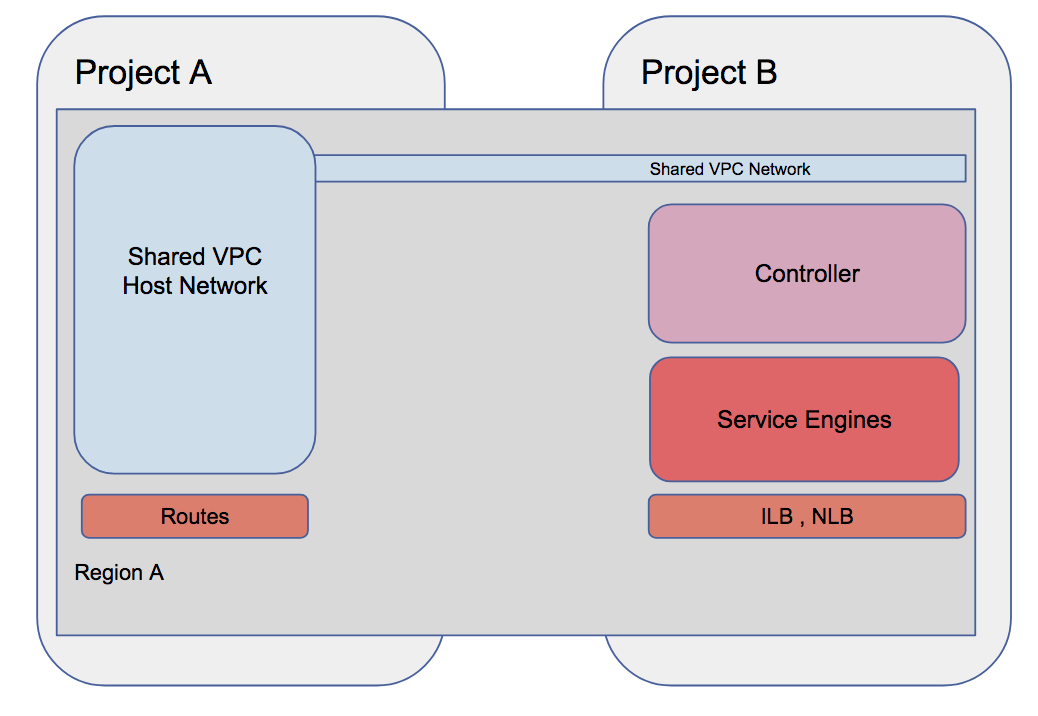
Roles and Permissions for the Virtual Machines (VM)
The Controller
When using a non-default service account, refer to Controller Service Account Configuration
Configuring IPAM
To configure GCP IPAM,
-
Navigate to Templates > Profiles > IPAM/DNS Profiles and click on Create.
-
Choose the Type as Google Cloud Platform IPAM from the drop-down list.
- Click on Manual Configuration and enter the details for,
- Network Host Project ID
- Service Engine Project ID
- Region Name
- VPC Network Name
- Click on Add Usable Network to specify the network details.
The New IPAM/DNS Profile: screen is as shown below:
Use the configuration specified in the following table to enter the respective fields in the New IPAM/DNS Profile: screen.
| |
|
|---|---|
| usable_network_uuids | AVI Network ID for VIP allocation |
| network_host_project_id | Project A (Shared VPC Project ID) |
| se_project_id | Project B (Project ID of the SEs) |
| region_name | Region A (Region Name of the SEs) |
Configuring Controller Service Account
Follow the steps given below to configure the Service Account:
- Create a service account for the Controller in the Controller project
- Create Role for the Controller in the Network (XPN)Project and Assign the Role to a Member
- Create a Role for The Controller in the Service Engine Project and Add as a Member
Creating a service account for the Controller in the Controller project.
To create a service account,
- Open the Service Accounts page in the GCP Console and select the required Project.
- Click on Create Service Account and enter a service account name and select a role with desired permissions for the service account.

Creating Role for the Controller in the network (XPN)Project and assigning the role to a member.
Create a role for the service account created in the XPN project and assign networking permissions to the role. To create a role,
- Navigate to the Roles page in the GCP Console for the XPN project.
-
Click on Create Role and enter the Title, and Role ID.
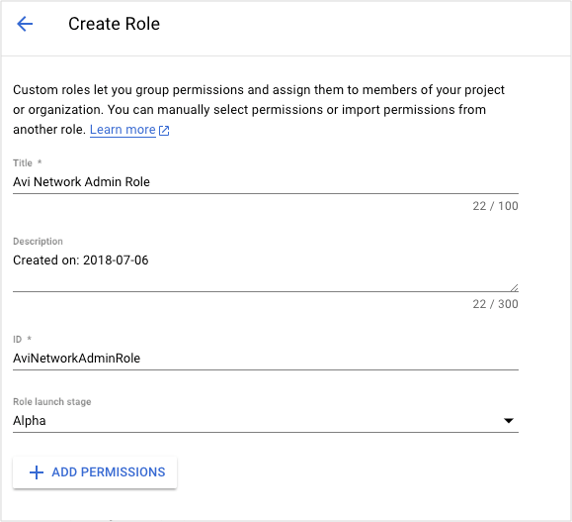
-
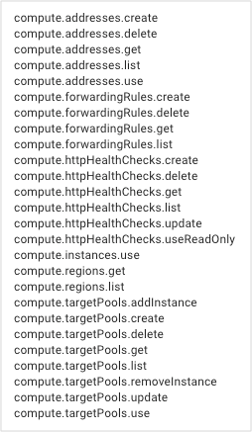
Click on Add Permissions and select the following permissions:
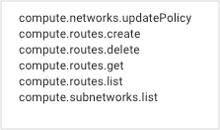
- Click Add.
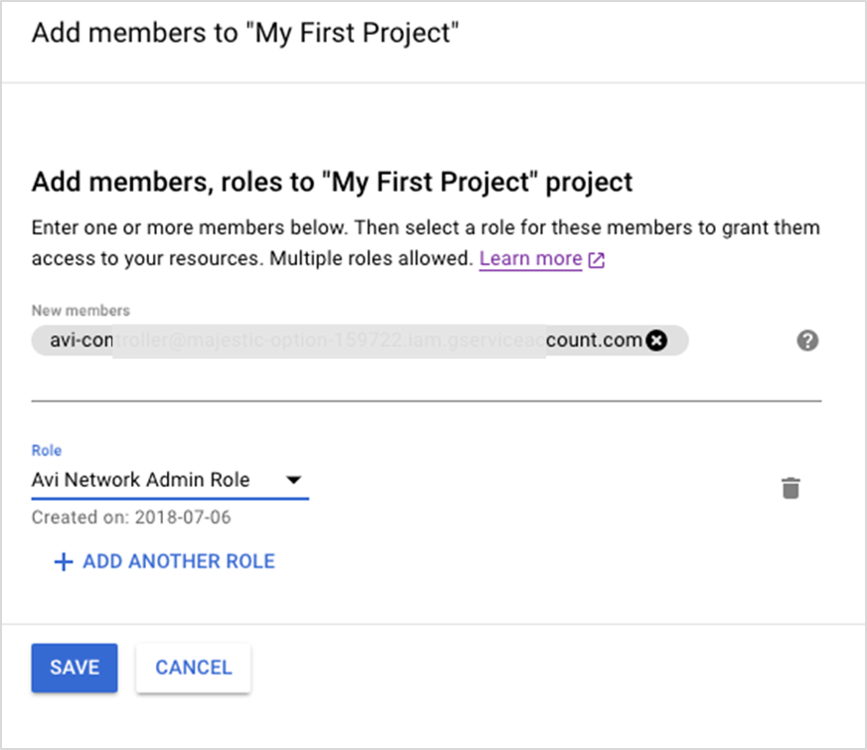
Add the Service Account as a Member to the Project
Add the service account that was created as a member to the XPN project, with AviNetworkAdminRole.
- Open the IAM page in the GCP console for the XPN project.
- Click on Add.
- Select the Service Account as the New Member.
- Select the Role with the desired permissions.
- Click on Save.
Create a Role for The Controller in the Service Engine Project and Add as a Member
-
Create a role for the service account and assign permissions required to create load balancers.
-
Add the following permissions:
-
Add the
avi-controller@majestic-option-159722.iam.gserviceaccount.comservice account created above as a member, to the service engine project with theAviControllerSERolethat was created.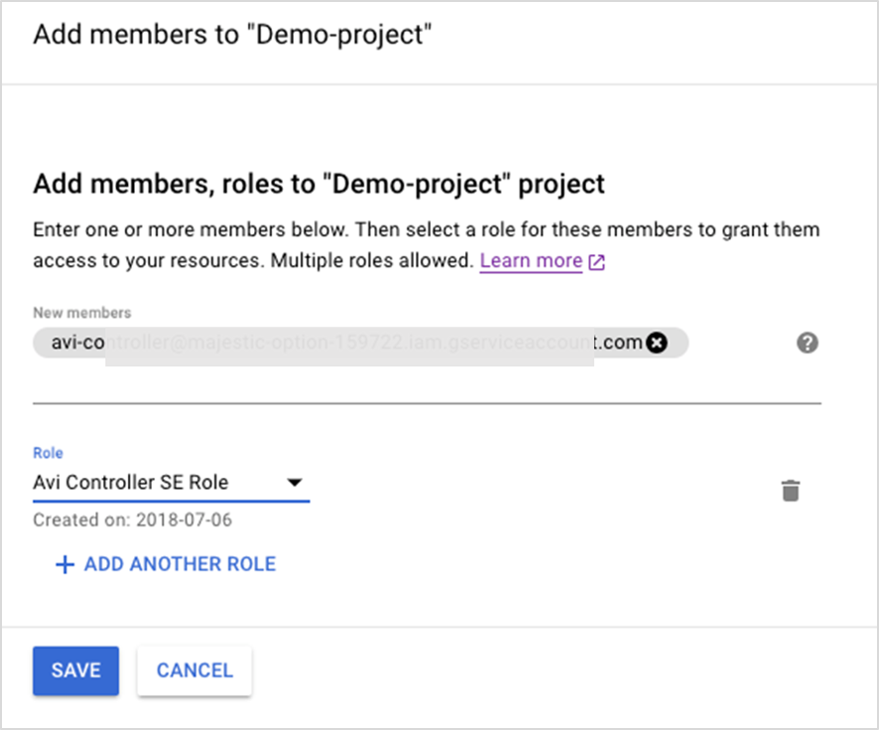
Creating Service Account, Role for Service Engine
These operations are performed in the Service Engine project and are required only if Compute Engine Default Service Account is not there in the project.
Create a role for service engines
- Navigate to the Roles page in the GCP Console for the XPN project.
-
Click on Create Role and enter the Title, and Role ID.
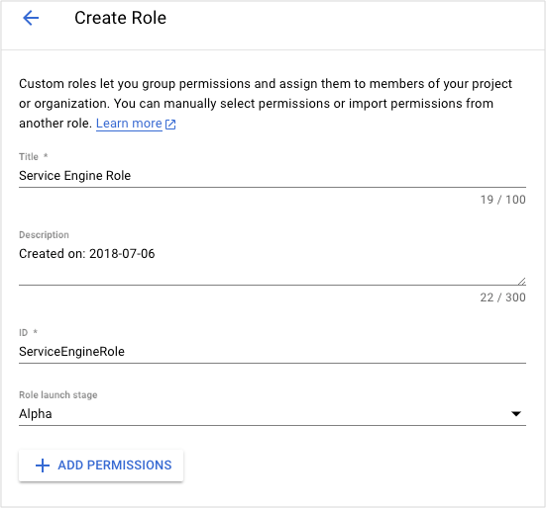
- Click on Add Permissions and select
compute.instances.get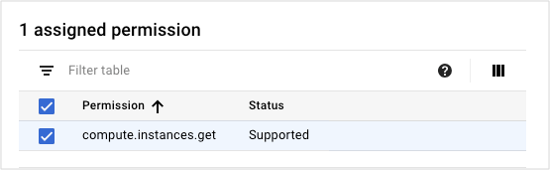
Create a Service Account for the service engines and assign it the role created above.
To create a service account,
- Open the Service Accounts page in the GCP Console and select the required Project.
-
Click on Create Service Account and enter a service account name and select a role with desired permissions for the service account.
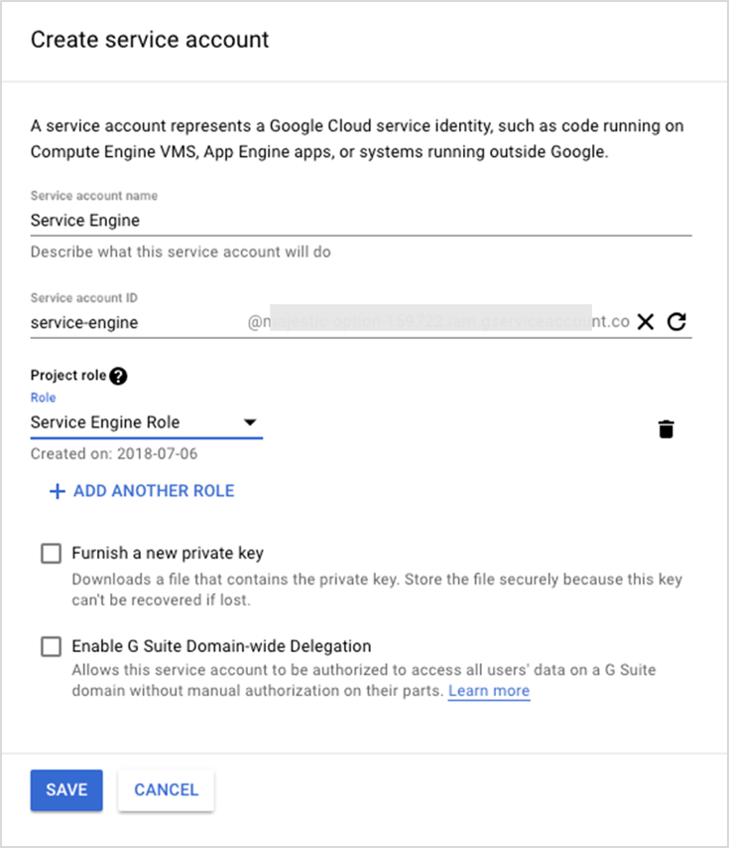
Note: Make a note of the email ID of the service account.
- Click Save.
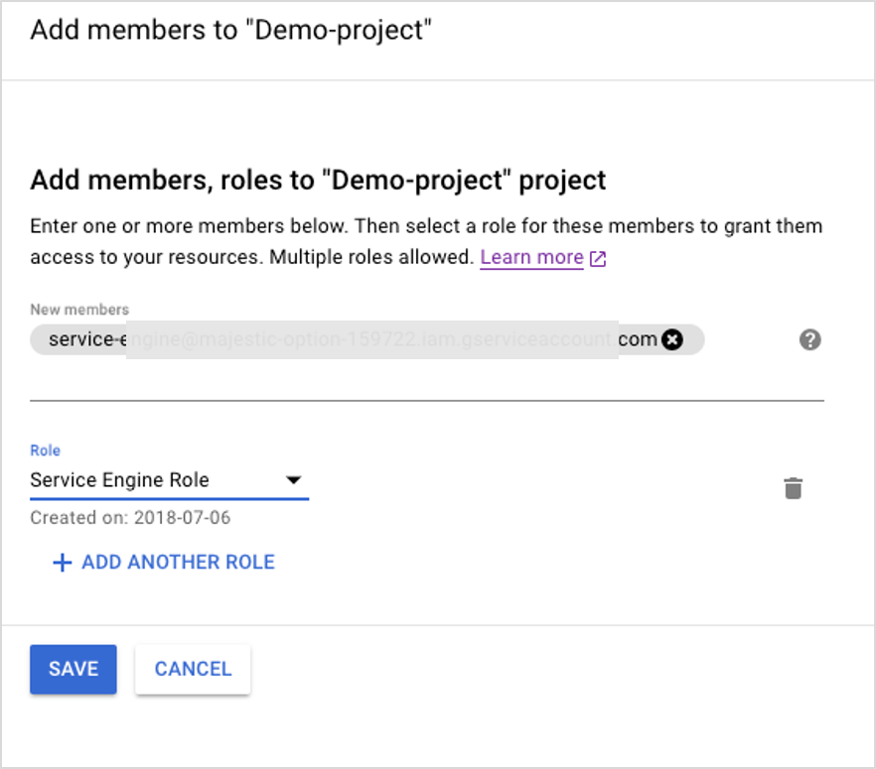
To add this service account as a member, - Open the IAM page in the GCP console for the required project.
- Click on Add.
-
Select the service account as the New Member and select the Role created.
-
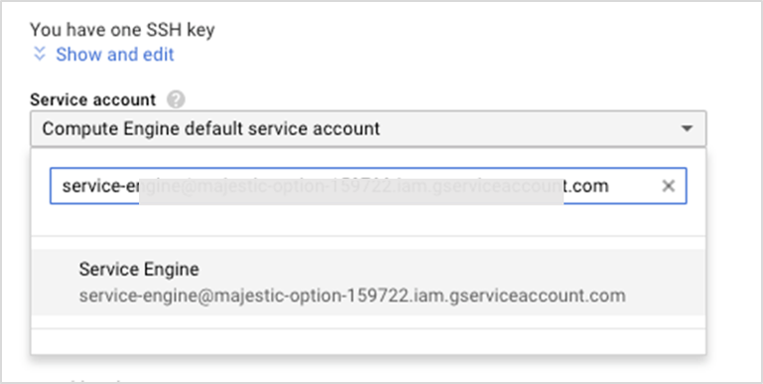
Add this service to the Service Engine Virtual Machine account as shown in the following image.
Autoscaling Permissions for Instance Templates
Instead of individually controlling each instance in your project, in GCP, you can create and manage groups of VM instances. An instance template is used to create a group of identical instances. These are called managed instance groups.
You can automatically add or delete instances from a managed instance group based on the increase or decrease in load.
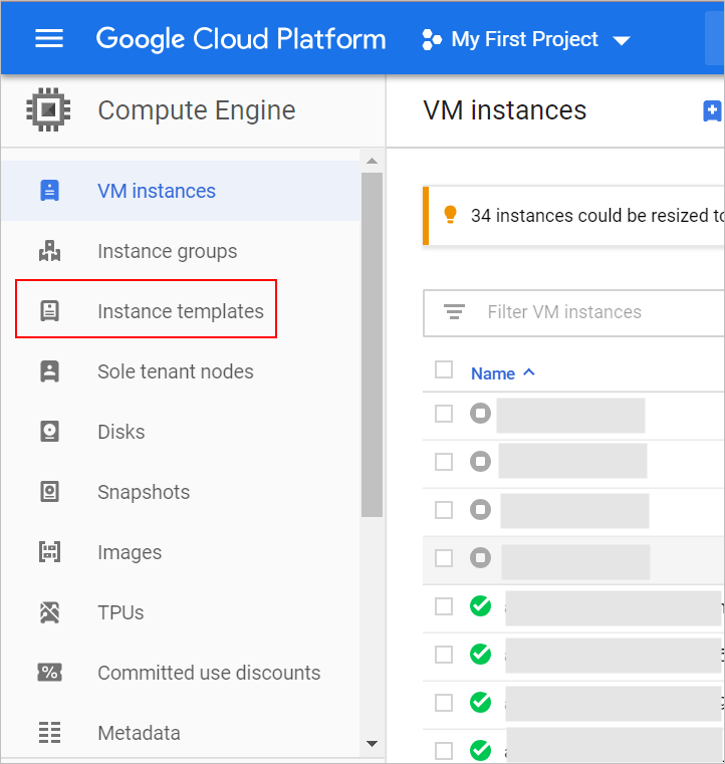
To create an instance template,
- From the GCP console, click on Go to Compute Engine.
- Click on Create Instance templates as shown below.
- Enter the Name of the instance.
- Select Small (1 shared vCPU) as the Machine Type.
- Select a boot disk with a CentOS 7 image and 20 GB capacity.
-
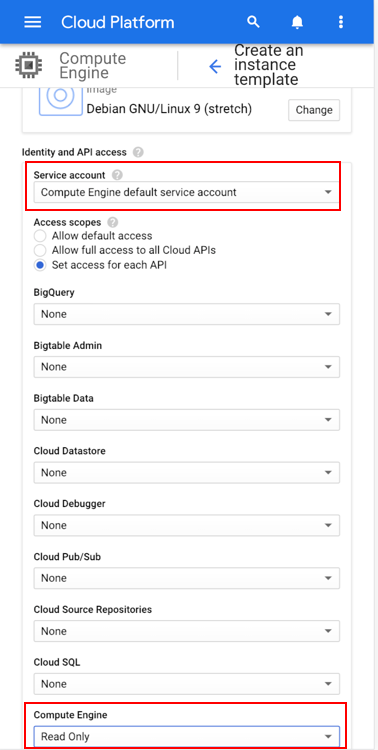
Under Identity and API access and click on Set access for each API.
-
When using a default Compute Engine service account, if the project has Compute Engine Default Service Account enabled, then select that as the Service account, and Select Read Only permissions for the Compute Engine as shown below.
-
When using a non-default service account, refer to Controller Service Account Configuration .
-
- Select Read Only under Compute Engine.
- Click on Allow HTTP traffic under Firewall to permit outside connections.
- Click on Networking > Network Interfaces.
- Enter the network and subnetwork details.
- Set IP forwarding to On.
- Copy the public key from the machine which will be used for initiating SSH.
- Click on the Security tab and click on Add Item under SSH Keys.
- Paste the key in the text box.
- Click on Create.