Deploying Avi Vantage in No Access Mode
Overview
This guide explains the deployment process of Avi Vantage in no access mode.
Deploying Avi Vantage in No Access Mode
Following are the steps to deploy Avi Vantage in a vCenter managed VMware cloud in no access mode:
- The Controller does not access vCenter and does not automatically deploy Avi SEs or connect them to the networks.
- The SE deployment and network placement are performed by Avi Vantage and vCenter administrators.
- The Controller does not provide the VM properties of the SE VM analytics. However, it continues to provide virtual service analytics.
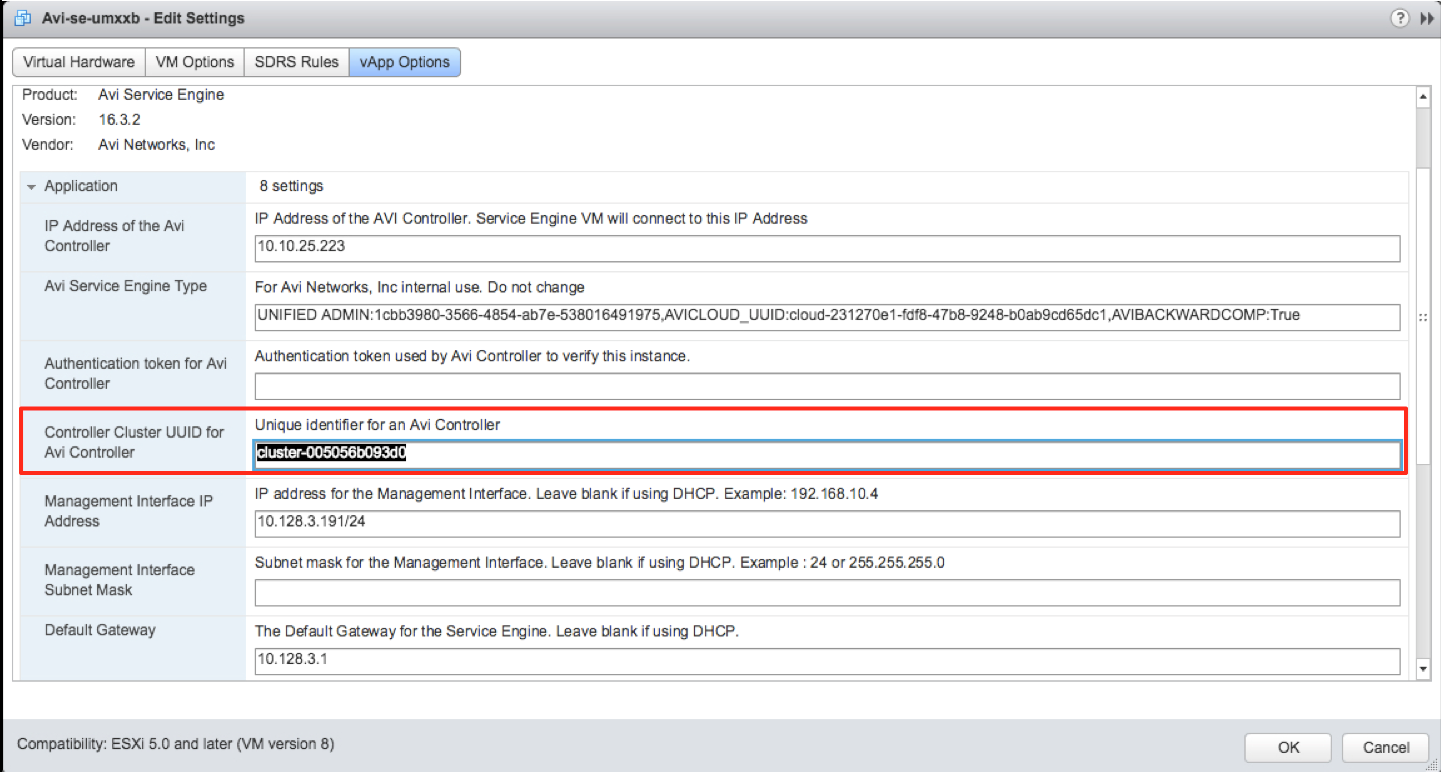
- vCenter’s OVF property Controller cluster UUID for Avi Controller must be set.
Follow the steps given below to deploy Avi Vantage in a vCenter managed VMware cloud in no access mode:
- Deploying Avi Controller OVA
- Performing initial Avi Controller setup
- Installing Avi Service Engine
- Downloading Avi Service Engine on OVA
- Deploying Avi Service Engine OVA file
- (For no access mode) Configuring Service Engine interfaces
- (For static IP assignment) Configuring IP address pools for networks
Note: It is mandatory for No Access clouds on vCenter environments, that the AVISETYPE ovf parameter contains NETWORK_ADMIN,AVICLOUD_UUID: <cloud-uuid> in a scenario where a write access cloud is also pointing to the same vCenter.
Deploying Avi Controller OVA in No Access Mode
Log into the vCenter server through a vCenter client. Use the client to deploy Avi Controller OVA file by following the steps mentioned below:
- Click on File in the top menu and choose Deploy OVF Template.
- Follow the Deploy OVA Template wizard instructions:
- Choose Thick Provision Lazy Zeroed for disk format.
- Choose a port group for Destination Networks in Network Mapping.
This port group will be used by the Avi Controller to communicate with vCenter. - Specify the management IP address and default gateway. In the case of DHCP, leave this field empty.
- Power on the VM.
Note: After you install the OVA and before you power the Controllers ON, edit the hardware resources and change the CPU, memory, and disk to the minimum recommended values for production. Refer to Avi Controller Sizing for more details.
Performing the Avi Controller Initial Setup
You can change or customize settings following initial deployment using the Avi Controller’s web interface.
Navigate to the Avi Controller on your browser.
Note: While the system is booting up, a blank web page or a 503 status code may appear. Wait for about 5 to 10 minutes and then follow the instructions below for the setup wizard.
The steps are similar to the ones mentioned for write access in the above section.
In the cloud setup, navigate to Infrastructure > Clouds. Click Create and select No Orchestrator option from the drop-down list.
Follow the similar steps mentioned in the above section for write access.
- To verify vCenter resources discovery by Avi Controller, navigate to Administration > Settings > Infrastructure. The discovery status should be 100% complete.
If the management and pool networks use DHCP, then the deployment procedure is complete. If static address allocation is used, then an additional step as explained at Configuring IP address pools for networks is required.
Downloading Avi Service Engine on OVA
The OVA image file for Service Engines is embedded in the Avi Controller image. The Avi SE OVA image can be downloaded using the web interface or the API.
- Using the web interface – Navigate to Infrastructure > Cloud, click on the button (as shown in the screenshot below) and select se.ova to download the OVA image.
- Using the API – Navigate to http://avi-ctrl-ip/api/fileservice/seova, where avi-ctrl-ip is the IP address of the Avi Controller.
Deploying Avi Service Engine OVA file
Note: For high availability, use a minimum of two Avi Service Engines for deployment.
-
In vCenter, click on File in the top menu and choose Deploy OVF Template.
- Follow the Deploy OVA Template wizard instructions:
-
Choose Thick Provision Lazy Zeroed for disk format.
-
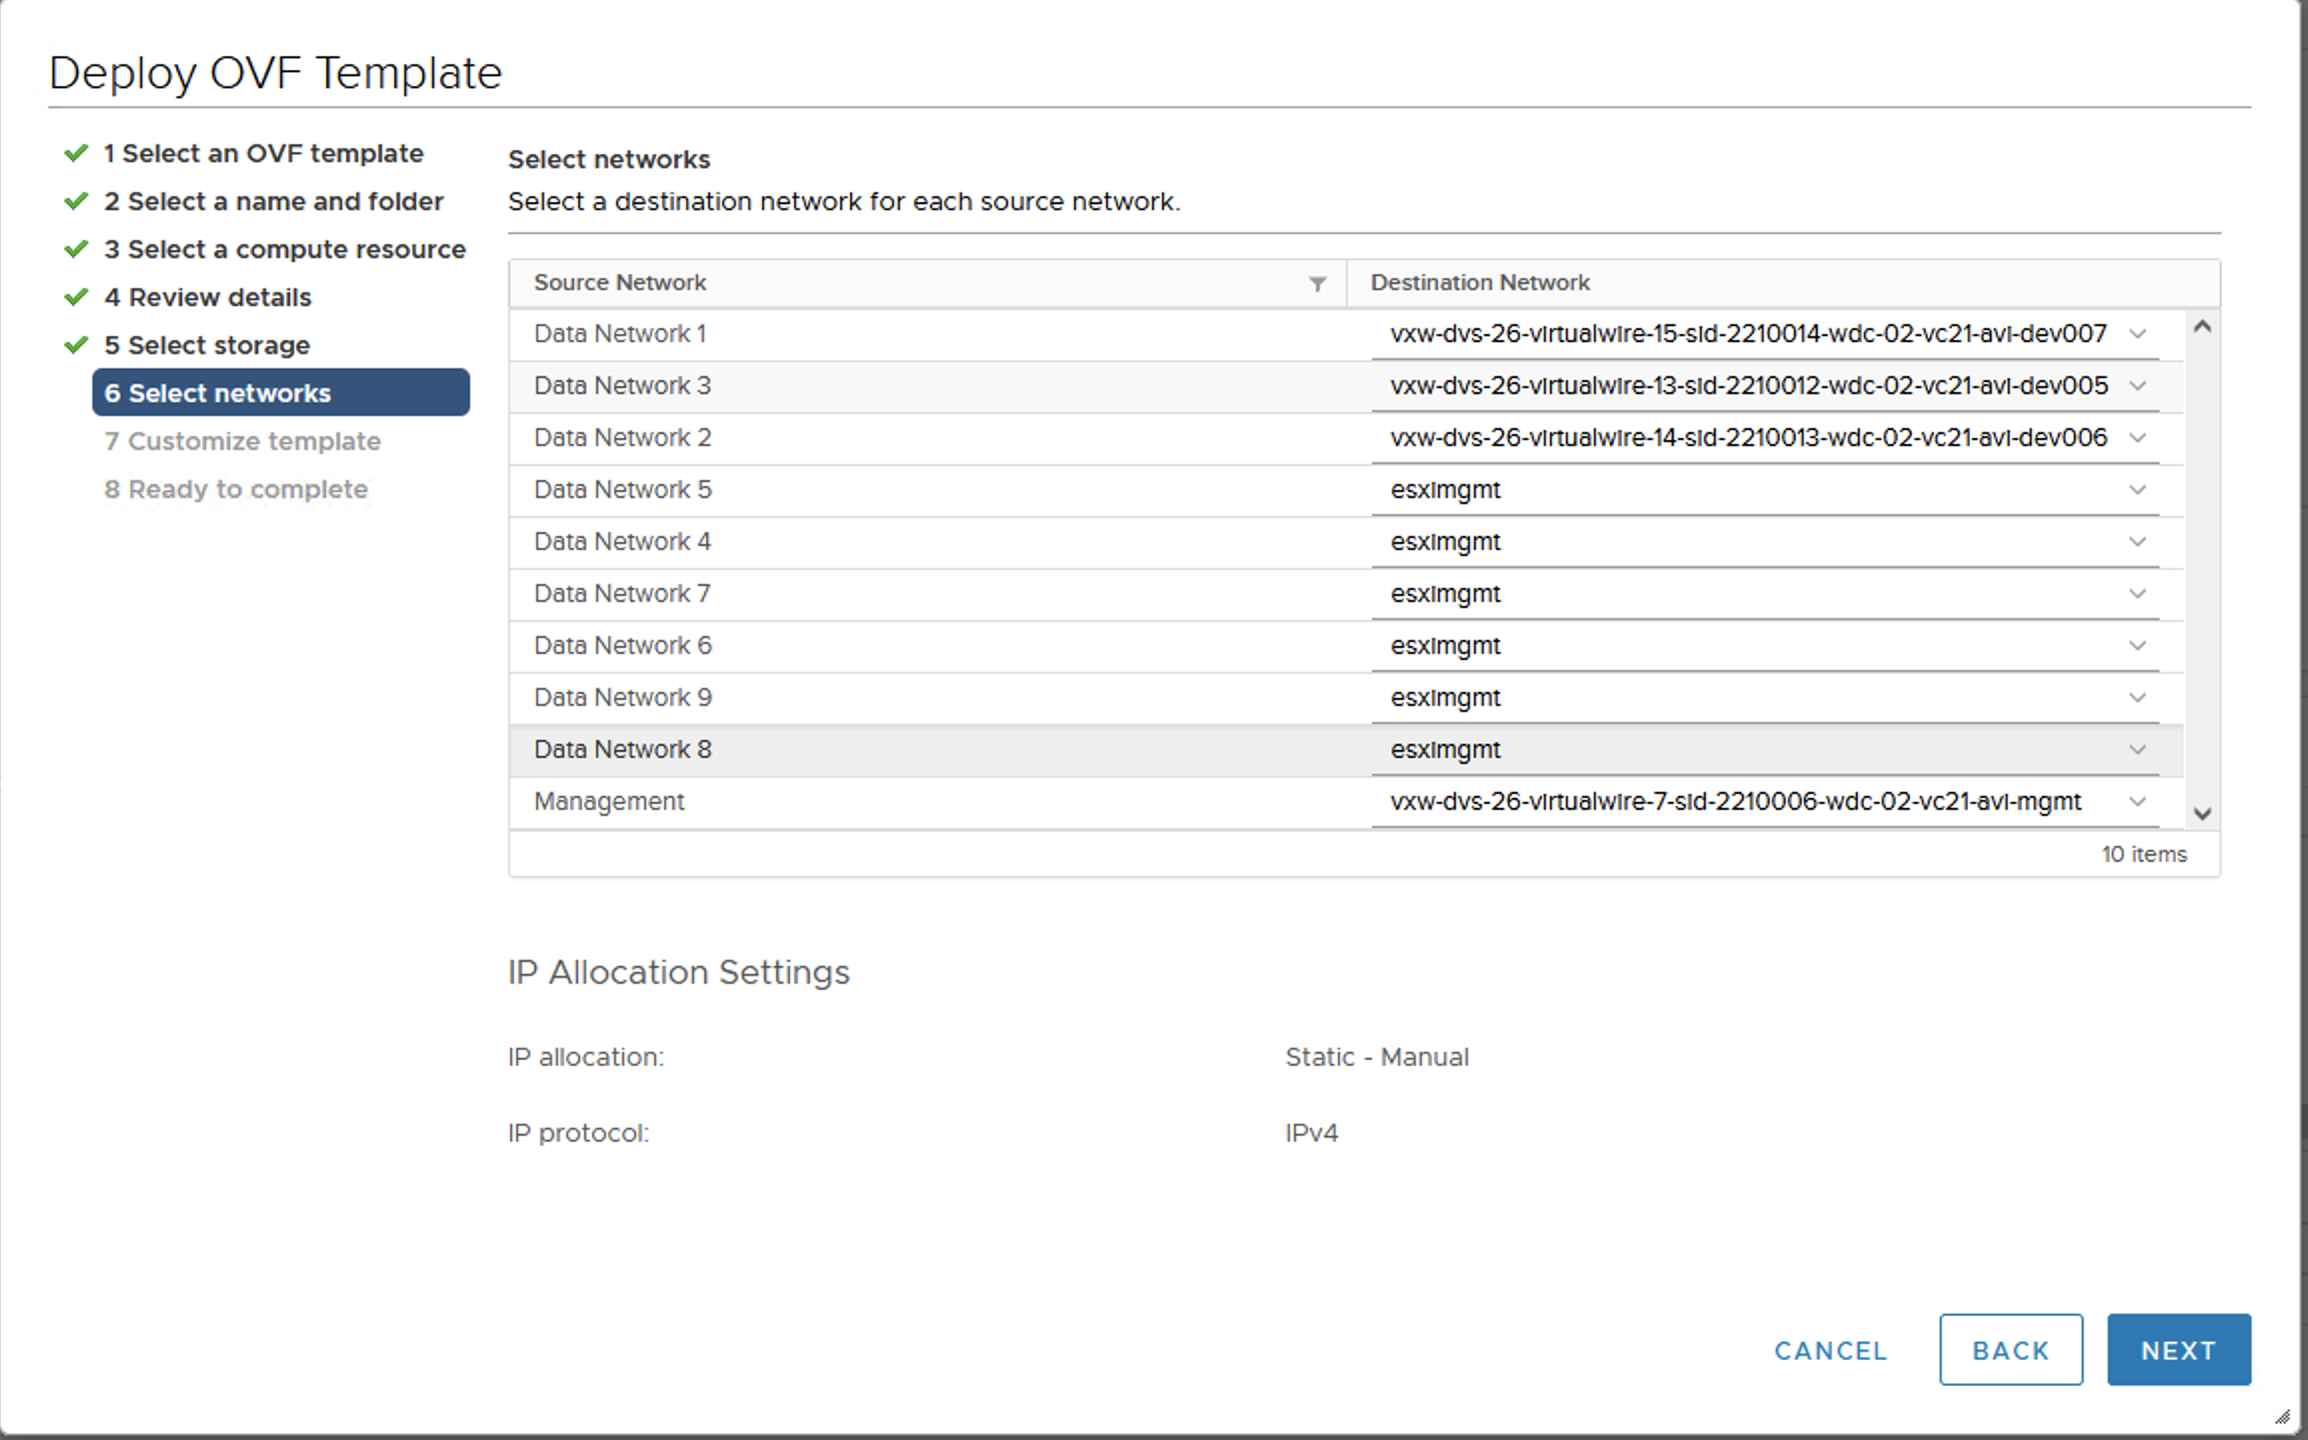
Choose the port groups for the Avi SE network connections. The Avi SE has ten vNICs. Connect the first vNIC to the management network. Connect the other vNICs to the respective data network.
-
For the management connection, choose a port group that will allow the Avi SEs to communicate with the Avi Controller. An Avi SE can be connected to up to nine data networks. Choose a port group in the destination networks for each source network, where you can host the virtual services and pools. The Avi Controller expects the Avi SE’s data vNICs to be connected to virtual service and pool networks.
-
Specify the Avi Controller IP address.
- Enter the Avi Controller’s authentication token key:
- Log into Avi Controller.
- Navigate to Infrastructure > Cloud
- Click on the key icon to view the authentication token key.
- Copy the authentication token.
- Paste the authentication token key into the Authentication Token for Avi field.
- Specify the management IP address and default gateway. In the case of DHCP, leave this field empty.
- Starting with 22.1.3, Avi supports IPv6 for management plane and communication between controller to Service Engine over IPv6. The following fields are added for IPv6 addresses in Service Engine OVF properties:
- avi.mgmt-ip-v6.SE: Management Interface IPv6 Address
- avi.mgmt-mask-v6.SE: Management Interface IPv6 Subnet Mask
- default-gw-v6.SE: The Default IPv6 Gateway for the Service Engine.
Enter IPv6 addresses in the aforementioned fields when the Service Engine connects to a Controller with IPv6 management IP for secondary interface withSE_SECURE_CHANNEL labelset. The Service Engine management interface can be IPv4 or IPv6 or dual stack.<br
-
-
In the VM properties menu, connect the Avi SE data vNICs that are required to reach a virtual service network and pool network to the port groups. Leave the unused vNICs disconnected.
- (For no access mode only) Note down the following information:
- MAC address of the vNICs
- IP subnet of the port group
This information will be used to identify the Avi SE interfaces, as the Controller does not have access to vCenter and so cannot associate the Avi SE’s interface names with VMware’s interface names.
- Power on the VM.
Repeat the above steps for at least one more Service Engine. By default, two Avi SEs are required for deploying a virtual service.
Configuring Avi Service Engine Interfaces
Note: This step is applicable only for no access mode.
Avi Service Engine requires an IP address in each of the virtual service networks and server networks. This process is automatic in write access mode. For no access mode, follow the steps below:
- On Avi UI, navigate to Infrastructure > Cloud Resources > Service Engine, and select the Avi SE that was deployed in the previous section.
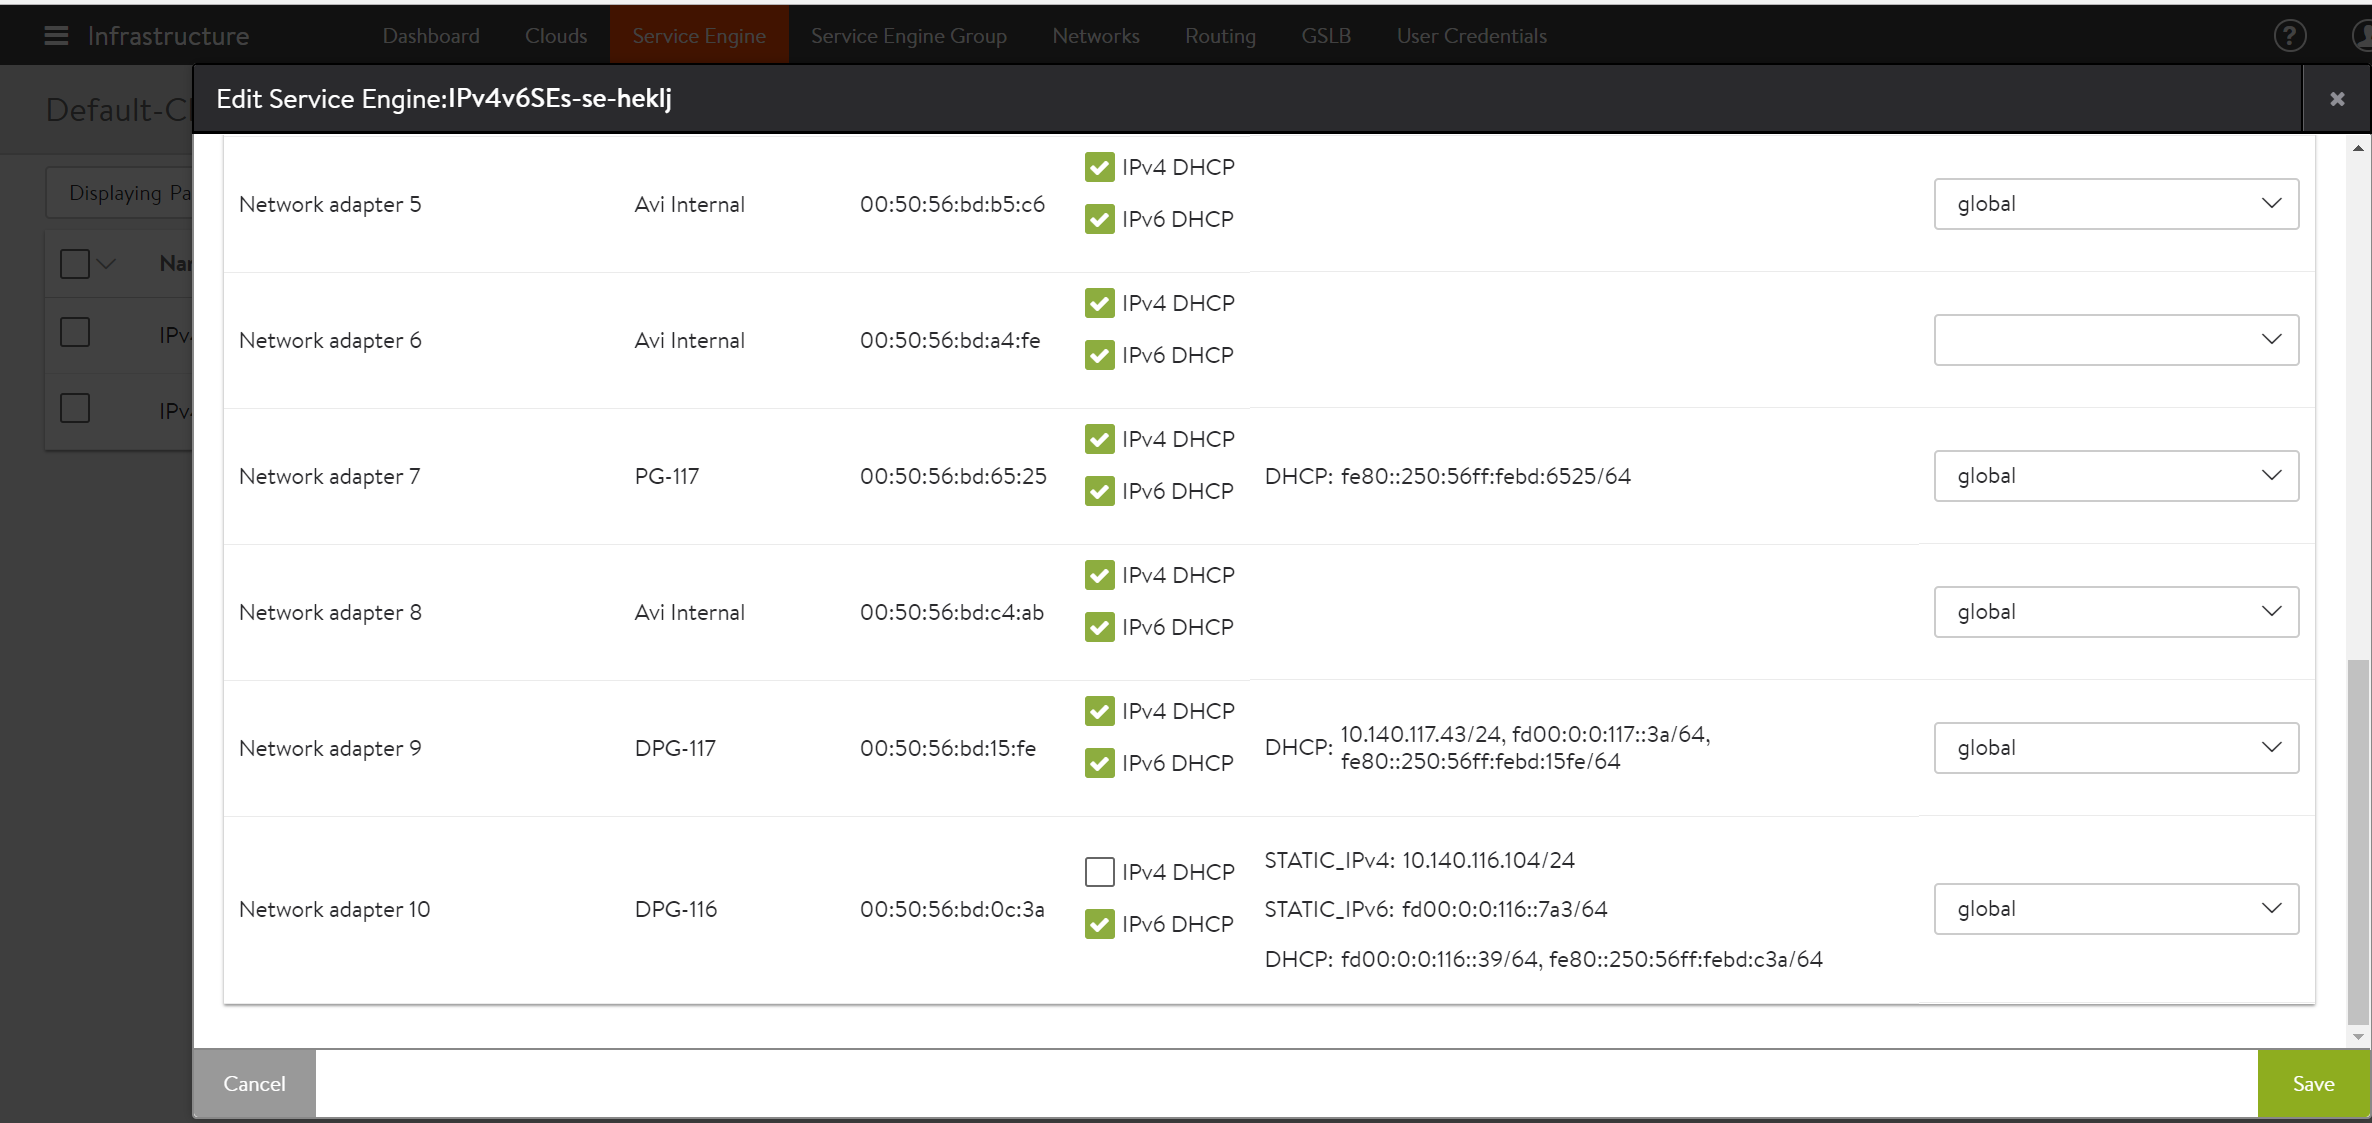
- Find the interface that matches the list of MAC addresses that were noted down during the Avi SE deployment.
- Enable the DHCP option for the interface, if it is available. Otherwise, provide a static IP address as explained in the next section.
Repeat the above steps for all connected interfaces of the virtual service and server networks.
Starting with Avi Vantage release 18.1.2, IPv6 addressing is supported for Service Engine interfaces. The following screenshot displays an example of configuring the interfaces with both IPv4 and IPv6 addresses.


