NSX ALB Basic Edition Installation Guide
Note: The Basic Edition of Avi Load Balancer (formerly known as NSX Advanced Load Balancer) has reached its End of Availability (EoA) date on Jan 30th, 2024. The changes only apply to the Basic Edition of Avi Load Balancer. For additional details, please visit https://kb.vmware.com/s/article/96386.
Overview
VMware NSX Advanced Load Balancer (NSX ALB, earlier Avi Vantage) is available in two editions:
- VMware NSX ALB Enterprise edition, which provides a full-featured license including multi-cloud integration, active-active high availability, GSLB, and WAF.
- VMware NSX ALB - Basic edition
This document describes the installation procedure for VMware NSX ALB - Basic edition.
Installing an Avi Controller
Note:
- Starting with Avi Vantage version 20.1.3, this guide describes the setting up Avi Basic Edition.
The Avi Controller OVA can be downloaded from My VMware customer portal. Service Engine creation will be handled by the Avi Controller.
Deploying Avi Controller
Log in to the vCenter server through a vSphere Web Client. Use the client to deploy Avi Controller OVA file by following the steps mentioned below:
- Click on File option in the top menu and choose Deploy OVF Template.
- Follow the Deploy OVA Template wizard instructions:
- Choose Thick Provision Lazy Zeroed for disk format.
- Choose a port group for Destination Networks in Network Mapping. This port group will be used by the Avi Controller to communicate with vCenter.
- Specify the management IP address and default gateway. In the case of DHCP, leave this field empty (Only static IP addresses should be used in production environment).
- Leave the Sysadmin login authentication key field blank.
- Power on the VM.
Repeat these steps to deploy 3 Avi Controller VMs to create an Avi Controller cluster set-up.
Performing the Avi Controller Initial setup
You can change or customize settings following initial deployment using the Avi Controller’s web interface. Navigate to the Avi Controller IP on your browser.
Notes:
While the system is booting up, a 503 status code, or a page with following message will appear:
Controller is not yet ready. Please try again after a couple of minutes. Wait for about 5 to 10 minutes and refresh the page. Then, follow the instructions below for the set-up wizard.
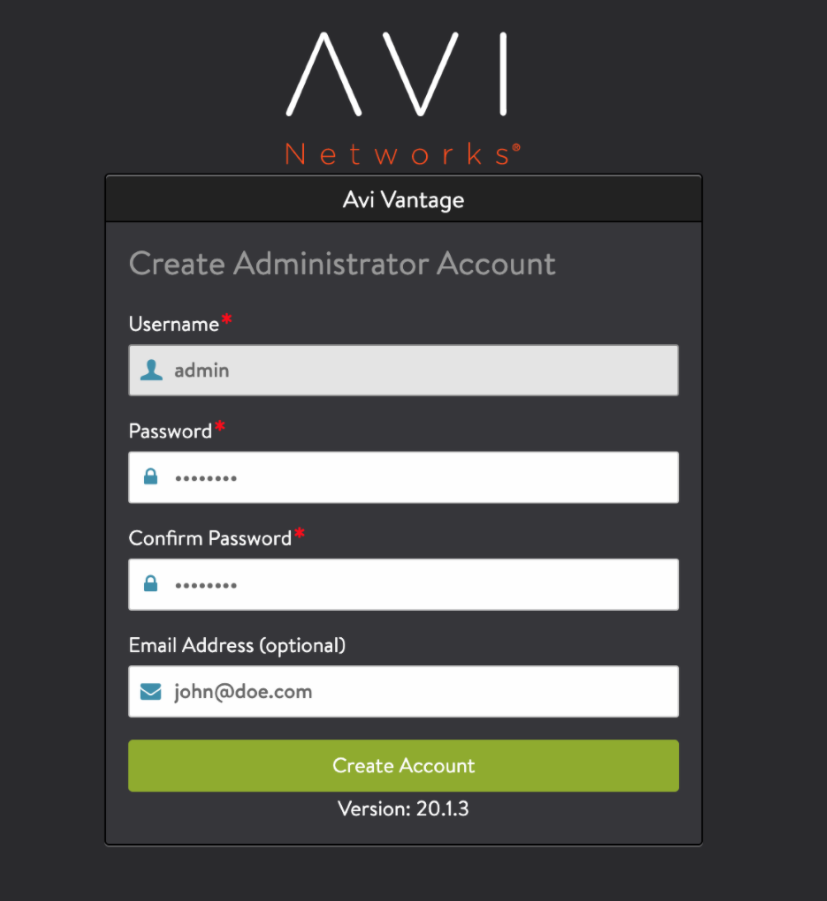
- Configure the administrator account.
Note: A valid email address is required for the admin password reset in case of the user account lockout.
-
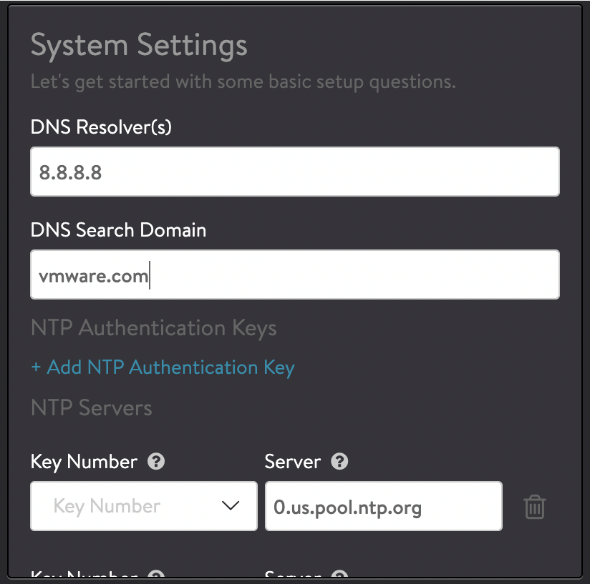
Configure DNS and NTP server information
-
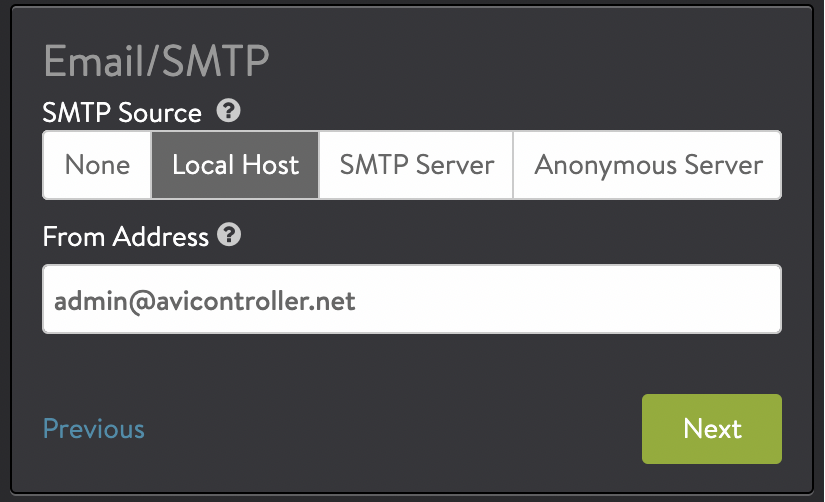
Configure Email or SMTP information
-
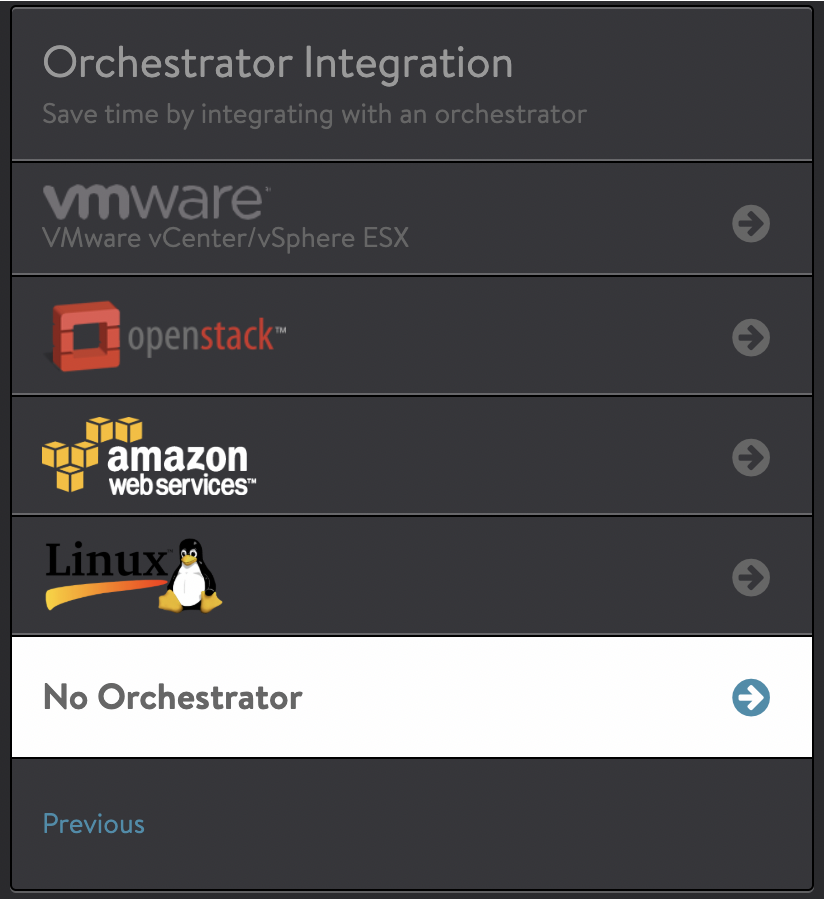
Select the No Orchestrator option for Orchestrator Integration as shown below.
-
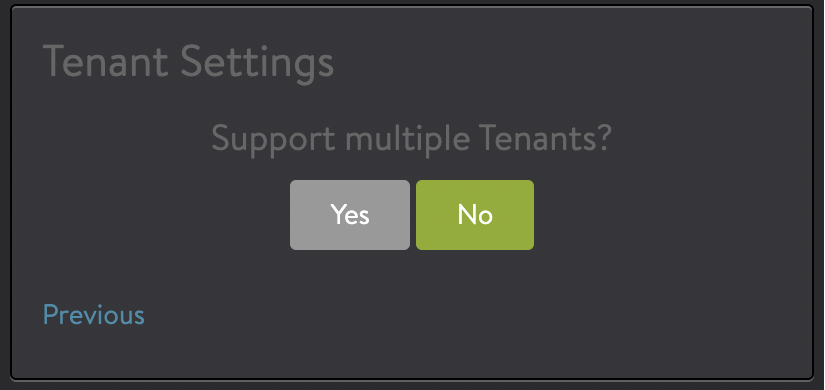
Select No for multiple tenants to complete the set-up.
Preparing Avi Controller for Basic Edition
Note: Starting with Avi Vantage 20.1.3, this step is not required on a new Avi Controller installation.
The Avi Controller boots up in the Enterprise Edition by default. Features that are not supported the Basic edition need to be removed before changing the license tier.
Performing a Configuration Audit
Note: Starting with Avi Vantage 20.1.3, this step is not required on a new Avi Controller installation.
Run the configuration audit API to identify the Enterprise Edition features that need to be removed.
All configuration violations need to be corrected before license tier change is allowed.
Shown below is the output of the configuration audit API performed right after a fresh install.
[admin:cntrl]: > show configuration audit tier basic
+--------------------+---------------+--------------------------------------------------------------------------------------------------------------------------------------------------+
| Object Type        | Name          | License Violations                                                                                                                               |
+--------------------+---------------+--------------------------------------------------------------------------------------------------------------------------------------------------+
| ServiceEngineGroup | Default-Group | Field ServiceEngineGroup.ha_mode cannot have HA_MODE_SHARED as its value in BASIC license tier. Allowed value(s): HA_MODE_LEGACY_ACTIVE_STANDBY. |
|                    |               | Field ServiceEngineGroup.hm_on_standby cannot have True as its value in BASIC license tier. Allowed value: False.                                |
|                    |               | Field ServiceEngineGroup.app_cache_percent cannot have 10 as its value in BASIC license tier. Allowed value: 0.                                  |
|                    |               |                                                                                                                                                  |
+--------------------+---------------+--------------------------------------------------------------------------------------------------------------------------------------------------+
The following are the observations from the above output:
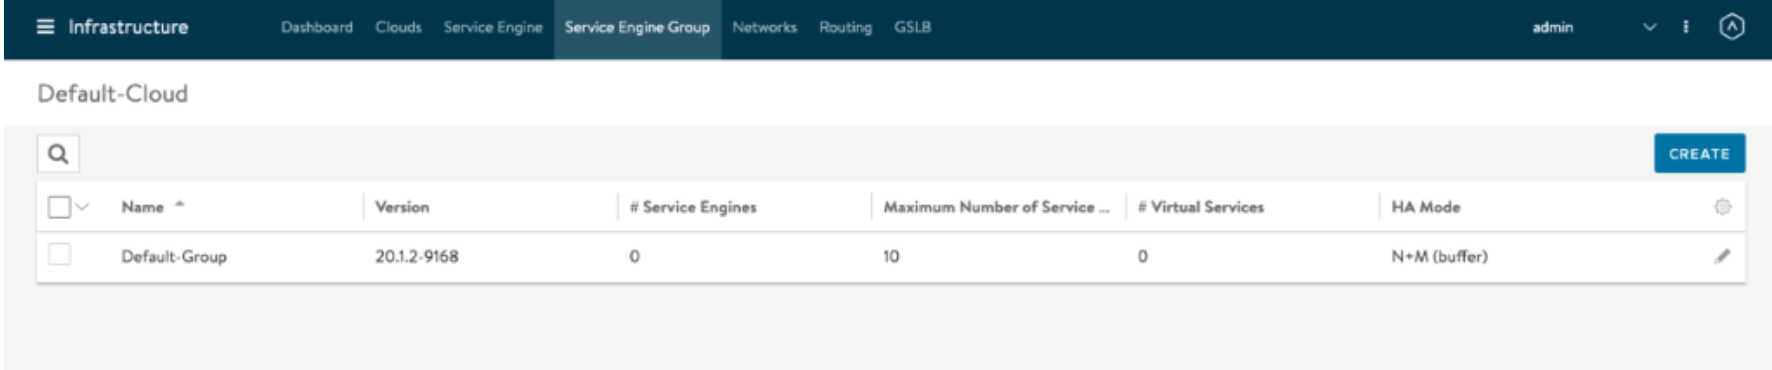
- The default Service Engine Group (Default-Group) has a default HA mode of N+M. As NSX ALB Basic Edition supports the legacy Active/Standby HA mode only, this needs to be changed.
- As NSX ALB Basic edition does not support configurable cache memory, this value needs to be edited to 0.
- As NSX ALB Basic edition does not support health monitoring from the standby SE, this needs to be disabled.
In case the Avi Controller has been in use and other features configured, the above command will display all features that should be removed before proceeding.
Setup Service Engine Group to Legacy Active/Standby
Note: Starting with Avi Vantage version 20.1.3, this step is not required on a new Avi Controller installation.
Before configuring the Avi Controller to be in the Basic edition tier, the Service Engine group needs to be re-configured to adhere to the Basic edition restrictions. Login to the Avi UI using the Avi Controller IP address on your browser.
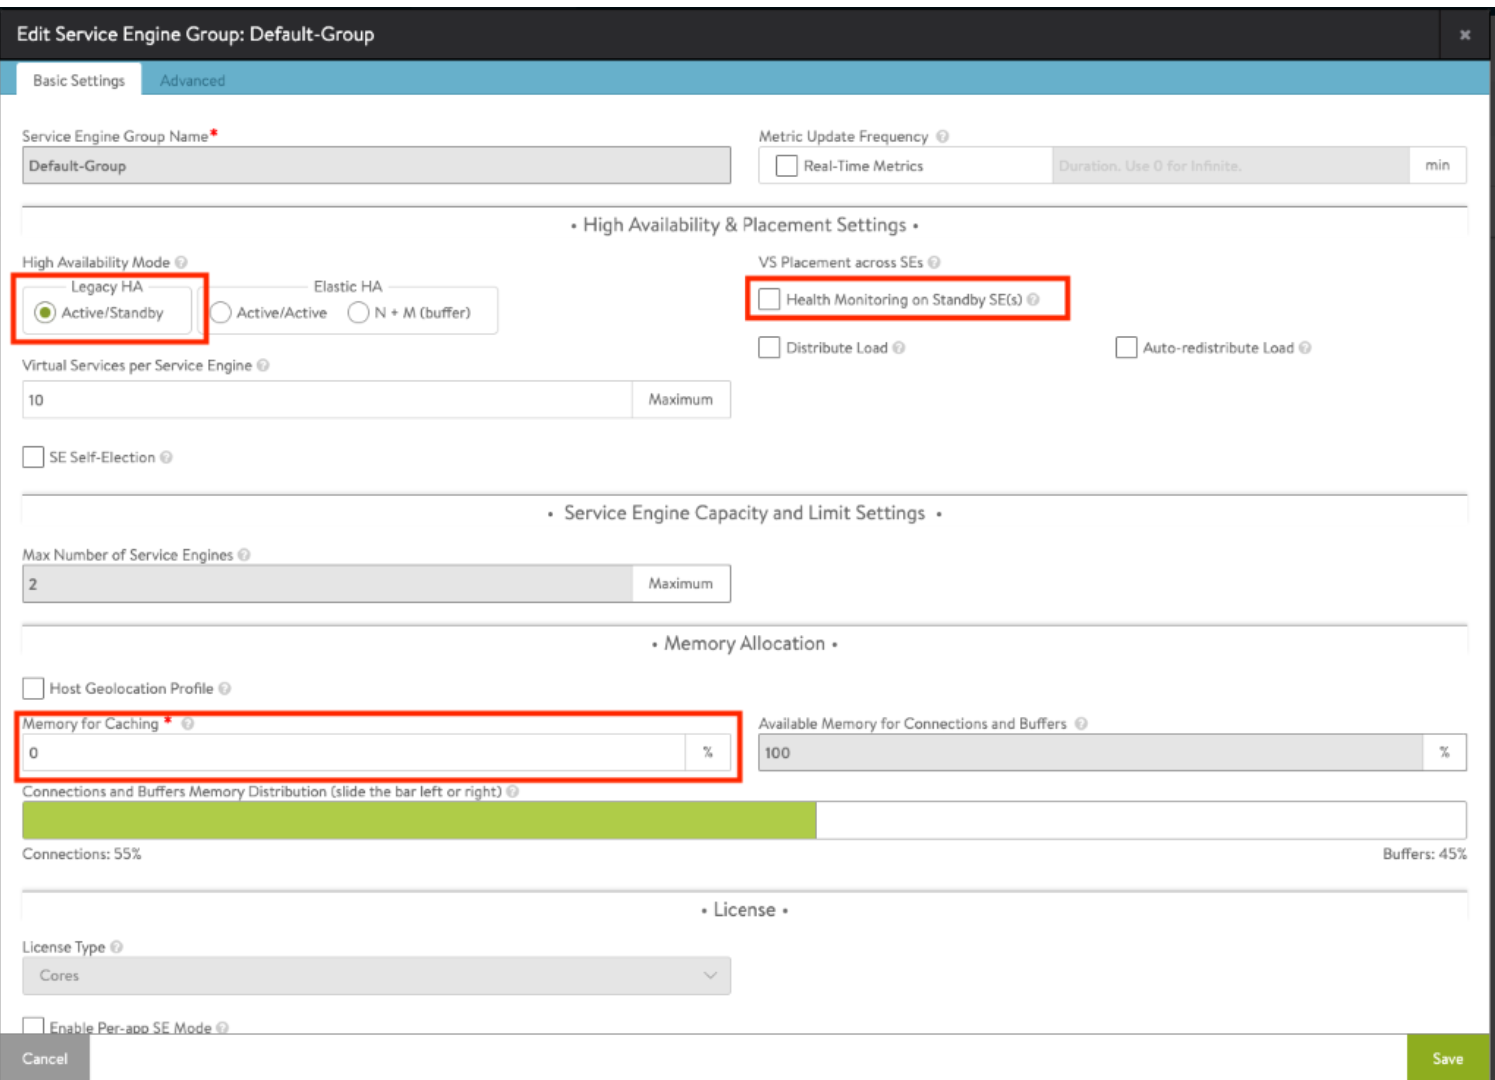
Navigate to Infrastructure > Service Engine Group, edit the Default-Group and perform the following steps:
- Select the Active/Standby option as the High Availability Mode
- Uncheck the Health Monitoring on Standby SE(s) option
- Set 0 as the value for Memory for Caching
- Click on Save
Run the configuration audit API to validate that no configuration violations are found.
[admin:ctrl]: > show configuration audit tier basic
License audit passed successfully
[admin:ctrl]: >
Change Default License Tier to Basic Edition
The Avi Controller would be set up in the Enterprise edition license tier when it boots up. Change the default license tier on the Avi Controller to Basic Edition by the following workflow:
UI Workflow
-
Login to the Avi Controller as an admin user
-
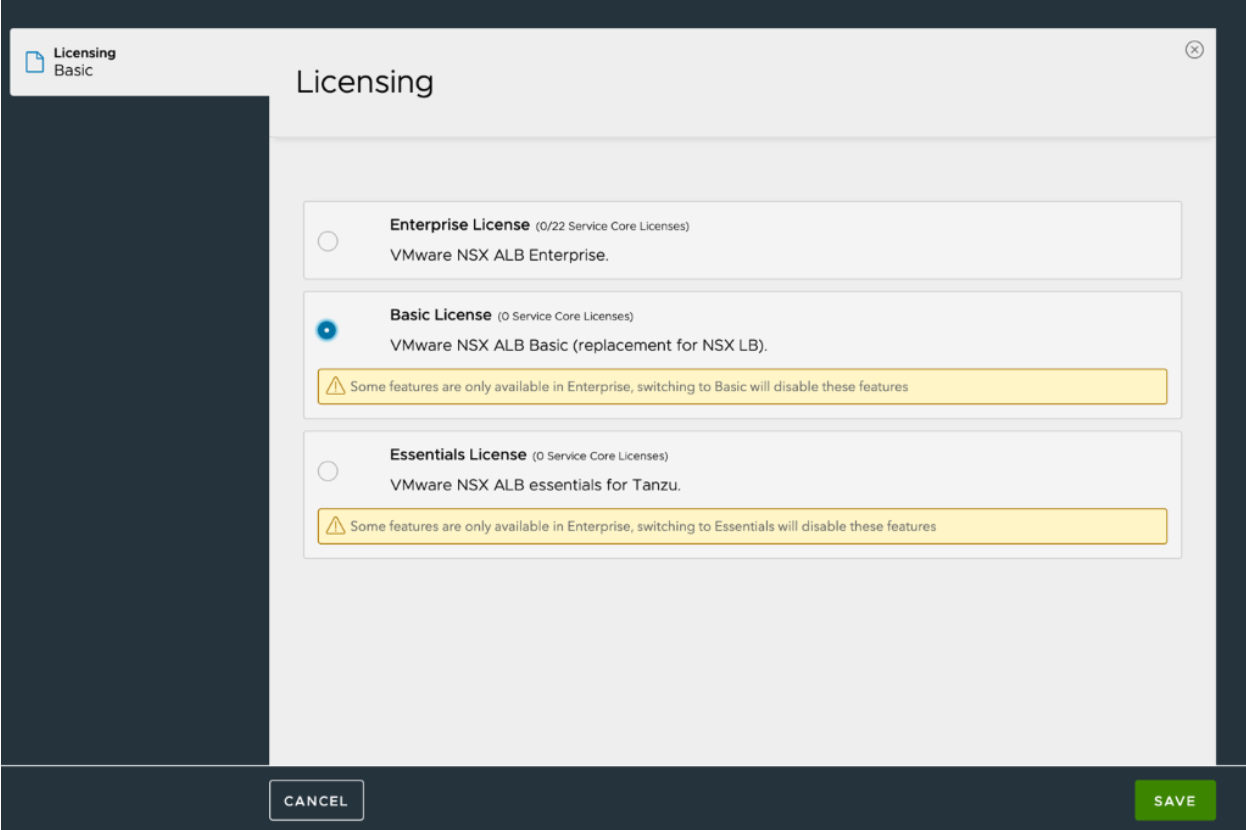
Navigate to Administration > Settings > Licensing
-
Click on the Settings icon
-
Select Basic License
-
Click on Save option
CLI Workflow
-
Login to the Avi Controller as an admin user
-
Use the
show systemconfiguration | grep default_license_tierto check the license tier associated with the Avi Controller.
[admin:ctrl]: > show systemconfiguration | grep default_license_tier
| default_license_tier    |ENTERPRISE
[admin:ctrl]: >
Use the configure systemconfiguration command to change the default license tier value from enterprise to basic as shown below.
[admin:ctrl]: > configure systemconfiguration
[admin:ctrl]: systemconfiguration > default_license_tier basic
overwriting the previous entered value for default_license_tier
[admin:ctrl]: systemconfiguration > save
After a tier change, you can click on Learn More beside Unlock more features and possibilities with Enterprise edition. to access a detailed feature comparison datasheet.
Additional Resources
Note: Avi Controllers setup in the Basic edition only support legacy Active/Standby HA mode for the Service Engine Groups.
You can refer to the following guides for additional information: