Direct Server Return on NSX Advanced Load Balancer
Overview
In general, a load balancer (NSX Advanced Load Balancer) performs address translation for the incoming requests and outgoing requests. Return packets go through the load balancer and the destination and source address is changed as per the configuration on the load balancer.
The following is the packet flow when Direct Server Return (DSR) is enabled:
- The load balancer does not perform any address translation for the incoming requests.
- The traffic is passed to the pool members without any changes in the original source and destination address.
- The packet arrives at the server with the virtual IP address as the destination address.
- The server responds with the virtual IP address as the source address. The return path to the client does not flow back through the load balancer and thus the term, Direct Server Return.
Note: This feature is only supported for IPv4.
Use Case
DSR is often applicable to audio and video applications as these applications are very sensitive to latency.
Supported Modes
Refer to the following table for the supported modes for DSR.
| DSR Type | Encapsulation | How it works |
|---|---|---|
| Layer 2 DSR | MAC-based Translation | NSX Advanced Load Balancer Controller rewrites the source MAC address with Service Engine Interface MAC address and destination MAC address with server MAC address. |
| Layer 3 DSR | IP-in-IP | An IP-in-IP tunnel is created from the NSX Advanced Load Balancer to the pool members, which can be a router hop(s) away. The incoming packets from clients are encapsulated in IP-in-IP with source as the Service Engine’s interface IP and destination as the back-end server IP address. |
| Layer 3 DSR | GRE | Starting with NSX Advanced Load Balancer release 21.1.4, Generic Routing Encapsulation (GRE) tunnel is supported for layer 3 DSR. In this case, the incoming packets from clients are encapsulated in a GRE header, followed by the outer IP header (delivery header). |
Refer to the following table for the specification of supported features for DSR.
| Feature | Support |
|---|---|
| Encapsulation | IP-in-IP, GRE, MAC-based translation |
| Ecosystem | VMware write, VMware No-access, and Linux server cloud |
| Dataplance drivers | DPDK and PCAP support for Linux server cloud |
| BGP | VIP placement using BGP in front-end |
| Load balancing algorithm | Only Consistent Hash is supported for L2 and L3 DSR |
| TCP UDP | Support for both TCP Fast Path and UDP Fast Path in L2 and L3 DSR |
| High Availability (SE) | N+M, active-active, and active-standby |
Layer 2 DSR
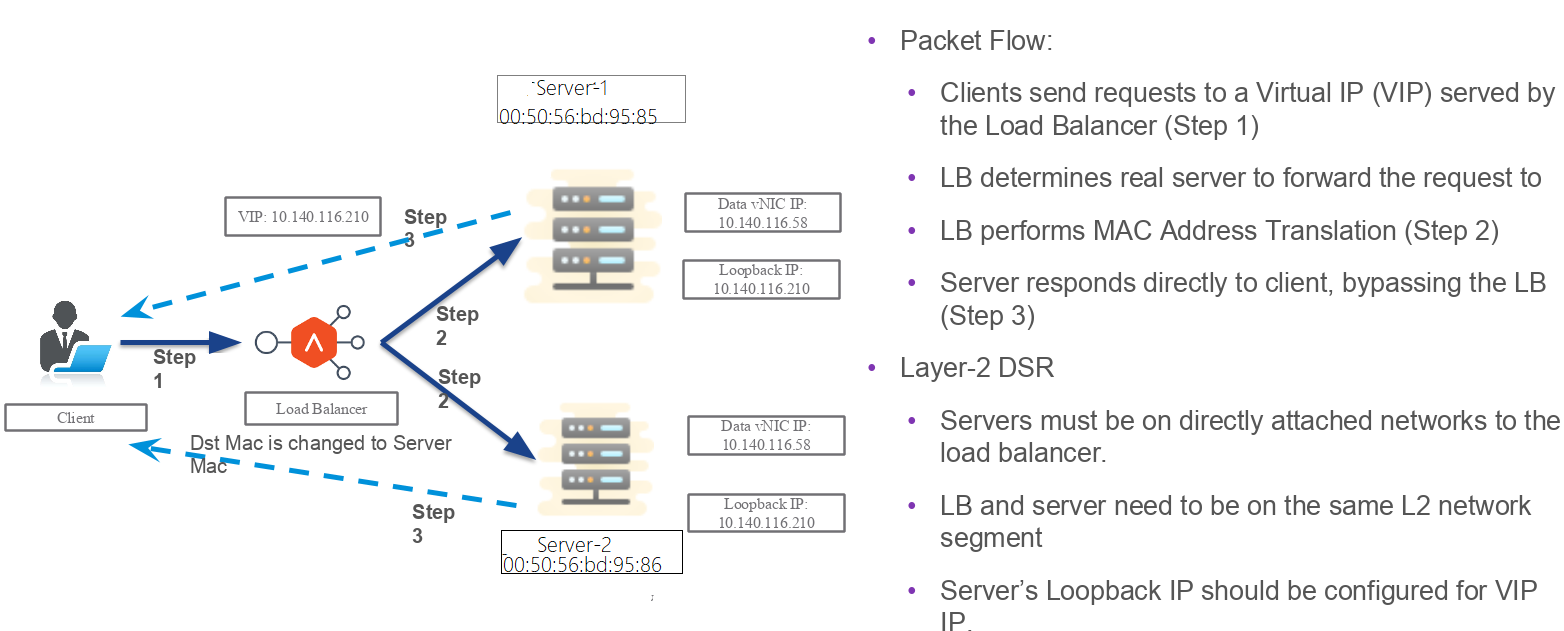
- Destination MAC address for the incoming packets is changed to server MAC address.
- Supported modes: DSR over TCP and UDP.
- Health monitoring of TCP Layer2 DSR is supported as well.
Packet Flow Diagram
The following diagram exhibits packet flow diagram for Layer 2 DSR.
Configuring Health Monitor (TCP/HTTP) in DSR
When Layer 2 Direct server return (DSR) is configured, the HTTP/ TCP pool health monitor’s destination IP is the VS VIP. For the Ping health monitor, the destination is the backend Server IP.
Following are the commands needed to configure on the server to make the HTTP health monitor work:
netsh interface ipv4 set interface "Ethernet0" forwarding=enabled
netsh interface ipv4 set interface "Ethernet1" forwarding=enabled
netsh interface ipv4 set interface "Ethernet1" weakhostreceive=enabled
netsh interface ipv4 set interface "Loopback" weakhostreceive=enabled
netsh interface ipv4 set interface "Loopback" weakhostsend=enabled
Where, Ethernet0 = Management interface name Ethernet1 = Data interface name Loopback = Loopback interface name (VIP)
Configuring Network Profile for Layer 2 DSR
Login to the NSX Advanced Load Balancer CLI and use the configure networkprofile <profile name> command to enter into TCP fast path profile mode. For Layer 2 DSR, enter the value for the DSR type as dsr_type_l2.
[admin:10-X-X-X]: > configure networkprofile <profile name>
[admin:10-X-X-X]: networkprofile> profile
[admin:10-X-X-X]: networkprofile profile> tcp_fast_path_profile
[admin:10-X-X-X]: networkprofile profile:tcp_fast_path_profile>dsr_profile dsr_type dsr_type_l2
[admin:10-X-X-X]: networkprofile profile:dsr_profile> save
[admin:10-X-X-X]: networkprofile> save
Once the network profile is created, create a L4 application virtual service with the DSR network profile created above and attach DSR-capable servers to the pool associated with virtual service.
Configuring Server
ifconfig lo:0 <VIP ip> netmask 255.255.255.255 -arp up
echo 1 > /proc/sys/net/ipv4/conf/all/arp_ignore
echo 2 > /proc/sys/net/ipv4/conf/all/arp_announce
echo 2 >/proc/sys/net/ipv4/conf/<Intraface of pool server ip configured>/rp_filter

sysctl -w net.ipv4.ip_forward=1
Configuring Network Profile
Configuring Network Profile for DSR over TCP and UDP using NSX Advanced Load Balancer UI
Network profile for DSR over TCP and UDP can be created using NSX Advanced Load Balancer UI as well. Login to the NSX Advanced Load Balancer UI and follow the steps mentioned below.
-
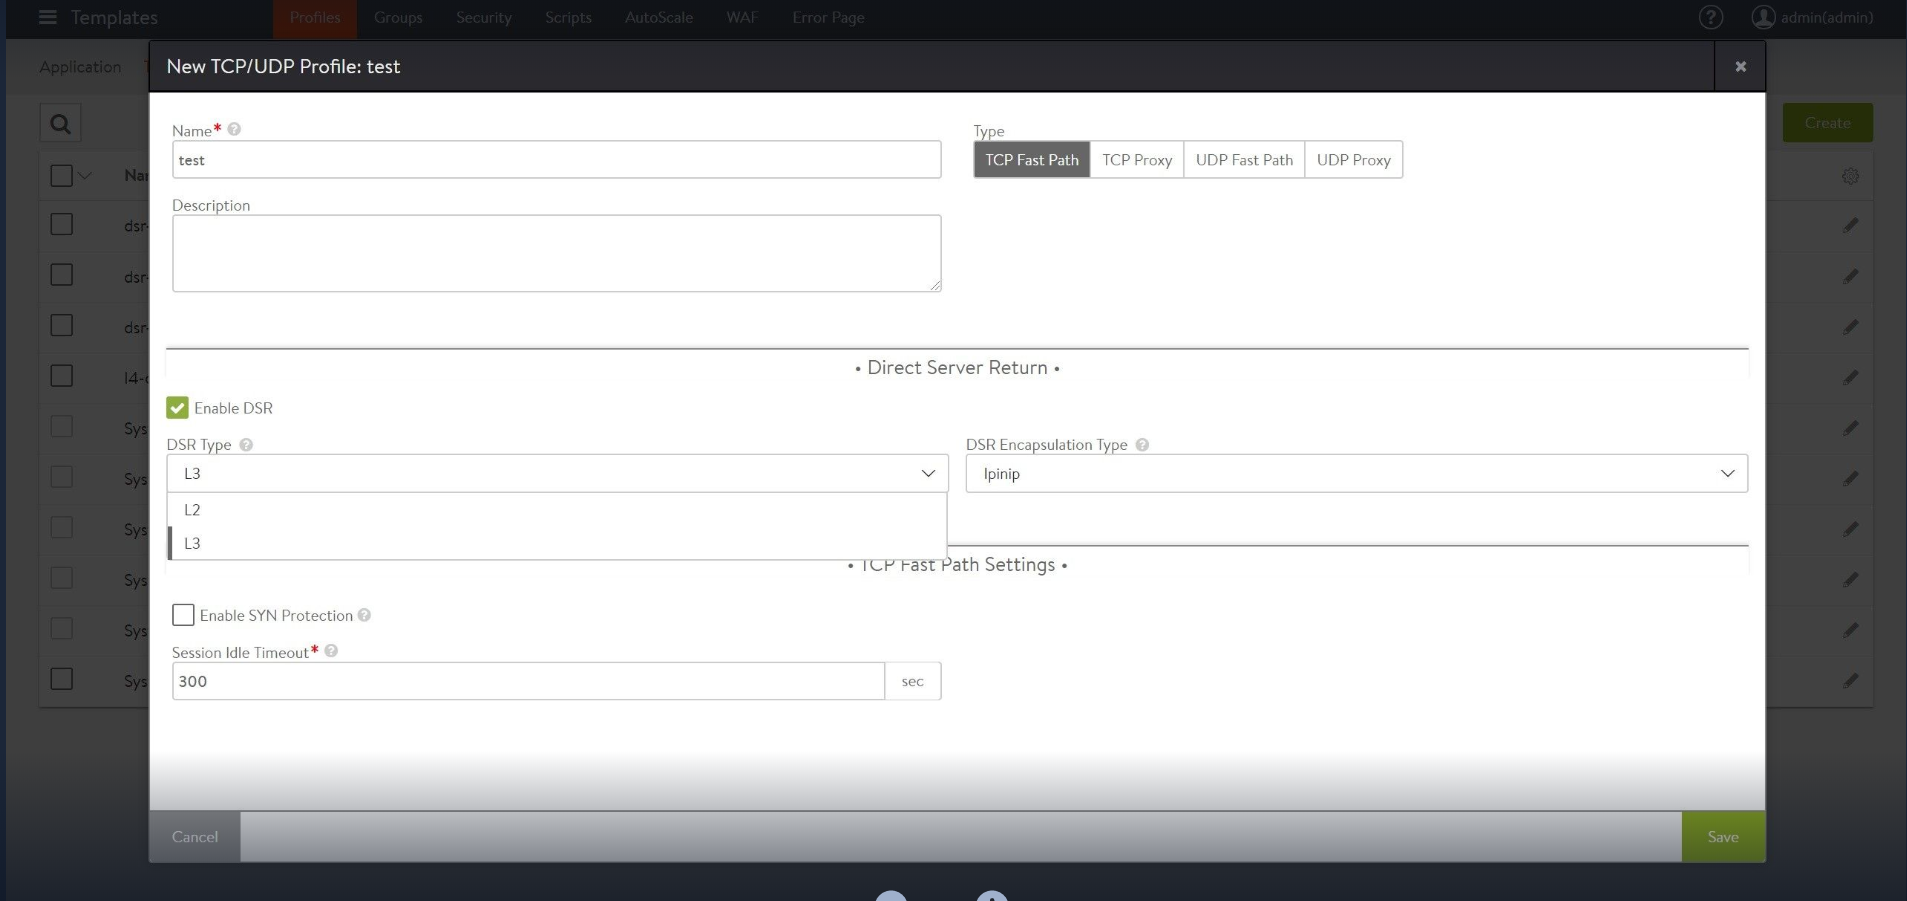
Navigate to Templates > Profiles > TCP/UDP. Click on create to create a new TCP profile or select the existing one to modify .
- Provide the desired name and select TCP Fast Path as Type.
Select the following options:
- Enable checkbox for Enable DSR.
- Use the drop-down option for DSR Type and select L2 or L3 as per the requirement.
- Select IPinip/Gre as the option for DSR Encapsulation Type.
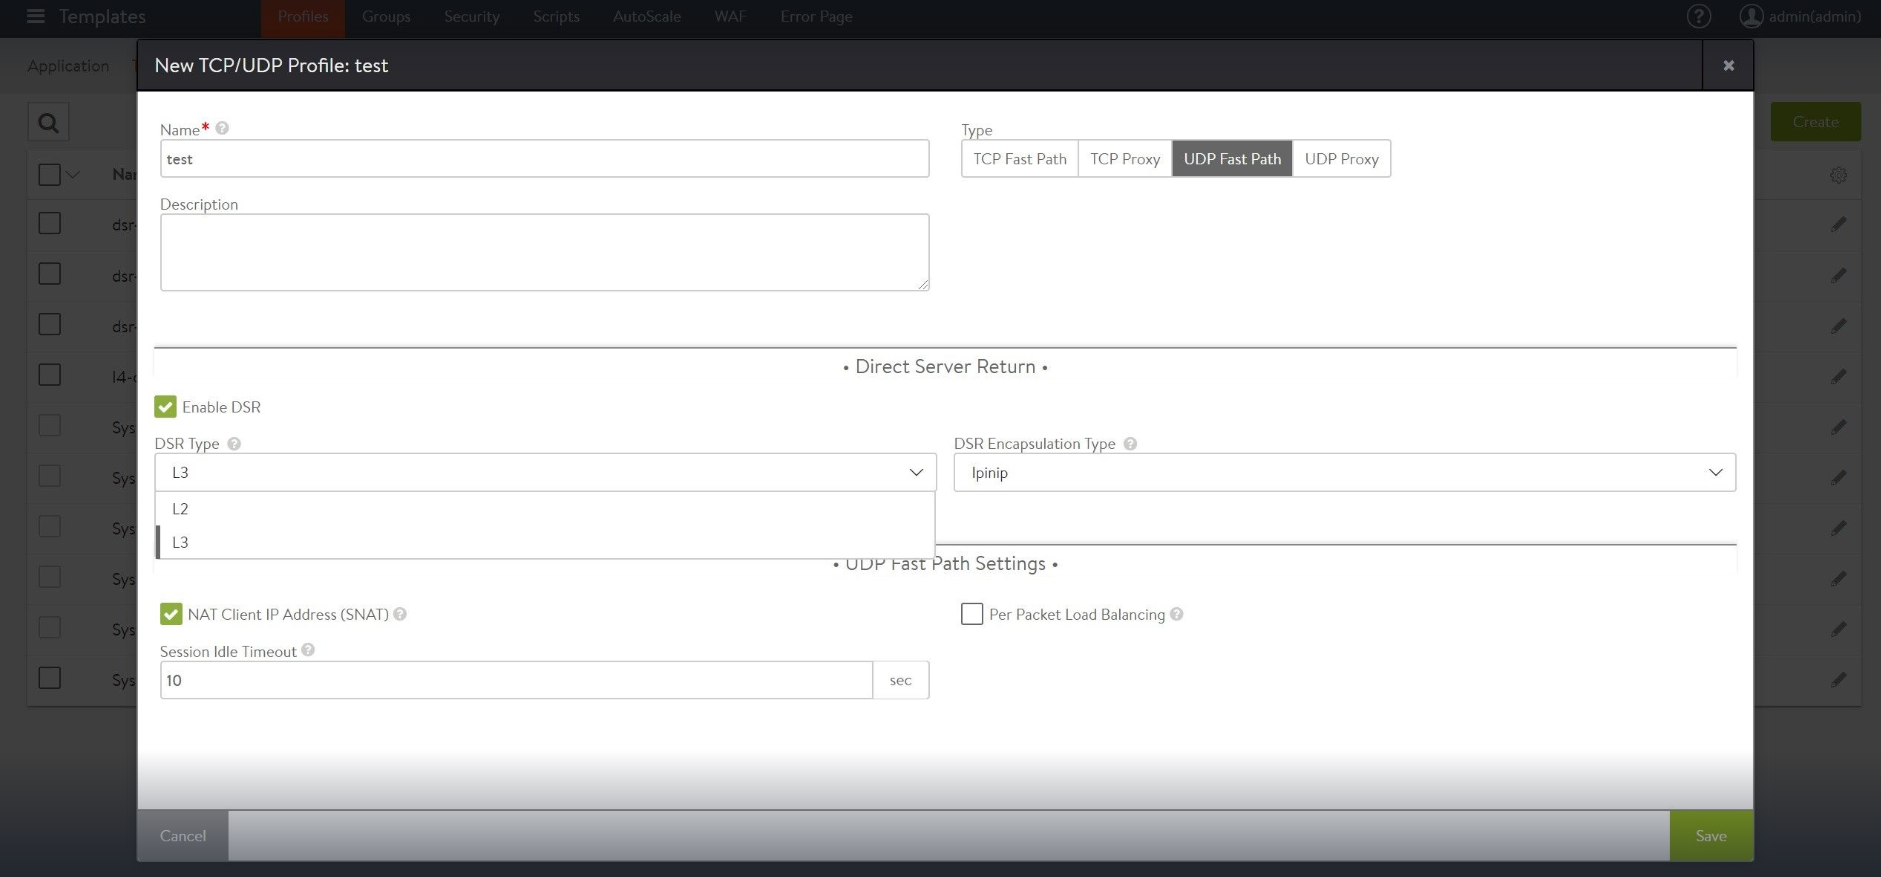
- For UDP fast path profile, select UDP Fast Path as Type.
Select the following options:
- Enable checkbox for Enable DSR.
- Use the drop-down option for DSR Type and select L2 or L3 as per the requirement.
- Select IPinip/Gre as the option for DSR Encapsulation Type.
Layer 3 DSR
- L3 DSR can be used in conjunction with a full proxy deployment:
- Tier 1: L3 DSR
- Tier 2: Full-proxy (with SNAT)
- Supported mode: IPinIP
- Virtual service placement is supported in the front-end using BGP.
- Supported load balancing algorithm: Only consistent hash is supported.
- Deployment mode: Auto gateway and traffic enabling should be disabled for the deployment mode when Layer 7 virtual service is configured (in the deployment mode Tier-2 as shown below).
- If the Service Engines are scaled out in the Tier-2 deployment mode, pool members are added manually once new Service Engines are added.
Note: In case of tier-1 DSR, the backend application servers must listen on all the virtual service listening ports.
Packet Flow Diagram
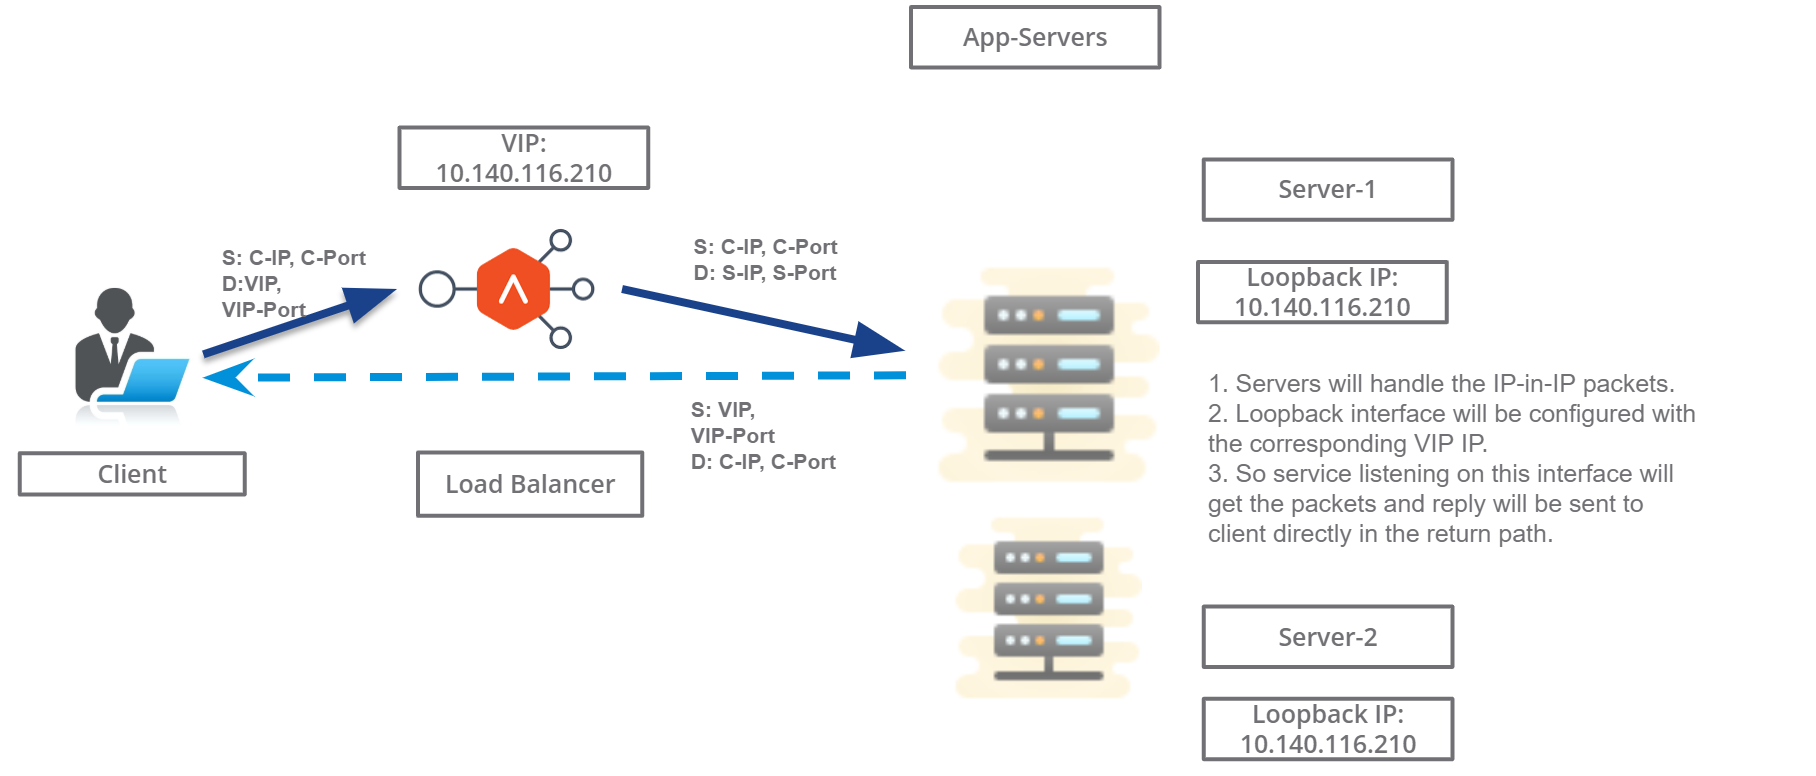
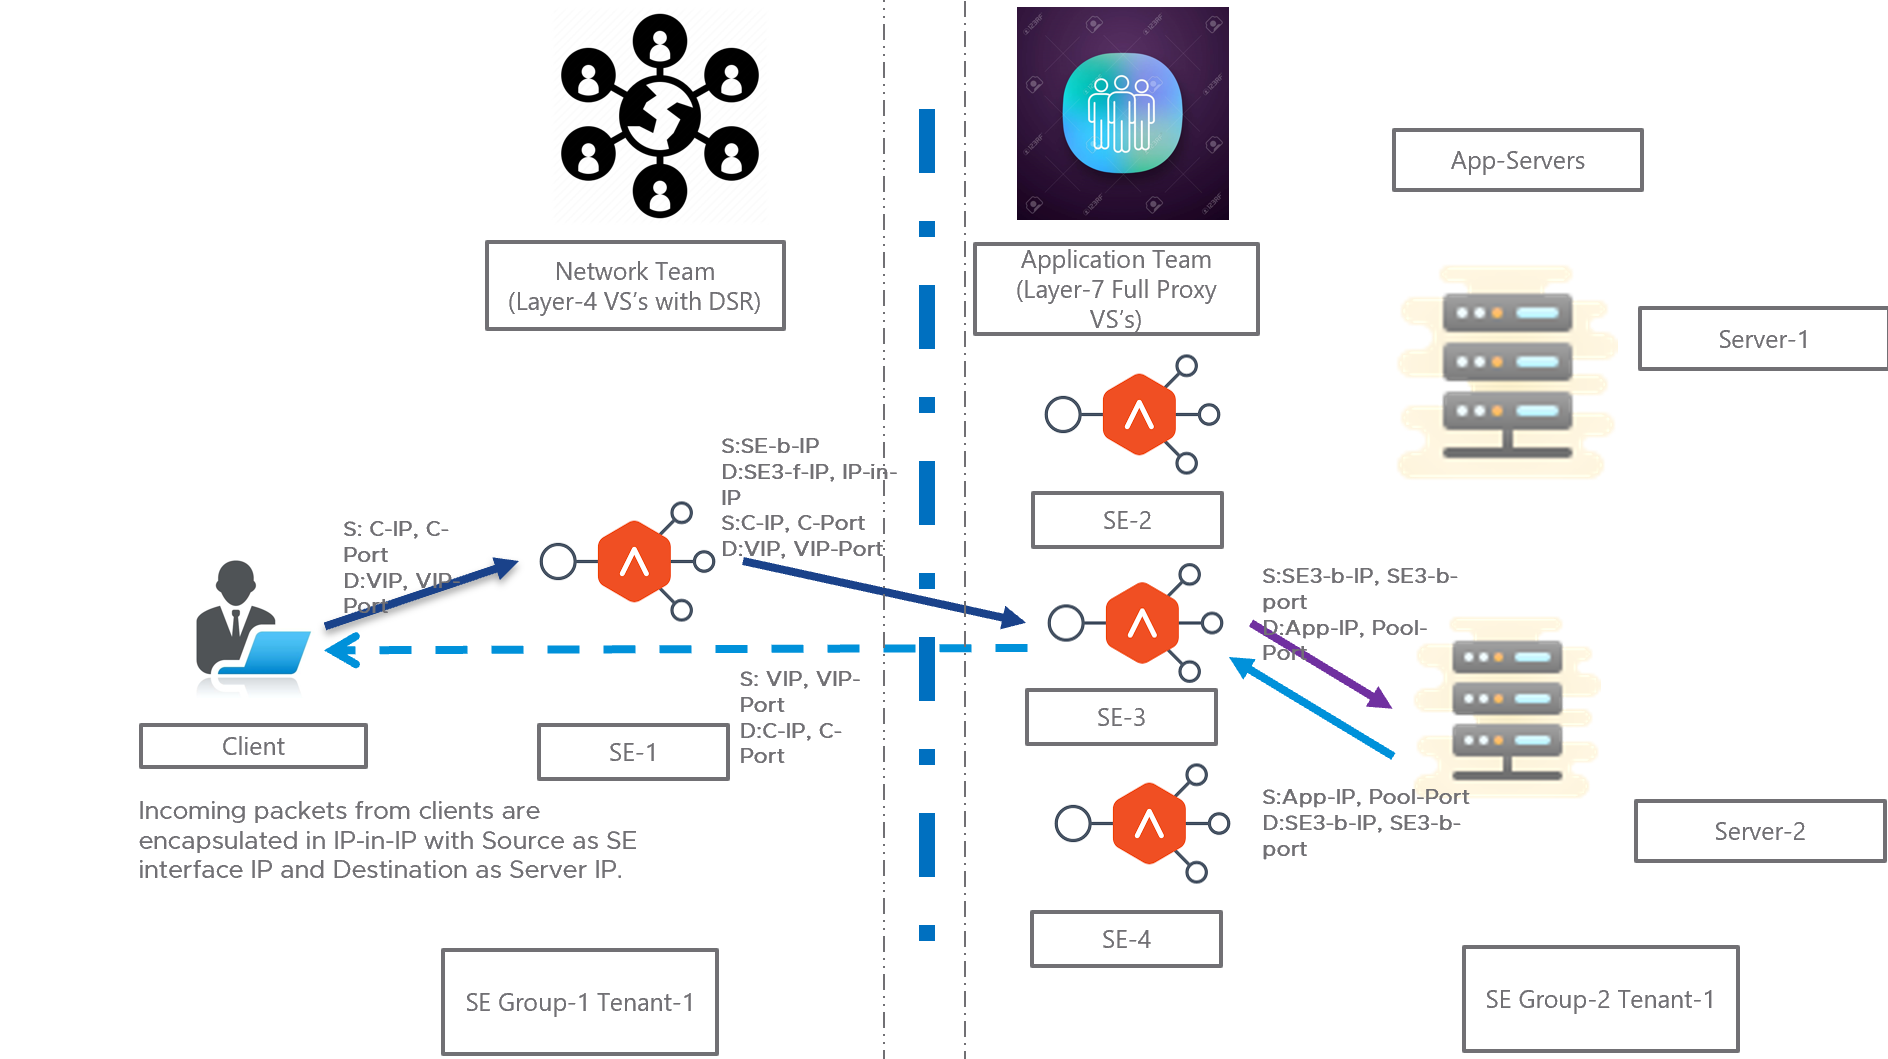
The following diagram exhibits packet flow diagram for Layer 3 DSR.
Notes:
- IP-in-IP tunnel is created from the load balancer to the pool members, which can be a router hop(s) away.
- The incoming packets from clients are encapsulated in IP-in-IP with source as the Service Engine’s interface IP address and destination as the back-end server IP address.
- In the case of the Generic Routing Encapsulation (GRE) tunnel, the incoming packets from clients are encapsulated in a GRE header, followed by the outer IP header (delivery header).
Configuring Network Profile for DSR over TCP using NSX Advanced Load Balancer CLI
Login to the NSX Advanced Load Balancer CLI and use the configure networkprofile <profile name> command to enter into TCP fast path profile mode. Enter the value for the DSR type as dsr_type_l3 and encapsulation type as encap_ipinip or encap_gre.
Run the following command for IPnIP encapsulation:
[admin:10-X-X-X]: > configure networkprofile <profile name>
[admin:10-X-X-X]: networkprofile> profile
[admin:10-X-X-X]: networkprofile profile> tcp_fast_path_profile
[admin:10-X-X-X]: networkprofile profile:tcp_fast_path_profile>dsr_profile dsr_type dsr_type_l3 dsr_encap_type encap_ipinip
[admin:10-X-X-X]: networkprofile profile:dsr_profile> save
[admin:10-X-X-X]: networkprofile> save
This will create the DSR profile (default L3, IPinIP encapsulation).
Run the following command for GRE encapsulation:
[admin:10-X-X-X]: > configure networkprofile <profile name>
[admin:10-X-X-X]: networkprofile> profile
[admin:10-X-X-X]: networkprofile profile> tcp_fast_path_profile
[admin:10-X-X-X]: networkprofile profile:tcp_fast_path_profile>dsr_profile dsr_type dsr_type_l3 dsr_encap_type encap_gre
[admin:10-X-X-X]: networkprofile profile:dsr_profile> save
[admin:10-X-X-X]: networkprofile> save
This will create the DSR profile (default L3, GRE encapsulation).
Configuring Network Profile for DSR over UDP using NSX Advanced Load Balancer CLI
Login to the NSX Advanced Load Balancer CLI and use the configure networkprofile <profile name> command to enter into UDP fast path profile mode. Enter the value for the DSR type as dsr_type_l3 and encapsulation type as encap_ipinip or encap_gre.
Run the following command for IPnIP encapsulation:
[admin:10-X-X-X]: > configure networkprofile <profile name>
[admin:10-X-X-X]: networkprofile> profile
[admin:10-X-X-X]: networkprofile profile> udp_fast_path_profile
[admin:10-X-X-X]: networkprofile profile:udp_fast_path_profile>dsr_profile dsr_type dsr_type_l3 dsr_encap_type encap_ipinip
[admin:10-X-X-X]: networkprofile profile:dsr_profile> save
[admin:10-X-X-X]: networkprofile> save
Run the following command for GRE encapsulation:
[admin:10-X-X-X]: > configure networkprofile <profile name>
[admin:10-X-X-X]: networkprofile> profile
[admin:10-X-X-X]: networkprofile profile> udp_fast_path_profile
[admin:10-X-X-X]: networkprofile profile:udp_fast_path_profile>dsr_profile dsr_type dsr_type_l3 dsr_encap_type encap_gre
[admin:10-X-X-X]: networkprofile profile:dsr_profile> save
[admin:10-X-X-X]: networkprofile> save
Deployment Modes
Tier-1
-
Layer 4 virtual service is connected to application servers which terminate the connections. Pool members are the application servers.
-
Servers handle the IPinIP packets. The loopback interface is configured with the corresponding virtual service IP address. The service listening on this interface receives packets and responds to the client directly in the return path.
Tier-2
- Layer 4 virtual service is connected to corresponding Layer 7 virtual service (which has the same virtual service IP address as Layer 4 virtual service) which terminates the tunnel.
- Layer 4 virtual service’s pool members will be Service Engines of the corresponding Layer 7 virtual services.
- For Layer 7 virtual service, traffic is disabled so that it does not perform ARP.
- Auto gateway is disabled for Layer 7 virtual service.
- Servers are Service Engines of corresponding Layer 7 virtual service.
Packet Flow
-
IPinIP packets reaches to one of the Service Engines of Layer 7 virtual service. That SE will decrypt and handle the IPinIP packet and gives it to the corresponding layer 7 virtual services. The virtual service sends it to the back-end servers.
-
Return packets from the back-end servers are received at the virtual service and the virtual service forwards the packets directly to the client.
-
The following diagram exhibits packet flow for the tier-2 deployment in the Layer 3 mode.
The following are the observations for the above deployment as mentioned in the diagram:
- Layer 4 virtual service is connected to corresponding Layer 7 virtual service (which has the same virtual service IP address as Layer 4 virtual service) which terminates the tunnel.
- Layer 4 virtual service’s pool members will be Service Engines of the corresponding Layer 7 virtual services.
- For Layer 7 virtual service, traffic is disabled so that it does not perform ARP.
- Auto gateway is disabled for Layer 7 virtual service.
- Servers are Service Engines of corresponding Layer 7 virtual service.
- Return packets from the back-end servers are received at the virtual service and the virtual service forwards the packets directly to the client.
Creating Virtual Service and Associating it with the network profile (for Tier-2 deployment)
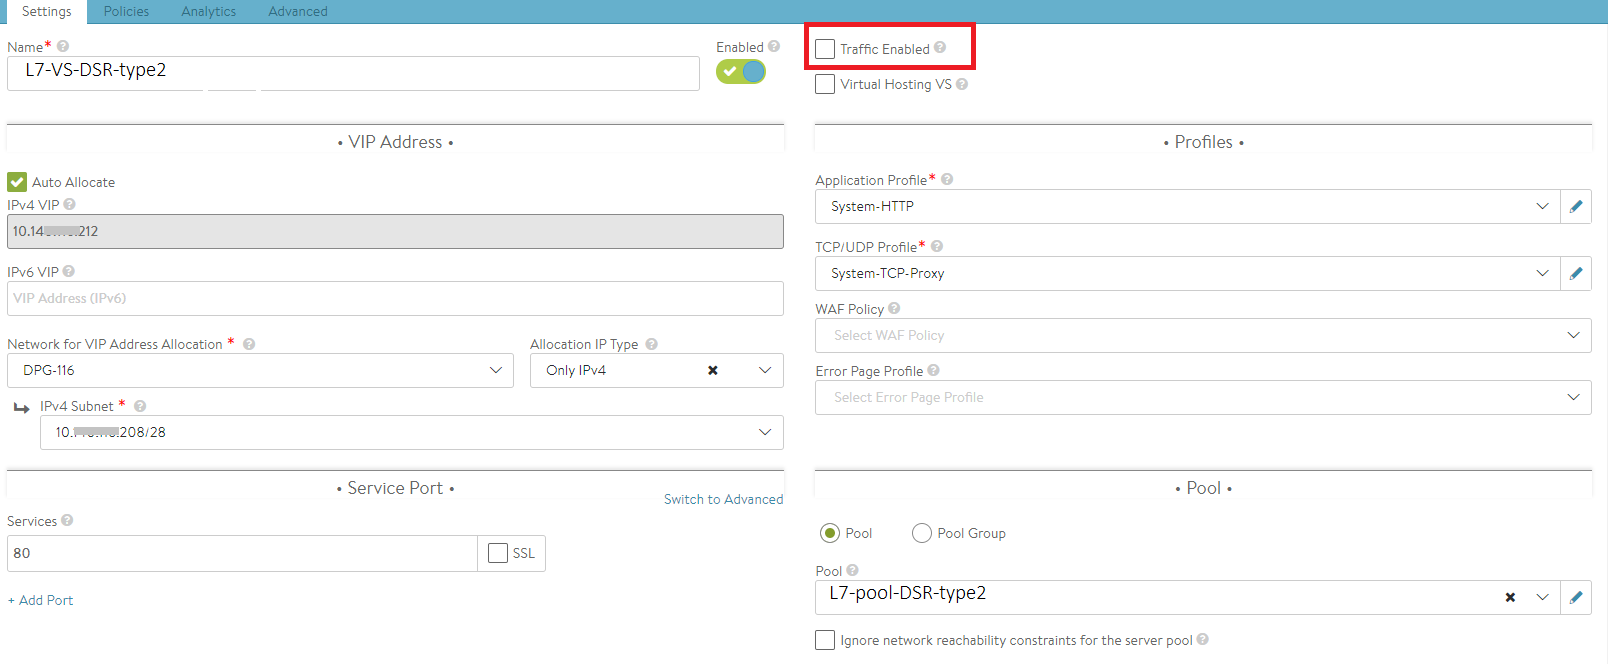
Navigate to Application > Virtual Services and click on create to add a new virtual service. Provide the following information as mentioned below.
- Provide the desired name for the virtual service and IP address.
- Select the network profile created in the previous step for Tier-2 deployment from the TCP/UDP Profile drop-down.
-
Select the pool created for the selected virtual service.
Note: The option for Traffic Enabled should not be checked for the Tier-2 deployment.
Configuring Server
modprobe ipip

ifconfig tunl0 <Interface ip of the server, same should be part of
pool> netmask <mask> up

ifconfig lo:0 <VIP ip> netmask 255.255.255.255 -arp up
echo 1 > /proc/sys/net/ipv4/conf/all/arp_ignore
echo 2 > /proc/sys/net/ipv4/conf/all/arp_announce
echo 2 >/proc/sys/net/ipv4/conf/tunl0/rp_filter

sysctl -w net.ipv4.ip_forward=1
Configuring the loopback interface for Windows
The following commands must be configured on the server to make HTTP health monitor work for Windows servers in the back end:
netsh interface ipv4 set interface "Ethernet0" forwarding=enabled
netsh interface ipv4 set interface "Ethernet1" forwarding=enabled
netsh interface ipv4 set interface "Ethernet1" weakhostreceive=enabled
netsh interface ipv4 set interface "Loopback" weakhostreceive=enabled
netsh interface ipv4 set interface "Loopback" weakhostsend=enabled
In the above steps,
Ethernet0 = Management interface name
Ethernet1 = Data interface name
Loopback = Loopback interface name (VIP)

