Avi Deployment Guide for Google Cloud Platform (GCP)
About Google Cloud Platform (GCP)
Google Cloud Platform is a cloud computing service that offers hosting on the same supporting infrastructure Google uses internally for end-user products such as Google Search and YouTube. Cloud Platform provides developer products to build a range of programs from simple websites to complex applications.
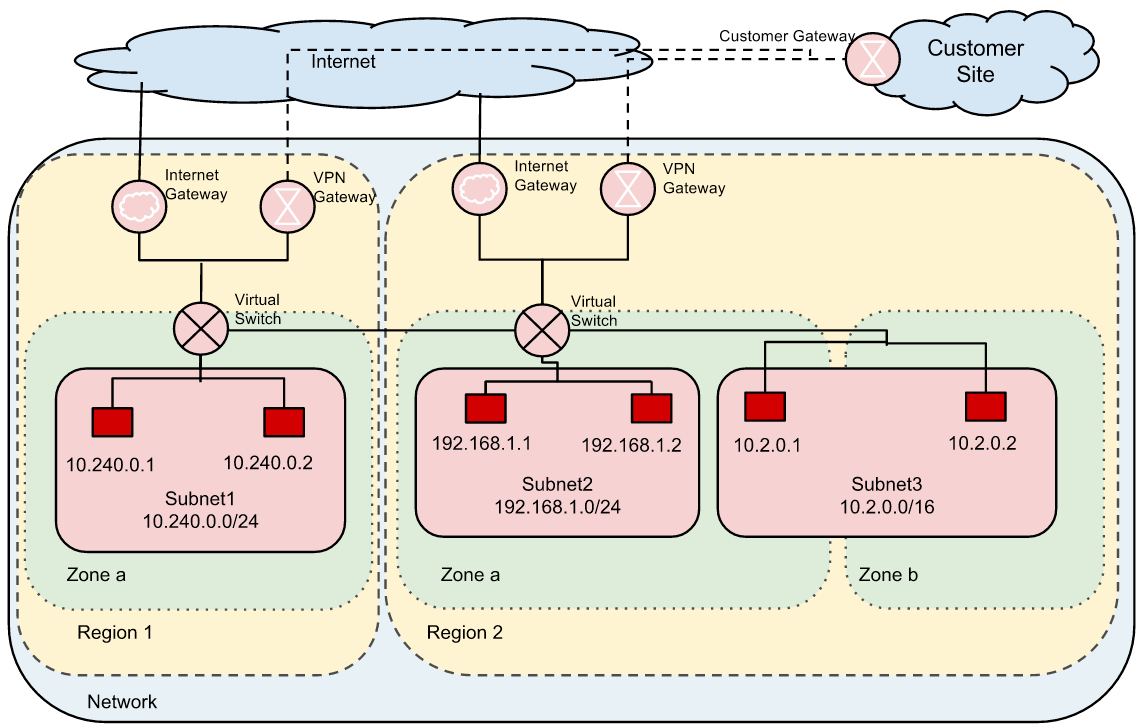
Google Cloud Platform is a part of a suite of enterprise services from Google Cloud and provides a set of modular cloud-based services with a host of development tools, including hosting and computing, cloud storage, data storage, translation APIs and prediction APIs. A sample deployment case would look as below.
Note: Linux Server Cloud and GCP IPAM on GCP are not supported.
About Avi Vantage
The Avi Vantage Platform provides enterprise-grade distributed ADC solutions for on-premises as well as public-cloud infrastructure. Avi Vantage also provides built-in analytics to diagnose and improve the end-user application experience, while making operationalizing easier for network administrators.
Avi Vantage is a complete software solution which runs on commodity x86 servers or as a virtual machine and is entirely accessible via REST API calls.
Purpose of this Guide
Avi Vantage serves as an application delivery controller for application workloads running on Google Cloud Platform (GCP). The purpose of this document is to describe the process of provisioning and configuring an Avi Vantage solution version 18.1.x.
Intended Audience
The document is intended for,
- GCP system administrators, who provision the Avi Vantage solution.
- Network administrators, who configure/operationalize the Avi Vantage solution.
We assume you are familiar with the following. - The basics of load balancing and application delivery
- Basic GCP functionality (find more information here).
Features
Avi Vantage for GCP provides the following functionality.
- Virtual Machines (VMs) are created using standard Google versions (For example, CentOS 7.5). The CentOS image for the base VM is available in the Google repository.
- The Avi Controller and Avi Service Engines (SE) run as Docker containers.
- The SE uses a single interface for control and data traffic. In case of dedicated management, the SE can use two interfaces.
Note: Starting release 18.1.3, an SE can be configured with multiple interfaces. For more information, refer to Configuring Instances with Mutliple Interfaces. - Starting with release 18.1.2, you can create a load balancer with a virtual IP (VIP)from the GCP Virtual Private Cloud (VPC) subnet. For more information, refer to Configuring Avi Vantage in GCP with BYOIP Support.
- The service account authentication mechanism is used. Privilege is inherited on being spawned by an authenticated entity through API cells. The Controller instance should be spawned with a read-write scope, while SEs are spawned with a read-only scope. For more information, refer to GCP Roles and Permissions.
- The only interaction that the Controller has with the Google API is to add a route to the VIP via the instance. The Controller uses query API calls as well. The Controller also interacts with the Google Cloud Platform to program the routes. For a floating IP, a network load balancer is added.
- For SE high availability, only elastic HA modes are supported for SEs. For more information, refer to Elastic HA for Service Engines.
- The GCP Avi Controller instances need access to the GCP API endpoints. This can be achieved through any of the following mechanisms:
- Controller instances having external IP addresses attached to them.
- Controller instances connecting to a network, through a VPN, that has Internet access.
- The Controllers’ subnet is enabled for Private Google Access.
Limitation
- Legacy networking mode is not supported
Provisioning Avi Vantage in GCP
This section discusses the process of provisioning and configuring Avi Vantage with Google Cloud Platform.
Network, Subnet, Instances in Google Cloud
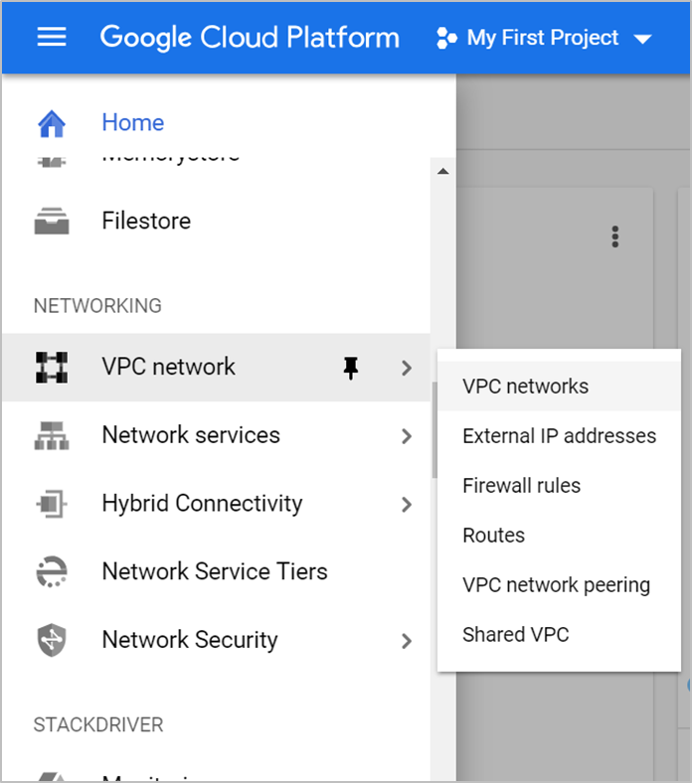
Networking resources help in managing networks, fire walls, and other aspects of your networks and instances. Find networking resources on the left side menu in the GCP console.
Creating Virtual Private Cloud (VPC) Network
A VPC network, sometimes just called a network, is a virtual version of a physical network, like a data center network. It provides connectivity for your compute engine VM instances, Kubernetes engine clusters, and other resources in your project.
To create a VPC network,
- Go to the Google Cloud Platform console via https://console.cloud.google.com.
- Navigate to the project that you have subscribed to.
- Click on VPC network > VPC networks.
- Click on Create VPC Network.
- Enter a Name for the VPC Network.
- Enter the subnet name, IP address range of the network to the VPC network.
Note: Enter only an IP4 address because GCP does not support IPV6. - Click on Create.
The network created is as shown below.
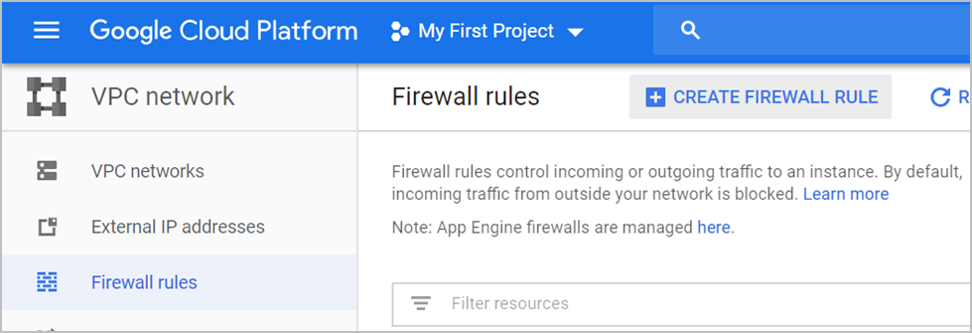
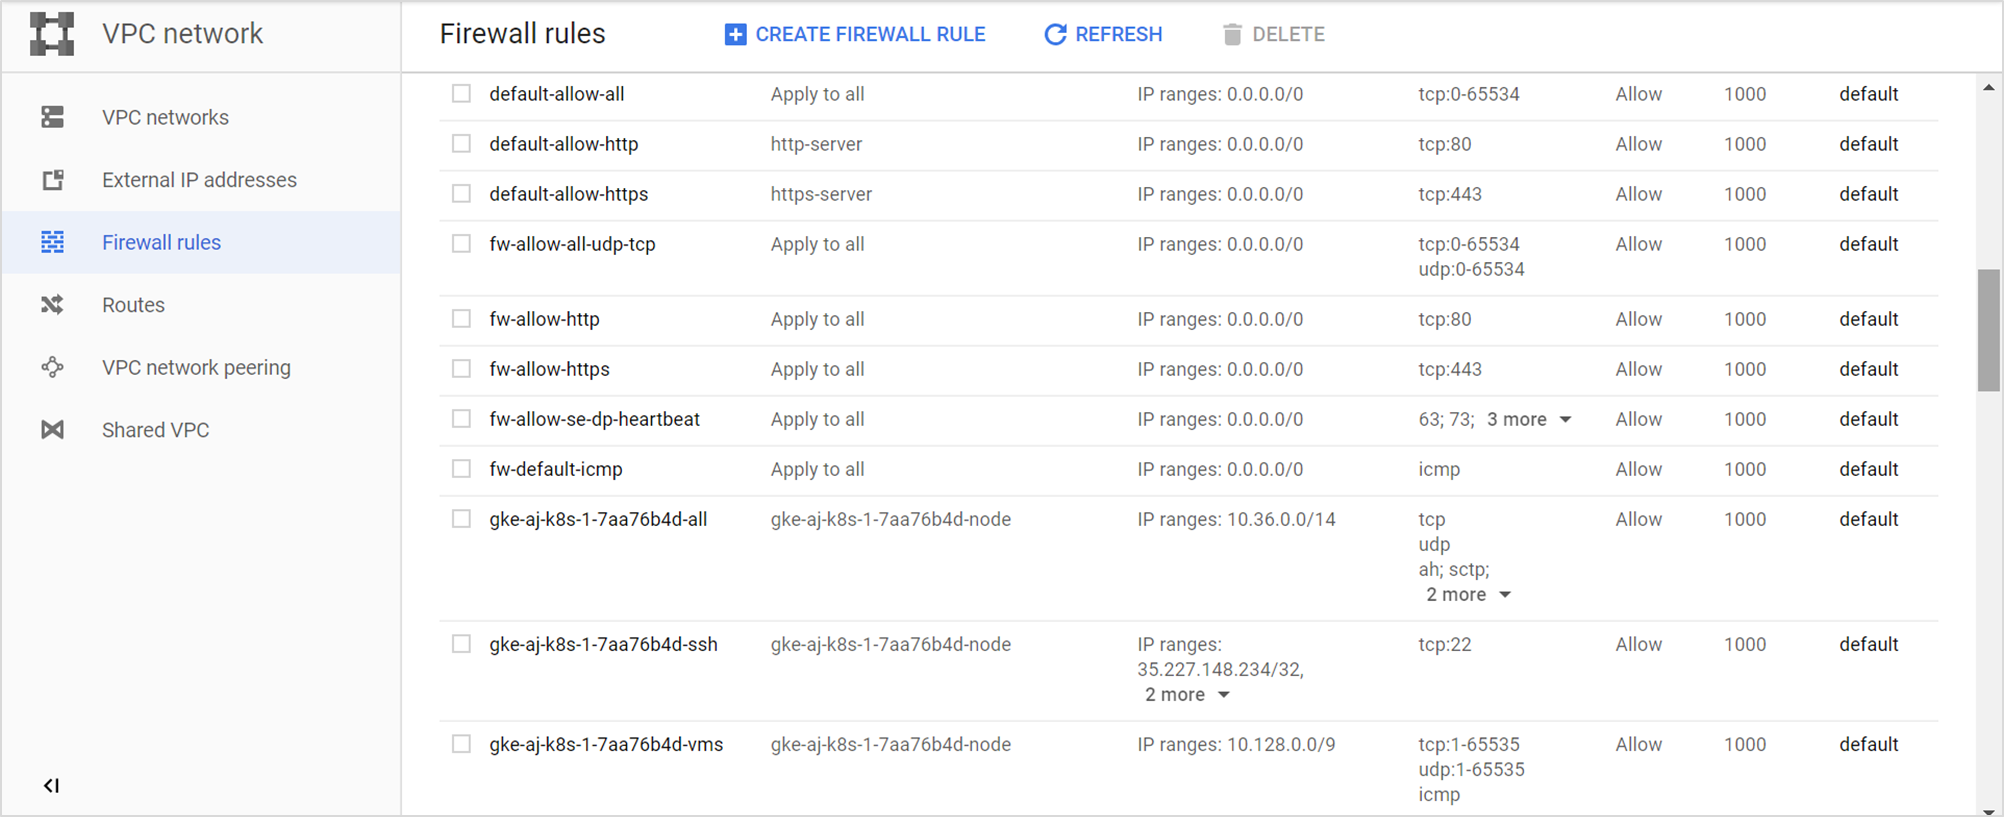
Firewall Rules in GCP
GCP firewall rules let you allow or deny traffic to and from your VM instances. Protocol ports are used by Avi Vantage for management communication as described in Protocol Ports Used by Avi Vantage for Management Communication.
To create firewall rules,
- Click on VPC network under Networking in the left pane > Firewall Rules.
- Click on Create Firewall Rule.
The Create a firewall rule screen appears. Create firewall rules to allow TCP, UDP, and ICMP traffic within the network and HTTP/HTTPS from outside under the respective network.
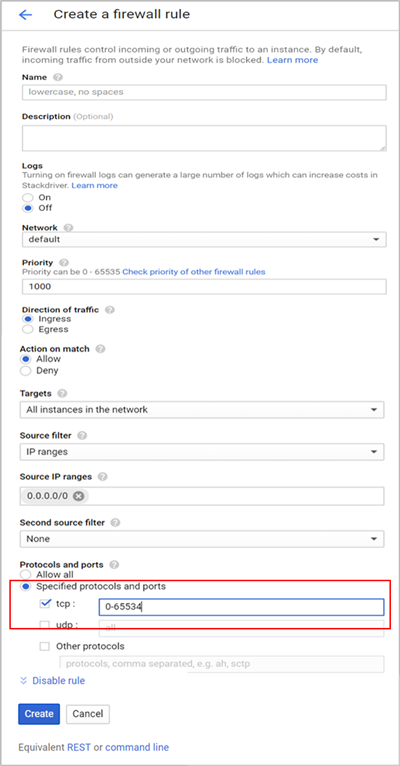
Creating Firewall Rules for All UDP and TCP Traffic
To create rules for all UDP and TCP traffic, configure the fields as shown in the image below and click on Create.
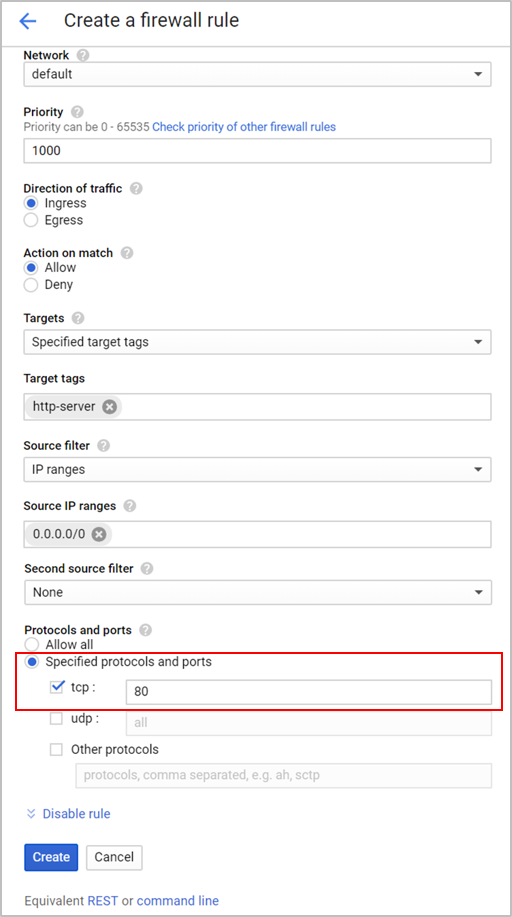
Creating Firewall Rules on TCP port 80 and 443
To create rules on TCP port 80 and 443, configure the fields as shown in the image below and click on Create.
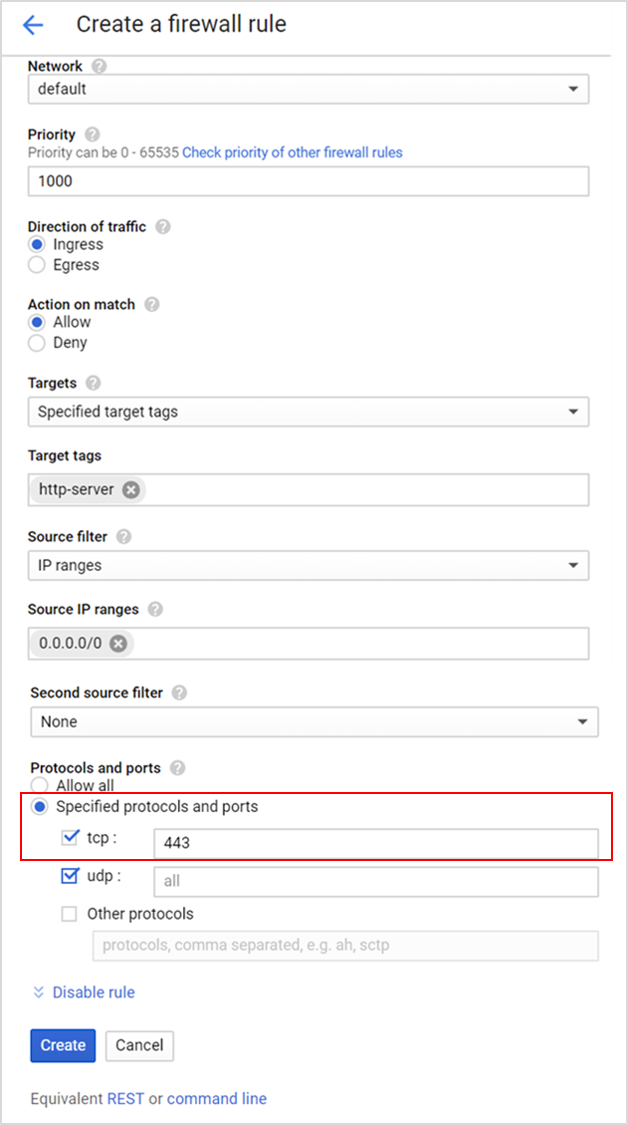
Creating Firewall Rules for ICMP
To create firewall rules for ICMP, configure the fields as shown in the image below and click on Create.
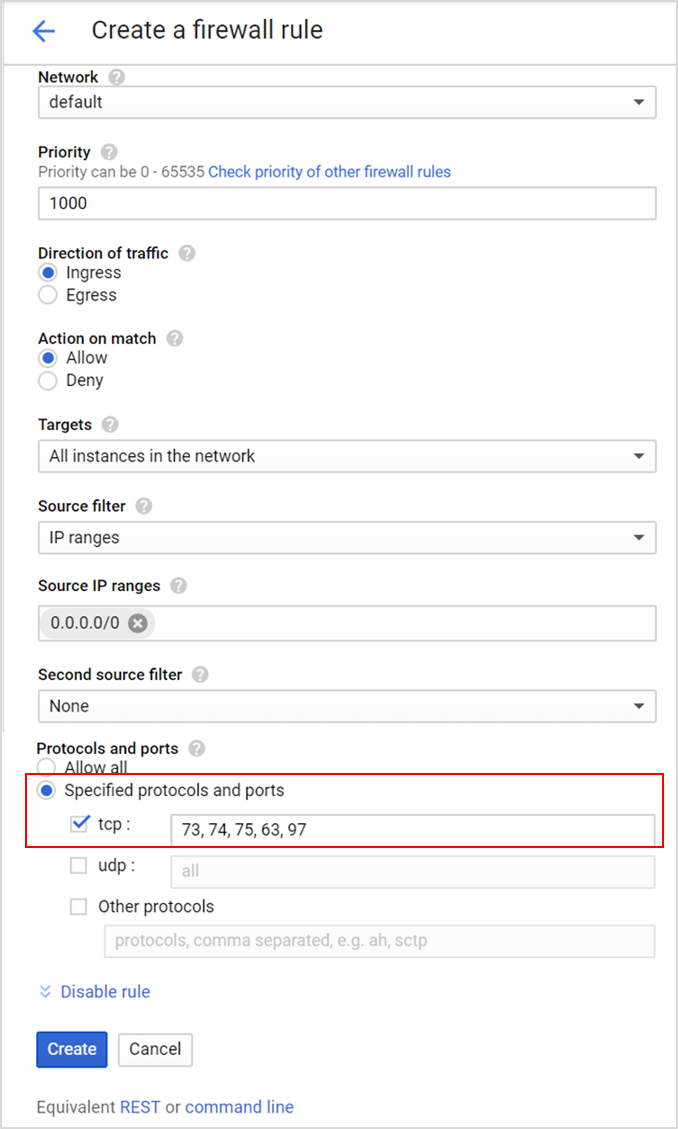
Creating Firewall Rules for Internal SE-to-SE Communication
To create firewall rules for internal SE-to-SE, configure the fields as shown in the image below and click on Create.
The firewall rules created are listed as shown below.
Creating a Controller
To create an Avi Controller instance,
- Navigate to the Google Cloud Platform console and click on Compute engine > VM instances.
- Click on Create Instance.
- Enter the Name for the instance, Region and Zone.
- Select the Machine Type as n1-standard-4 for 4 vCPUs and 15 GB of memory.
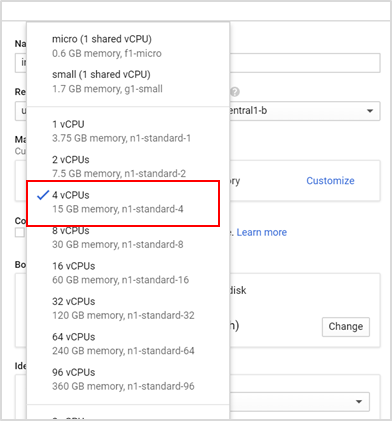
Note: The sizing will vary depending on your scaling requirement. - To choose a different distribution and change the size of the disk, click on Change.
Note: Avi Vantage supports only CentOS and Ubuntu. For more information, refer to the Ecosystem Support article.
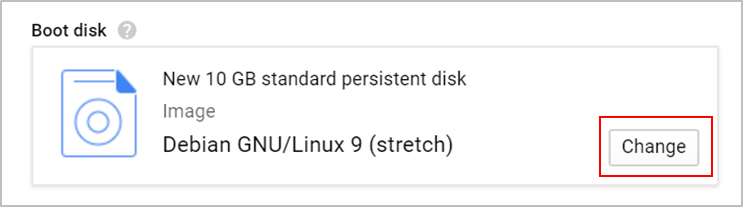
- Select CentOS 7 image and select the boot disk size,(a minimum of 40GB) as required. For more information refer to the Sizing Service Engines article.
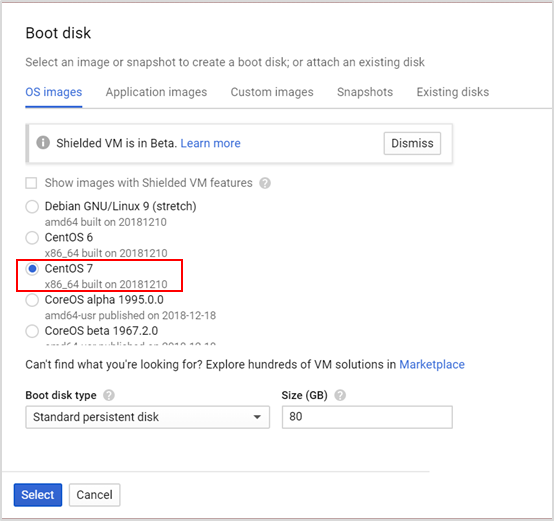
- Click on Select.
- Click on Identity and API access.
Note: Alternatively, the service account authentication mechanism can also be used. Privilege is inherited on being spawned by an authenticated entity through API cells. The Controller instance should be spawned with a read-write scope, while SEs are spawned with a read-only scope. For more information, refer to GCP Roles and Permissions. - Select the required Service Account.
- Select Set access for each API as the Access Scope.
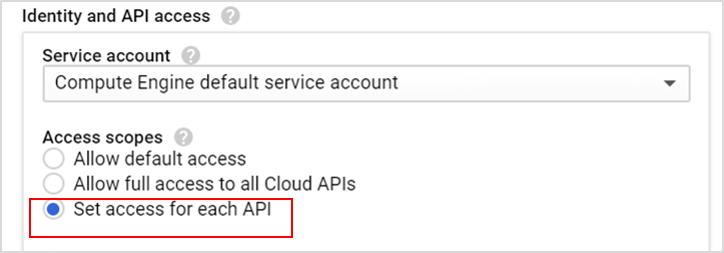
- Select Read Write permissions for compute engine.

- Click on Allow HTTP traffic and Allow HTTPS traffic to permit outside connections.

- Click on the Security tab.
- Copy the public key from the machine which will be used for initiating SSH and paste them into the text box.
The Avi Controller is created with an external and an internal IP address from the network range specified while creating the networks.
Note: Google Cloud Platform does not allow serial console access to the created instance if an external IP is not allocated. Serial console access is not required for installing or operating Avi Vantage but may be useful for troubleshooting. - Click on the Create button.
Creating a Server Instance
The server instance should be running a server to accept traffic on specific ports on which the VS would be created.
To create a server instance,
- From the GCP console, click on Go to Compute Engine.
- Click on Create Instance in the VM Instances page.
- Enter the Name of the instance and the Zone in which the server will be created.
- Select the Machine Type as n1-standard-4 for 4 vCPUs and 15 GB of memory.
Note: The sizing will vary depending on your scaling requirement. - To choose a different distribution and change the size of the disk, click on Change. Note: Avi Vantage supports only CentOS and Ubuntu. For more information, refer to the Ecosystem Support article.
- Under Identity and API access, click on Set access for each API.
- Select Read Only permissions under Compute Engine. Note: Alternatively, the service account authentication mechanism can also be used. Privilege is inherited on being spawned by an authenticated entity through API cells. The Controller instance should be spawned with a read-write scope, while SEs are spawned with a read-only scope. For more information, refer to GCP Roles and Permissions.
- Click on Allow HTTP traffic under Firewall to permit outside connections.
- Click on Networking > Network Interfaces.
- Enter the network and subnetwork details.
- Set IP forwarding to On.
- Copy the public key from the machine which will be used for initiating SSH.
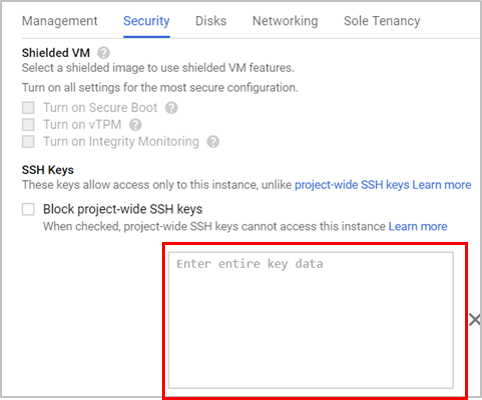
- Click on the Security tab and click on Add Item under SSH Keys.
- Paste the key in the text box shown below.
- Click on Create.
Similarly, create a client instance with the required specifications.
Creating an SE VM Instance
To create an SE VM instance,
- From the GCP console, click on Go to Compute Engine.
- Click on Create Instance in the VM Instances page.
- Enter the Name of the instance and the Zone in which the server will be created.
- Select 1 vCPU as the Machine Type with 3.75 GB memory.
- Select a boot disk with either Ubuntu 16.04 LTS or Debian GNU/Linux 9 (stretch) as OS image. For more information, refer to the Ecosystem Support article.
- Under Identity and API access and click on Set access for each API.
- Select Read Write permissions under Compute Engine.
- Click on Allow HTTP traffic and Allow HTTPS traffic under Firewall to permit outside connections.
- Click on Networking > Network Interfaces.
- Enter the network and subnetwork details.
- Set IP forwarding to On.
- Copy the public key from the machine which will be used for initiating SSH.
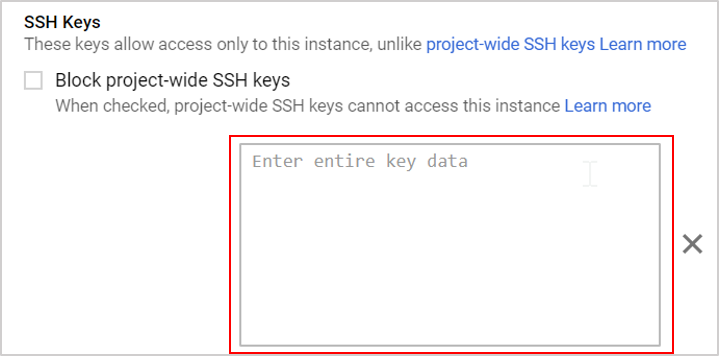
- Click on the Security tab and click on Add Item under SSH Keys.
- Paste the key in the text box shown below.
- Click on Create.
Preparing the Instances
Turning on yum-cron
For this, the instance needs to be on CentOS 7.5.
Installing Docker
- To configure a docker repository, create the file
docker.repo under /etc/yum.repos.d/[localhost@avi-controller ~]$ sudo vim docker.repo [docker-main] name=Docker Repository baseurl=https://yum.dockerproject.org/repo/main/centos/7/ enabled=1 gpgcheck=1 gpgkey=https://yum.dockerproject.org/gpg - Verify the instances are running on CentOS 7.5
[localhost@avi-controller ~]$ cat /etc/centos-release CentOS Linux release 7.5.1611 (Core) - Install and start docker on all five instances.
sudo yum update -y sudo yum install -y epel-release sudo yum install -y yum-utils sudo yum-config-manager --add-repo https://download.docker.com/linux/centos/docker-ce.repo sudo yum install -y docker-ce sudo systemctl enable docker sudo systemctl start docker (Lock release ) head -n1 /etc/centos-release | awk ' {print $4} ' > /etc/yum/vars/releasever - To remain on the current release of CentOS/RHEL, lock the Linux System to the specific OS version. To know more, refer to Locking a Linux System to a Specific OS Version.
For more information, refer to Docker storage drivers.
As shown below, devicemapper is configured with loopback. This is suitable for a proof of concept and not for production environment. It is recommended to use overlay2 as the recommended storage driver for production. For example,
root@cnu-bm6 ~]# docker info
Containers: 1
Running: 1
Paused: 0
Stopped: 0
Images: 1
Server Version: 17.12.1-ce
Storage Driver: overlay2
Backing Filesystem: xfs
Supports d_type: true
Native Overlay Diff: true
Logging Driver: json-file
Cgroup Driver: cgroupfs
Plugins:
Volume: local
Network: bridge host macvlan null overlay
Log: awslogs fluentd gcplogs gelf journald json-file logentries splunk syslog
Swarm: inactive
Runtimes: runc
Default Runtime: runc
Init Binary: docker-init
containerd version: 9b55aab90508bd389d7654c4baf173a981477d55
runc version: 9f9c96235cc97674e935002fc3d78361b696a69e
init version: 949e6fa
Security Options:
seccomp
Profile: default
Kernel Version: 3.10.0-693.21.1.el7.x86_64
Operating System: CentOS Linux 7 (Core)
OSType: linux
Architecture: x86_64
CPUs: 8
Total Memory: 15.51GiB
Name: cnu-bm6
ID: V2GA:L7IT:NW6S:FSDD:JLO2:OIGX:USQQ:UGXQ:BUA3:MYU3:O6JB:FQYX
Docker Root Dir: /var/lib/docker
Debug Mode (client): false
Debug Mode (server): false
Username: abcd
Registry: https://index.docker.io/v1/
Labels:
Experimental: false
Insecure Registries:
127.0.0.0/8
Live Restore Enabled: false

WARNING: bridge-nf-call-iptables is disabled
WARNING: bridge-nf-call-ip6tables is disabled
[root@cnu-bm6 ~]#
If the instance is spawned for Ubuntu, sshguard must be configured, as explained below. sshguard can take allowed from files when the -w option argument begins with a ‘.’(dot) or a ‘/’(slash). Given below is a /etc/list, a sample allowed file.
# comment line (a '#' as very first character)
# a single IPv4 and IPv6 address
1.2.3.4
2001:0db8:85a3:08d3:1319:8a2e:0370:7344
#   address blocks in CIDR notation
127.0.0.0/8
10.11.128.0/17
192.168.0.0/24
2002:836b:4179::836b:0000/126
#   hostnames
rome-fw.enterprise.com
hosts.test.com
The following is a snippet of sshguard referencing the test file.
sshguard -w /etc/test
Testing Server on the Server Instance
To test the instance, start a webserver listening on ports as configured for the virtual service to be used as a pool server as shown in the example below.
sudo docker run -d -p 80:80 avinetworks/server
Configuring Avi Vantage (Method 1)
- Install/run the Avi Controller on the instance created. For instructions, refer to Installing Avi Vantage for a Linux Server Cloud
- In Avi Vantage, navigate to Infrastructure > Dashboard.
-
Ensure the SE Status is green as shown in the image below.
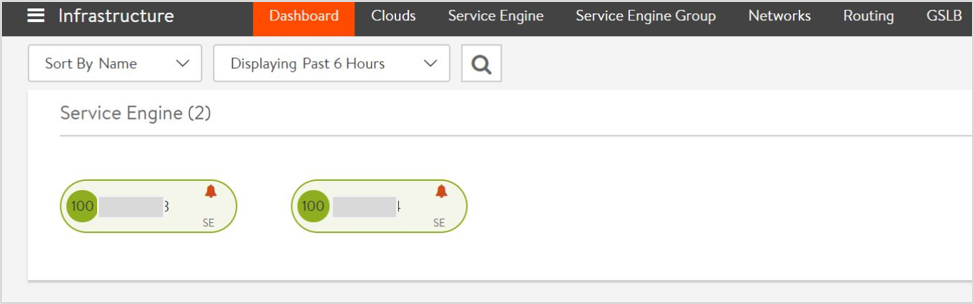
Starting with NSX Advanced Load Balancer 22.1.3, the following screen is displayed: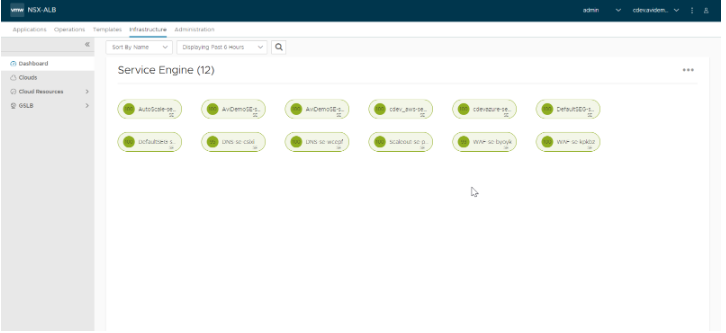
sshinto the Avi Controller instance,execto the Controller and start the Avi shell. Type this command to list the container id to be used.
sudo docker ps
sudo docker exec -it [container_id] bash
shell
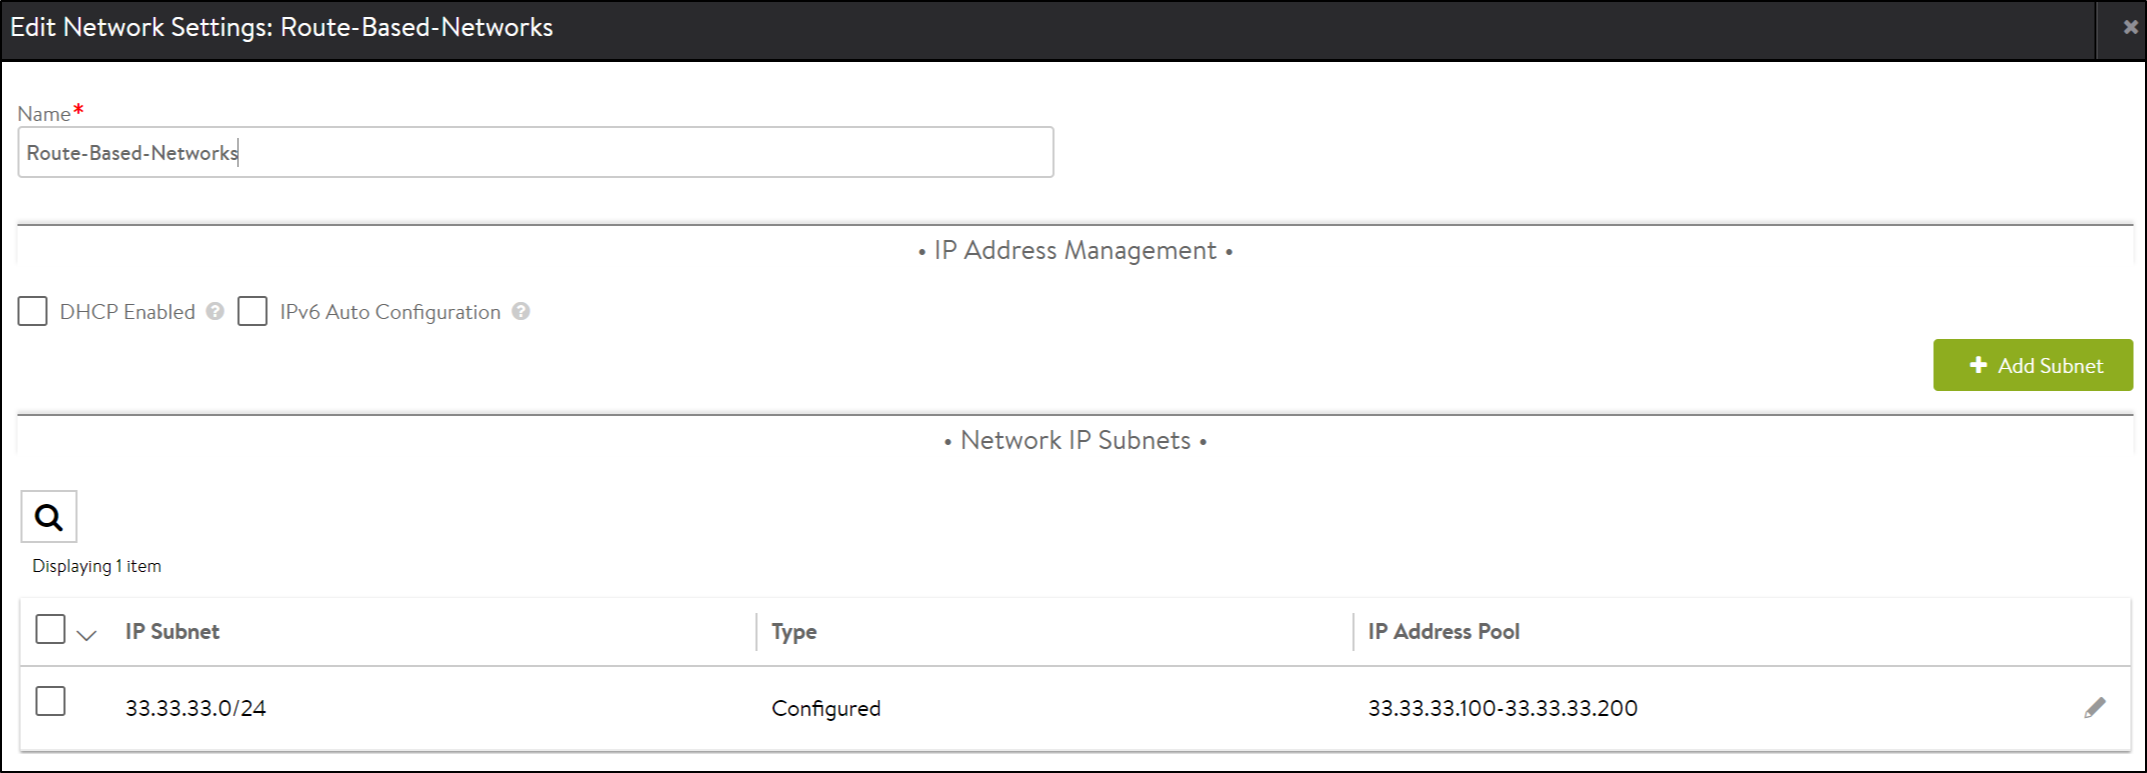
- Create a network with an IP address pool for VIP allocation. In Avi Vantage, navigate to Infrastructure > Networks > Create.
-
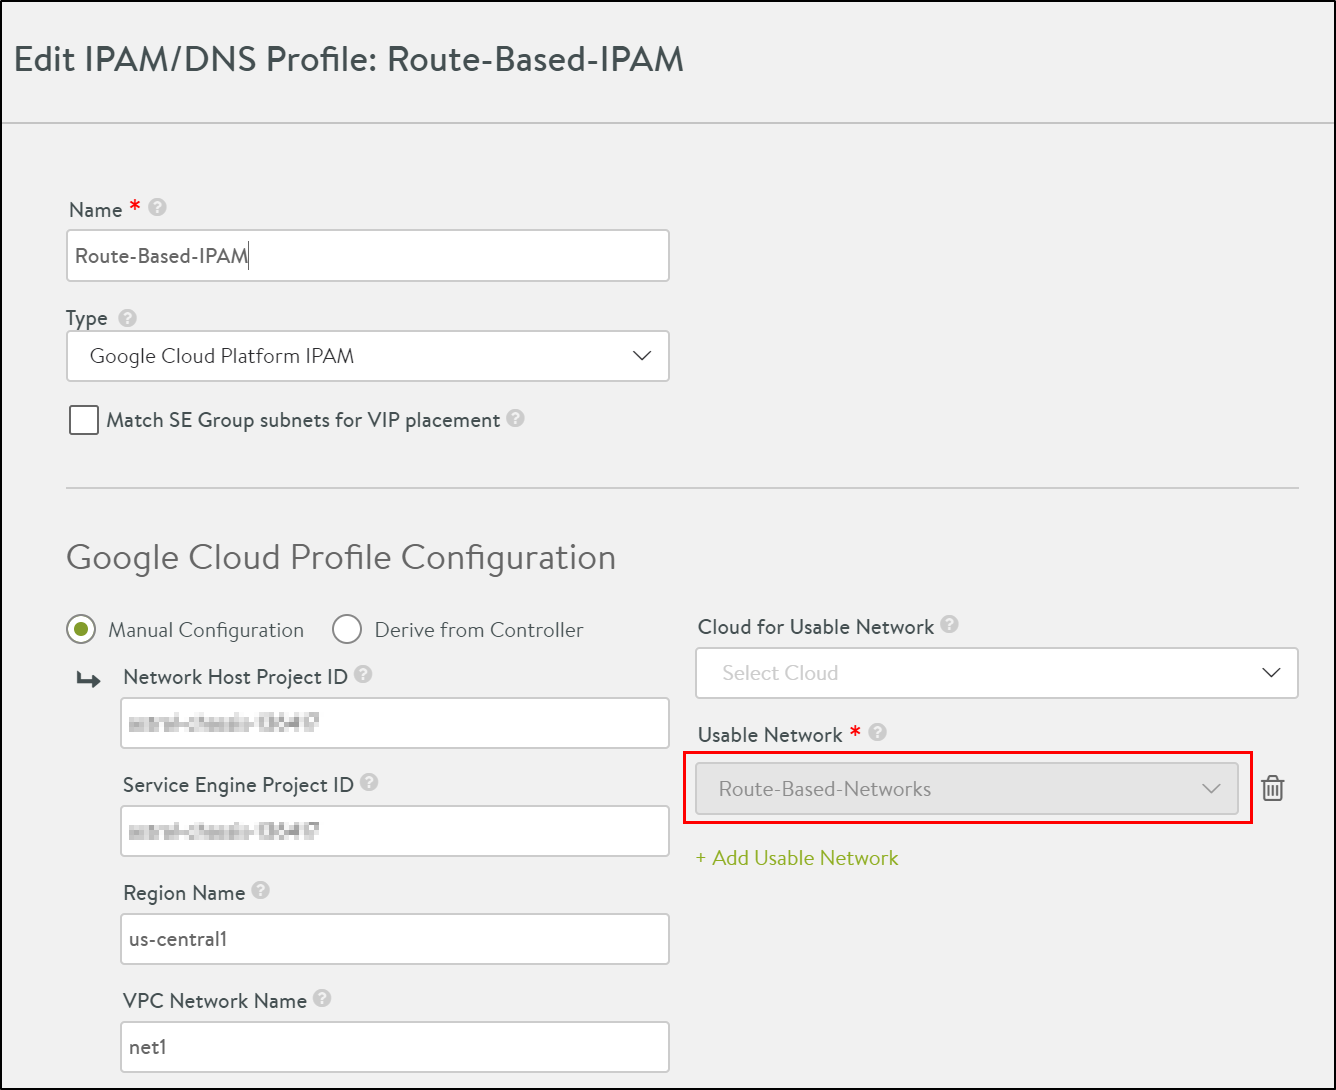
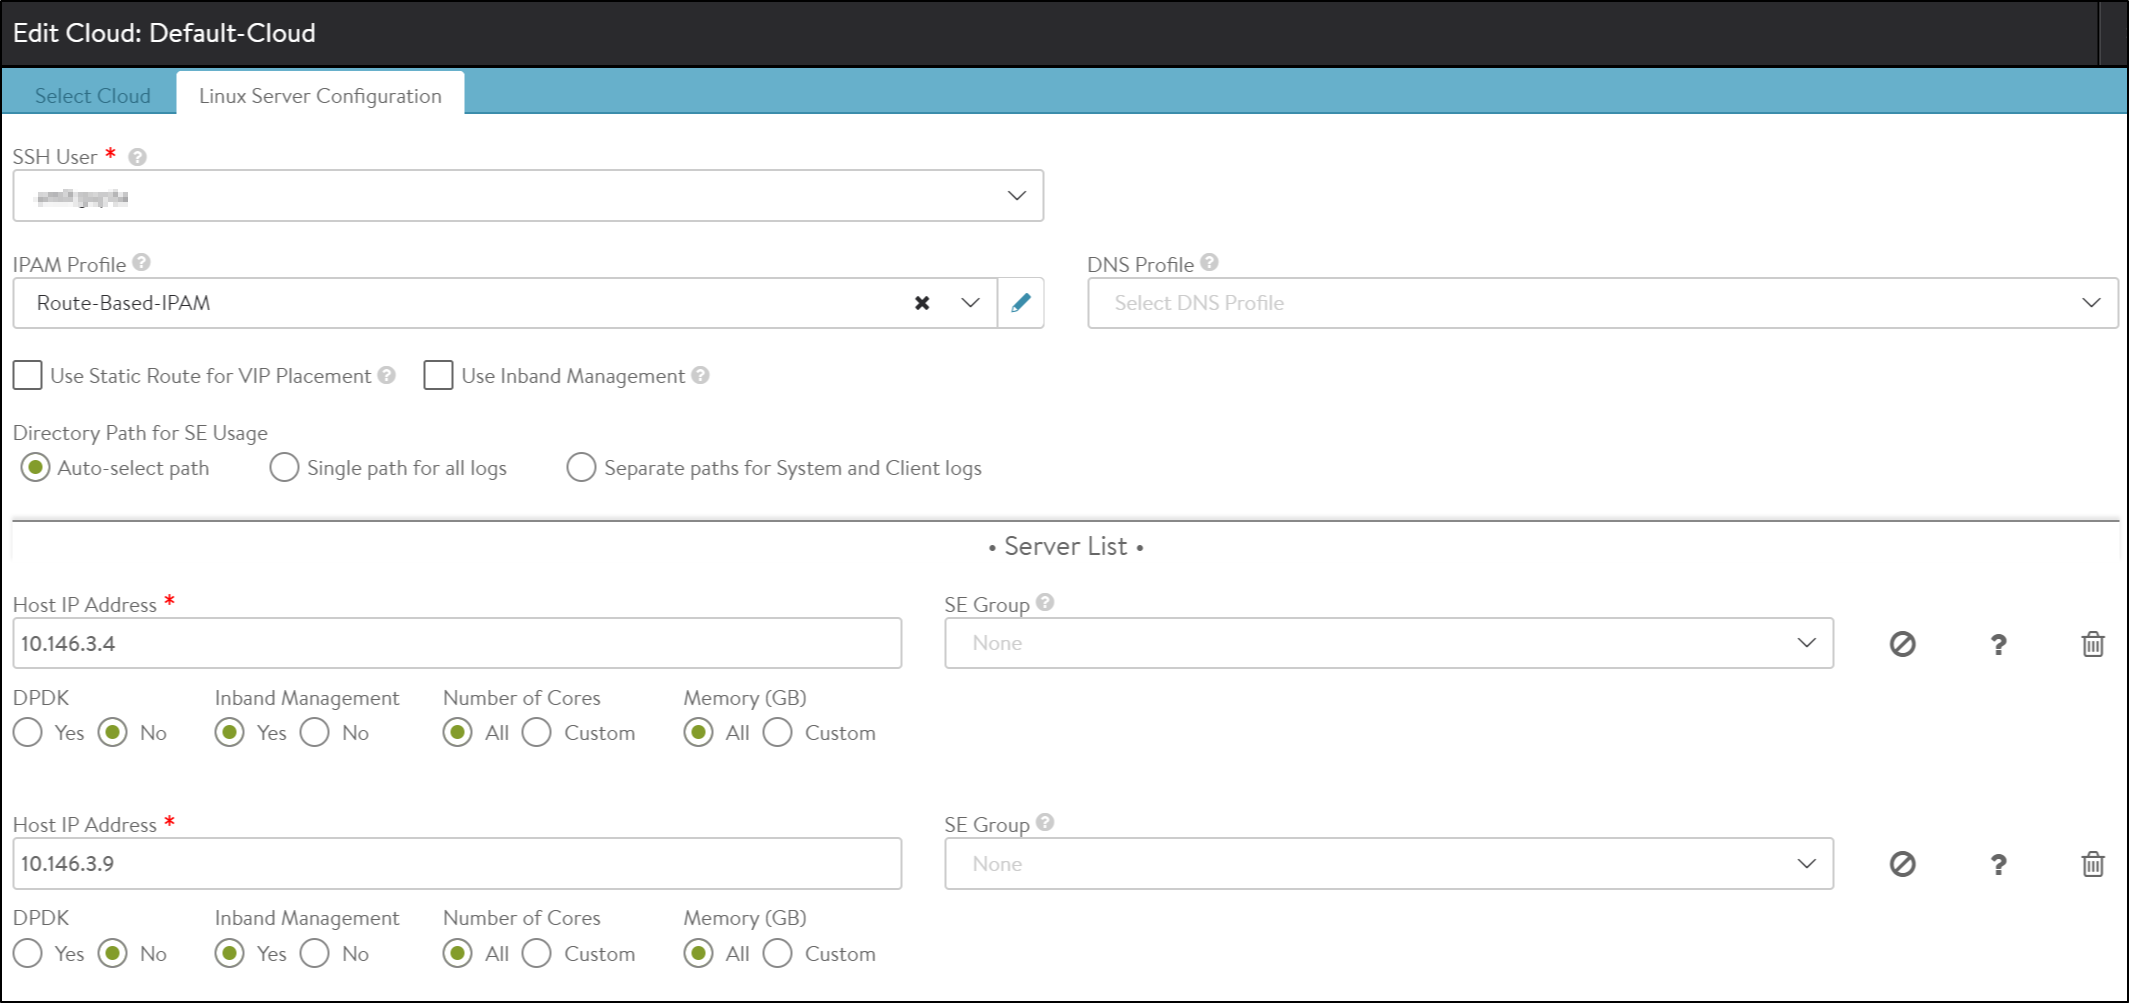
Navigate to Templates > Profiles > IPAM DNS Profiles and create IPAM as shown below.
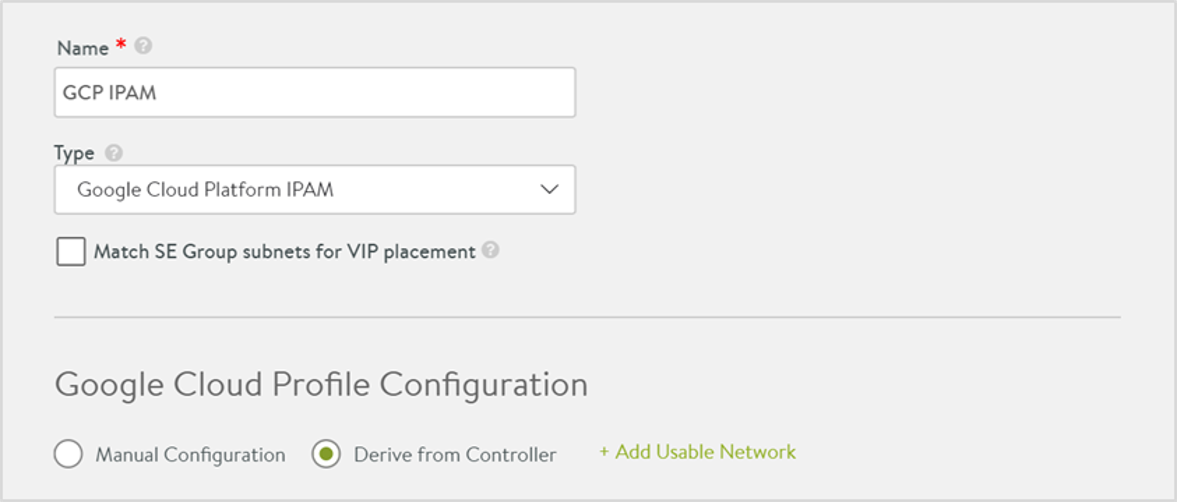
Starting with NSX Advanced Load Balancer 22.1.3, the following screen is displayed: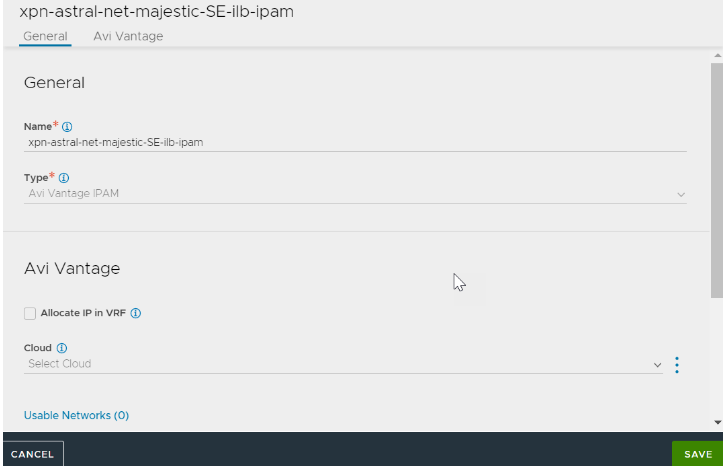
- Go to Infrastructure > Clouds.
- Edit the Default cloud and select the Cloud Infrastructure Type as Linux.
- Click on Next.
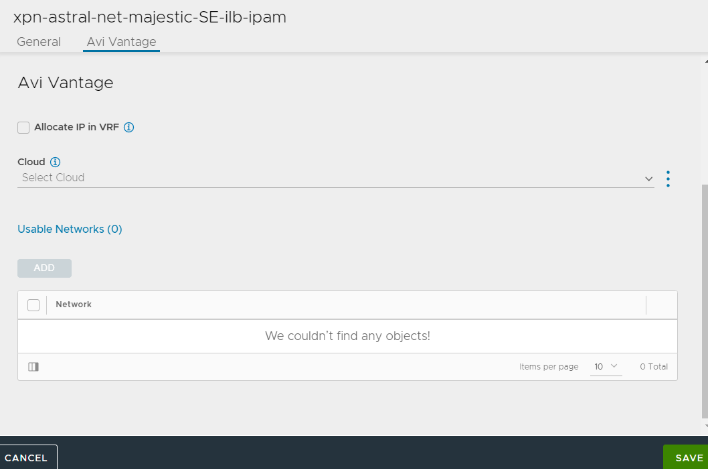
- In the Linux Server Configuration screen, select GCP as the IPAM Profile.
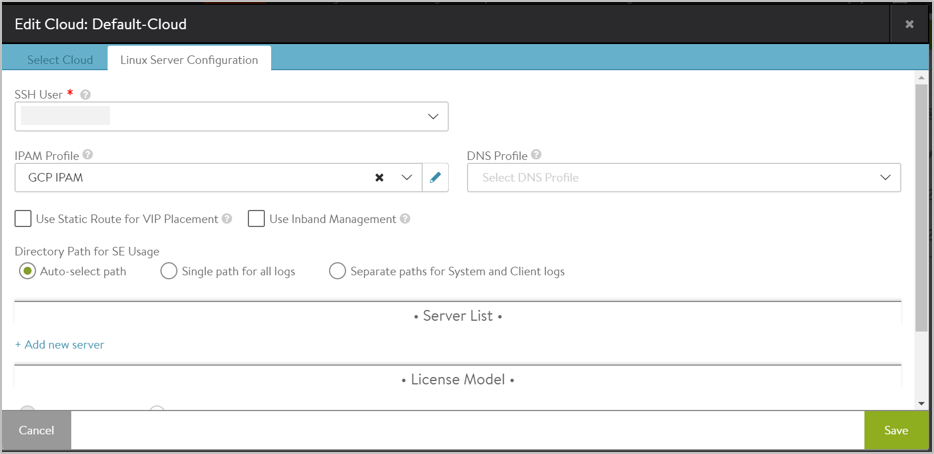
Starting with NSX Advanced Load Balancer 22.1.3, the following screen is displayed:
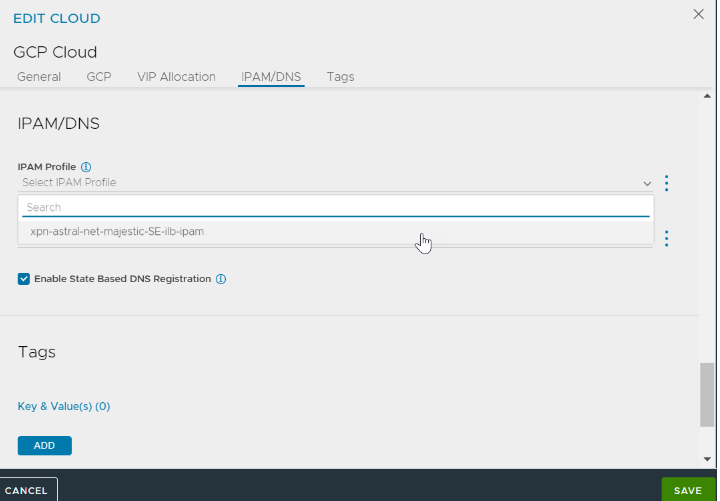
- Navigate to IPAM/DNS tab.
- Select the GCP IPAM profile for the IPAM Profile field.
-
Click *SAVE**.
For more information on GCP refer to IPAM Provider (Google Cloud Platform).
Adding SE to the Cloud
Create a network profile and attached it to the IPAM as shown below.
To add an SE to the cloud, navigate to Infrastructure > Clouds and configure the LSC cloud as shown below.
Starting with NSX Advanced Load Balancer 22.1.3, the following UI is available:
To know more, refer to Adding Avi Service Engines to a Linux Server Cloud.
Installing and Configuring the Avi Controller and Service Engines (Method 2)
Alternately, if the Controller service file is already created, fresh start a Controller with a setup.jsonfile to configure a Linux server cloud with a GCP IPAM profile and a network for VIP allocation.
- Copy the setup.json file shown below to /opt/avi/controller/data on the host (assuming /opt/avi/controller/data is the volume used for the Controller in the service file).
- Modify ssh keys, username, network subnets and network/IPAM names as appropriate.
{
   "CloudConnectorUser": [
       {
           "name": "rangar",
           "tenant_ref": "admin",
           "public_key": "ssh-rsa AAAAB3NzaC1yc2EAAAADAQABAAABAQC9ZZWDLSl/PJHWA8QuDlfDHJuFh6k55qxRxO28fSRvAEbWCXXgXdnH8vSVVDE
Mo0brgqrp+vful2m7hNm0TPv8REbT2luVeWo+G0R1hxzdALzI8VmMBxX2VduKZ5Zrh3C9GKxaUYb4R2hzLaYKUBQnFa2B0YWiAfC3ow71fwwgb7cVhxExTyhhF01gY
9Tcb3w9uugv3vXNzyxDssHXtwY60WcVUIK1L+8SqXu/r6YUG8j4IsaYkXJHBE6CHPwDg4uwRG35IkfhsIg0KtKRwpzHbhOx0qRjG9ZaVc0SnfMIHmdAFwXpDpi/AKV
NAmjkix2GIPIi1OISnEngSjnugVb7\n",
           "private_key": "-----BEGIN RSA PRIVATE KEY-----\nMIIEowIBAAKCAQEAvWWVgy0pfzyR1gPELg5XwxybhYepOeasUcTtvH0kbwBG1gl1\
n4F3Zx/L0lVQxDKNG64Kq6fr37pdpu4TZtEz7/ERG09pblXlqPhtEdYcc3QC8yPFZ\njAcV9lXbimeWa4dwvRisWlGG+Edocy2mClAUJxWtgdGFogHwt6MO9X8MIG+
3FYcR\nMU8oYRdNYGPU3G98PbroL971zc8sQ7LB17cGOtFnFVCCtS/vEql7v6+mFBvI+CLG\nmJFyRwROghz8A4OLsERt+SJH4bCINCrSkcKcx24TsdKkYxvWWlXNE
p3zCB5nQBcF\n6Q6YvwClTQJo5IsdhiDyItTiEpxJ4Eo57oFW+wIDAQABAoIBAFu7XeUA9L5ZmdDs\nVhJwg/VOX80W3dHbdc7M8NCAVCsnGSgFwQAAtMBxXiENfAx
A8NKUoS9ejMMUtvNJ\n7x+ywcF3WE63ze/htKGMF2ZNIJ+yAb3Zl6OIswxynTi131cJbINJ9gBwyExsWZyf\nmXIZQwmDKFxeHLlQ80QeR9qDxF3Ypyz7vdEtQMtpI
3JQJMbUX6dmQm0UtOKi5tL8\nzkskZJHnaqwJlem92Zon7S8PIflsPevsAmDrTPbmxIL6Z3KlJkoLzTcWefA6E19N\nw4JmylQokAWiqQ1il+qrcITIZGhsZre081N
wjHkzzA8kdb4EUO0nhy7rzbmS67TN\n08Fe0RECgYEA98WaJR5k/r8VBlKEQTErye29cJmkr0w5ZPX+bwko+ejj2S2vqpJc\nuR0YO3q5zY5a4A/33X/vke+r1bNPr
p9QSnBscFvA/AEXGAiAeuCsuB+pw8C3N5C5\ncTzKNFx1c2KXbejRkhvL9gz5tJZpdHIqzbGQmwEiNFqnYy6BPbhTm8UCgYEAw6+2\n5WvAGH9Ub+ZfySoeNNaxXfI
DvXA2+G/CBg99KYuXzWWmeVx9652lc4Gv+mxhFiJd\nilMfWljlb+f1G5sJnZ3VMKSf/FF¬¬6Mo8MsnAkvjnVWBoezo2sVzu+9g3qGRXNTtRM\nSH1N/eWPeJGwD+Vyk
D3r8K+iag7cMhrLpGPWk78CgYARatumJlfVLJuOwTg42PsK\nC+NYSgSwqfwS49QJ/CvcPYne135U0EsiXDA65iqvj4VF4Pl8oaS2rpF2yU8dqGdd\nhD+rOlf7nxv
/fYGCoc6idt9ZOm/mwQ64LhzMx38eKF0axdYNnlSdLFZVYolxPSFT\nKltO+ipsYb8IktlU/GMsPQKBgQCeirlqzM64yki11Hcce3Q3qQ3QqGihTc4roBgZ\nYuksB
L37mnSy9N3MTFAk8hiKks5h6XvRuyC2yTkyXkL2l7jFq39zRp2cBsMzPTSz\nSSpruF2CYL8+6AeOMYi4v3M/2asaR+R6ApNytk90Bs0XQ/V6qcCDozi6Jsn+Cjmd\
nOYo67wKBgAcUFRHUX4VwCUZAAIxyTM+efpf5z8dKHh/iJA6rtqcTi4vHddEJinT6\ntOiqXjciZEKqZ08GtImIPtuhIBO0m10fCfcjrGxGz2+N9o8fyNvFWU83kG9
IXSq8\nU1YOIYvXwWFQLWIUvyOgnyT4bW0OLa8OrJEq1/DaH8gpvvFi8qRK\n-----END RSA PRIVATE KEY-----\n"
       }
   ],
   "IpamDnsProviderProfile": [                                                                                      [39/5306]
       {
           "name": "gcp",
           "type": "IPAMDNS_TYPE_GCP",
           "tenant_ref": "admin",
           "gcp_profile": {
               "usable_network_refs": [
                   "/api/network/?name=net1"
               ]
           }
       }
   ],
   "Network": [
       {
           "name": "net1",
           "tenant_ref": "admin",
           "cloud_ref": "admin:Default-Cloud",
           "configured_subnets": [
               {
                   "prefix": {
                       "ip_addr": {
                           "type": "V4",
                           "addr": "10.9.0.0"
                       },
                       "mask": 24
                   },
                   "static_ranges": [
                       {
                           "begin": {
                               "type": "V4",
                               "addr": "10.9.0.2"
                           },
                           "end": {
                               "type": "V4",
                               "addr": "10.9.0.254"
                           }
                       }
                   ]
               }
           ]
       }
   ],
   "SeProperties": [
       {
           "se_runtime_properties": {
               "global_mtu": 1400,
               "se_handle_interface_routes": true
           }
       }
   ],
   "Cloud": [
       {
           "name": "Default-Cloud",
           "tenant_ref": "admin",
           "vtype": "CLOUD_LINUXSERVER",
           "ipam_provider_ref": "admin:gcp",
           "linuxserver_configuration": {
               "ssh_attr": {
                   "ssh_user": "rangar",
                   "host_os": "COREOS"
               },
               "se_sys_disk_path": "/”
           }
       }
   ]
}
- Perform first setup on the Controller and specify a username/password.
- Select GCP IPAM as the IPAM provider for the Default Cloud and configure a Linux Server cloud using IP addresses for the two Avi Service Engine instances created.
Creating Virtual Service and Verifying Traffic
To create a virtual service,
-
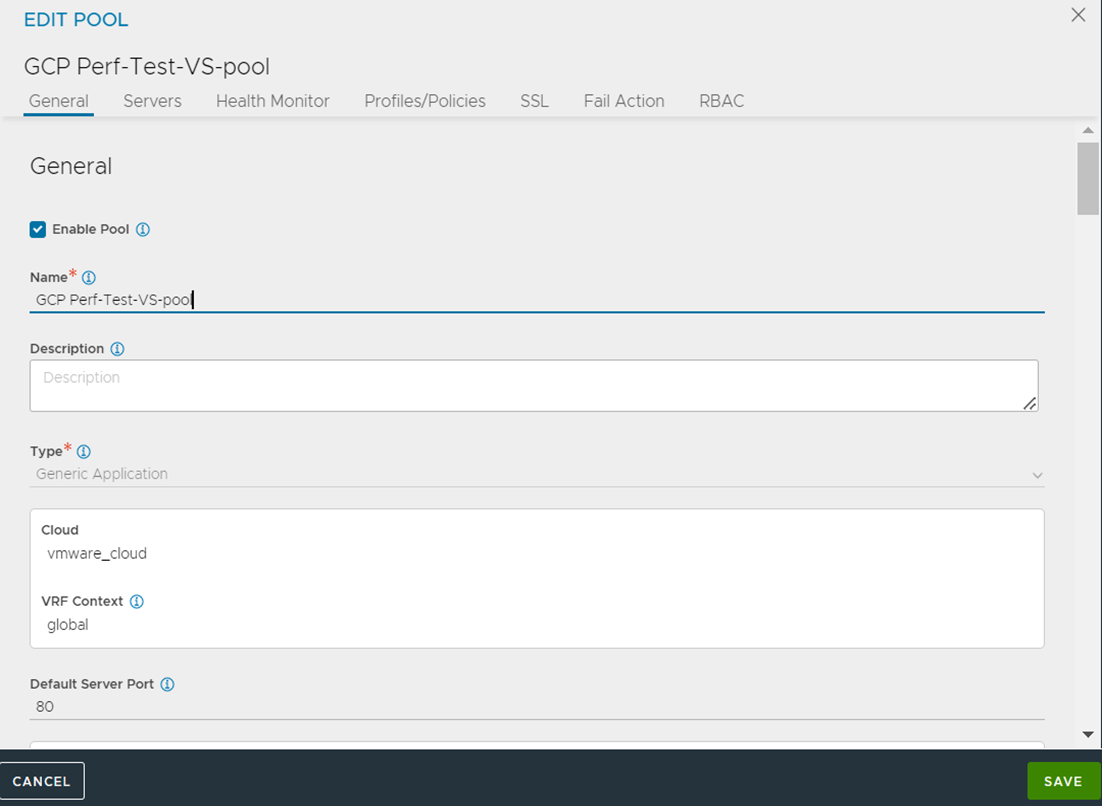
Create a pool. For instance, GCP-Perf-Test-VS-Pool as shown below:
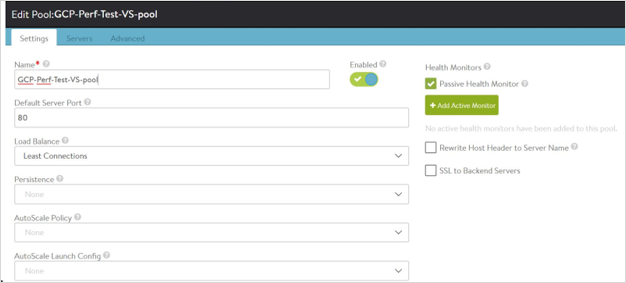
Starting with NSX Advanced Load Balancer 22.1.3, the following UI is available:
- Add server instance IP as pool server.
- Create an internal virtual service called GCP-Perf-Test-VS. The VIP is auto-allocated from the VIP/IPAM subnet 10.y.y.y./24
- The VIP is auto-allocated from the VIP/IPAM subnet 10.y.y.y./24
Note: IP subnet 10.x.x.x is mentioned only for reference purpose. Placement subnet should be set to the major subnet in the VPC used by the Avi Controller and Service Engines.

Starting with NSX Advanced Load Balancer 22.1.3, the following UI is available:
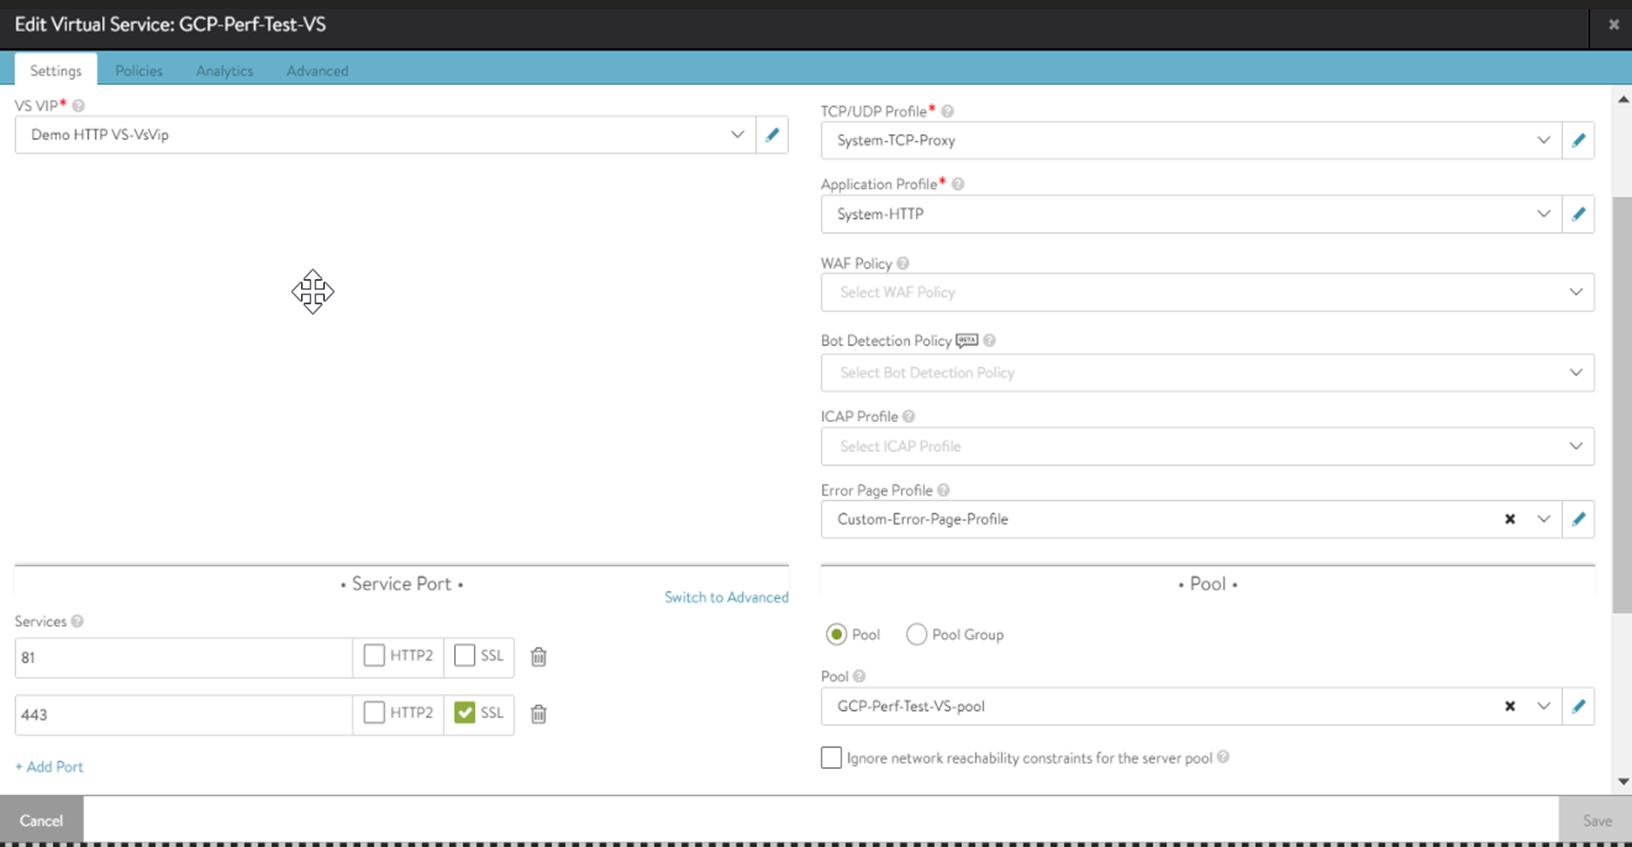
The virtual service created is as shown below.
Assigning Floating IP
Avi Vantage supports allocating floating IP (where a load balancer whose frontend will be a public IP allocated from GCP and the backend will be the service engines) to a virtual service.
Starting with Avi Vantage release 18.2.3, floating IP can be assigned via the Avi UI.
To allocate floating IP, click on Assign Floating IP for External Client Access to enable it.
Note: Auto Allocate is enabled by default. Click on Auto Allocate to disable it and enter the floating IP address to manually assign the floating IP.
Floating IP can also be assigned via the CLI as shown below.
++Truncated Output++
+------------------------------------+-----------------------------------------------------+
[admin]: virtualservice> vip index 1
[admin]: virtualservice:vip> auto_allocate_floating_ip
Overwriting the previously entered value for auto_allocate_floating_ip
[admin]: virtualservice:vip> save
[admin]: virtualservice> save
++ Truncated Output++

Testing ICMP Traffic
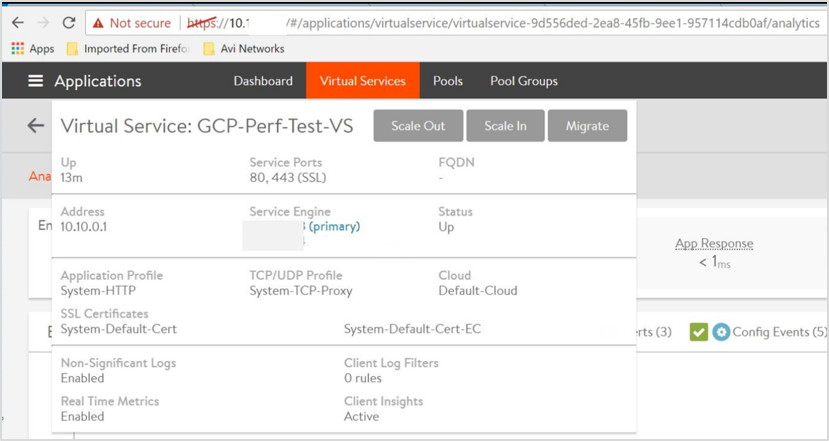
Send ICMP traffic to the VIP IP. 10.10.0.1 in this case and make sure that it gets programmed.
[localhost@avi-test-server ~]$ ping 10.10.0.1
[root@admin]# curl -I 10.10.0.1
HTTP/1.1 200 OK
Content-Type: text/html
Content-Length: 3800
Connection: keep-alive
Server: nginx/1.12.2
Date: Mon, 18 Mar 2019 06:55:12 GMT
Last-Modified: Tue, 06 Mar 2018 09:26:21 GMT
ETag: "5a9e5ebd-e74"
Accept-Ranges: bytes
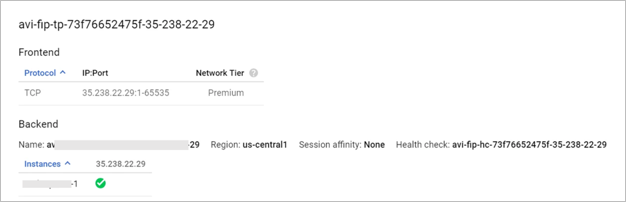
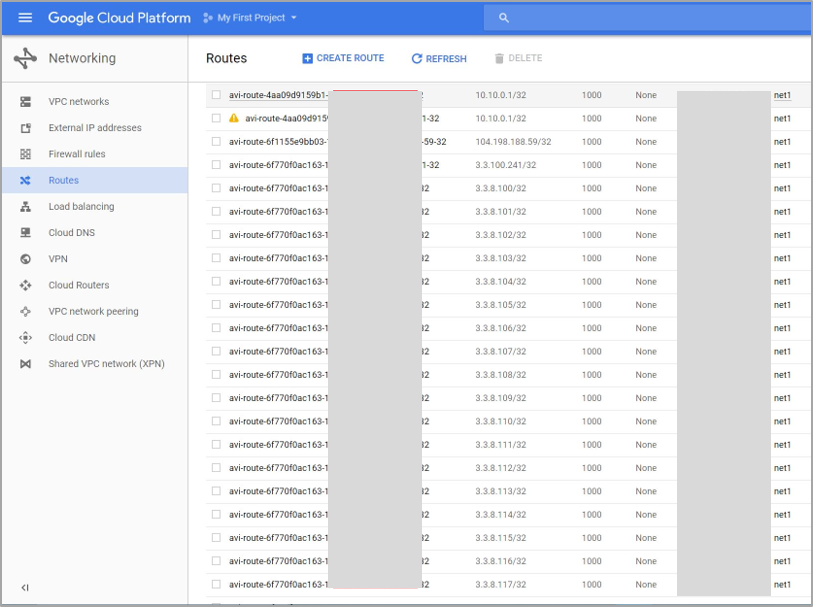
- Verify that a route for the VIP/32 is programmed in GCP with nextHop as Service Engine 1 with IP 10.8.2.3, as can be seen below with the notation.
![]()
API for Configuring Virtual Service and Pool
Copy the setup.json file shown below to /opt/avi/controller/data on the host (assuming /opt/avi/controller/data is the volume used for the Controller in the service file).
{
    "name": "vs1",
    "pool_ref": "pool_ref",
    "services": [
        {
            "port": 80
        }
    ],
    "vip": [
        {

            “auto_allocate_ip” = true,
            “auto_allocate_floating_ip” = true
            "ipam_network_subnet": {
                "network_ref": "network_ref",
                "subnet": {
                    "ip_addr": {
                        "addr": "6.2.0.0",--> IPAM subnet.
                        "type": "V4"
                    },
                    "mask": 16
                }
            },
            "subnet": {
                "ip_addr": {
                    "addr": "10.146.11.0", --> placement subnet, subnet having reachability to client facing VIP
                    "type": "V4"
                },
                "mask": 24
            }
        }
    ]
}
Troubleshooting
Service Engine failing to connect to the Controller or frequently losing connectivity to Ubuntu is a common issue.
Root Cause
- This is due to
sshguard. Refer to http://www.sshguard.net/docs/ for more information on sshguard. sshguardsupports addresses. The allowed addresses are not blocked, even if they appear to generate attacks. This is useful for protecting LAN users from being incidentally blocked.- When longer lists are needed for allowing, they can be wrapped into a plain text file, one address/hostname/block per line.
Mitigation
Configure the Controller IP (all three, if clustered) in the allowed file used by sshguard.
sshguard can take allowed files when the -w option argument begins with a ‘.’ (dot) or ‘/’ (slash). Below is a sample allowed file (/etc/test), with comment lines denoted by a ’#’ as the very first character.
       #   a single IPv4 and IPv6 address
       1.2.3.4
       2001:0db8:85a3:08d3:1319:8a2e:0370:7344
       #   address blocks in CIDR notation
       127.0.0.0/8
       10.11.128.0/17
       192.168.0.0/24
       2002:836b:4179::836b:0000/126
       #   hostnames
       rome-fw.enterprise.com
       hosts.test.com
sshguard is told to make a allow-list up from the /etc/test file as follows:
sshguard -w /etc/test