Load Balancing Workspace ONE with NSX Advanced Load Balancer
Overview
This document describes the configuration of the NSX Advacned Load Balancer (Avi Vantage) for Workspace ONE (WS1) access.
VMware Identity Manager combines applications and desktops in a single, aggregated workspace. Employees can then access the desktops and applications regardless of where they are based. With fewer management points and flexible access, Identity Manager reduces the complexity of IT administration.
There are five Workspace ONE Access services in scope for load balancing:
- Horizon IDM Service – This is the primary service powering the catalog and all things ‘Access’.
- CertProxy – Android SSO using TLS mutual authentication.
- KDC – iOS SSO using Kerberos pk-init authentication.
- CertAuth Service – Pure TLS mutual authentication.
- Integrated Windows Auth/Connector – Domain joined Kerberos authentication.
Note: In this document, we are covering configuration steps for all these five services. It is not mandatory to have all these in place, so please check the requirement to understand which services need to be configured.
It is assumed that services 1 to 4 are running on the same backend servers on different ports.
Prerequisites
- Ensure the new FQDN for Identity Manager is in DNS with both forward and reverse records and points to the virtual server IP address on the Avi Vantage that will be used for load balancing the Identity Manager appliances.
Note: VMware recommends using certificates that support Subject Alternate Names (SANs) defining each of the node FQDNs (public or internal) within the load-balanced VIP FQDN.
Wildcard certificates may be used, but due to wildcard certificate formats, SAN support is typically not available with wildcards from public CAs - and public CAs may complain about supplying an internal FQDN as a SAN value even if they do support SAN values. Additionally, some VMware Identity Manager features may not be usable with wildcard certificates when SAN support is not defined. - For information on the pre-requisites and deployment instructions for Workspace ONE Access, refer to : https://docs.vmware.com/en/VMware-Workspace-ONE-Access/19.03/vidm-install/GUID-E81B6B1B-A3D1-40D0-806A-3D31502C53A5.html
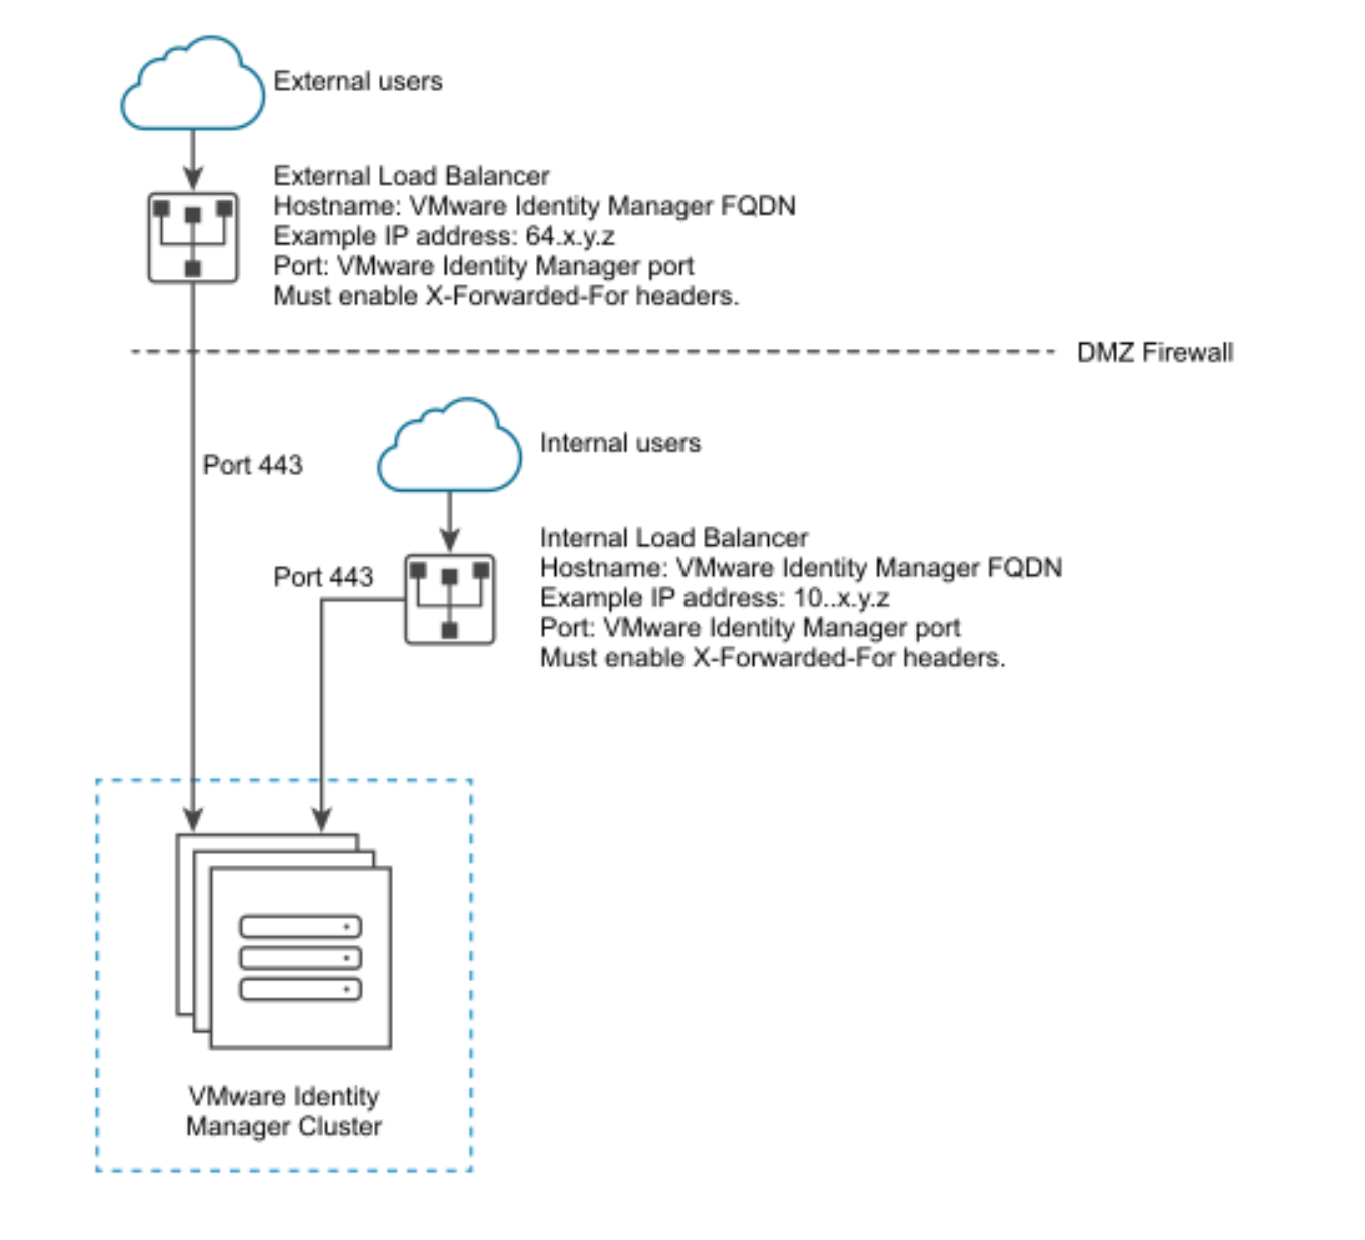
- During the deployment of the VMware Identity Manager machine, you enter the VMware Identity Manager FQDN and port number. These values must point to the host name that you want end users to access. The VMware Identity Manager machine always runs on port 443. You can use a different port number for the load balancer. If you use a different port number, you must specify it during deployment. Do not use 8443 as the port number, as this port number is the VMware identity Manager administrative port and is unique for each machine in a cluster.
- vIDM Connectors are required to implement Kerberos AuthN for domain joined workstations.
- For information on Load Balancer recommendations, refer to Using a Load Balancer or Reverse Proxy to Enable External Access to VMware Identity Manager.
- For information on Avi deployment, refer to Deploying Avi Vantage with VMware in Write Access Mode.
- For information on Avi cloud creation, refer to Cloud Configuration on Avi Vantage.
External Load Balancer Proxy with Virtual Machines
During deployment, the VMware Identity Manager instance is set up inside the internal network. If you want to provide access to the service for users connecting from outside networks, you must install an Avi load balancer in DMZ.
If you do not use a load balancer or reverse proxy, you cannot expand the number of VMware Identity Manager instances later. You might need to add more instances to provide redundancy and load balancing.
The following diagram shows the basic deployment architecture that you can use to enable external access.
Avi Vantage Configuration Entities
Application and TCP/UDP Profile
| Service/Component | Application Profile | TCP/UDP Type | TCP Timeout(in seconds) |
|---|---|---|---|
| IDM Horizon | HTTP Profile | TCP-Proxy | 3600 |
| Cet Proxy | System-L4-Application | TCP-Proxy or TCP-Fast Path | 1800 |
| Cert Auth | System-L4-Application | TCP-Proxy or TCP-Fast Path | 1800 |
| KDC-TCP | System-L4-Application | TCP-Proxy or TCP-Fast Path | 1800 |
| KDC-UDP | System-L4-Application | UDP-Proxy or UDP-Fast Path | 1800 |
| Connector/IWA | HTTP Profile | TCP-Proxy | 3600 |
Monitors
| Service/Component | Monitor Type | Health Monitor Recommendation | Health HTTP Response Code |
|---|---|---|---|
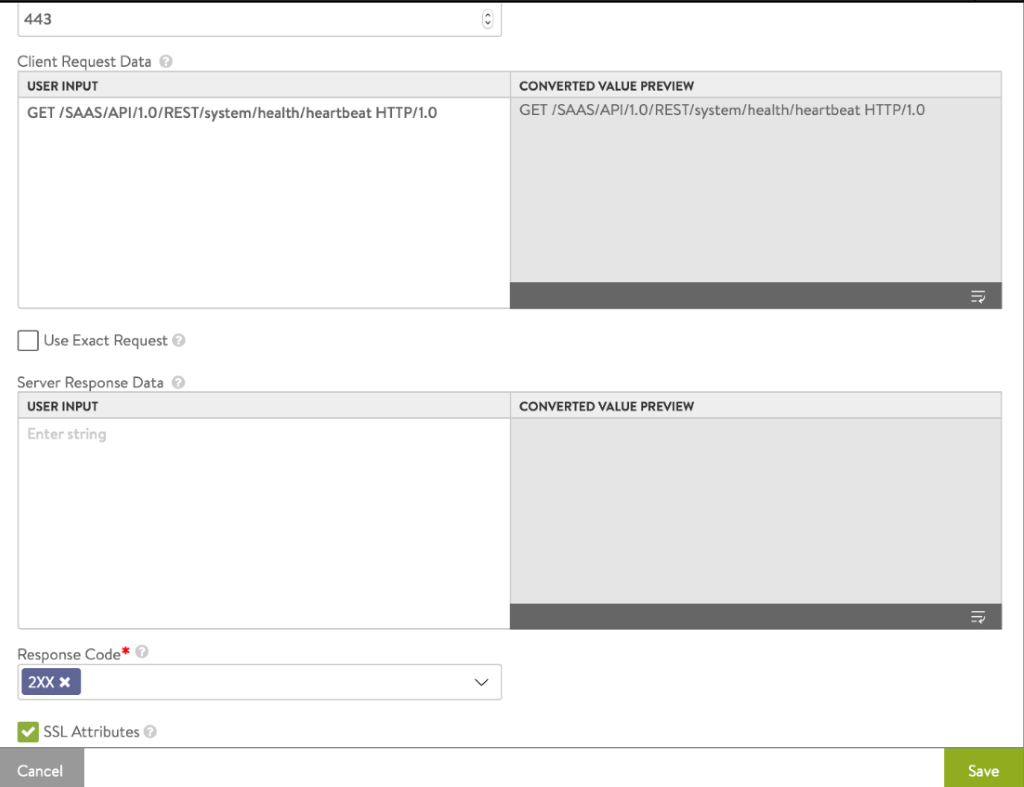
| IDM Horizon | HTTPS:443 | GET /SAAS/API/1.0/REST/system/health/heartbeat | 200 OK |
| Cet Proxy | HTTPS:5262 | GET /system/health | 200 OK |
| Cert Auth | HTTPS:7443 | GET /SAAS/API/1.0/REST/system/health/heartbeat | 200 OK |
| KDC | TCP:88 | NA | NA |
| Connector/IWA | HTTPS:443 | GET /hc/API/1.0/REST/system/health/allOk | 200 OK |
Persistence Profile
| Service/Component | Persistence Type | Persistence Timeout |
|---|---|---|
| IDM Horizon | Cookie | Session Cookie |
| Cet Proxy | Source IP | 3600 seconds |
| Cert Auth | Source IP | 3600 seconds |
| KDC | Source IP | 3600 seconds |
| Connector/IWA | No | N/A |
Client SSL profile
There is no recommended profile as such. However, if you have iOS users, then Apple iOS App Transport Security requirements apply to the Workspace ONE app on iOS. To enable users to use the Workspace ONE app on iOS, the load balancer must have ciphers with forward secrecy. The following ciphers meet this requirement: ECDHE_ECDSA_AES and ECDHE_RSA_AES in GCM or CBC mode as stated in the iOS 11 iOS Security document.
Server SSL profile
There is no recommended profile as such. However, if you have iOS users, then Apple iOS App Transport Security requirements apply to the Workspace ONE app on iOS. To enable users to use the Workspace ONE app on iOS, the load balancer must have ciphers with forward secrecy. The following ciphers meet this requirement: ECDHE_ECDSA_AES and ECDHE_RSA_AES in GCM or CBC mode as stated in the iOS 11 iOS Security document.
Pool
| Service/Component | Port | Load Balancing Algorithm | Persistence | SSL Profile |
|---|---|---|---|---|
| IDM Horizon | 443 | Least Connection | Cookie | WS1-access-ServerSSL |
| Cet Proxy | 5262 | Least Connection | Source IP Address | WS1-access-ServerSSL |
| Cert Auth | 7443 | Least Connection | Source IP Address | WS1-access-ServerSSL |
| KDC | 88 | Least Connection | Source IP Address | N/A |
| Connector/IWA | 443 | Least Connection | No | WS1-access-ServerSSL |
Virtual Service
| Service/Component | VIP:Port | Virtual Service Type | Pool |
|---|---|---|---|
| IDM Horizon | IP1:443 | L7:HTTPS | IDM Horizon-Pool |
| Cet Proxy | IP1:5262 | L4:TCP | CertProxy-Pool |
| Cert Auth | IP1:7443 | L4:TCP | CertAuth-Pool |
| KDC | IP1:88 | L4:TCP L4-UDP |
KDC-Pool |
| Connector/IWA | IP2:443 | L7-HTTPS | Connection IWA-Pool |
Configuring Avi Vantage
It is assumed that Avi Controller is deployed, and cloud configuration is done. Once the Avi Controller has been deployed, and the cloud configuration is completed, configure the virtual service and other entities as explained below: For the purpose of this document, we have all the services running on different backend ports.
Configuring Avi Vantage for IDM Horizon Service (HTTPS 443)
-
Creating HTTP Application Profile
To create new application profile, navigate to Templates > Profiles > Application > Click Create. Select the type as HTTP. Select the HTTP Limit Settings available under the DDos tab and set the HTTP Keep-Alive Timeout value to 1800000ms.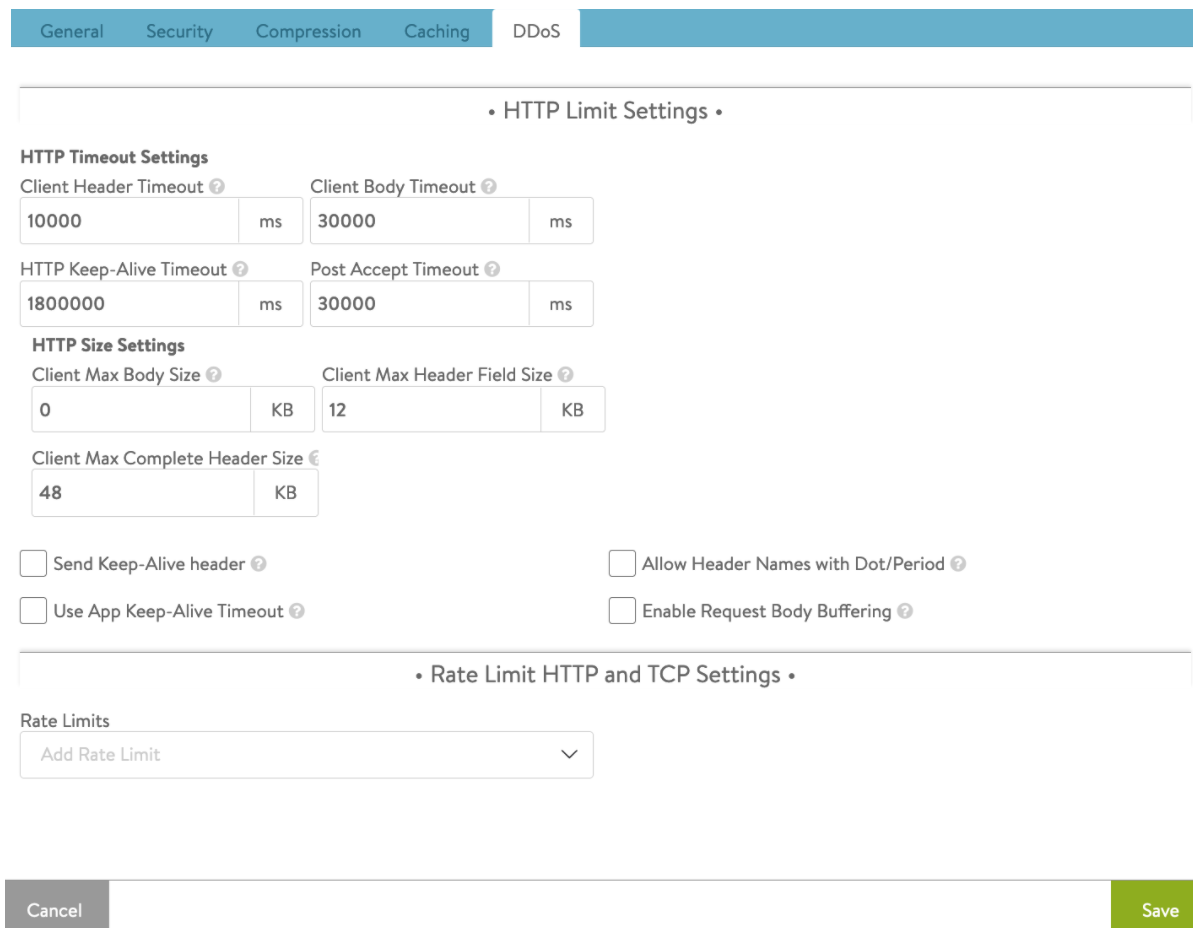
Click Save and proceed to the next step. -
Creating TCP Profile
For TCP/UDP, navigate to Templates > Profiles > TCP/UDP > Click Create. Set the value of Idle Duration to 3600 seconds, available under the TCP Proxy Settings > Custom. This value can be increased as per the requirement.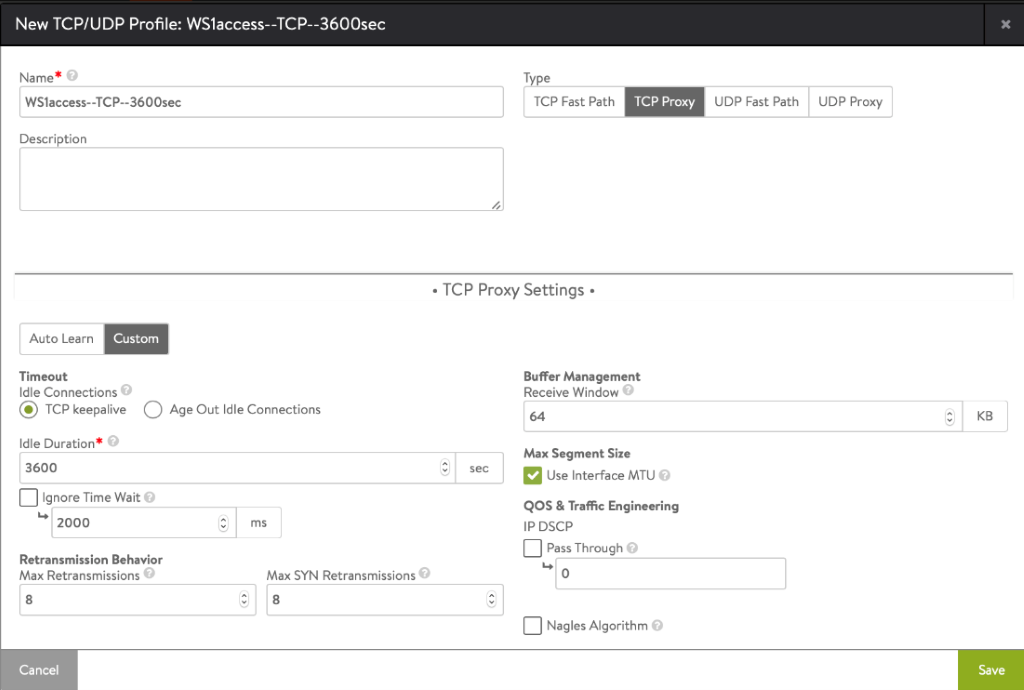
Click Save. -
Creating Custom Health Monitor
To create a custom health monitor, navigate to Templates > Profiles > Health Monitors. Click on Create. Enter the following details for the new health monitor as shown below:
-
Creating Persistence Profile
To create the persistence profile, navigate to Templates > Profiles > Persistence. Click on Create. Provide the following details as shown below for the New Profile Screen.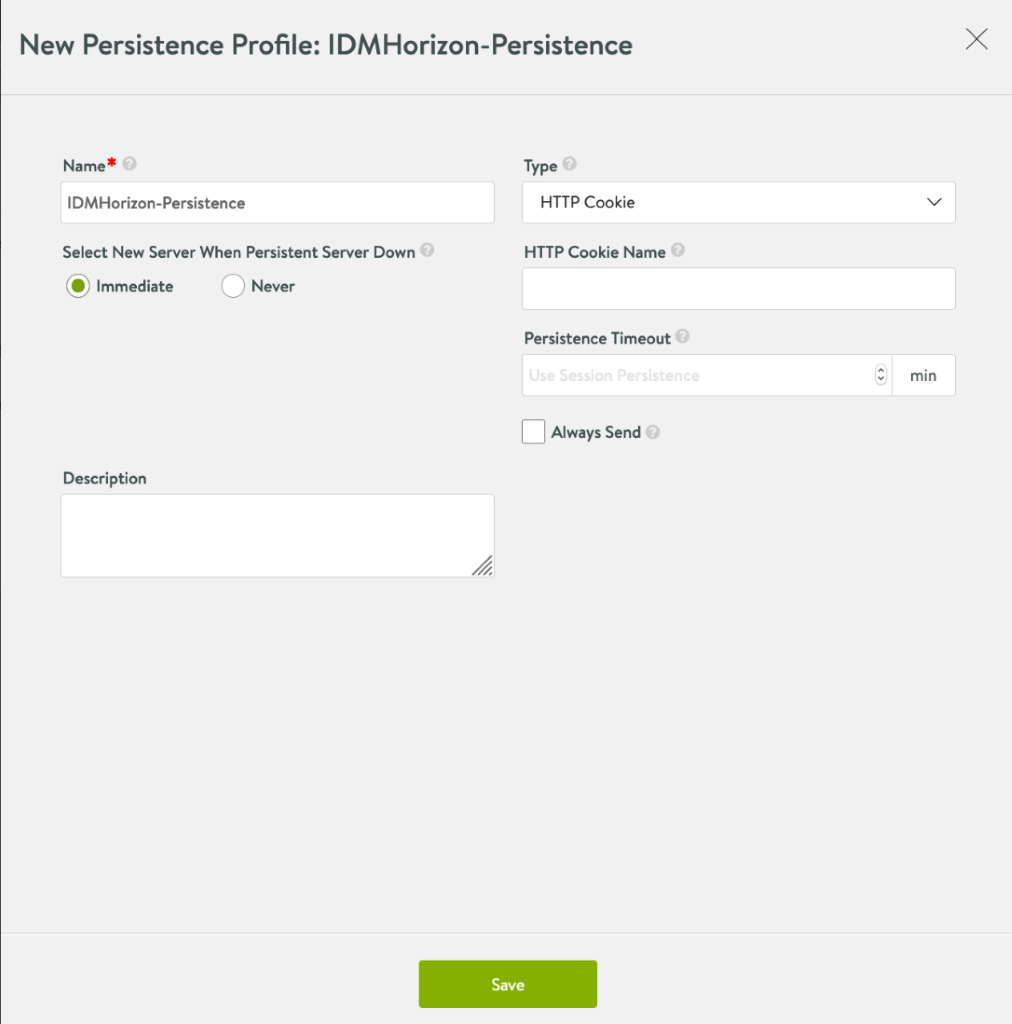
-
Creating IP Group
This step is to group all the three WS1 Access/vidm IP addresses in one IP group for the ease of use. To create the IP group, navigate to Templates > Groups > IP Group and select Create.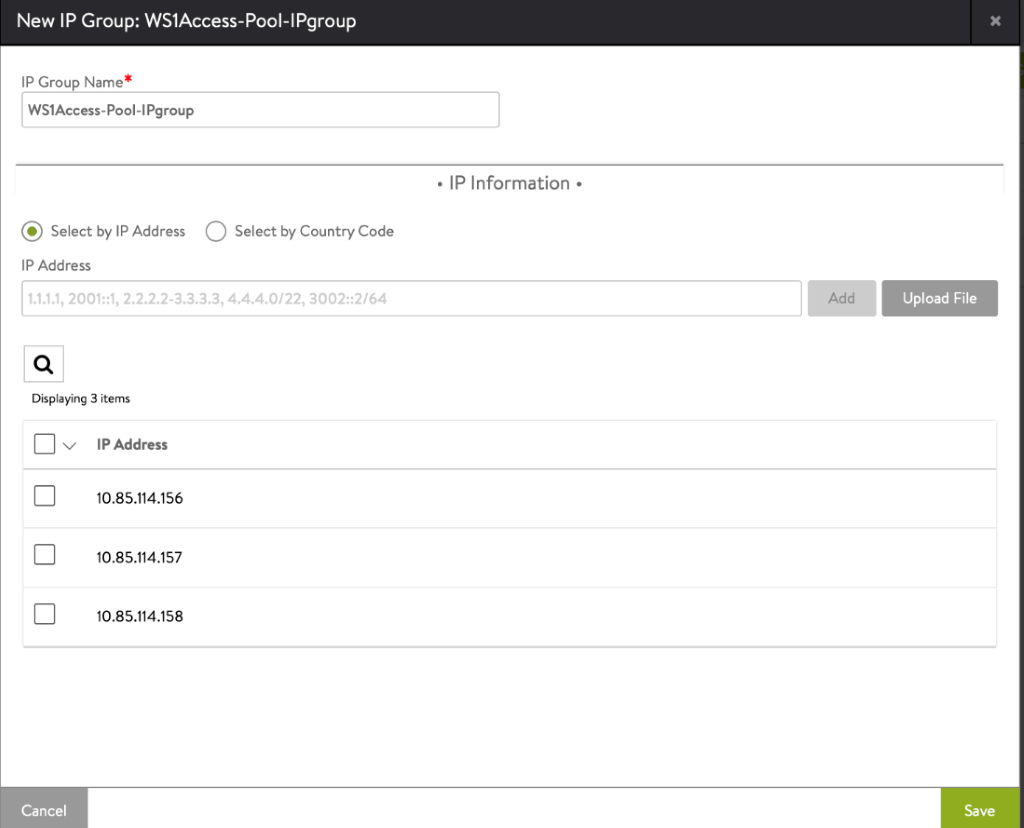
-
Create Server SSL Profile
There is no recommended profile as such. However, if you have iOS users then Apple iOS App Transport Security requirements apply to the Workspace ONE app on iOS. To enable users to use the Workspace ONE app on iOS, the load balancer must have ciphers with forward secrecy. The following ciphers meet this requirement: ECDHE_ECDSA_AES and ECDHE_RSA_AES in GCM or CBC mode as stated in the iOS 11 iOS Security document. To create an SSL profile, navigate to Templates > Security > SSL/TLS Profile. Click Create and select the Application Profile option.
Note:Note – This step is optional. We can also use default System SSL profile. This step is just to showcase the procedure of creating a new SSL profile if required based on any customization that you might want to do.
-
Creating Client SSL Profile
This step is optional. You can use same profile for client and server side.
For the purpose of this document, we have shown two different profiles. This could be done in scenario where you want to allow old ciphers for frontend for old clients, but different ciphers are required for backend communication. We can also use default System SSL profile. This step is just to showcase the procedure of creating a new SSL profile if required based on any customization that you might want to do. There is no recommended profile as such. However, if you have iOS users then Apple iOS App Transport Security requirements apply to the Workspace ONE app on iOS. To enable users to use the Workspace ONE app on iOS, the load balancer must have ciphers with forward secrecy. The following ciphers meet this requirement: ECDHE_ECDSA_AES and ECDHE_RSA_AES in GCM or CBC mode as stated in the iOS 11 iOS Security document.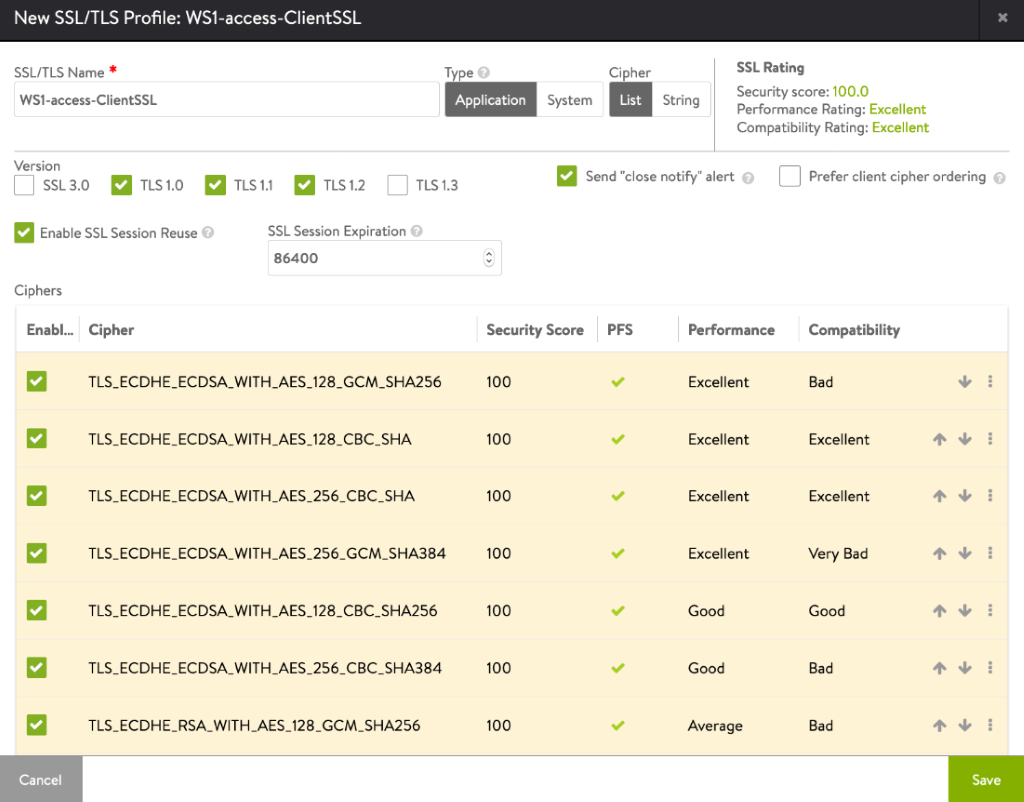
We can also use default System SSL profile. This step is for the reference for creating a new SSL profile if required based on any customization that you might want to do.
-
Creating Pool
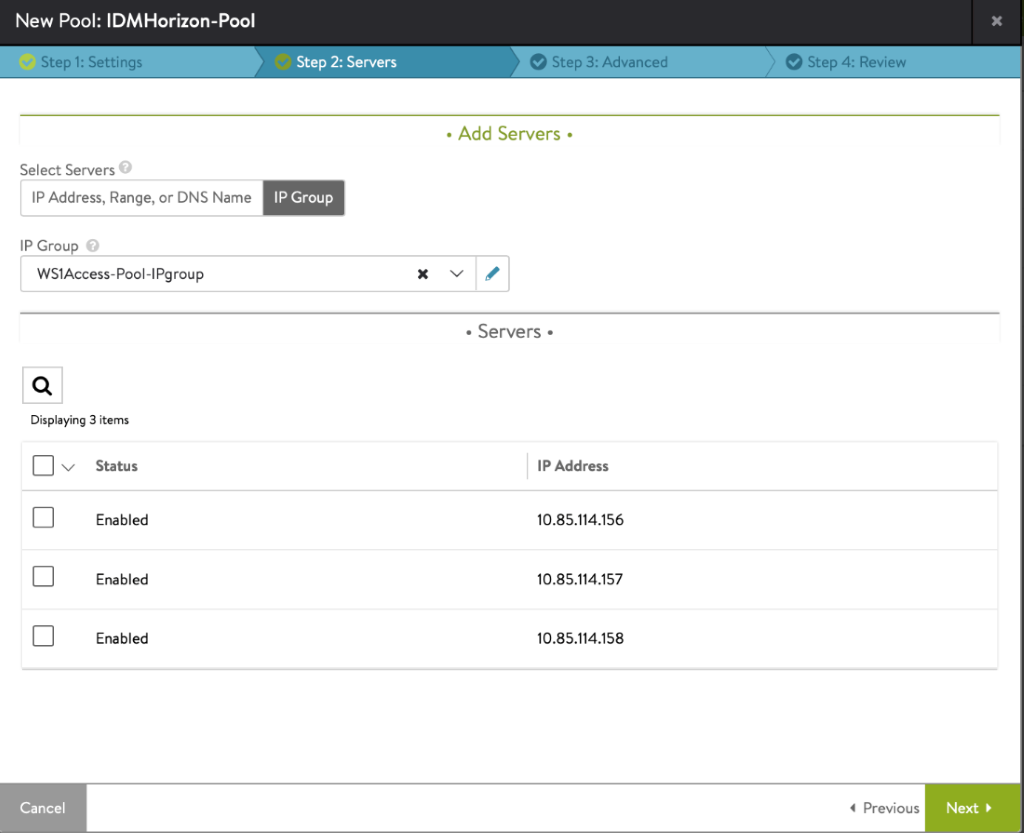
To create the pool, navigate to Applications > Pools, and select Create Pool. Select the required cloud from the Select Cloud sub-screen and click Next. Enter the details as shown in the section below (for the respective services). To bind the monitor, click on Add Active Monitor and select the custom monitors that were created in the previous step Click on Enable SSL and select the server SSL profile that was created in the previous step. Click Next. In the Servers tab, select the IP group of the servers that we created above. Click Next.
Navigate to Step 3: Advanced tab > Step 4: Review.
Click Next and then click Save.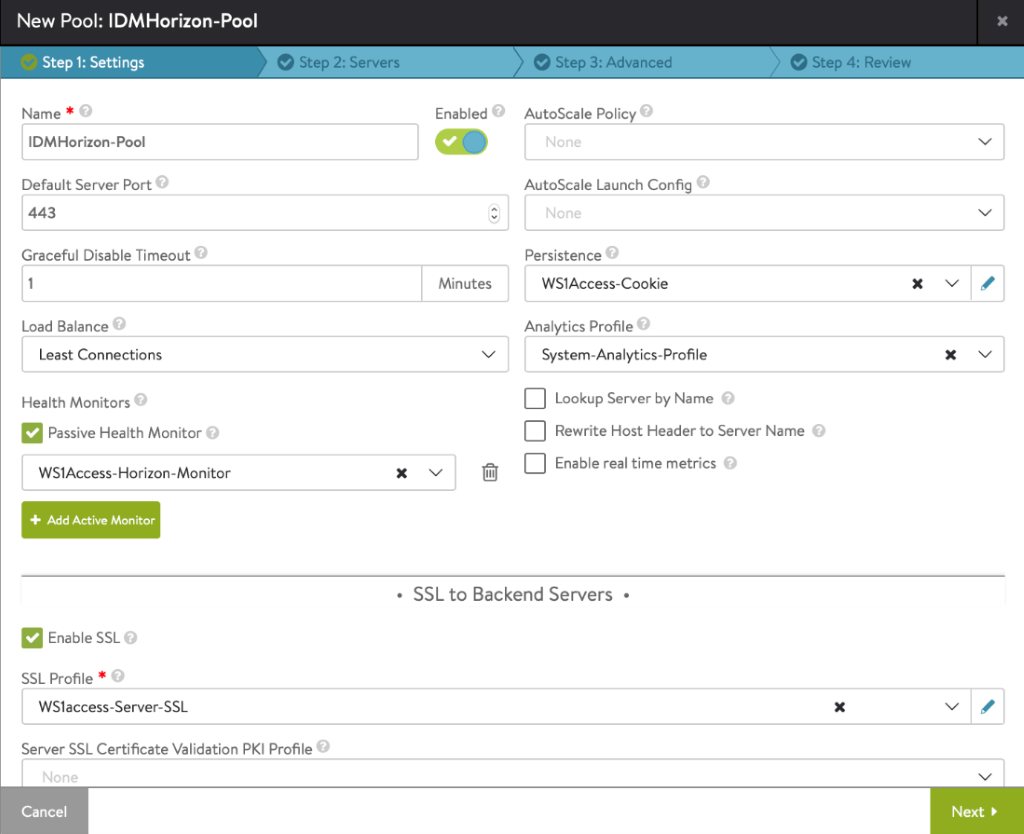
- Importing Certificate
The SSL connection is being terminated at Avi virtual service. Therefore, the SSL certificate must be assigned to the virtual service. It is recommended to install a certificate which is signed by a valid certificate authority instead of using self-signed certificates. Install the certificate in Avi Vantage and ensure the CA certificate is imported and linked. For instructions, refer to Import Certificates https://avinetworks.com/docs/20.1/ssl-certificates/#import-certificates/. Avi LB should have vidm/WS1 access root CA cert installed on it. As you will bind a certificate to Avi HTTPS VS, add the root and intermediate cert associated with that on VIDM as well. Note: For this set up, a certificate named WS1Access_Certificate has been installed. - Creating Virtual Server
Create two VIPs – Access VIP and Connector VIP.
For more information on creating a new virtual service, refer to Creating Virtual Service.
| Service/Component | VIP:Port | Virtual Service Type | Pool |
|---|---|---|---|
| IDM Horizon | 10.79.186.188:443 | L7:HTTPS | IDM Horizon-Pool |
| Cet Proxy | 10.79.186.188:5262 | L4:TCP | CertProxy-Pool |
| Cert Auth | 10.79.186.188:7443 | L4:TCP | CertAuth-Pool |
| KDC | 10.79.186.188:88 | L4:TCP L4-UDP |
KDC-Pool |
| Connector/IWA | I10.79.186.189:443 | L7-HTTPS | Connection IWA-Pool |
Creating Virtual Service for IDM Horizon
From the Avi UI, navigate to Applications > Virtual Services. Select Create Virtual Service > Advanced Setup.
Enter the details as shown below:

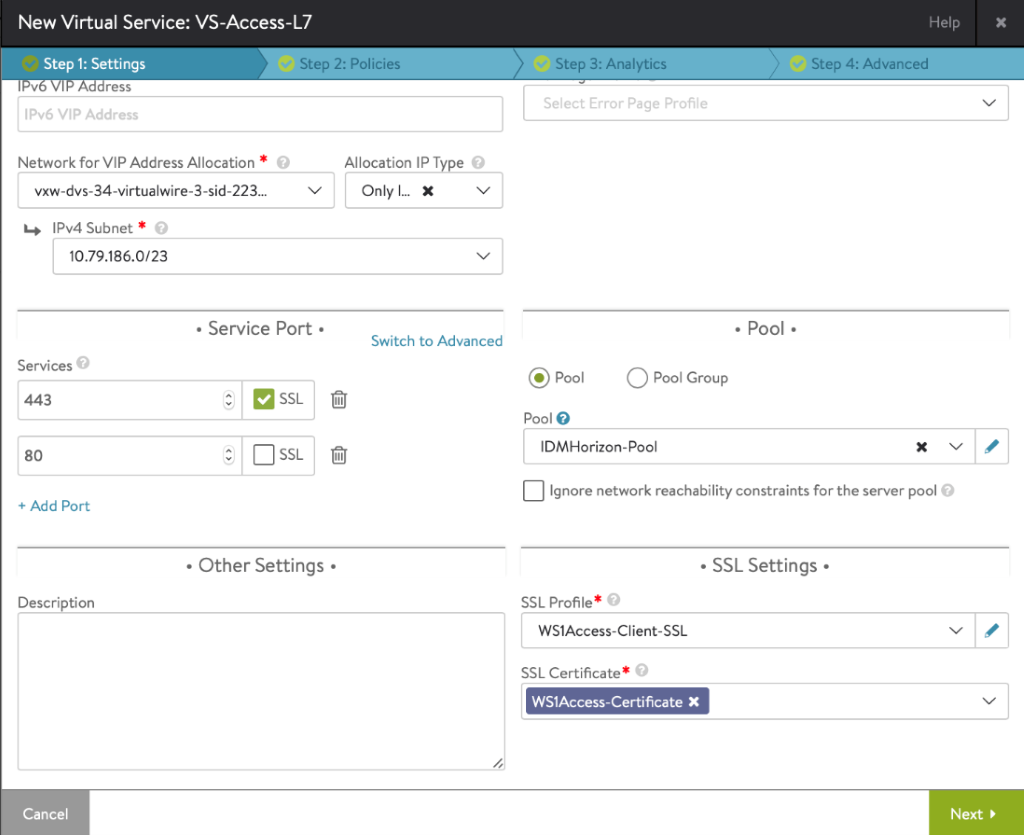

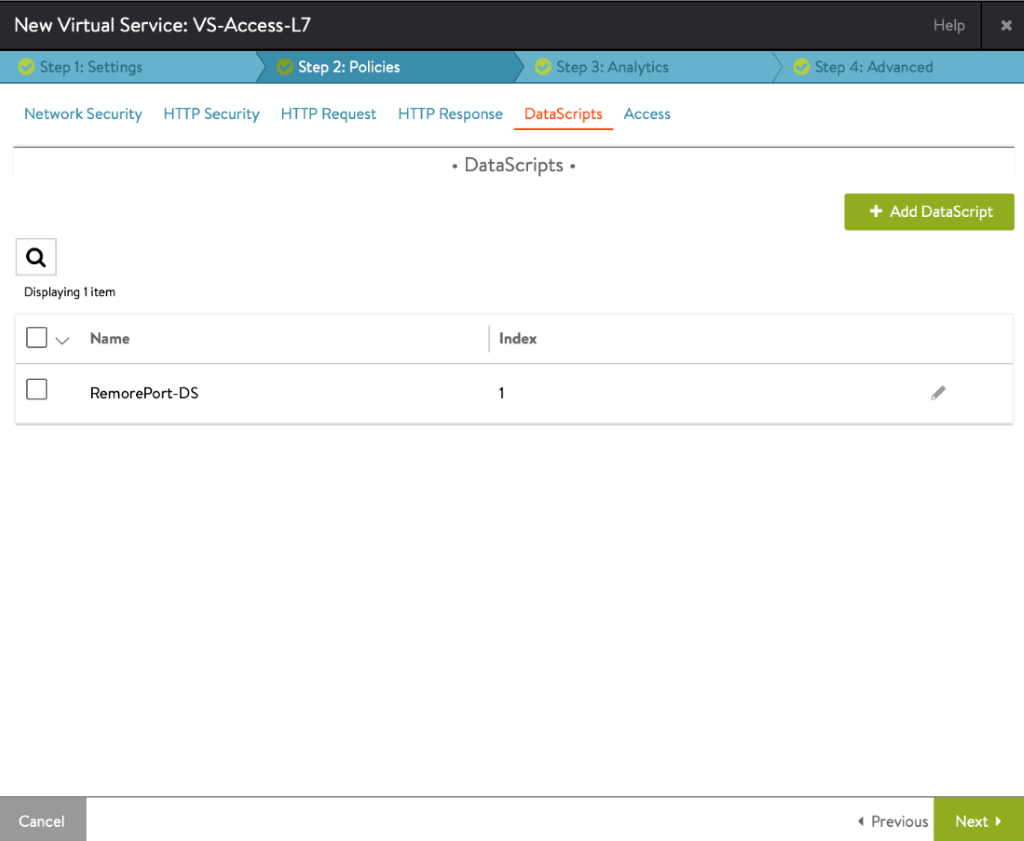
Click Next.
Click Next and Click Save.
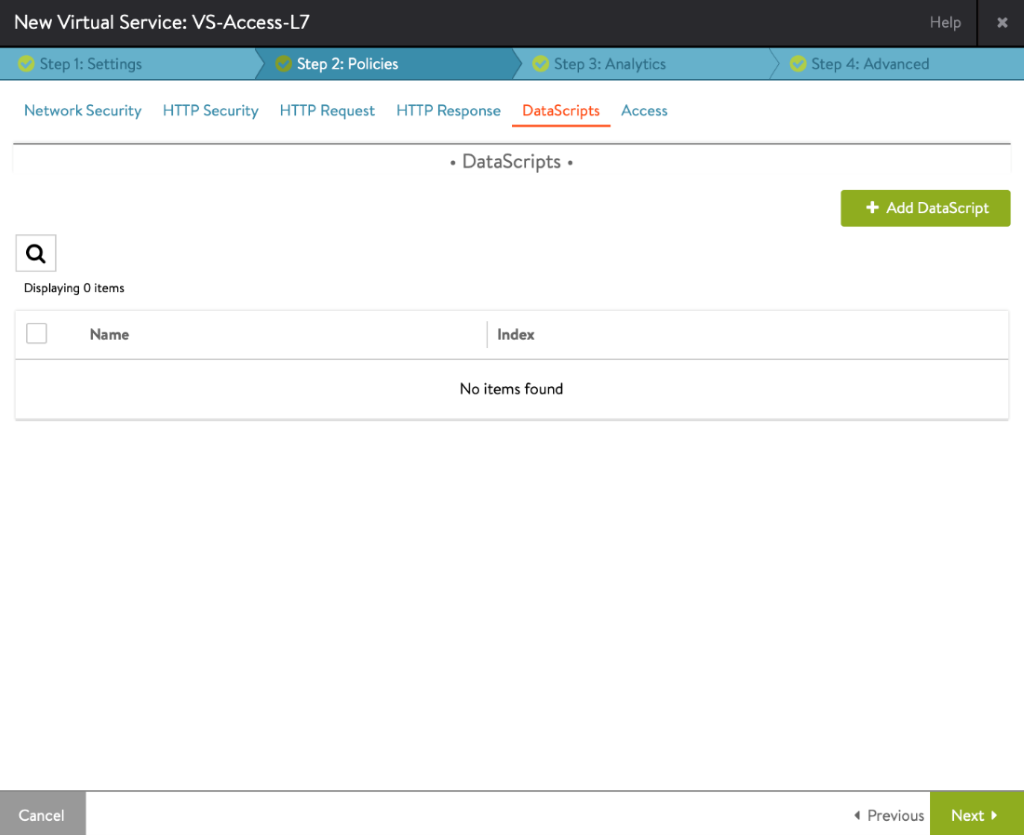
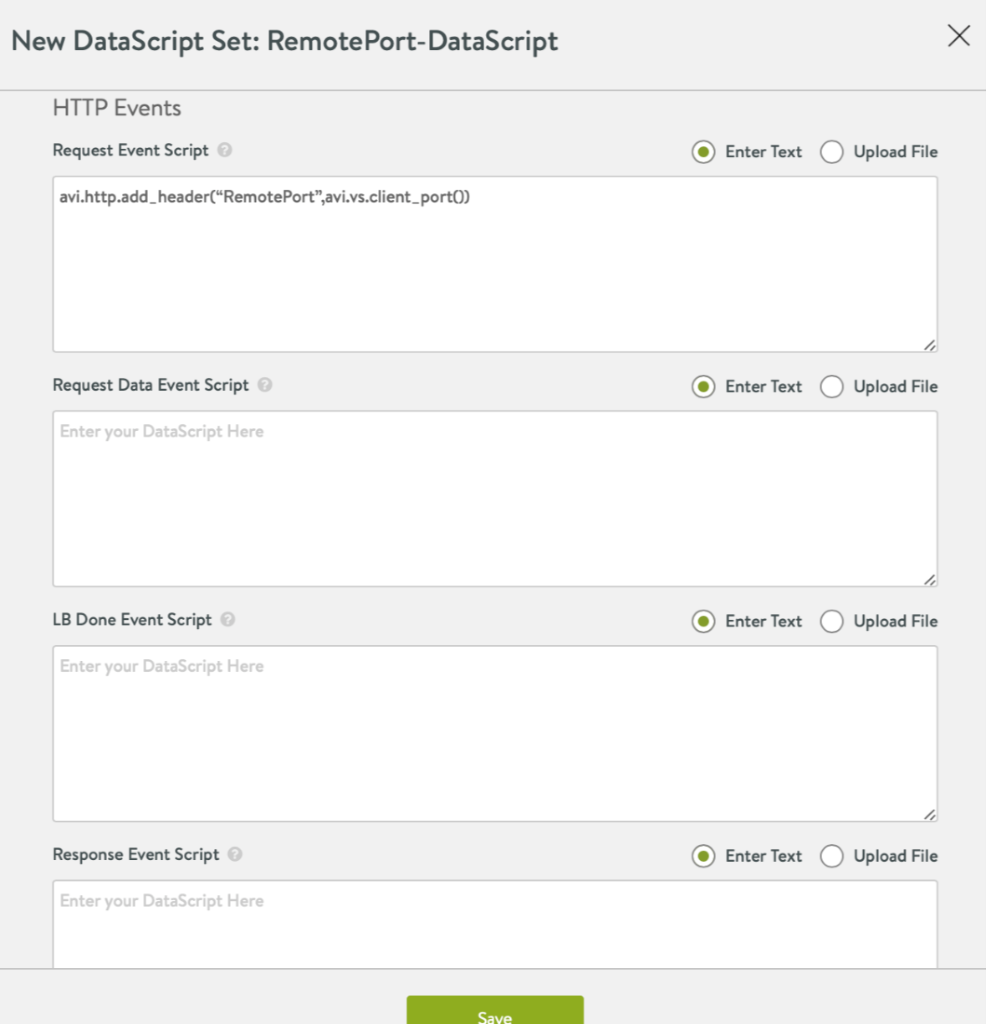
Note:
DataScript is needed only if Android SSO is required i.e., Cert Proxy service
If Cert Proxy service is not being load balanced on Avi Vantage, then this DataScript is not required.
Configuring Load Balancing for CertProxy Service (TCP 5262)
Use the following steps to complete load balancing configuration for the Cert Proxy service (Android SSO using TLS mutual authentication).
- Creating Application Profile — The default Layer 4 profile can be used (System-L4-application).
-
Creating TCP Profile: For creating TCP/UDP, navigate to Templates > Profiles > TCP/UDP, and click Create.
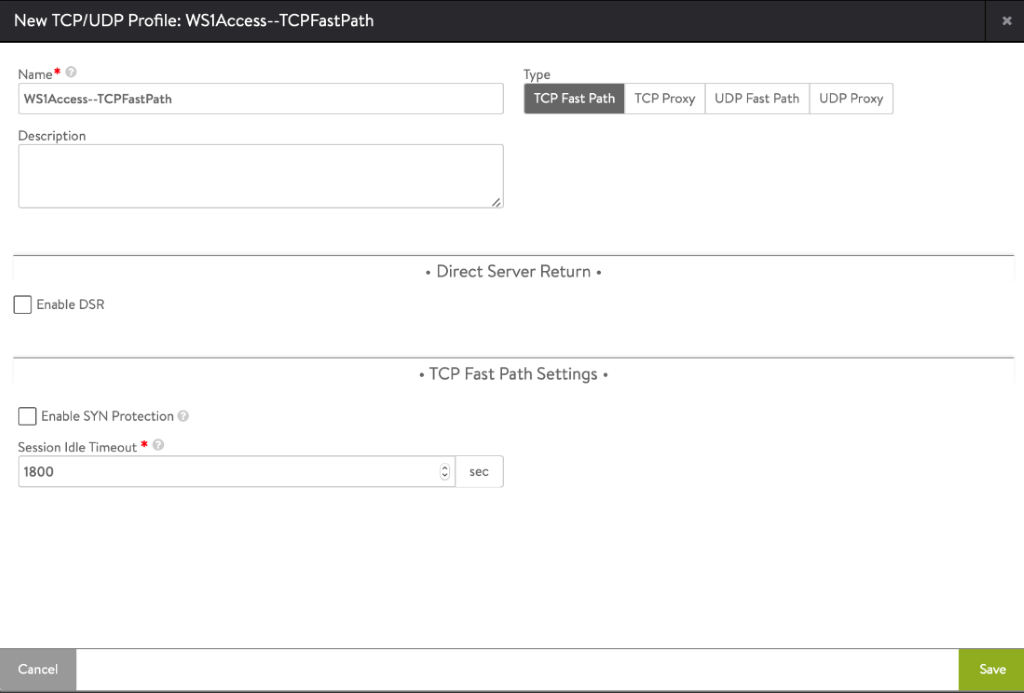
-
Creating Monitor To create a custom health monitor, navigate to Templates > Profiles > Health Monitors. Click Create.
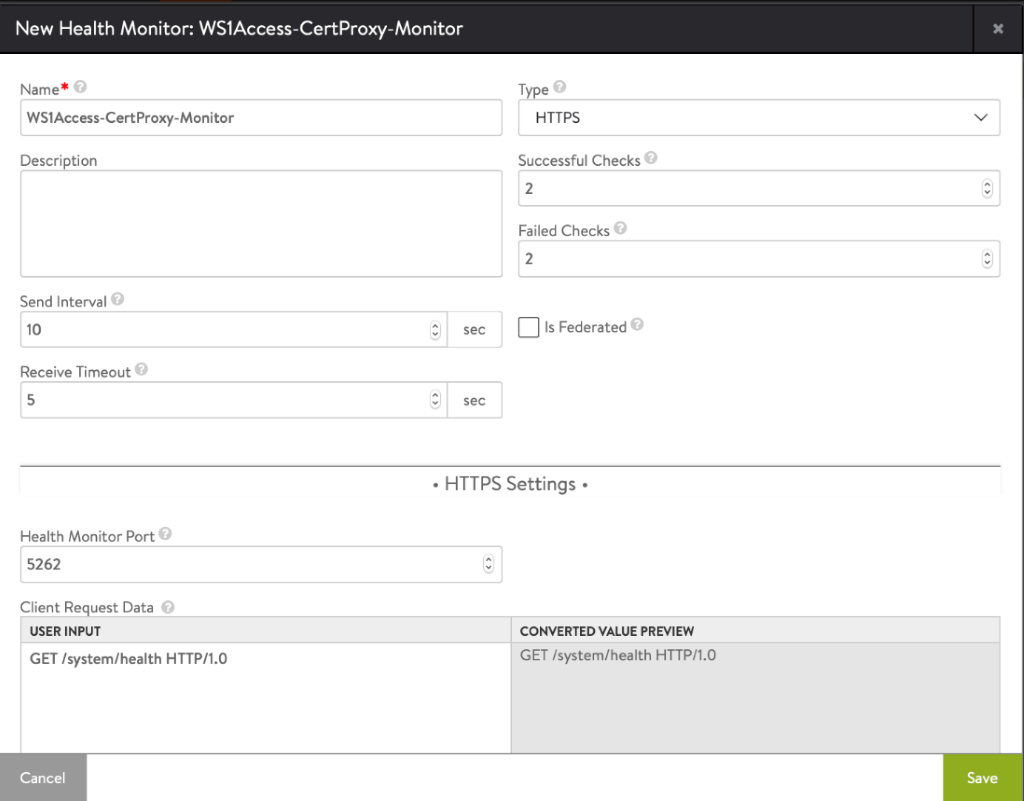
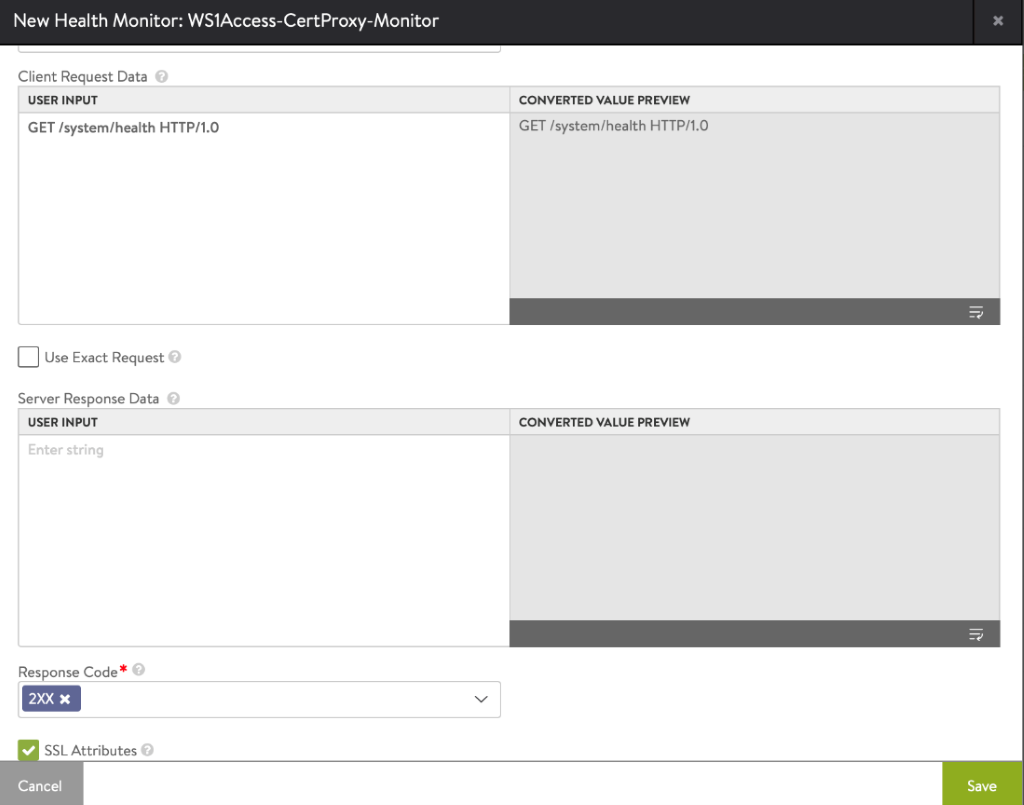
Click Save.
-
Creating Persistence Profile
To create the persistence profile, navigate to Templates > Profiles > Persistence. Click on Create. In the New Profile Screen, update the details as shown below: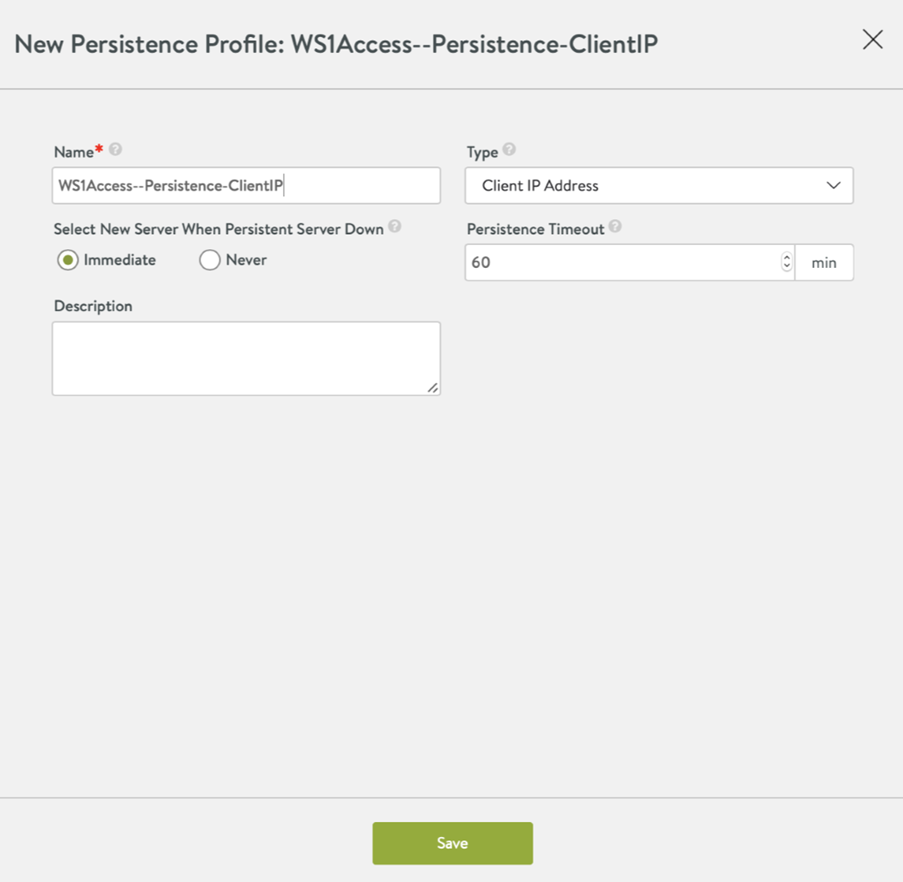
Click Save
- Creating IP group – You can use the same profile that we created above in IDM horizon service section.
- Creating Server SSL Profile - You can use same profile that we created above in IDM horizon service section.
-
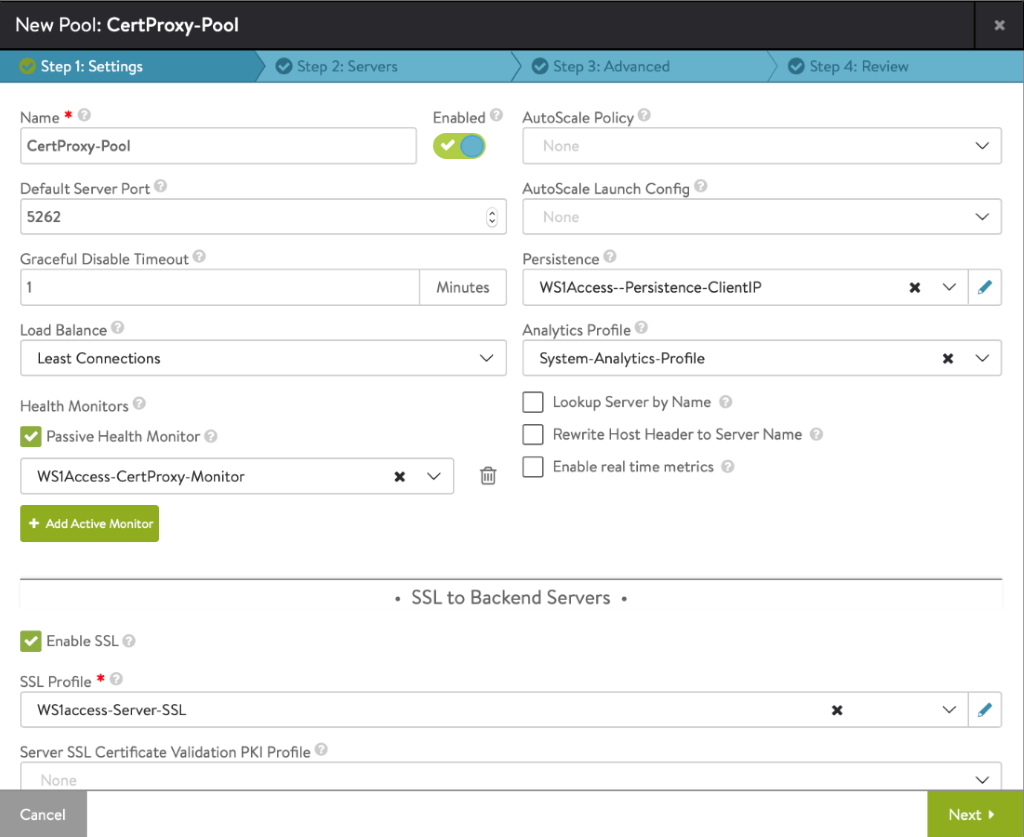
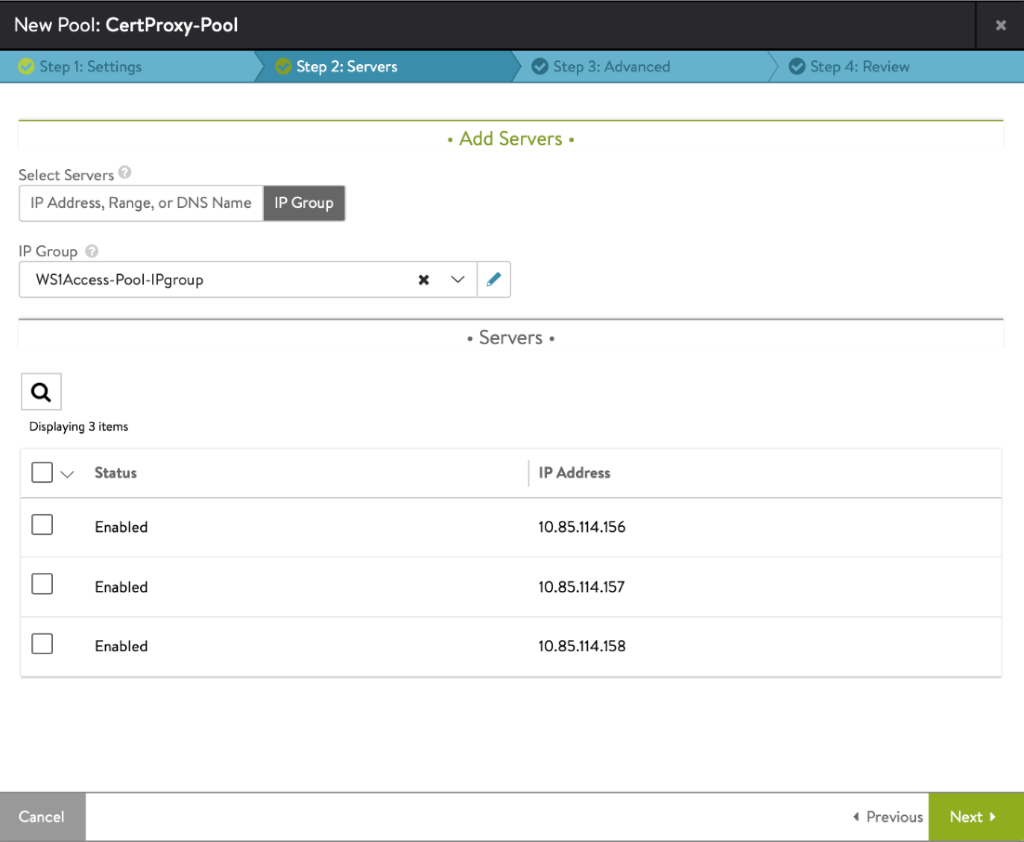
Creating Pool To create the pool, navigate to Applications > Pools. Select the cloud from the Select Cloud sub-screen and select Next. Select the Create Pool option. Enter the details as shown in the section below (for the respective services). To bind the monitor, click on Add Active Monitor and select the custom monitors that were created in the previous step. Select the Enable SSL and select the server SSL profile that was created in the previous step. Click on Next. In the Servers tab, select the IP group of the servers that we created above. Click Next. Navigate to Step 3: Advanced tab > Step 4: Review. Click Next and then click Save.

-
Creating Virtual Service
You can use Avi VIP sharing capability, for creating virtual service for various service components. For more information, refer to How to share a single VIP across multiple virtual services. Navigate to Applications > Virtual Services and select Create Virtual Service > Advanced Setup. Under VIP Address, click Switch to Advanced For the option under Virtual Service for VIP sharing, select the L7 virtual service that was created for the IDM Horizon service as shown in the screenshot below: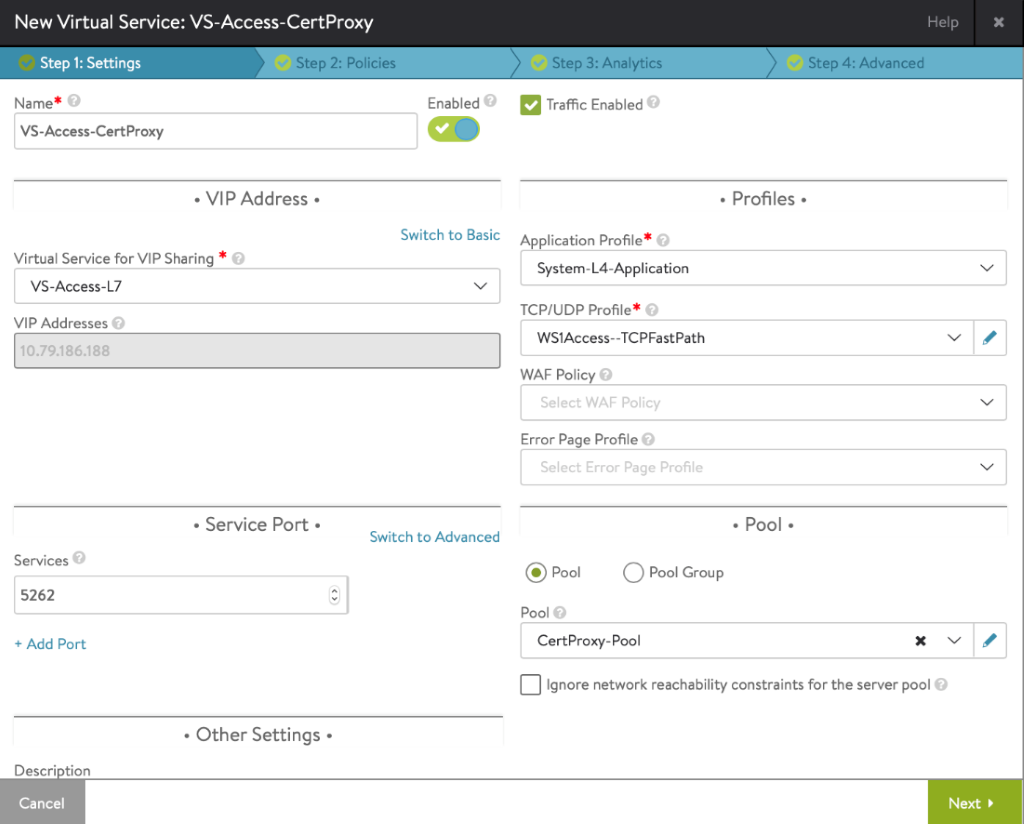
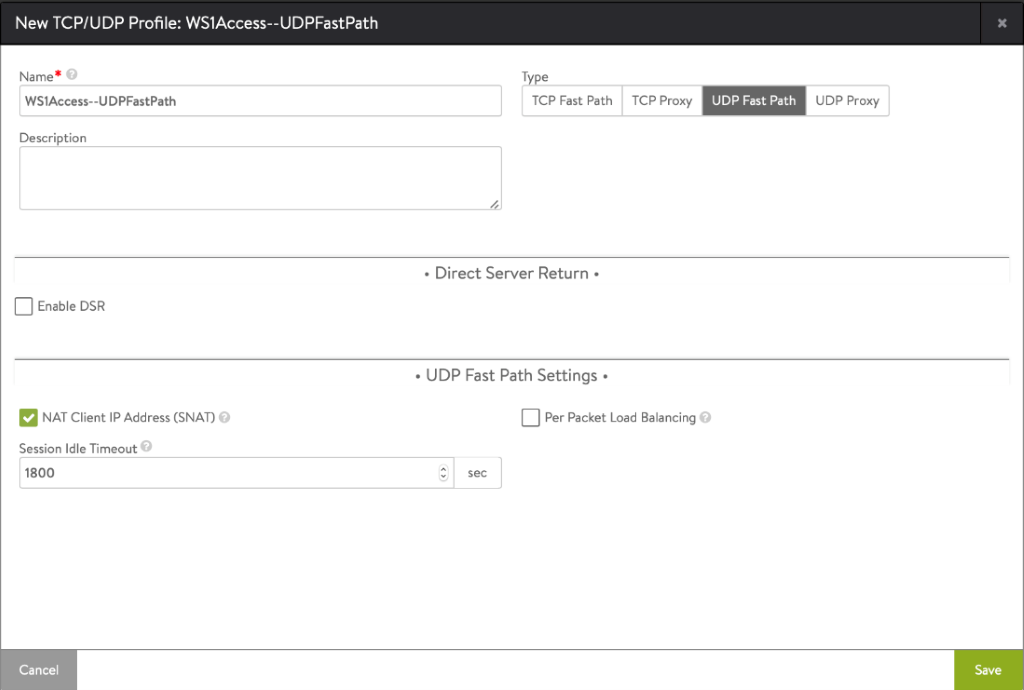
Configuring Load Balancing for KDC Service (TCP/UDP 88)
- Creating Application Profile — The default Layer 4 profile can be used (System-L4-application).
-
Creating TCP and UDP Profile: - Use the same steps as followed for creating TCP profile for the Cert Proxy service. For UDP Profile - For TCP/UDP, navigate to Templates > Profiles > TCP/UDP and click Create.
-
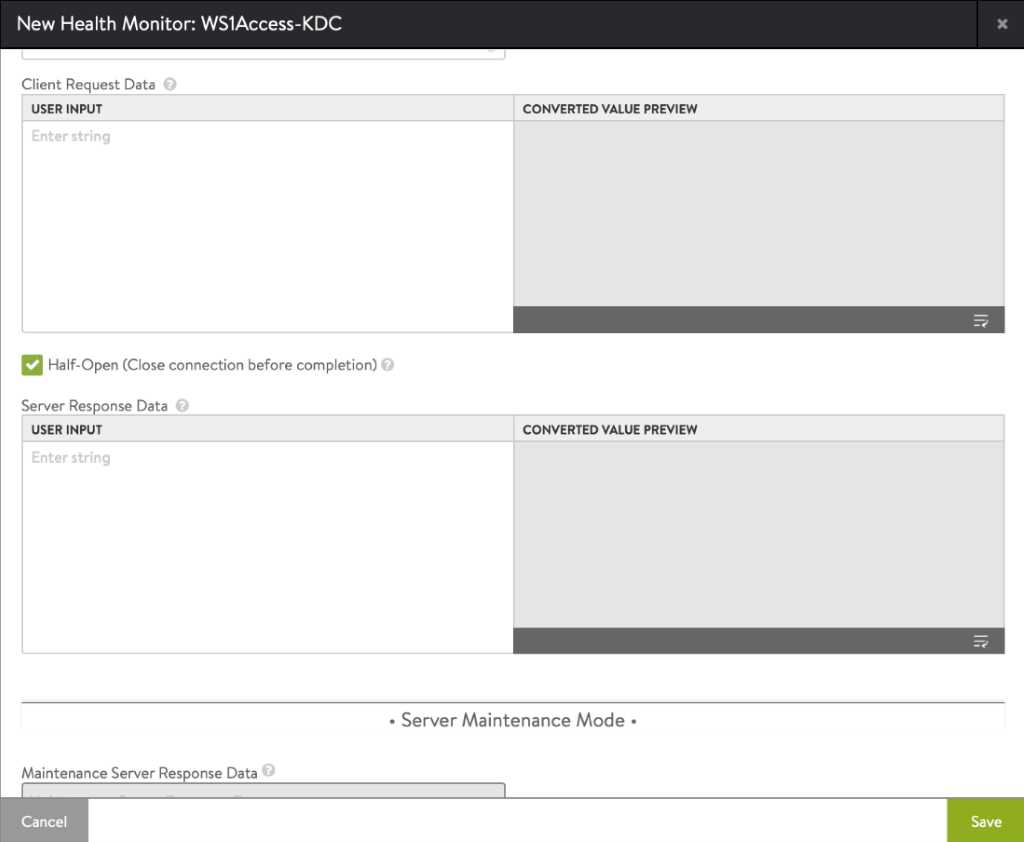
Creating Monitor
To create a custom health monitor, navigate to Templates > Profiles > Health Monitors. Click on Create. Enter the details in the New Health Monitor as shown below: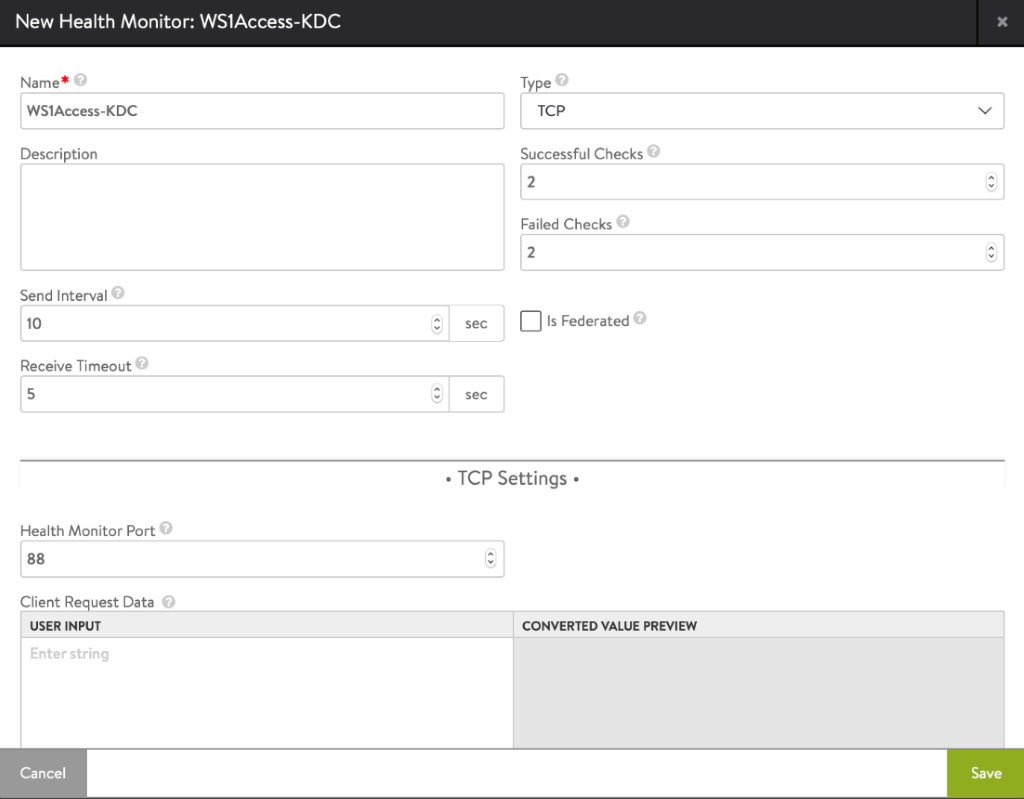
- Creating Persistence Profile – Use the same persistence profile that was created above for Cert Proxy service
- Creating IP group – Use the same IP group that we created above in IDM horizon service section
- Creating Server SSL Profile - Use the same IP group that we created above in IDM horizon service section
-
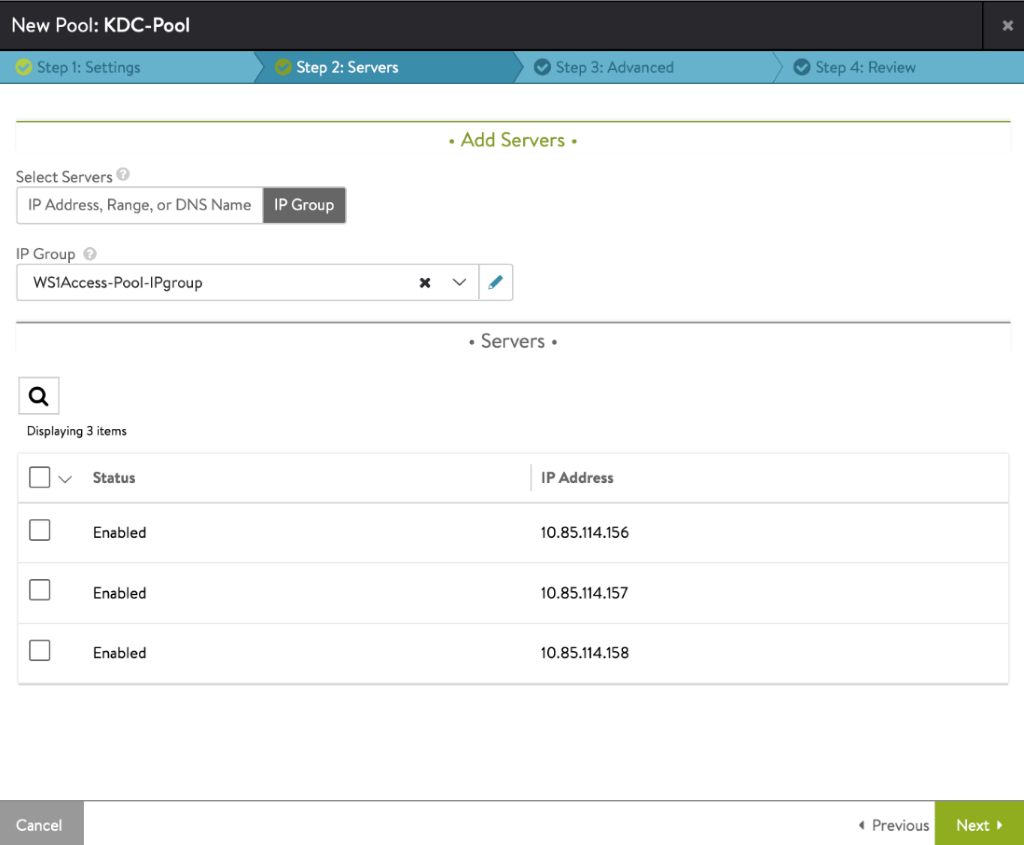
Creating Pool
To create the pool, navigate to Applications > Pools. Select the cloud from the Select Cloud sub-screen and click on Next. Click on Create Pool. Enter the details as shown below:
To bind the monitor, click on Add Active Monitor and select the custom monitors that were created in the previous step.
Select the Enable SSL option and select the server SSL profile that was created in the previous step.
Click on Next.
In the Servers tab, select the IP group of the servers that we created above. Click Next. Navigate to Step 3: Advanced tab > Step 4: Review. Select Next and then click Save.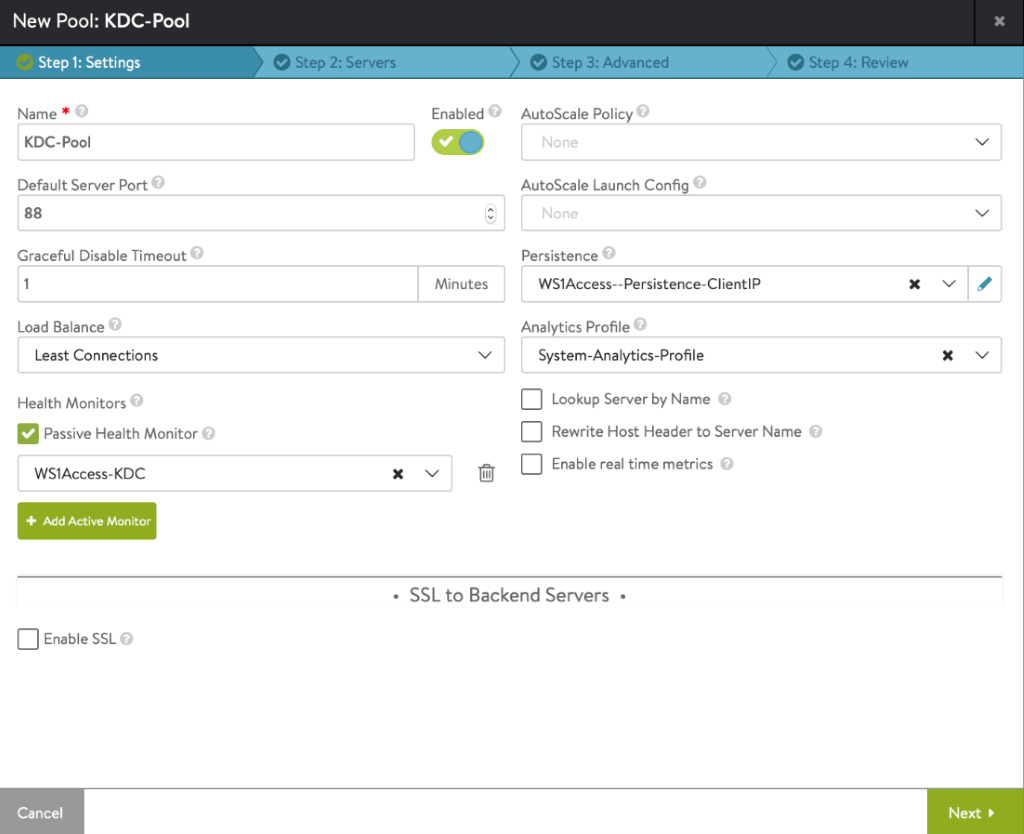
-
Creating Virtual Service
You can use Avi VIP sharing capability, for creating virtual service for various service components. For more information, refer to How to share a single VIP across multiple virtual services. Navigate to Applications > Virtual Services and select Create Virtual Service > Advanced Setup. Under VIP Address, click Switch to Advanced For the option under Virtual Service for VIP sharing, select the L7 virtual service that was created for the IDM Horizon service as shown below: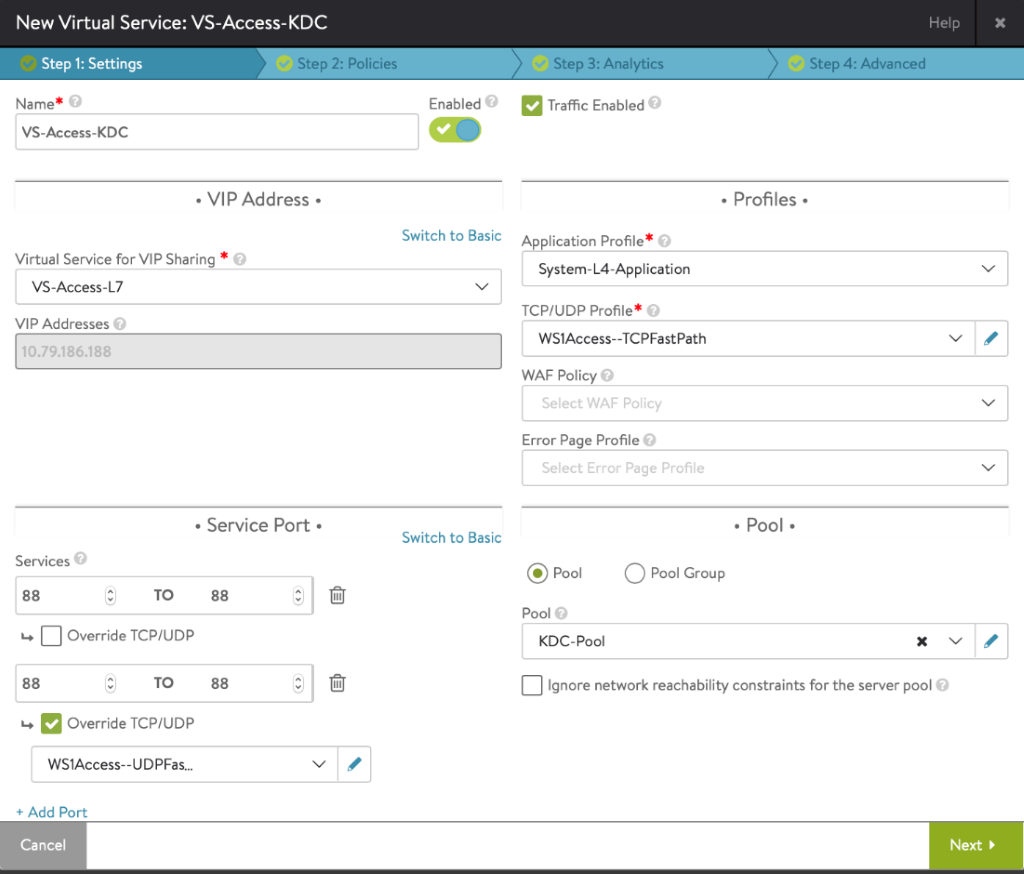
Load Balancing Cert Auth Service
- Creating Application Profile — The default Layer 4 profile can be used (System-L4-application).
- Creating TCP and UDP Profile: - Use the same steps as followed for creating TCP profile for the Cert Proxy service.
-
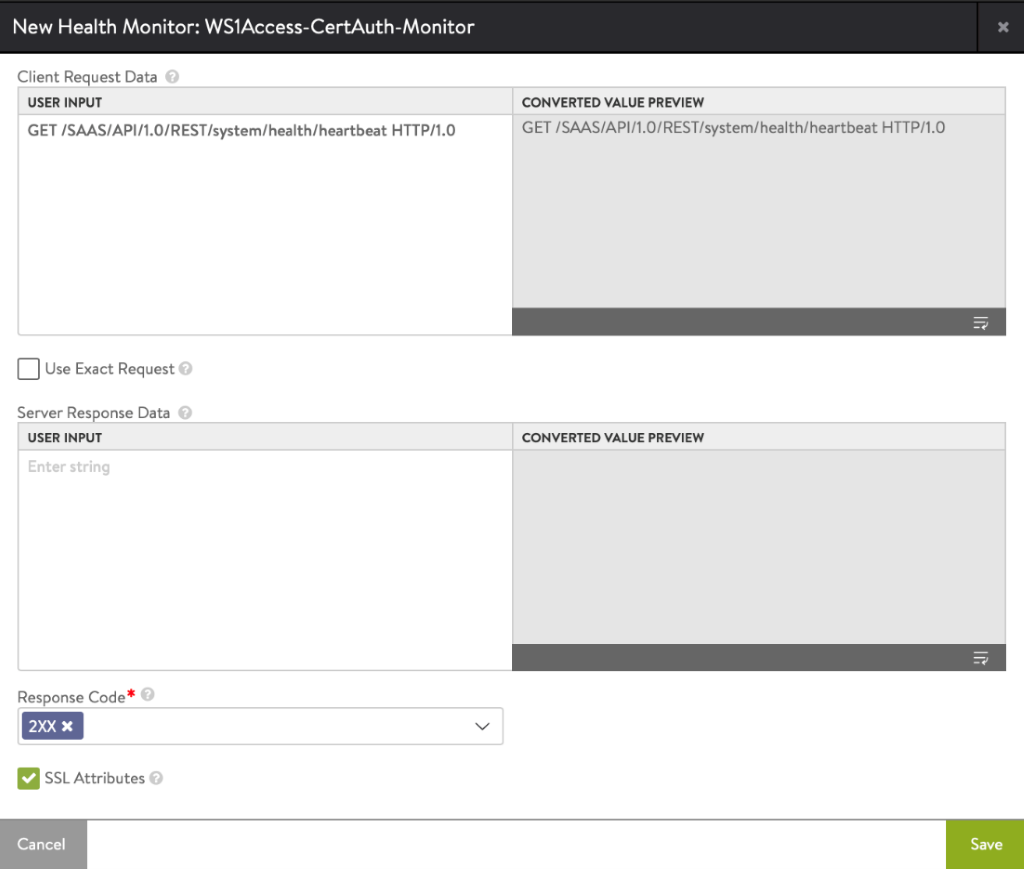
Creating Monitor
To create a custom health monitor, navigate to Templates > Profiles > Health Monitors and click on Create. Enter the details in the New Health Monitor screen as shown below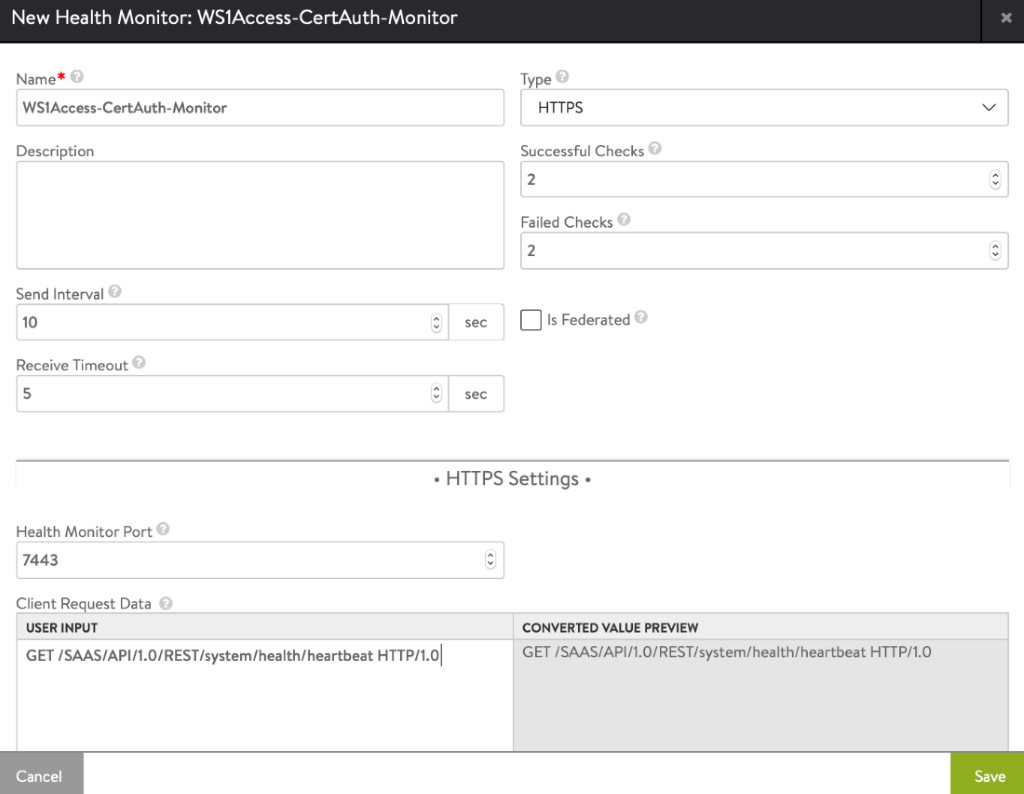
- Creating Persistence Profile – Use the same persistence profile that was created for the Cert Proxy service.
-
Creating IP group – Use the same IP group that was created for the IDM Horizon service.
-
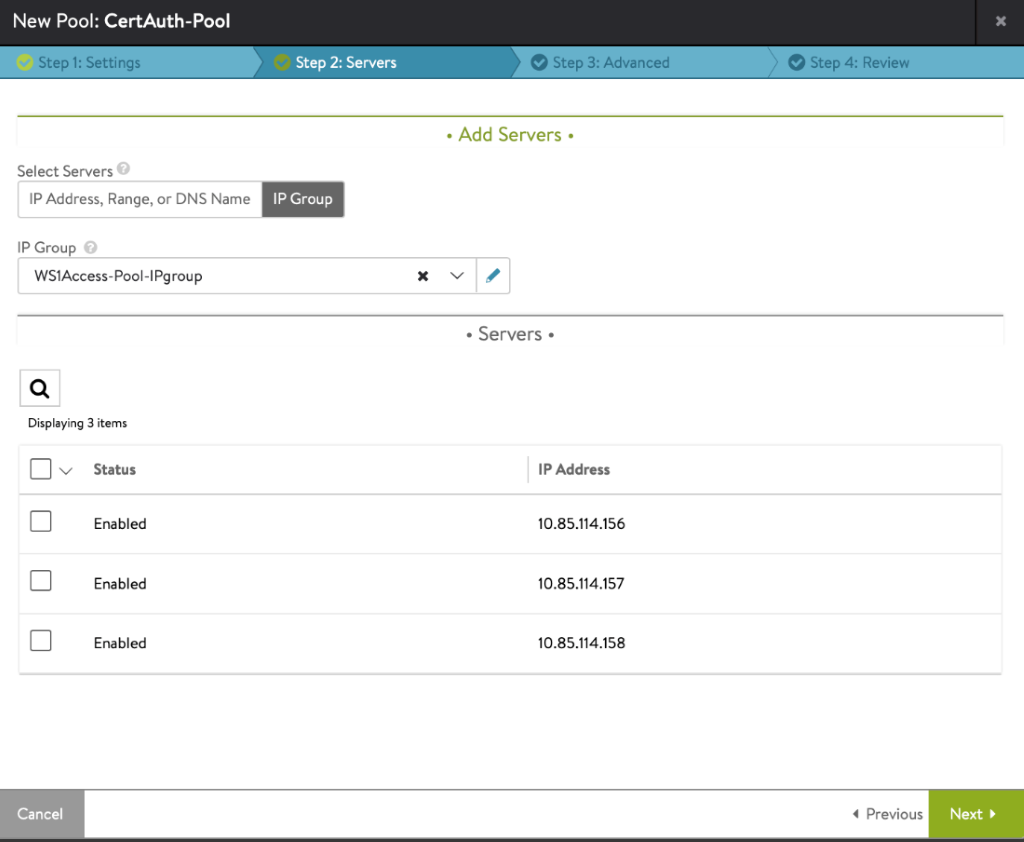
Creating Pool
To create the pool, navigate to Applications > Pools. Select the cloud from the Select Cloud sub-screen and select Next. Click on the Create Pool option. Enter the details as shown below:
-
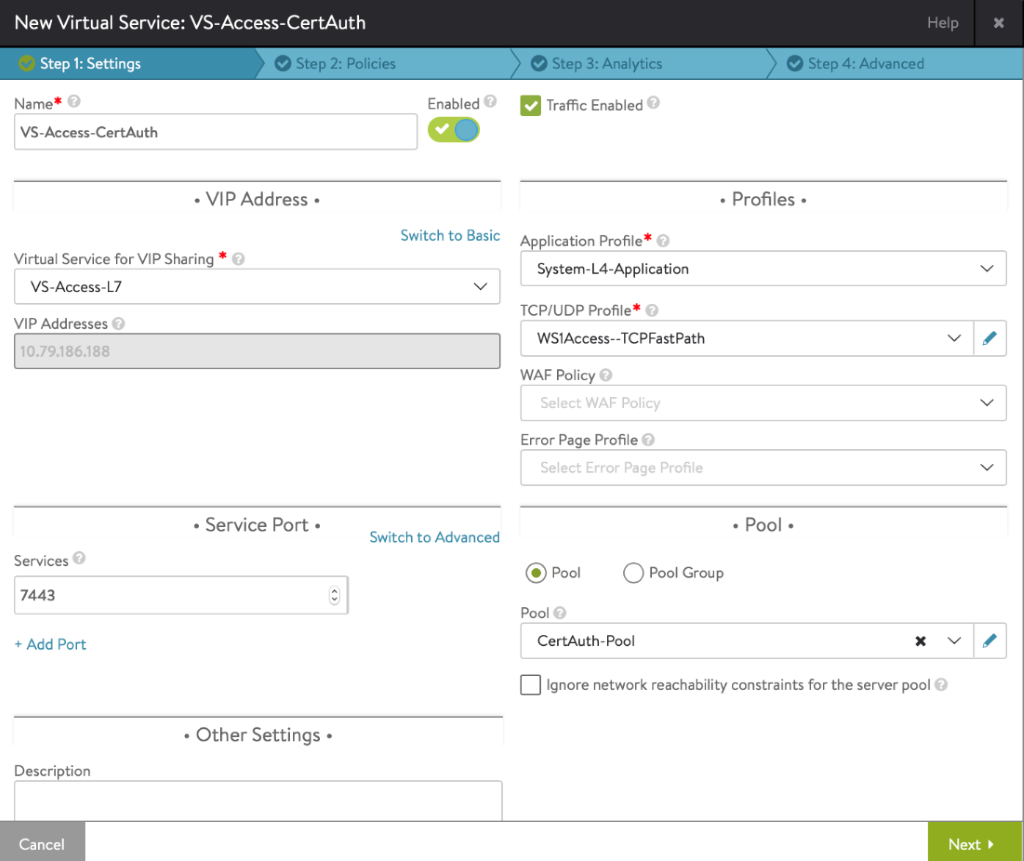
Creating Virtual Service Follow the same step as mentioned for the virtual service creation for the KDC service.
Configuring Load Balancing for Connector Service
- Creating Application Profile — The default Layer 4 profile can be used (System-L4-application).
- Creating TCP and UDP Profile: - Use the same steps as followed for creating TCP profile for the Cert Proxy service.
-
Creating Monitor
To create a custom health monitor, navigate to Templates > Profiles > Health Monitors and click on Create. Enter the details in the New Health Monitor screen as shown below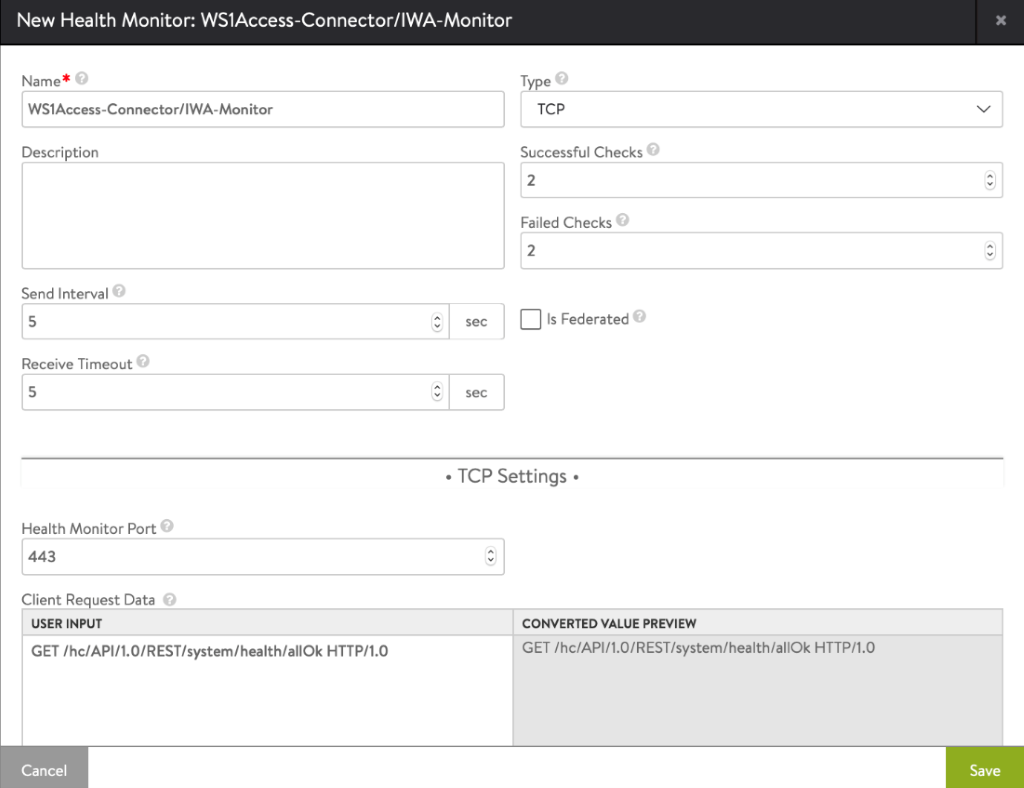
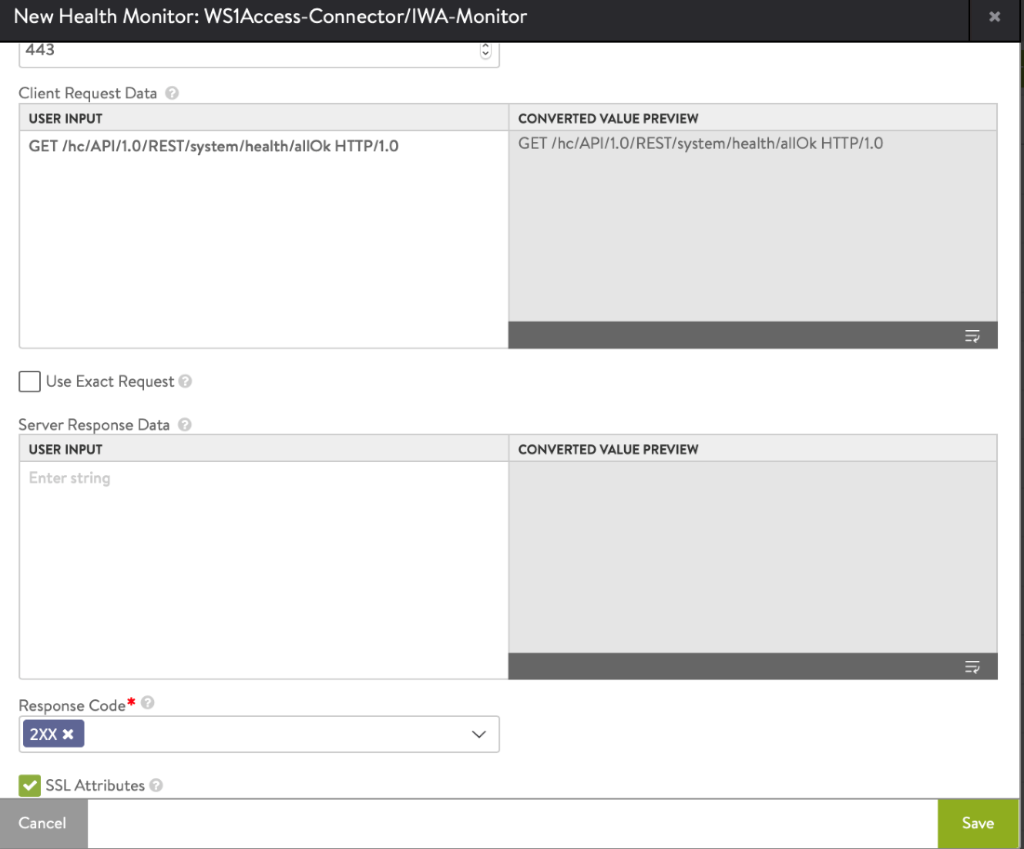
Click Save
- Creating Persistence Profile — No persistence required
- Creating IP group – Use the same IP group that was created for the IDM Horizon service.
- Creating Server SSL Profile - Use the same server SSL profile that was created for the IDM Horizon service.
- Creating Client SSL Profile - Use the same client SSL profile that was created for the IDM Horizon service.
- Creating Pool
To create the pool, navigate to Applications > Pools. Select the cloud from the Select Cloud sub-screen and select Next. Click on the Create Pool option. Enter the details as shown below: -
Creating Virtual Service
To create virtual service for the Connector service, navigate to Applications > Virtual Services. Click on Create Virtual Service > Advanced Setup. Enter the details as shown below: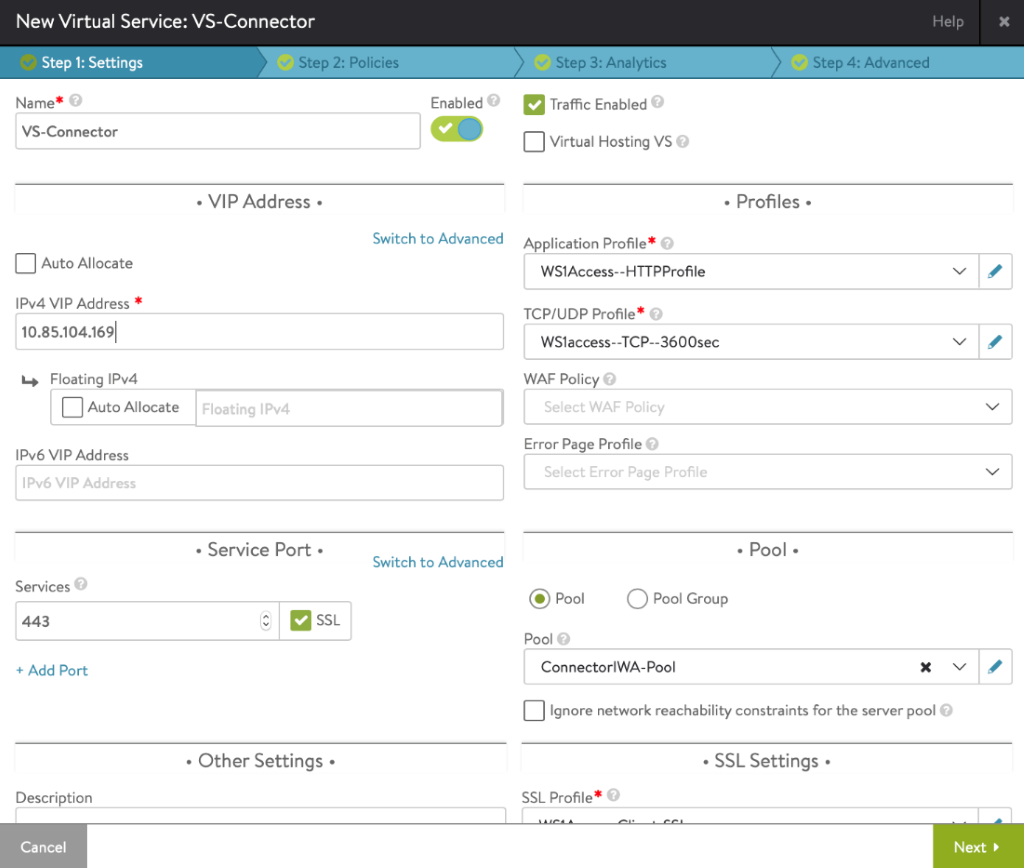
Click Next.
Click Next and save the configuration.